Enabling this option may hinder product performance due to the increased number of actions required when communicating with the S3 server. In order to integrate Amazon S3 with MetaDefender Storage Security please follow these steps:
Navigate to Inventory tab -> Add New -> Account -> Amazon S3
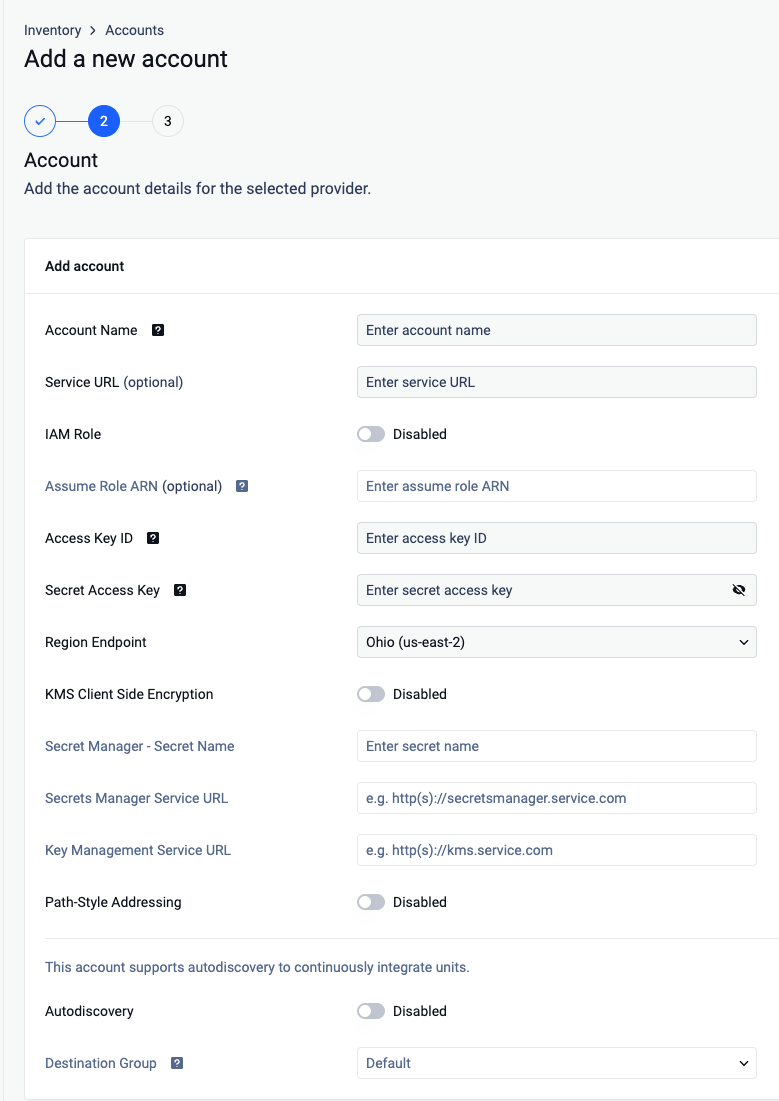
Give your account a name so you can easily identify it later
Optionally, add a custom Service URL for your S3 Service, if you have one configured.
There are two ways to connect:
via the IAM role from the EC2 instance (skip to step 7)
using security credentials
Enter your Access Key ID. Scroll to the end of this page for more details.
Enter your Secret Access Key. Scroll to the end of this page for more details.
Choose the Region endpoint where your S3 endpoint is located.
If you want to enable client-side encryption, please read the below section named Using client-side encryption
Enable Path-Style Addressing if needed.
Enable AutoDiscovery if needed
Choose the destination Group
Once the account is added successfully, proceed with adding the storage unit by navigating to Inventory tab -> Add New -> Unit -> Choose account previously created
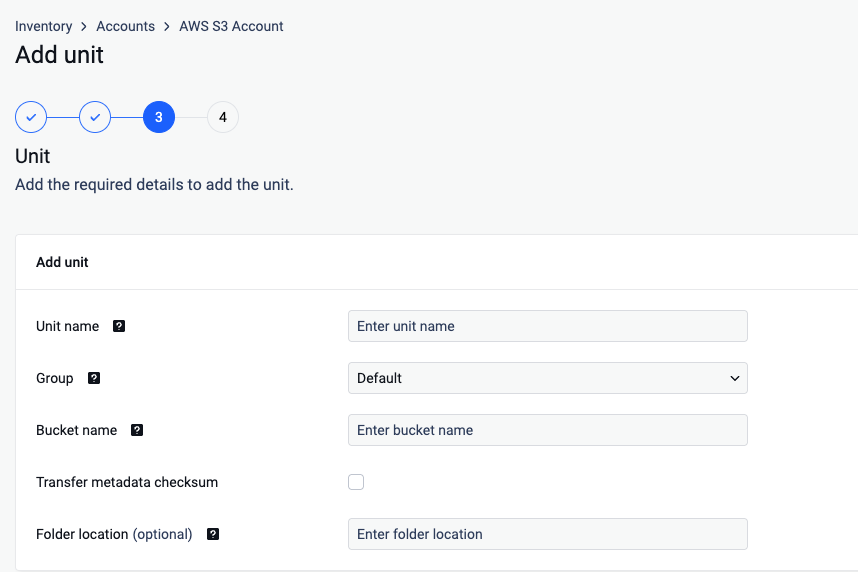
Give your storage a unique name so you can easily identify it later.
Assign a Group to your storage unit
Enter a valid S3 Bucket name
Enable Transfer metadata checksum if needed.
Add folder location (optional).
Complete the changes and add your storage unit.
Where can I find the Access Key ID and Secret Access Key?
To generate an Access Key ID / Secret Access Key pair please follow these steps:
Log in to IAM Console and go to Users
In the Details pane, click the appropriate IAM user or create one if none exists
From the Security Credentials, tab click Create Access Key
If you already have a maximum of two access keys—active or inactive—you must delete one first before proceeding. If you need more than two root access keys, IAM users (each of whom can be assigned their own access keys) would probably better suit your requirements.
Using IAM role for Amazon S3 integration
On S3 integration with IAM, the role configured on the EC2 machine will be used to authenticate.
With the optional field of Assume Role ARN, MetaDefender Storage Security allows integration with other buckets that are in different accounts from the current AWS account. This is possible by configuring Assume Role ARN field, with the ARN of the role that has access to the other account's S3 bucket.
If you are deploying MetaDefender Storage Security on an EC2 instance you will need to run the following AWS CLI command in order to increase the default hop-limit
aws ec2 modify-instance-metadata-options --instance-id <INSTANCE_ID> --http-put-response-hop-limit 3 --http-endpoint enabled
This is required because our services run within Docker and IMDSv2 restricts the number of "hops" each request to the metadata service can make.
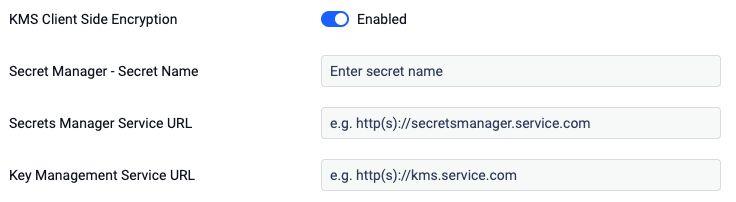
Using client-side encryption
To use client-side encryption, you will need to do the following. From AWS Console, navigate to Key Management Service (KMS) and click on Create a key. The key should be a symmetric key and used to encrypt and decrypt.
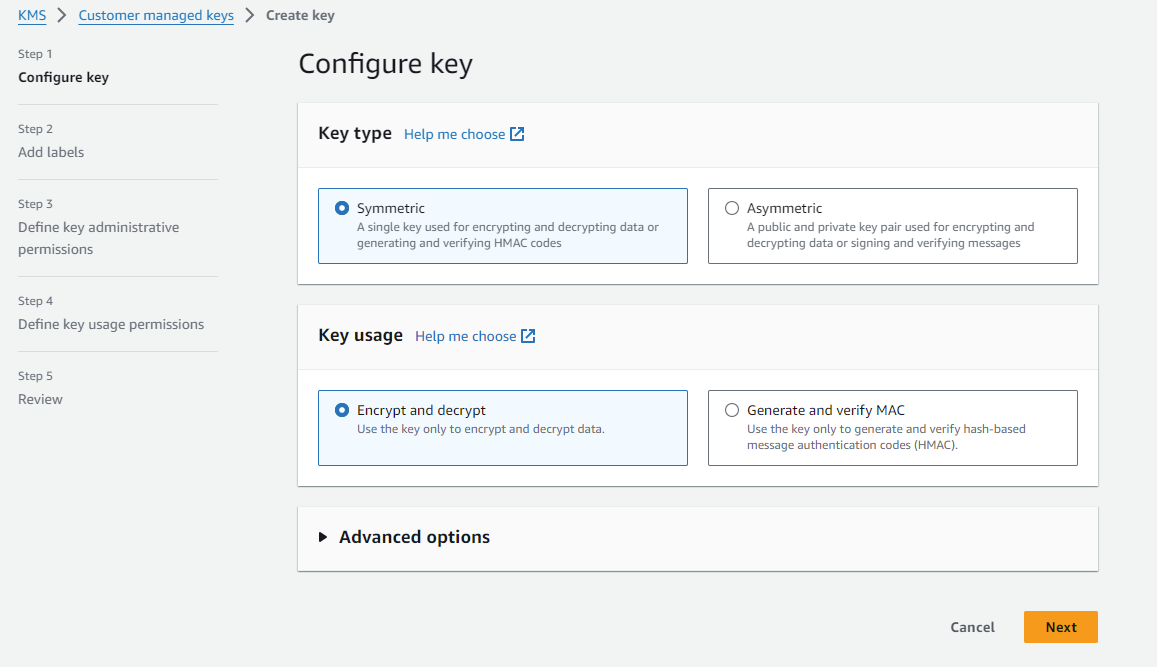
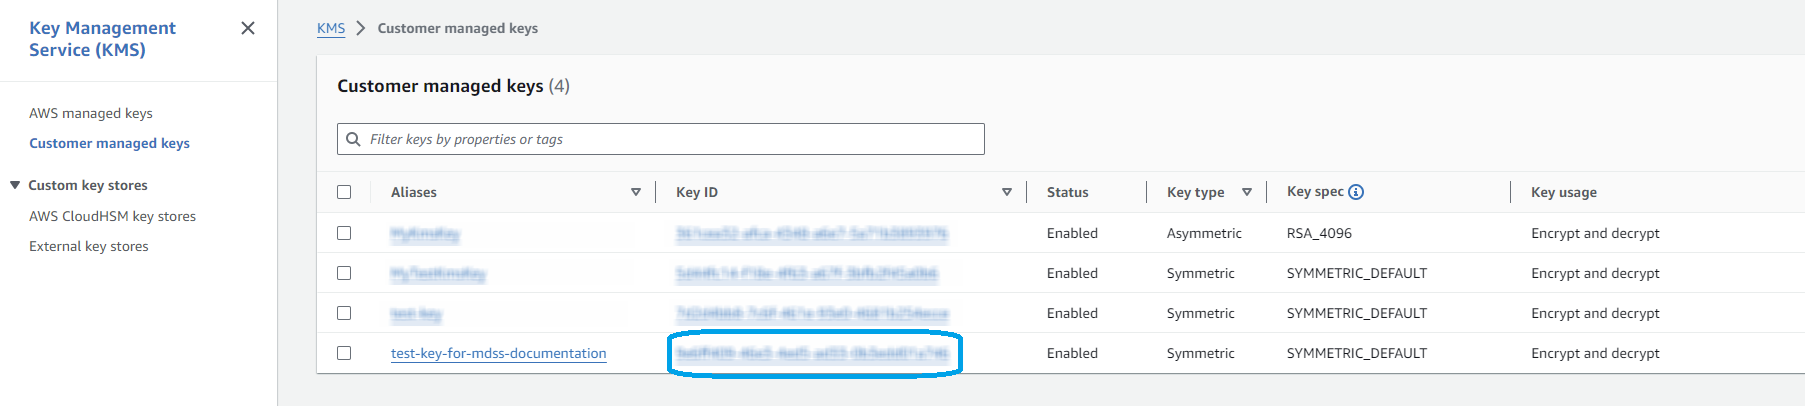
Click Next, give a name (Alias) to the key and finish the creation process. Once complete, the key should look like this:
From AWS Console, navigate to Secrets Manager and click on Store a new secret. Secret type should be Other type of secret and Encryption key should be the name of the key from step 2. The Secret value needs to be in plain text and should be the ID of the key created at step 1. Please note that we do not support Key/value.
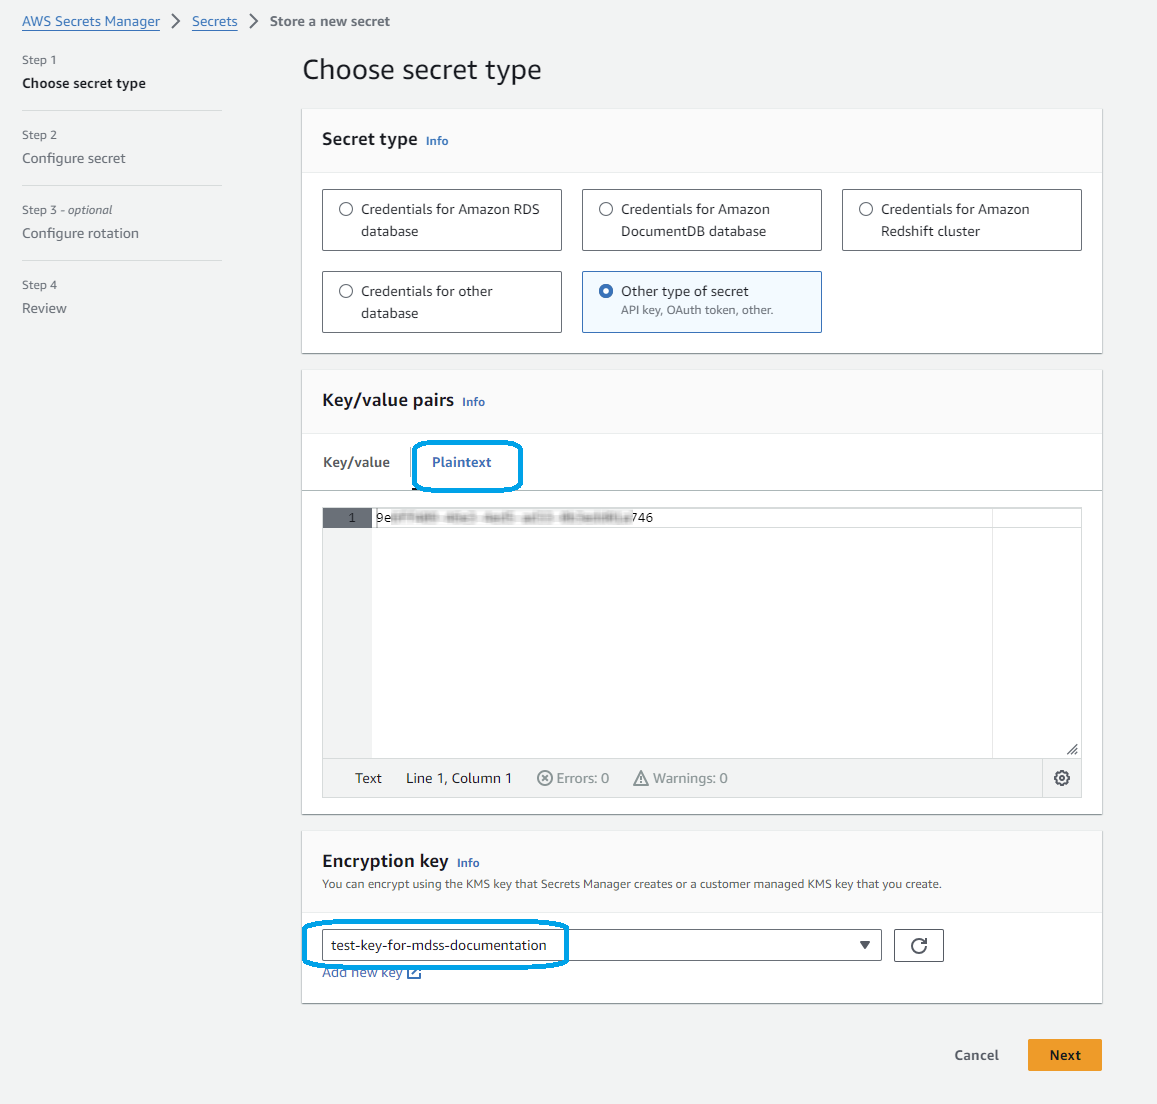
Click Next, give a name to the secret and finish the process. Once complete, the Secret should look like this:

Navigate to MetaDefender Storage Security UI and introduce the name of the secret created at step 4. If your Secret name is not valid or its value does not point to a valid key ID in Key Management Service, an error will be displayed on top of the UI. Also, optionally, you can add a custom Service URL for your Secrets Manager Service, if you have one configured.
Necessary AWS policies
These are the necessary AWS policies required in order to add an Amazon S3 Storage:
s3:GetObjects3:PutObjects3:GetObjectVersions3:ListBuckets3:ListBucketVersionss3:GetObjectTaggings3:GetObjectVersionTaggings3:PutObjectTaggings3:PutObjectVersionTaggings3:DeleteObjects3:DeleteObjectVersion
To be able to use client side encryption, additional AWS policies are required:
secretsmanager:GetSecretValuekms:DescribeKeykms:Decrypt
To be able to use server-side encryption with AWS Key Management Service (SSE-KMS), additional AWS policies are required:
kms:GenerateDataKeykms:DescribeKeykms:Decrypt
To be able to use autodiscovery, additional AWS policies are required:
s3:ListAllMyBuckets
S3 Compatible integrations
In order to use an S3 compatible storage unit the following requirements should be met:
A valid TLS endpoint. since we are enforcing HTTPS for all S3 integrations. A valid certificate is also required. Please note that there is an option to add a custom certificate
The storage should be configured to use or support the virtual-hosted addressing model, not path based.
The following object storage providers have been validated but any provider that meets the requirements and implements the S3 compatible open standard will work with MDSS:
MinIO Object Storage
Ceph Object Gateway
Configure UserAgent
In order to have a good tracking in AWS of every requests that MDSS does, a environment variable can be set that will be used to configure user agent.
Parameter | Value |
|---|---|
MDSS_LOG_IDENTIFIER | string |
By default this is not configured and the dotnet SDK value is used.
Transfer file metadata and checksum on created or moved files
MDSS does not support checksums CRC32C and CRC64NVME for any kind of operation.
This option enables the storage functionality to retrieve the metadata and checksum of files, and upon moving, copying or sanitizing them, the information is kept in the destination bucket for the files if it supports metadata or file checksum.
It can be enabled by checking the "Transfer file metadata and checksum on created files" and saving the storage. This also performs a test on the storage to verify if both functionalities are supported. If either of them is not supported either by the storage or due to permissions, the option cannot be enabled and saved.
If this option is enabled, the File API will provide information about the Checksum and Metadata of a file on the ObjectStorageMetadata field.
Files resulting from DeepCDR and Encrypted Files will have checksums recalculated if this option is enabled. At the same time these files will have the same metadata as the original file.
If a file has an unsupported checksum algorithm, or it does not have a checksum at all, the default CRC32 algorithm will be used to compute a checksum for data integrity by default. This is the case only if the transfer option is enabled.
Checksum algorithm | Transfer support in MDSS |
|---|---|
CRC-32 (used by default) | ✅ |
SHA-1 | ✅ |
SHA-256 | ✅ |
CRC-32C | ❌ |
CRC-64NVME | ❌ |
If this option is enabled scanning performance may be reduced as more queries are performed to AWS services, and also the checksum needs to be recalculated during scanning in certain scenarios which also involves a performance penalty.
To move checksum and metadata to storages created in versions prior to v3.5.3, these need to be retested for this functionality. This can be done with a simple Edit action on the storage, with no changed fields.
Server-Side Encryption Override
How to enable: Set the environment variable AMAZONSDK_USE _AWS _MANAGED _SSE to true. When set, all S3 uploads send the x-amz-server-side-encryption: aws:kms header, so S3 uses the AWS-managed KMS key (aws/s3) instead of the bucket’s default KMS key.
When to use: Enable this when S3 buckets are configured with SSE-KMS encryption using a KMS key that is not accessible to the service (e.g., cross-account keys, deleted keys, or keys without the required kms:GenerateDataKey permission). This is commonly needed in multi-account setups where the destination bucket's KMS key belongs to a different AWS account.
Note: Objects are encrypted with the AWS-managed key, not the bucket’s customer-managed key. This can affect key rotation and compliance that rely on a specific KMS key.