QUICK SEARCH
In Quick Search, you can locate sessions by typing simple search terms or text related to the session.
- In the default Quick Search box, type text related to a session (such as the source IP address, destinations IP address, IP subnets, or hashes of the session). Please note that Manual Scans can only be searched by File Hash for quick searches.
- Click one of the numbers below the text box (that appears as you type the search text) to specify the maximum number of results to be displayed in the right pane.
Note: Maximum number of session results that can be specified is 1000.
- Click Search to locate the matching sessions instantly. The session results matching your specified criteria are displayed in the right pane.
Search Rules for the Sessions and Threats Pages
Quick Search in the Sessions and Threats pages supports IP addresses, IP address subnets, and hashes and returns results in the right pane. Rules to be followed while using these items include:
- Regular expression for IP address pattern must be at least two ‘dot-separated’ IP address octets. For example: 8.8.
- Regular expression for IP subnets must be full IPv4 subnets in CIDR notation. For example: 192.168.0.0/24.
- Regular expression for hashes must contain 6 and more subsequent 0-9a-f characters or strings.
If your search request did not match any of the above patterns, the search text will be transformed into a new pattern where all space characters are replaced with an underscore, and all wildcards * with [a-z0-9_]*. InQuest API then matches the signature names in its database against the resulting new text pattern, and searches and returns session results related to the matched signature.
If your search request further didn’t match any patterns, the search is applied to any chunks having at least first three characters of a word. Also, the search engine makes characters (. / : & ? = % - @) as both word separators and parts of words. This means whenever you have signature containing 'qwer:tyui', you can match it with the text 'qwer', 'qwer:ty' as well as 'tyu'.
Manual Scans, while sessions, can only be quick searched for file hashes. IPs and subnets are not supported for Manual Scans. You can search for partial hashes or full hashes for MD5, SHA1, SHA256, SHA512, or SSDEEP hash types.
ADVANCED SEARCH
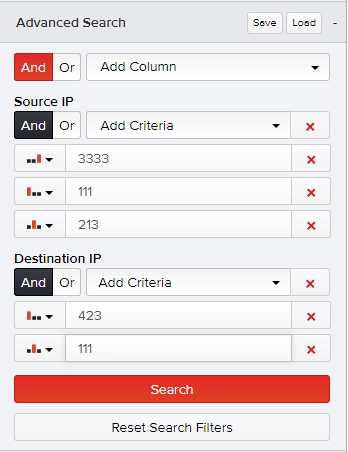
In Advanced Search, you can search sessions by adding column(s) and specifying one or more criteria to these columns using the available options from the drop-down menus. You can specify a time range for your Quick or Advanced Search by selecting a Time Interval from the drop-down menu (up to 30 days) or by specifying the From/To date range using the calendar; in cases where you want to expand the time range of your search to more than 30 days.
- Click Advanced Search and then click Add column to select the desired column(s) to your search (one at a time) using the available options from the drop-down menu. The Add Criteria search box appears below each added column.
- Click Add Criteria corresponding to each column and specify one or more criteria as required.
Note: You can remove individual search columns or criteria that you don't require, by clicking the corresponding button. To clear all the specified columns and criteria at once, click Clear.
- After adding all columns and their respective criteria, click Search. The session results matching your specified criteria are displayed in the right pane.
Note__: Advanced searches for the columns "Protocol Headers (HTTP)" or "Protocol Headers (SMTP)" are case sensitive.
MANAGING YOUR ADVANCED SEARCHES
You can save your advanced searches, view, reuse, or remove them from your database.
Save an Advanced Search
InQuest user interface enables you to save your advanced searches. Saving advanced searches helps you reuse the set of specified columns and criteria without having the need for you to specify them again. You can make your searches private to yourself or public as desired.
- On one of the Analysis pages, after specifying all the required columns and their search criteria in Advanced Search, click Save.
- Enter a meaningful title followed by a brief description for your search.Select the Make Public checkbox if required to share this search among other users.
- Select the Make Public checkbox if required to share this search among other users.
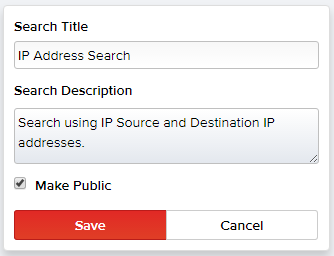
- Click Save.
A notification message appears on the lower-left corner of the screen stating your search has been saved. The details of your saved searches are logged in the My Searches tab.
View your Saved Advanced Search
You can view or delete the details of your saved searches in the My Settings page.
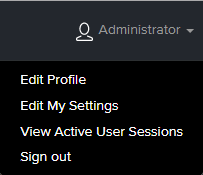
- Click on your user name on the top-right corner of the screen, and select Edit My Settings.
The default My Searches tab displays a list of sections and pages where you saved your advanced searches for yourself and/or for the public.
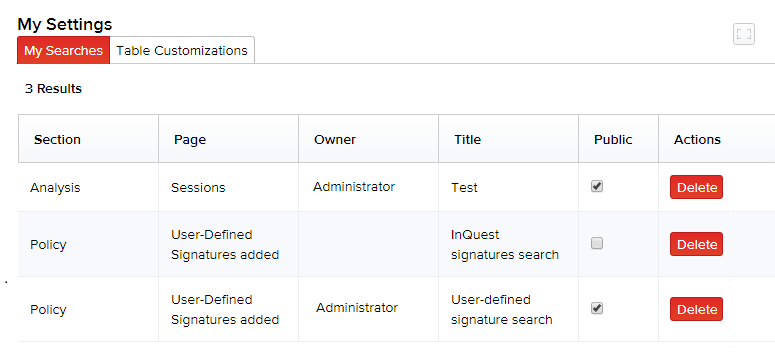
- If you had initially saved it as a private search in the Advanced Search menu, you can choose to share it with other users by selecting the Public checkbox on this page.
Click on your username on the top-right corner of the InQuest screen and select Edit My Settings. The default My Searches tab displays a list of sections and pages where you saved your advanced searches for yourself and for the public.
Tip: If you had initially saved it as a private search in the Advanced Search menu, you can choose to share it later with the public by selecting the Public checkbox on this page.
To remove the details of a saved search that is no longer required, click Delete corresponding to that search item. Click Delete again to confirm its removal.
Reuse your Saved Search
After saving your search in the Advanced Search menu for a page, click Load on to view a list of your private searches and public searches for that page. Click on the desired search to reuse it. You can also filter your searches here by typing in the partial or full word of the search title in the Filter searches field.
- Click Load in the Advanced Search menu to view a list of your private and public searches you saved.
- Click on the desired search. The specified columns and criteria for that search populate on the Advanced Search menu, which can be reused.
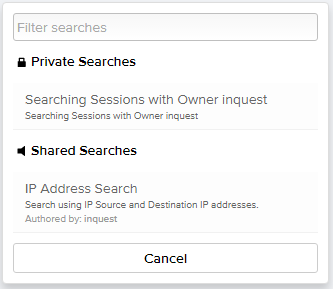
Note: You can also filter your searches on this screen by typing a partial or full word of the search title in the Filter searches field.
DATA EXPORT
You can download/export your Analysis data to your system. Click Actions on the top-right corner of the page and select Data Export. The Export page appears enabling you to export the session data of the selected Analysis tab (or even the data of a particular session) as an HTML page, XML, JSON, or a CSV file. The default Structure tab displays the basic structure of your sessions data. Click HTML, XML, JSON, or CSV tab and click Save As to export the session details to your system in your desired file formats.
TIPS
- To hide the tabular columns you do not want to display on the page, hover over the grey area at the top-right edge of the session table header. A drop-down menu appears listing all the tabular column header names. Click on the icon corresponding to a tabular column name to hide it from the table. The icon will now be changed to and the column is removed from the page display. To display the column back in place in the future, click on this new icon again.
- Click Reset to revert to the default display where all the columns are set to be displayed. You can also click the available up and down arrows in this menu to prioritize and arrange the column headers in the table as required.
- Click on any column in the table header to arrange and display the items in the table in a particular sequence (alphabetical, ascending, or descending order).
- To move across session pages, use page navigation by clicking the page numbers on the top of the table.
- Click to expand to full screen. To restore to the default screen that displays the InQuest logo and the left navigational product menu items, click

