Specific permission sets for using the MetaDefender NDR software can be granted to a new or an existing user group. User group permissions can be as broad or granular as necessary. For instance, a new "Analysts" group you create can be assigned the 'read' permissions for all MetaDefender NDR features, but may not be granted the 'write' permissions. Read permissions allow a user only to view the product features, and write permissions mean users can view the product features and perform administrator tasks too.
- Click Authentication > User Groups > New Group. The Add Group page appears.
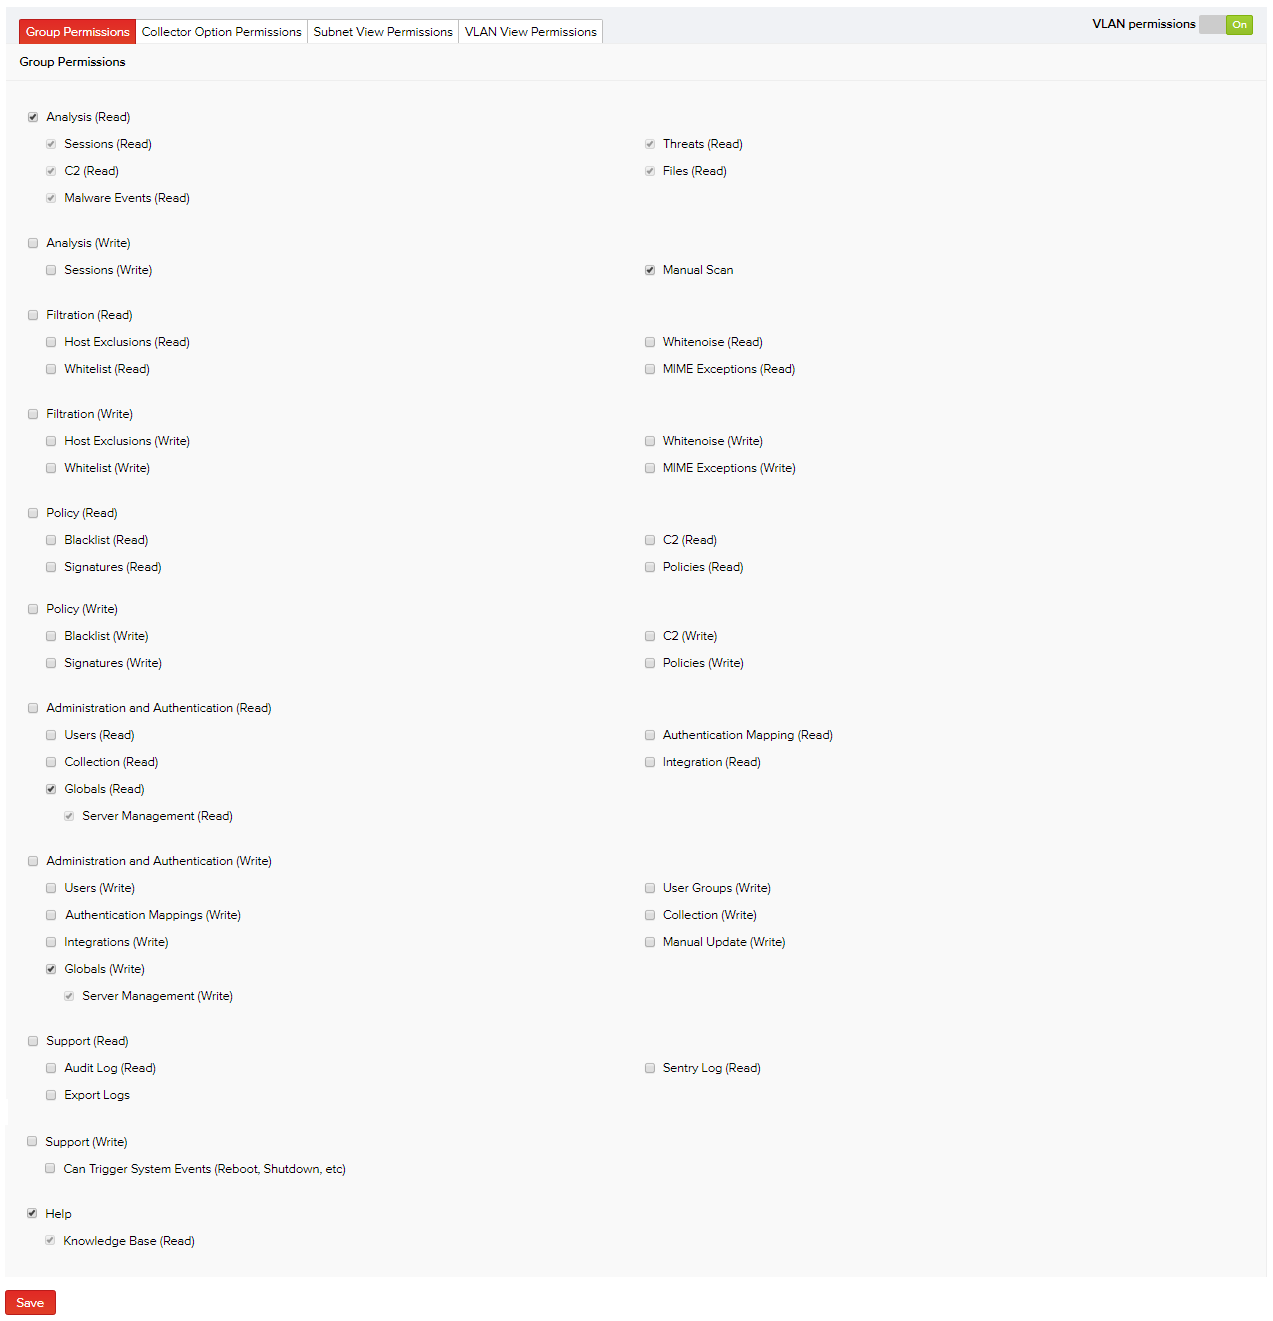
- Type the name and description for the user group, select an existing policy, and then click Save. The Group Permissions, Device Permissions, and Subnet View Permissions tabs auto-populate in the lower part of the page.
- In the default Group Permissions tab, specify permissions for the group by selecting or deselecting the available product access permission sets as required.
Note: Selecting the primary permission gives control over all its ancillary permissions.
- After specifying the required product access permissions, click Save.
The following table provides information on the list of product access permissions available to the user groups and their description.
| Group Permission | Description (What controls you will have) |
|---|
| Analysis (Read) | View the session data displayed on the Sessions, Threats, C2, Files, Malware Events, and RetroHunt Events pages in the Analysis menu. |
| Analysis (Write) |
- Perform the “manual scan” operation where you can manually upload files or raw traffic dumps to be scanned.
- Add/change workflow status for all relevant sessions in the Analysis menu.
|
| Filtration (Read) | View specific MIME execptions/file types, heavily trafficked sites and hosts excluded from scanning, files with specific MD5 checksums that are specified to bypass scanning and all activated MD5s. Data related to these items can be viewed in the MIME Exceptions, HTTP Host Exclusions, Whitelist, and Whitenoise pages respectively. |
| Filtration (Write) |
- For specific suppliers, you can specify exceptions and filter the overwhelming MIME file types from being queued for scanning and manage the huge backlog in the MIME Exceptions page.
- Exclude heavily trafficked sites or HTTP hosts generating huge amounts of file alerts in the HTTP Host Exclusions page.
- Bypass scanning of certain files by adding MD5 hashes in the Whitelist page.
- Enable or disable these MD5s by checking or unchecking their respective statuses under the Status column in the Whitenoise page.
- Enable or disable all MD5s by clicking the Toggle all - On or Off buttons on the left pane respectively, then click Toggle to confirm the operation.
Note: See the Performance Tuning section for more information on adding exceptions, specifying new HTTP host exclusions, whitelisting and activating files with specific MD5 checksums. For blacklisting suspicious files, see the Blacklist section. |
| Policy (Read) |
- View the blacklisted suspicious files with their threat scores in the Blacklist page in the Policy menu.
- View the details of the user-defined signature in Policy > User-Defined Signatures tab.
- View the list of monitored IP addresses and DNS name resolution along with their description in C2 – IP and DNS tabs respectively.
- View the list of existing policies and their details in the Policies tab.
|
| Policy (Write) |
- Edit the threat score of the blacklisted suspicious files, add and delete the MD5 hash in the Blacklist page in the Policy menu.
- Add, edit, or delete the user-defined signature in Policy > User-Defined Signatures tab.
- Add IP addresses and DNS name resolution to be monitored in C2 – IP and DNS tabs respectively.
- Add, edit and delete policies from the system.
|
| Administration and Authentication (Read) |
- View the list of users and their details by clicking the Authentication menu in the default Users tab.
- View the properties and their values configured for all collectors by clicking Administration > Collection > View Collection Properties.
- View the existing workflow status types.
- View the default configurations related to password complexity requirements, user accounts lockout options, upstream proxy, SMTP mail servers, nameservers, database information retention and NTP server settings.
- View the list of remote authentication account details.
- View the local and external integrations and their statuses.
|
| Administration and Authentication (Write) |
- Add, save, edit, and delete user account details.
- Generate API keys for the user.
- Lock a user account when required.
- Add, edit, and delete authentication mapping and its associated authentication servers.
- Prioritize the authentication servers for a mapping as required.
- Add collection properties, assign values and save them for all collectors by clicking Administration > Collection > View Collection Properties > Add Collector Property.
- Edit or delete collector properties.
- When offline, you can manually upload files to the manager for applying product updates that include codepacks, feedpacks, and sigpacks by clicking Administration > Manual Update.
- Add new workflow status types to be included in the sessions.
- Add, edit, or delete users/user groups and their associated permissions.
- Configure the security disclaimer message to be displayed to the users, password complexity requirements, user accounts lockout options, upstream proxy, SMTP mail server, nameservers, database information retention, and NTP server settings.
- Enable or disable the statuses for the local and external integrations.
|
| Support (Read) |
- Overview of the software version and licensing information, InQuest Support contact details, links to download the product documentation, and an interface for exporting product logs to the InQuest Technical Support team.
- View the list of audit logs and engine logs in Support > System Logs.
- View the end-user license agreement for the InQuest software by clicking Support > Licensing > EULA.
- View the sites and licenses for the open-source libraries built on by InQuest by clicking Support > Licensing > Software and then the appropriate links.
|
| Support (Write) | Trigger system control operations like the rebooting (or force rebooting) and shutting down of selected or all servers, view EULA, and the sites and licenses for the open-source libraries built on by InQuest. |
| Help | View a list of signatures and their details in the Knowledge Base menu. |
For an existing user group, click Authentication > User Groups > View. The Edit Group page appears where you can enable or disable the required user group permissions in the Group Permissions tab. After specifying the required permissions, click Save.
For instructions on configuring permissions in the remaining tabs, see the Device Permissions, Subnet View Permissions, and VLAN Permissions sections.