This guide covers the configuration required to integrate Meraki access points with MetaDefender NAC such that Meraki can act as an enforcement device.
By configuring MetaDefender NAC as an AAA server, creating Group Policies, and leveraging related features available in Meraki, MetaDefender NAC will be enabled to block, redirect or limit device's network access based on User Identity/Role, Device Type, Location, Ownership (enterprise or personally liable), and Security Compliance Status in real-time.
A key benefit of MetaDefender NAC’s RADIUS-Based Enforcement (RBE) for Meraki is that it does not rely on "VLAN Steering". MetaDefender NAC integrates directly with Meraki Access Points to assign network access privileges dynamically using Meraki’s Group Policy firewall technology. MetaDefender NAC’s device-centric approach, coupled with the ability to leverage Meraki’s network, application and quality-of-service network access technologies, results in an MetaDefender NAC-Meraki industry exclusive offering.
MetaDefender NAC’s RBE for Meraki approach offers the following customer benefits:
• Easier to design, deploy, and support – Fewer technical resources required Leverage industry standards – 802.1X, RADIUS and Change of Authorization (COA) Better end user experience – No IP address/VLAN changes!
• Real-time post-admission network access control – No need to re-authenticate a user’s device to conduct a security posture check or change network access status
• Higher level of device quarantine/segmentation – Devices are restricted/isolated directly, not placed into a shared/dirty/common VLAN
MetaDefender NAC
If you have not yet configured your MetaDefender NAC appliance(s) with an IP address and confirmed access to the MetaDefender NAC Managed Support Services Center, please contact your MetaDefender NAC Network Specialist at support@opswat.com
Pre-Requisites
This integration requires:
• MetaDefender NAC Version 6.1.5 or higher
• Meraki AP’s running BETA firmware (July 2016)
Network Installation and Testing
Prior to integration with MetaDefender NAC, please confirm that the WLANs you will be integrating are fully functional. Simply associating successfully with the SSID and browsing to a non-cached website should suffice.
Ensure the static route below is added to the Layer 3 routing device upstream of your wireless access points. Note – If MetaDefender NAC is already integrated with your wired network, applying the “MetaDefender NAC” route-map to the appropriate Layer 3 interfaces on the router is preferred over the static route. Examples below are for Cisco and Brocade platforms. Please contact your MetaDefender NAC Network Specialist if you require assistance with this task.
Static Route (apply if MetaDefender NAC is not integrated with wired network)
Route-map (apply if MetaDefender NAC is already integrated with wired network):
Once you have this configured, please associate it with the SSID and browse to the following URLs. Each should resolve to a login screen successfully
https://[ip address of your MetaDefender NAC enforcer]:8443/dashboard.do
https://198.31.193.211:8443/dashboard.do
https://portal.myweblogon.com:8443/dashboard.do
https://portal.myweblogon.com:8443/dashboard.do
Section 1 – Group Policy Configuration
NOTE – Ensure test WLANs are used for initial integration testing. Do not complete these steps on a production WLAN until after testing has been validated.
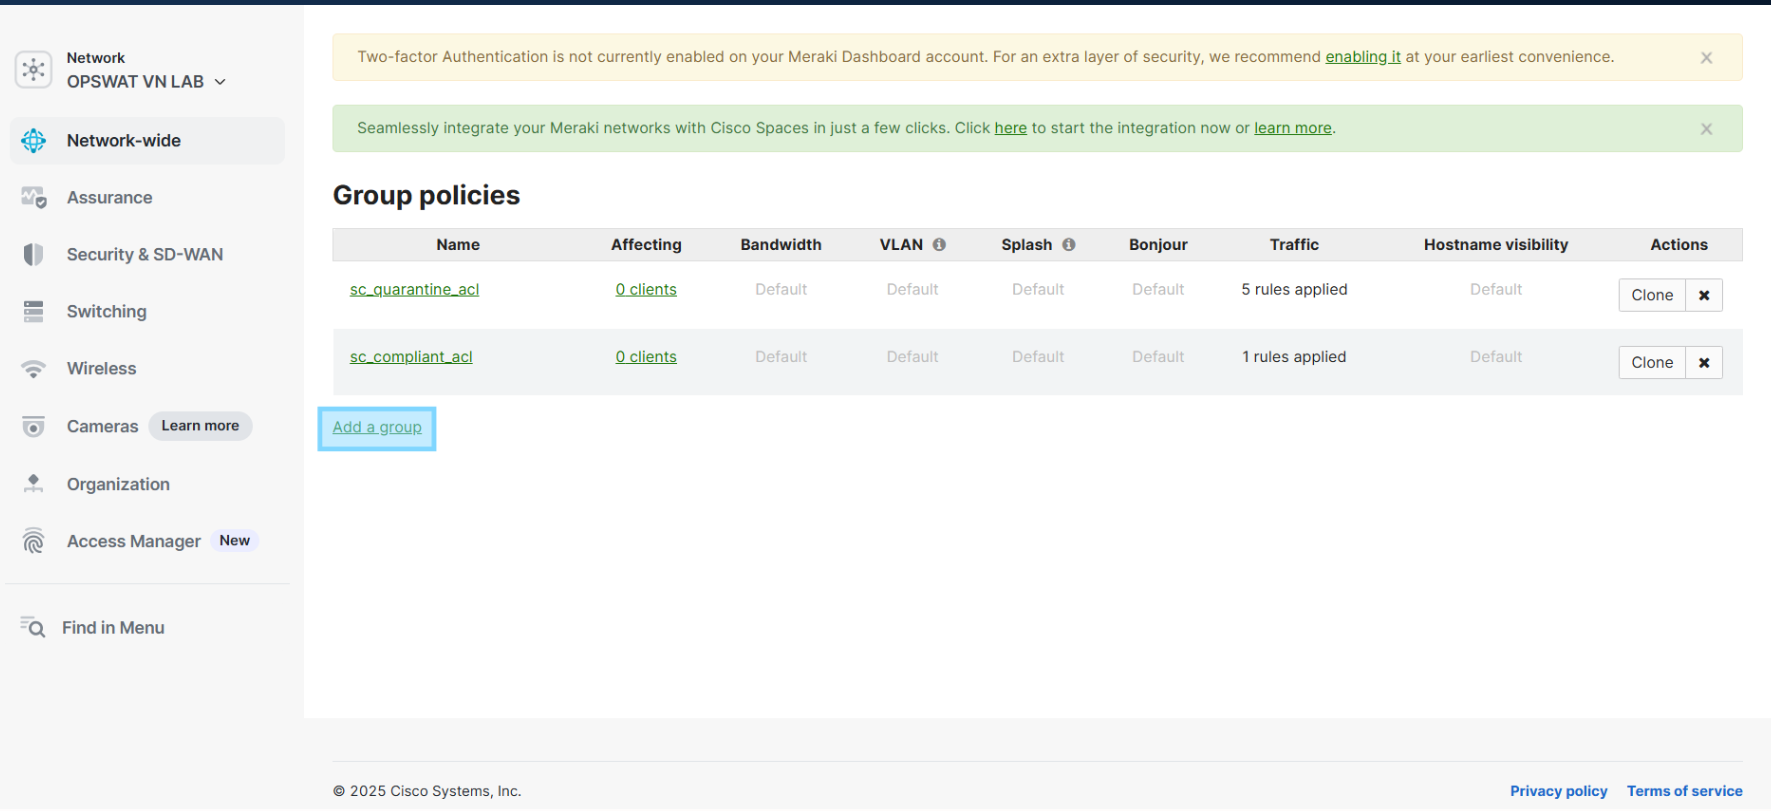
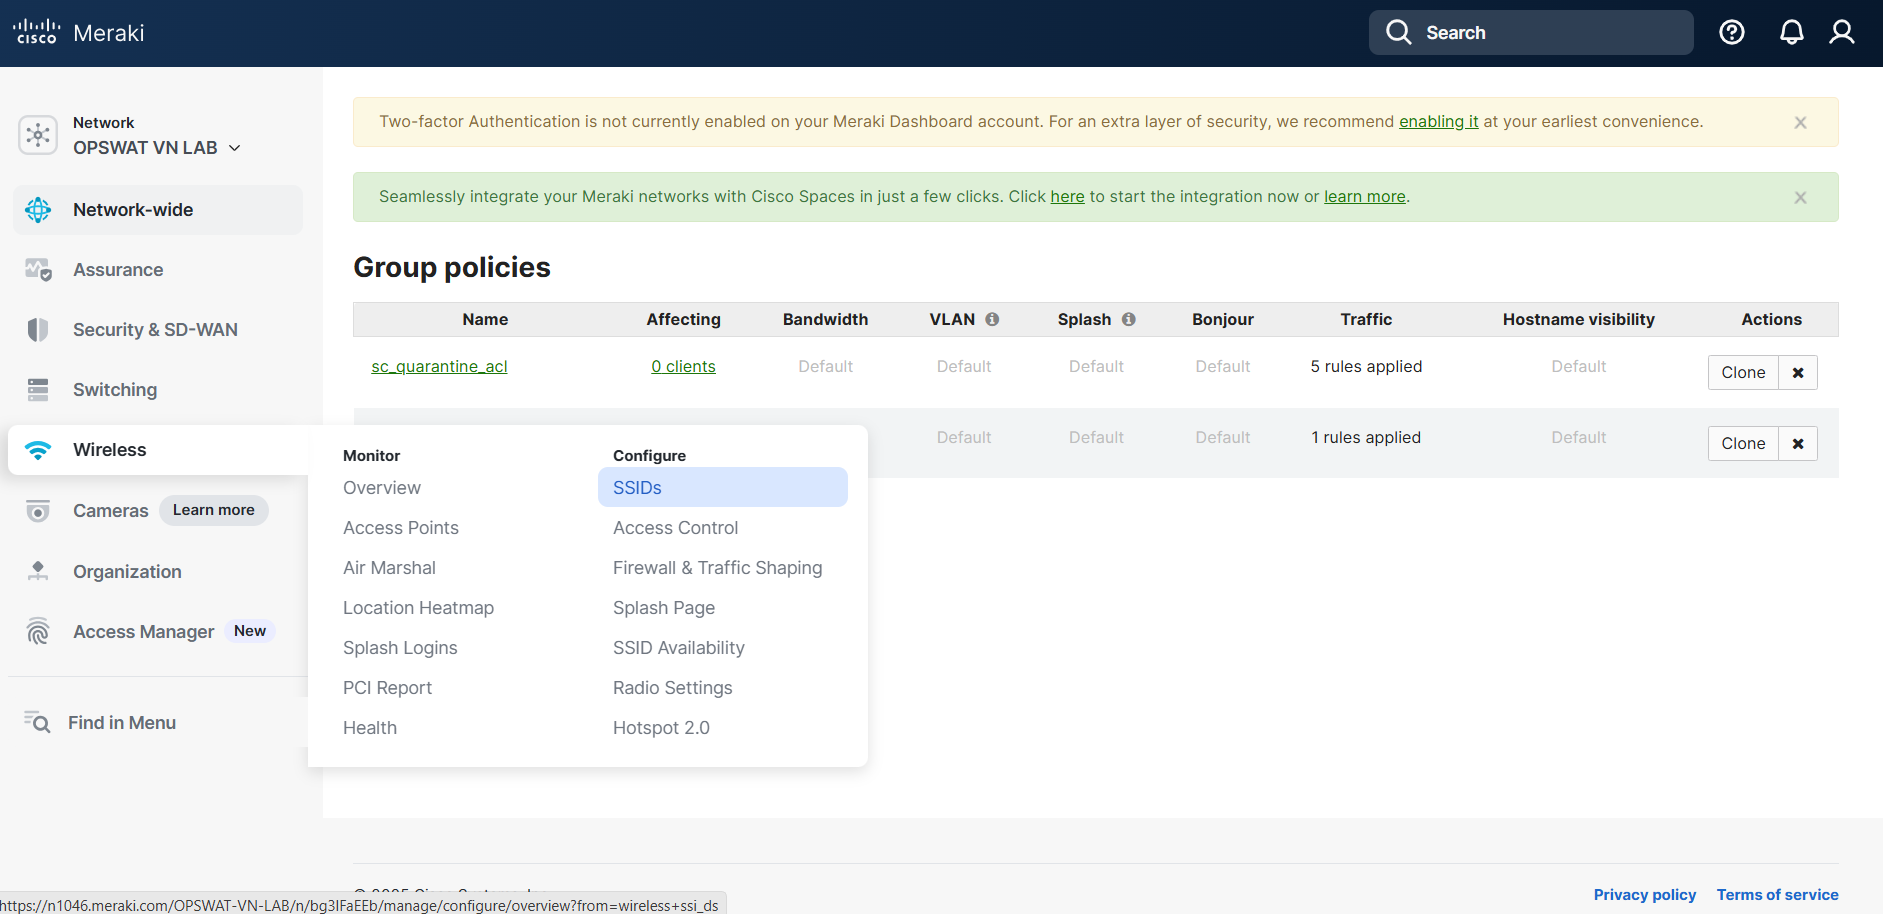
Network-Wide -> Group Policies and select “Add a group”.
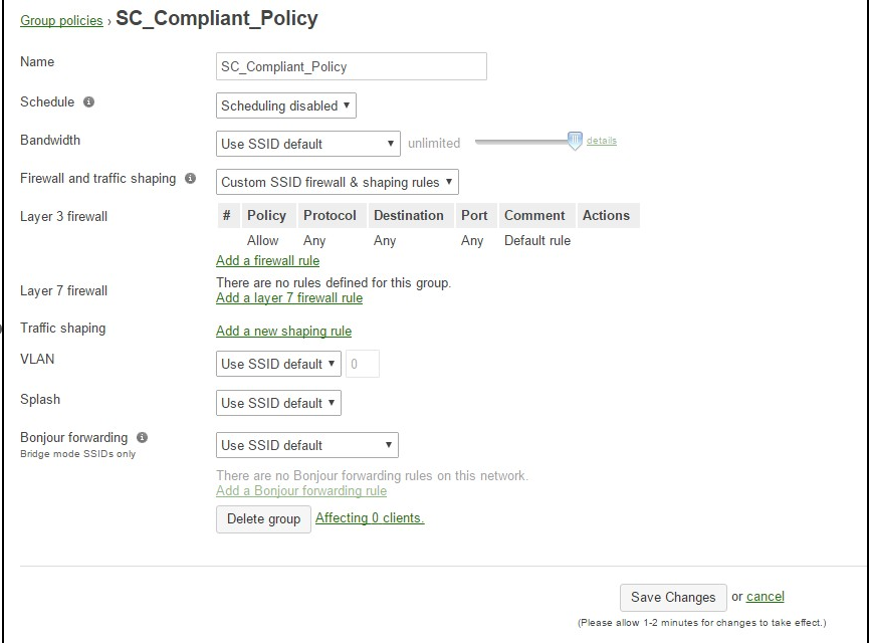
1.1 Configure SC_Compliant_Policy
The SC_Compliant_Policy group policy defines what access will be allowed after successful authentication. In the example below full access is permitted but access may be configured as desired.
Note: If additional levels of access are to be defined for different roles, names must be unique. Example: “Faculty_Compliant_Policy”, “Student_Compliant_Policy”, etc.
Enter a single rule as pictured in the image (below) permitting any traffic. When finished, click “Save Changes” followed by “Add a group”.
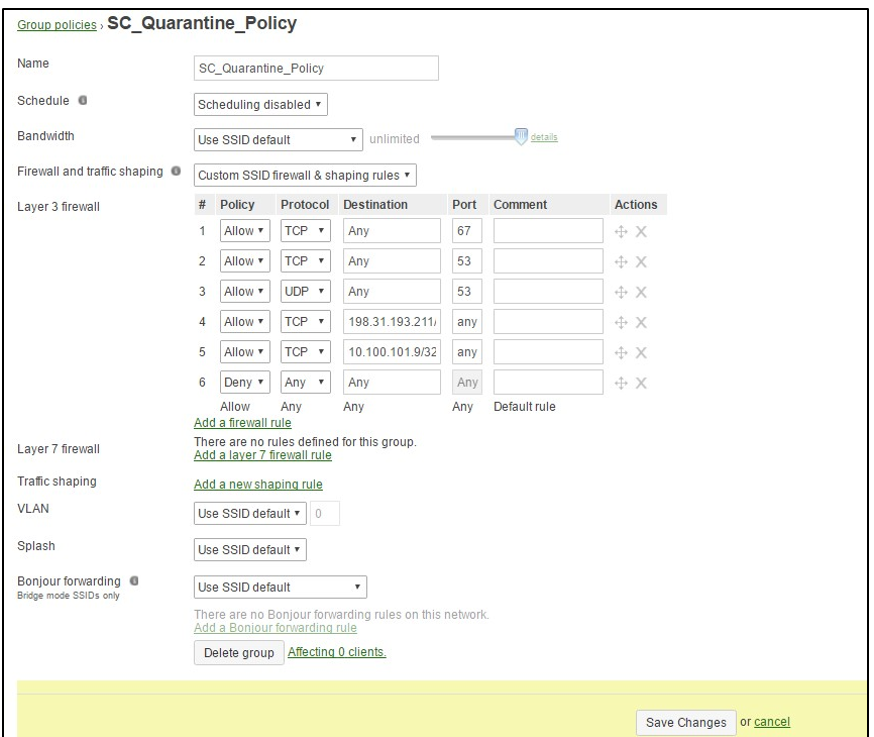
1.2 Configure SC_Quarantine_Policy
The SC****Quarantine Policy group policy defines what access will be allowed while quarantined for a failed policy. Ensure the ACL rules permit access to any IP address for TCP and UDP port 53, and TCP port 67. Additionally, permit any traffic to the following IP addresses: 198.31.193.211/32 and the local IP of your MetaDefender NAC Enforcer. The example in the image below is using the minimum required rules.
When finished, click “Save Changes” followed by “Add a group”.
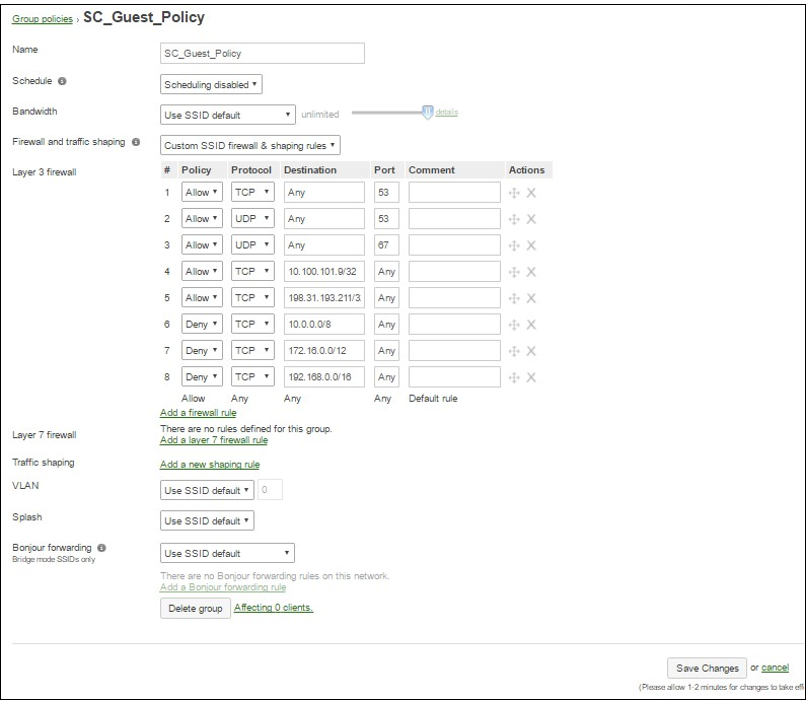
1.3 Configure SC_Guest_Policy
The SC_Guest_ Policy group policy defines what access will be allowed to guests after successful authentication. Ensure the ACL rules permit access to any IP address for TCP and UDP port 53, and TCP port 67. Additionally, permit any traffic to the following IP addresses: 198.31.193.211/32 and the local IP of your MetaAcces NAC Enforcer. The example in the image will allow guest users internet only access by denying traffic to private IP space:
When finished, click “Save Changes” followed by “Add a group”.
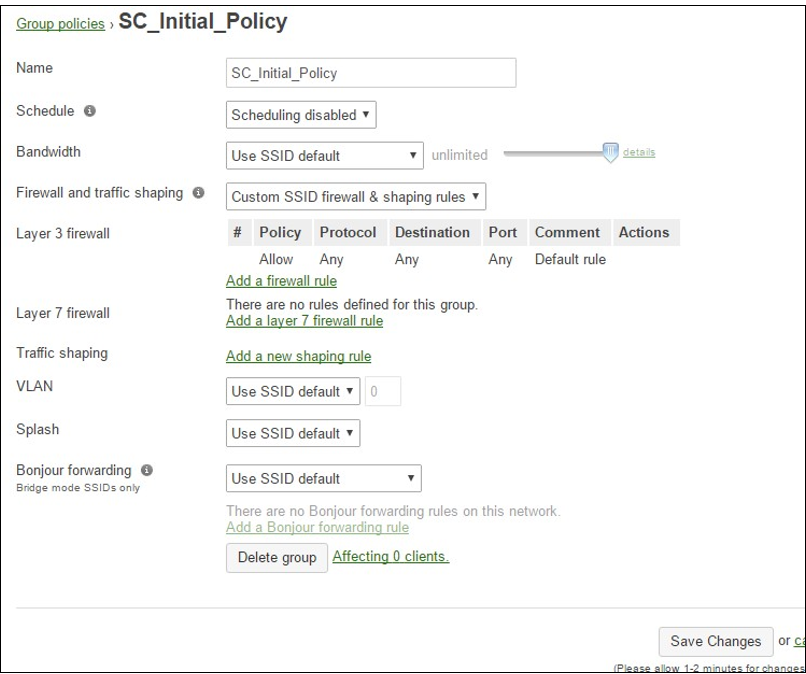
1.4 Configure SC_Initial_Policy
The SC_Initial_Policy group policy defines what access will be allowed on the first association, or if the endpoint is not under policy in MetaAcces NAC. Best practice to allow full access for this group Policy.
Enter a single rule as pictured in the image (below) permitting any traffic. When finished, click “Save Changes”.
Section 2 - SSID Configuration
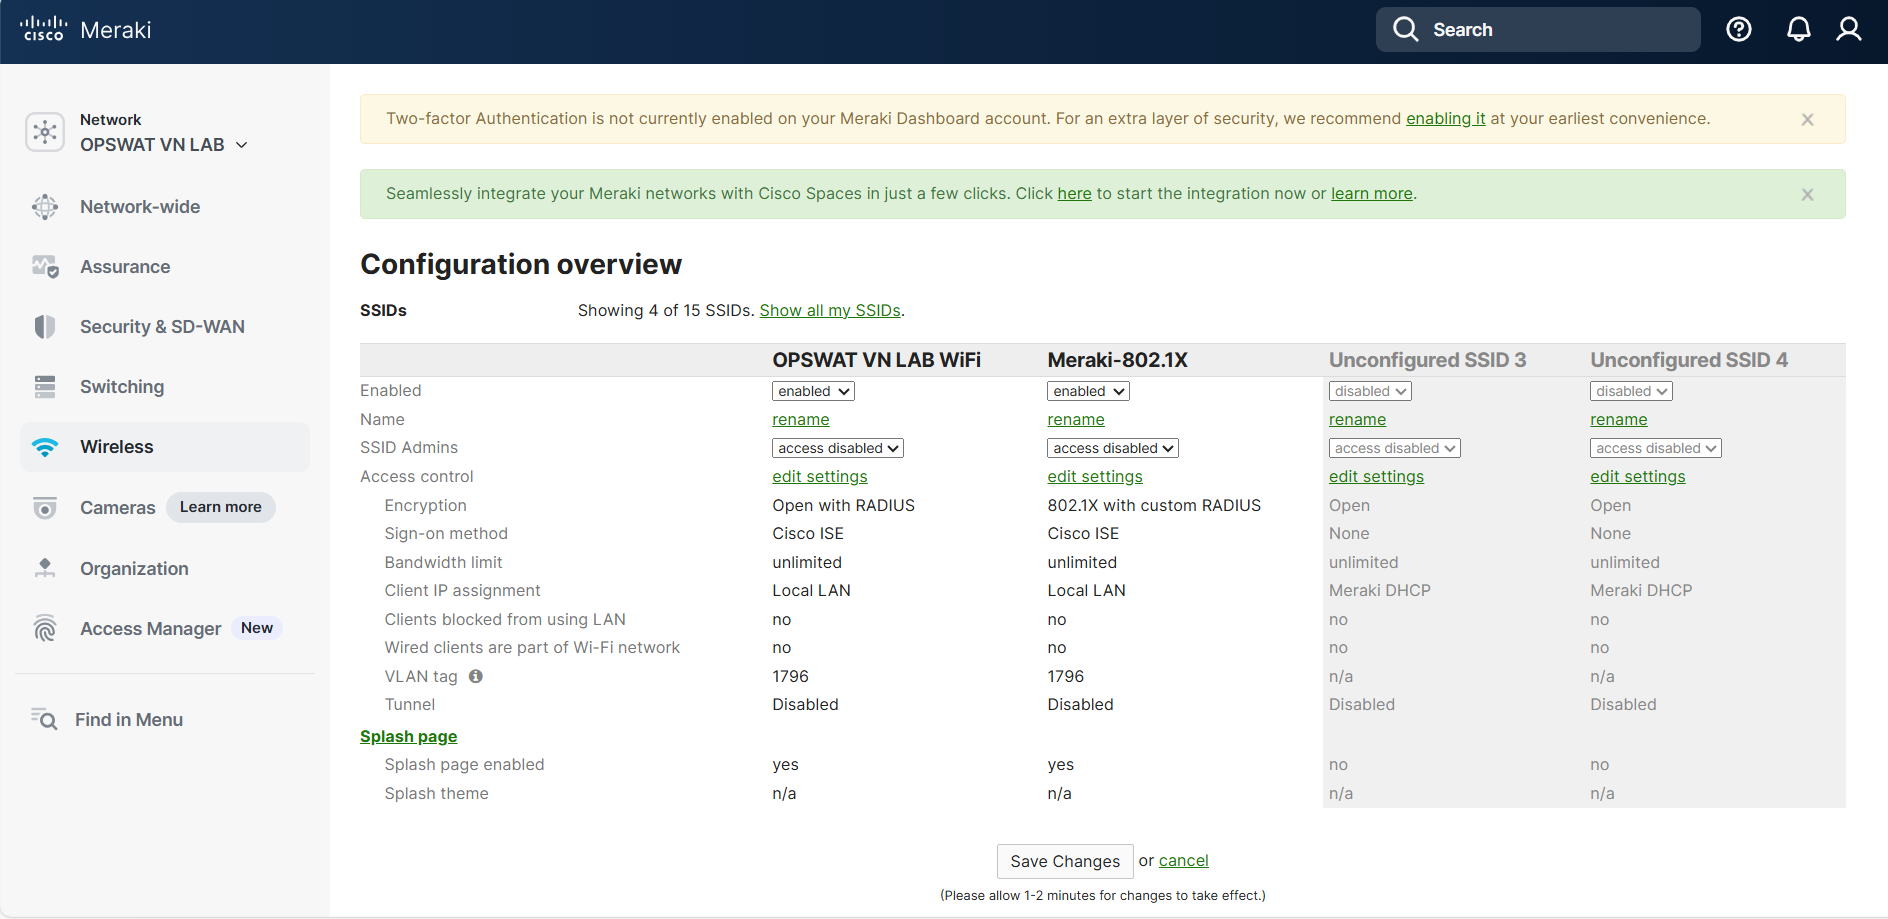
Click on Wireless -> SSIDs and select “rename” for one of your unconfigured SSIDs. Name the SSID, enable it, and click on “Save Changes”.
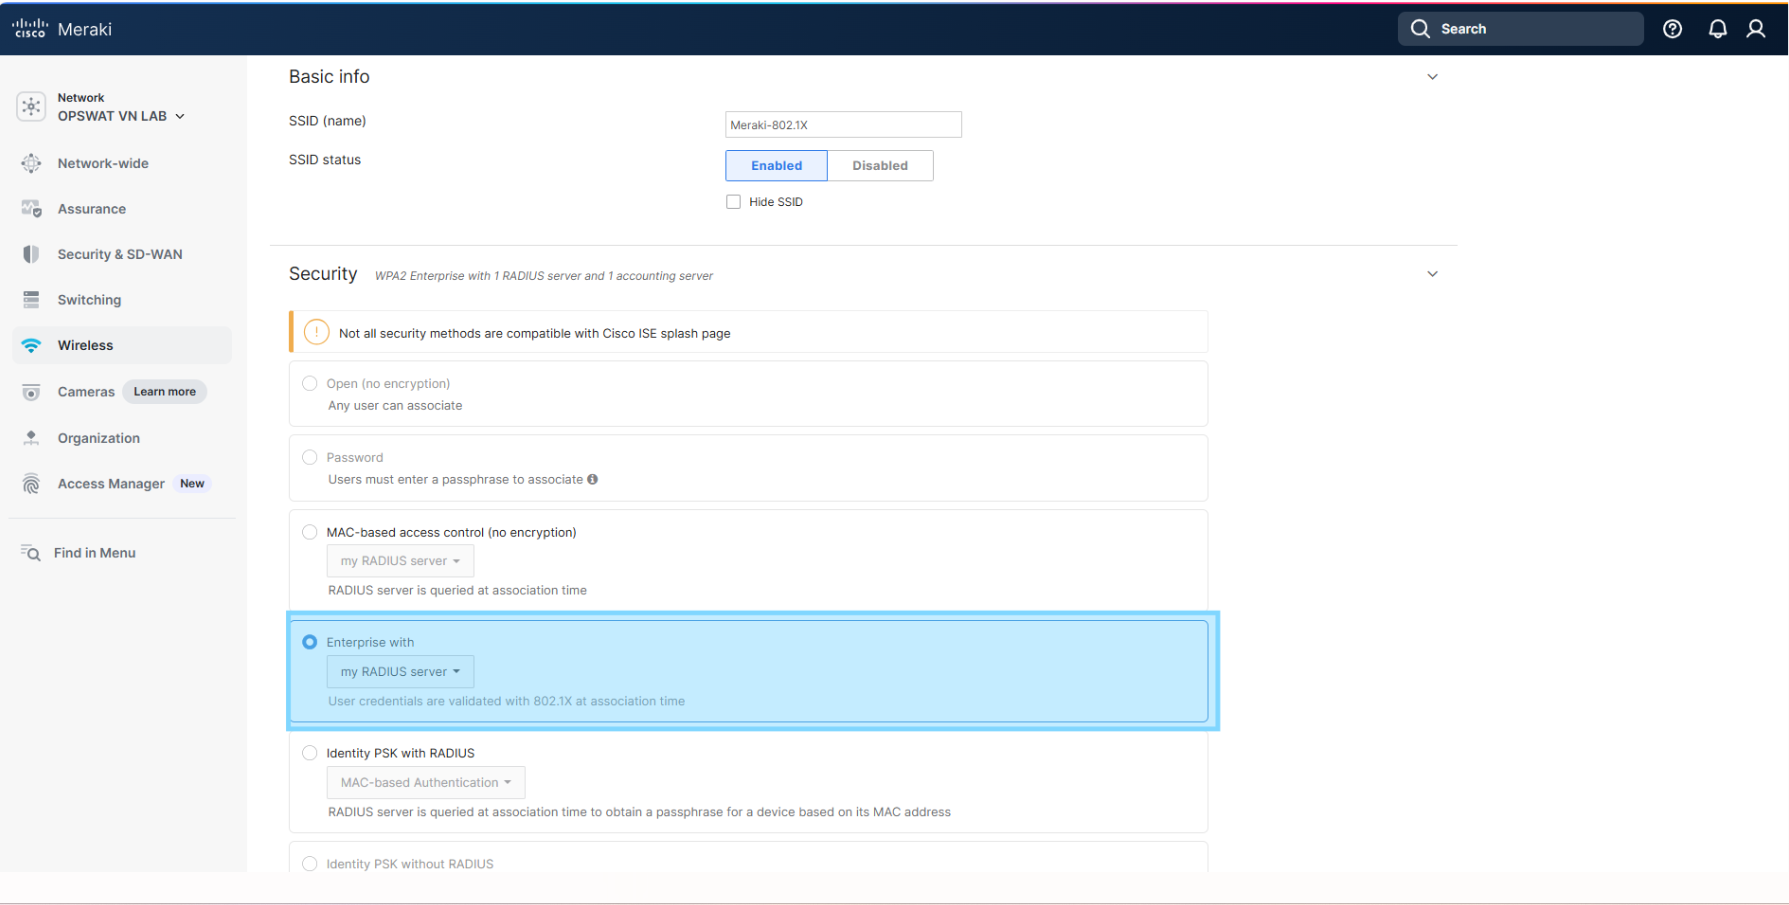
Section 3 - Configure Access Control for WPA2/WPA3 Enterprise SSID
In your newly renamed SSID, click on “edit settings” to edit Access Control.
3.1 Configure Association Requirements
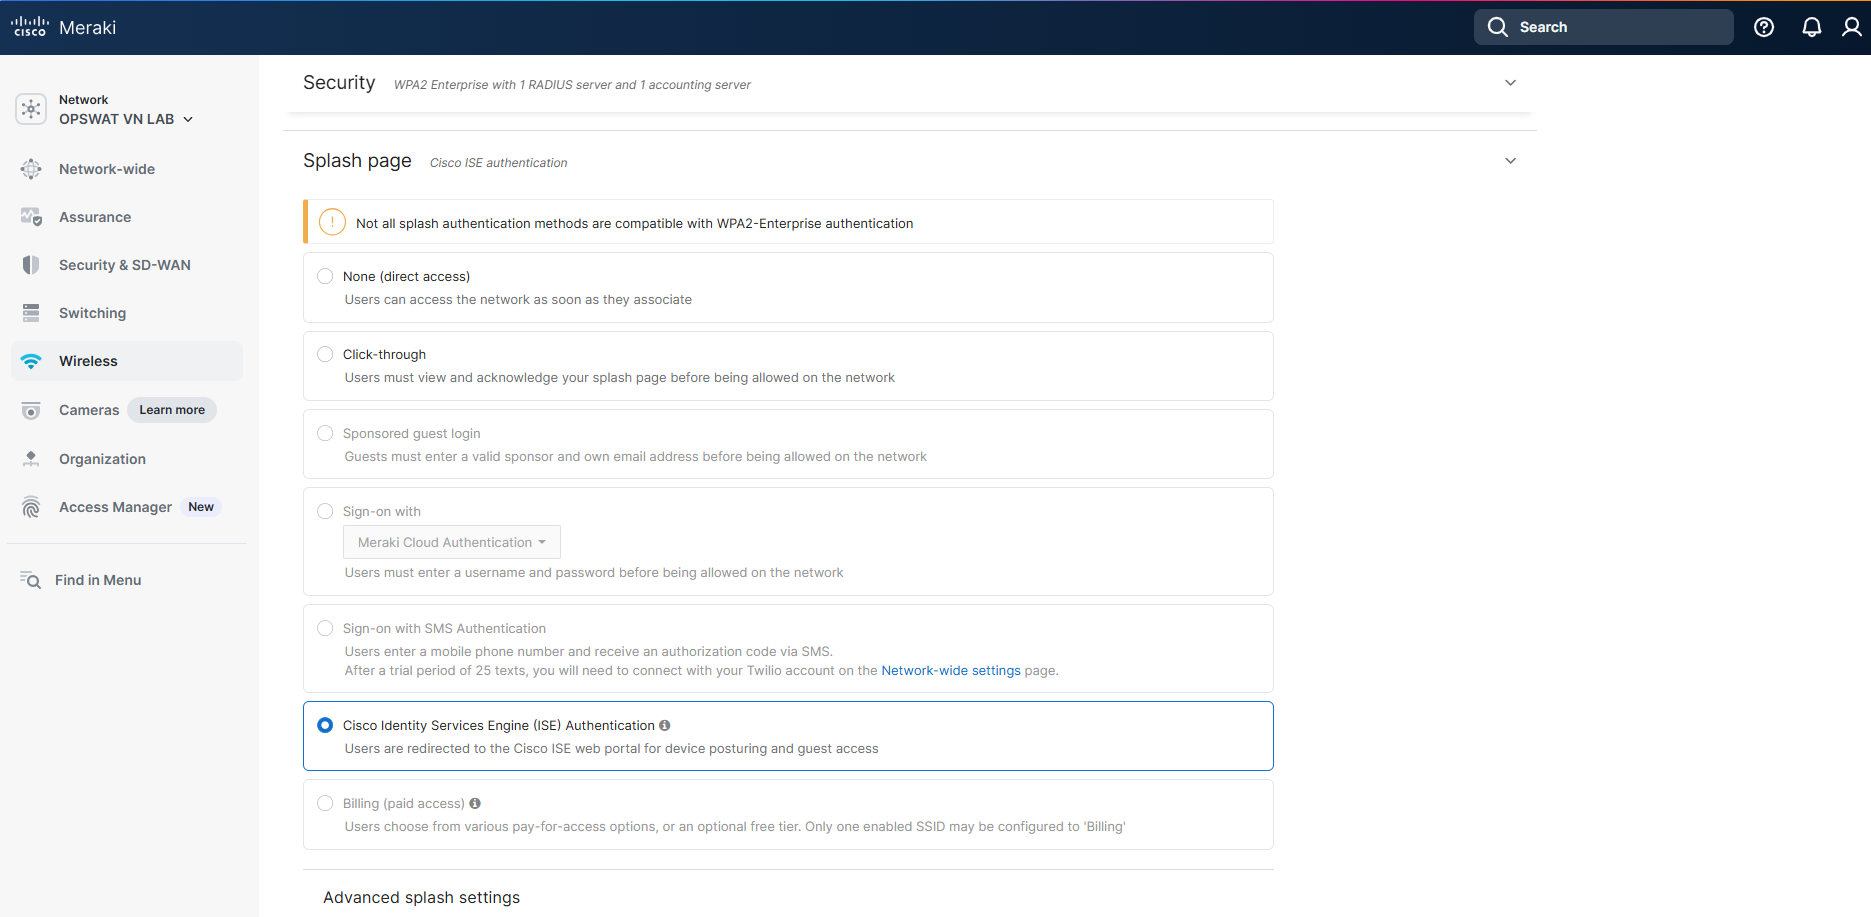
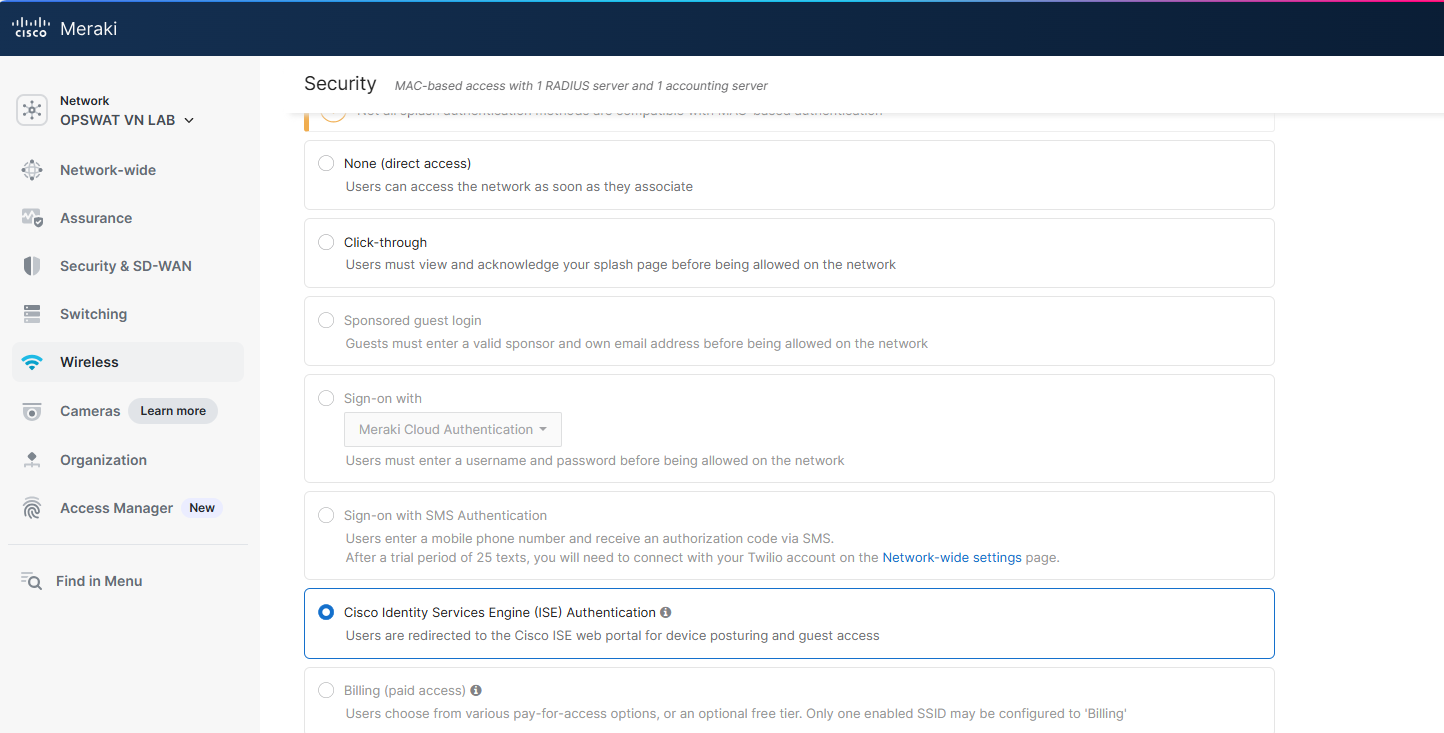
3.2 Configure Splash Page
For the Splash Page, choose “Cisco Identity Services Engine (ISE) Authentication”
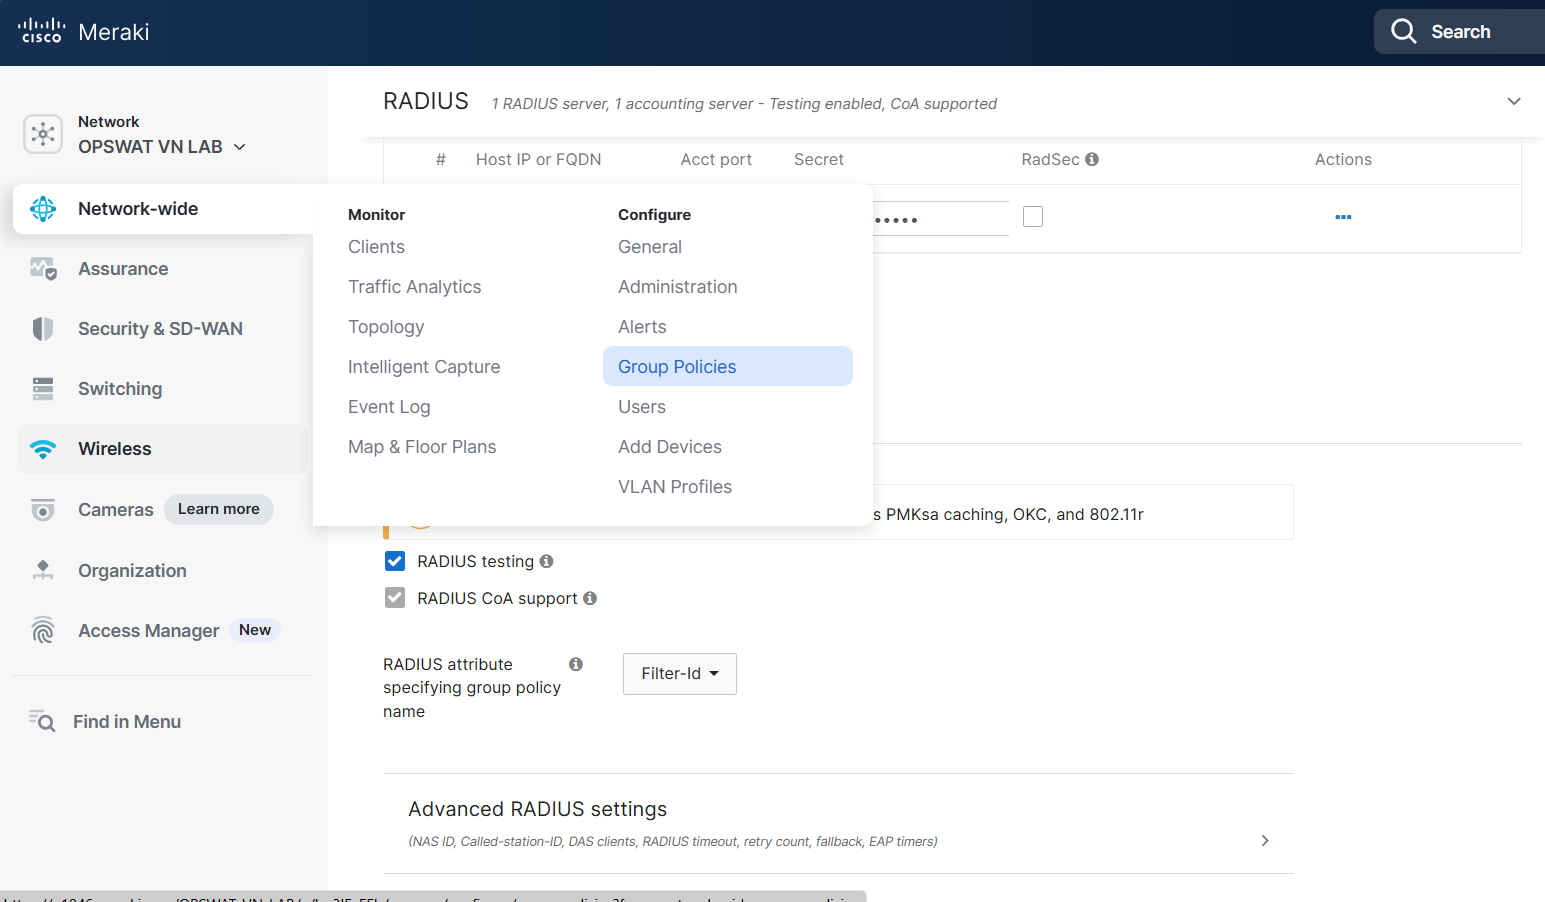
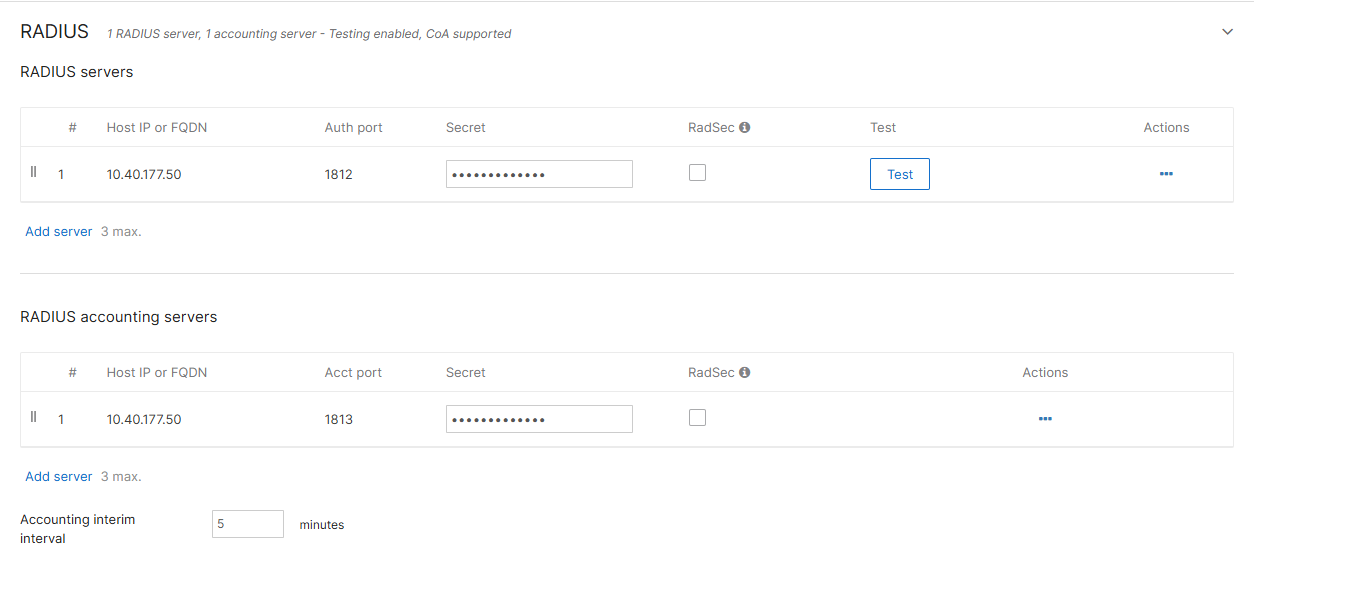
3.3 Configure RADIUS
For the RADIUS servers, set the “Host” field to the IP address of your MetaDefender NAC appliance. Note the shared secret that is used as this will need to be provided to your MetaDefender NAC representative to complete the configuration on the appliance.
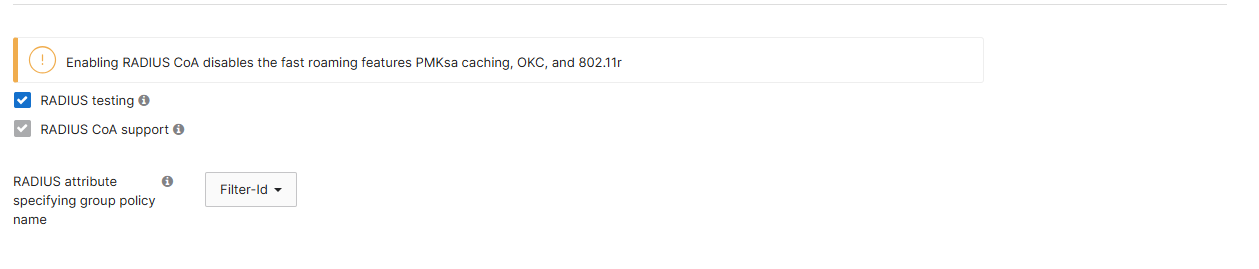
Additionally, enabled RADIUS CoA support.
Enable RADIUS accounting, and for the RADIUS accounting servers, set the “Host” field to the IP address of your MetaDefender NAC appliance, and the port to 1813. Note the shared secret that is used as this will need to be provided to your MetaDefender NAC representative to complete the configuration on the appliance.
Lastly, ensure that the RADIUS attribute specifying group policy name is set to “Filter-Id” ]( For the RADIUS servers, set the “Host” field to the IP address of your MetaDefender NAC appliance. Note the shared secret that is used as this will need to be provided to your MetaDefender NAC representative to complete the configuration on the appliance.
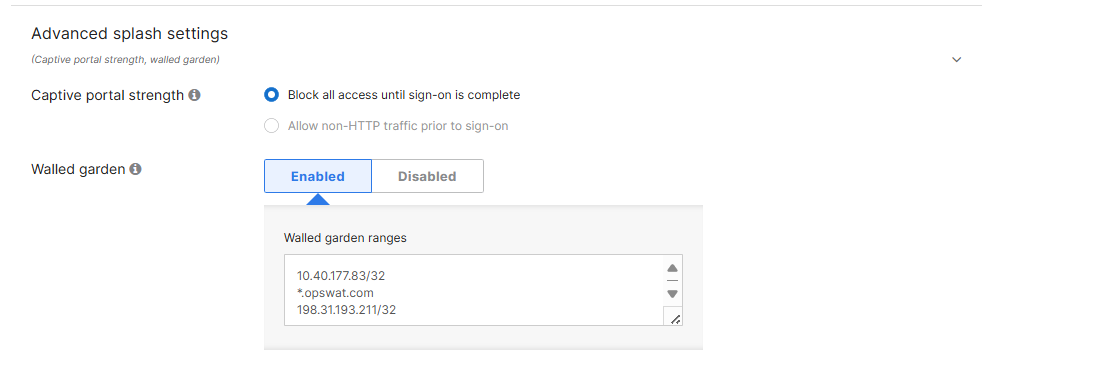
3.4 Enable Walled Garden
Ensure that Walled garden is enabled.
IMPORTANT: Add the IP address of your MetaDefender NAC appliance, the IP address 198.31.193.211/32, and the IP address of your main website. In this example, the MetaDefender NAC appliance is 10.40.177.83, and the website is www.opswat.com When finished, click “Save Changes”.
Note : For Apple CNA and Android captive portal detection, ensure the following entries are *not present in the Walled Garden. Conversely, having these entries present will bypass captive portal detection if that is the desired behavior (e.g. to prevent CNA pop-up on Apple devices):
17.0.0.0/8, captive.apple.com, *.apple.com, *.appleiphonecell.com, *.ibook.info, *.itools.info, *. airport.us, *.thinkdifferent.us, clients3.google.com, *.gstatic.com.
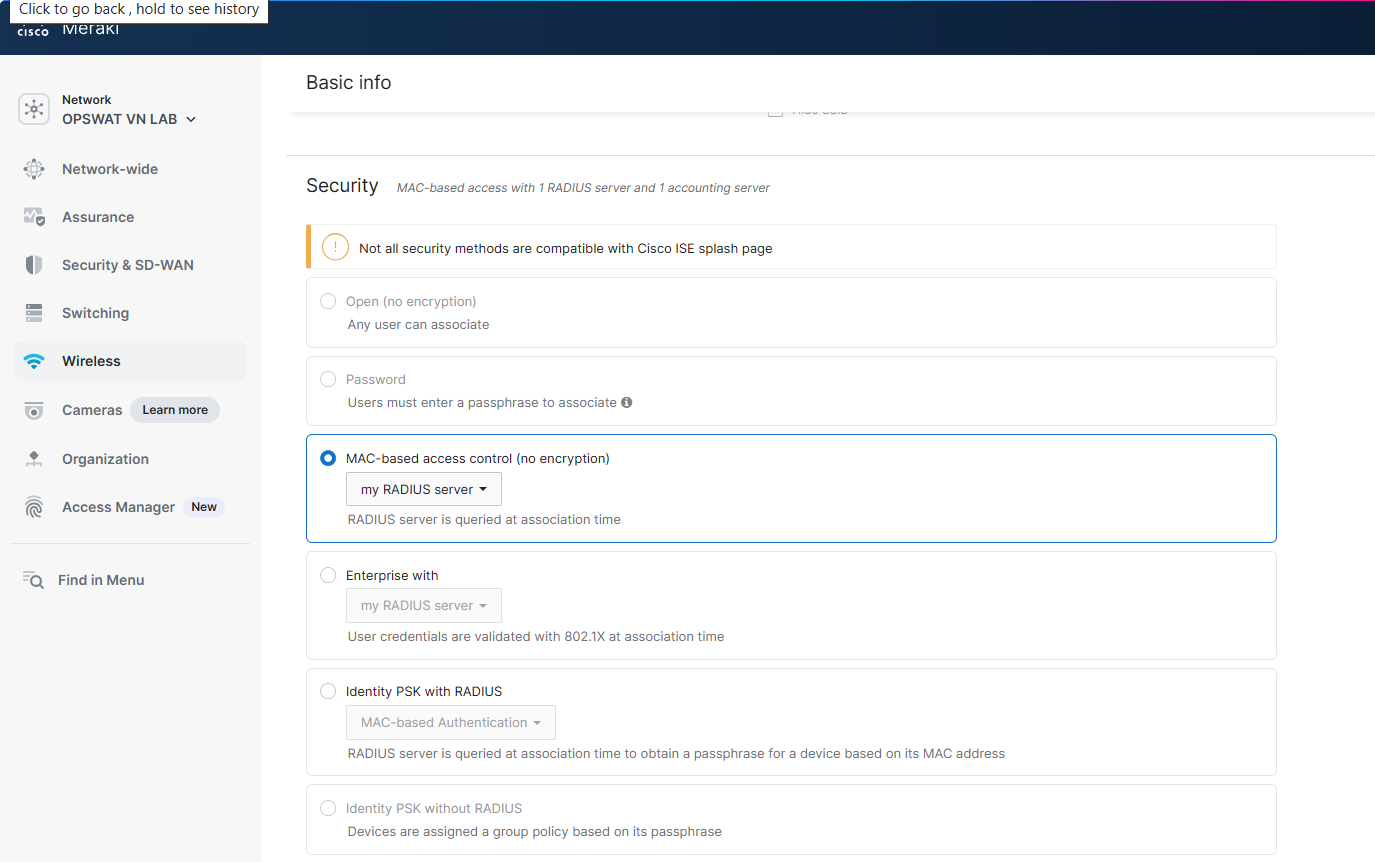
Section 4 - Configure Access Control for an Open SSID
In your newly renamed SSID, click on “edit settings” to edit Access Control.
4.1 Configure Association Requirements
4.2 Configure Splash Page
For the Splash Page, choose “Cisco Identity Services Engine (ISE) Authentication”.
4.3 Configure RADIUS
For the RADIUS servers, set the “Host” field to the IP address of your MetaDefender NAC appliance. Note the shared secret that is used as this will need to be provided to your MetaDefender NAC representative to complete the configuration on the appliance.
Additionally, enabled RADIUS CoA support.
Enable RADIUS accounting, and for the RADIUS accounting servers, set the “Host” field to the IP address of your MetaDefender NAC appliance, and the port to 1813. Note the shared secret that is used as this will need to be provided to your MetaDefender NAC representative to complete the configuration on the appliance.
Lastly, ensure that the RADIUS attribute specifying group policy name is set to “Filter-Id”
4.4 Enable Walled Garden
IMPORTANT: Add the IP address of your MetaDefender NAC appliance, the IP address 198.31.193.211/32, and the IP address of your main website. In this example, the MetaDefender NAC appliance is 10.40.177.83, and the website is www.opswat.com When finished, click “Save Changes”.
Note – For Apple CNA and Android captive portal detection, ensure the following entries are *not present in the Walled Garden. Conversely, having these entries present will bypass captive portal detection if that is the desired behavior:
17.0.0.0/8, captive.apple.com, *.apple.com, *.appleiphonecell.com, *.ibook.info, *.itools.info, *. airport.us, *.thinkdifferent.us, clients3.google.com, *.gstatic.com.
