Overview
The following guide covers all Cisco WLAN Controller configurations required to integrate the controller with NAC to be leveraged as an enforcement device. Cisco WLAN controllers running 7.2 or later are supported for centrally switched traffic. Radius Based Enforcement (RBE) is supported for Open networks and for Secure networks using WPA2E/802.1x.
By configuring your NAC Enforcer as an Authentication and Accounting Server, creating Access-Lists and leveraging features available in the WLAN controller, NAC will be enabled to block, redirect or limit access based on NAC Policy Group definitions.
NAC Installation
If you have not configured your NAC appliance with an IP address and confirmed access to the proactive Impulse Management Services, please contact your Impulse Network Specialist at support@opswat.com.
Network Preparation and Testing
Prior to integration with NAC, please confirm that the WLANs you will be integrating are fully functional. A simple test of successfully associating with the SSID and browsing to a non-cached website should suffice.
Ensure the static route below is added to the Layer 3 routing device upstream of your wireless controller(s). Note – If NAC is already integrated with your wired network, applying the “impulse” route-map to the appropriate Layer 3 interfaces on the router is preferred over the static route. Examples below are for Cisco and Brocade platforms. Please contact your Impulse Network Specialist if you require assistance with this task.
Static Route (apply if NAC is not integrated with wired network):
Route-map (apply if NAC is already integrated with wired network):
Once you have this configured, please associate with the SSID and browse to the following URLs. Each should resolve to a login screen successfully.
• https://[ip address of your NAC enforcer]:8443/dashboard.do
•https://198.31.193.211:8443/dashboard.do
• https://portal.myweblogon.com:8443/dashboard.do
General RADIUS settings
NOTE – Ensure test WLANs are used for initial integration testing.
NOTE - If for a wireless subnet and the wireless controller is operating in DHCP Proxy mode (Cisco defaults to this) ensure the Layer 3 interface on the wireless controller (also referred to as a dynamic interface) has a DHCP server entry for the NAC server IP. If this is not configured, NAC will not receive DHCP requests because the controller, not the Layer 3 switch/router, handles DHCP relay when in Proxy mode.
NOTE - If for a wireless subnet that terminates on a firewall and not a router, the note directly above still applies since the relay is handled by the controller, not the firewall.
Add NAC Enforcer as a RADIUS Authentication server globally
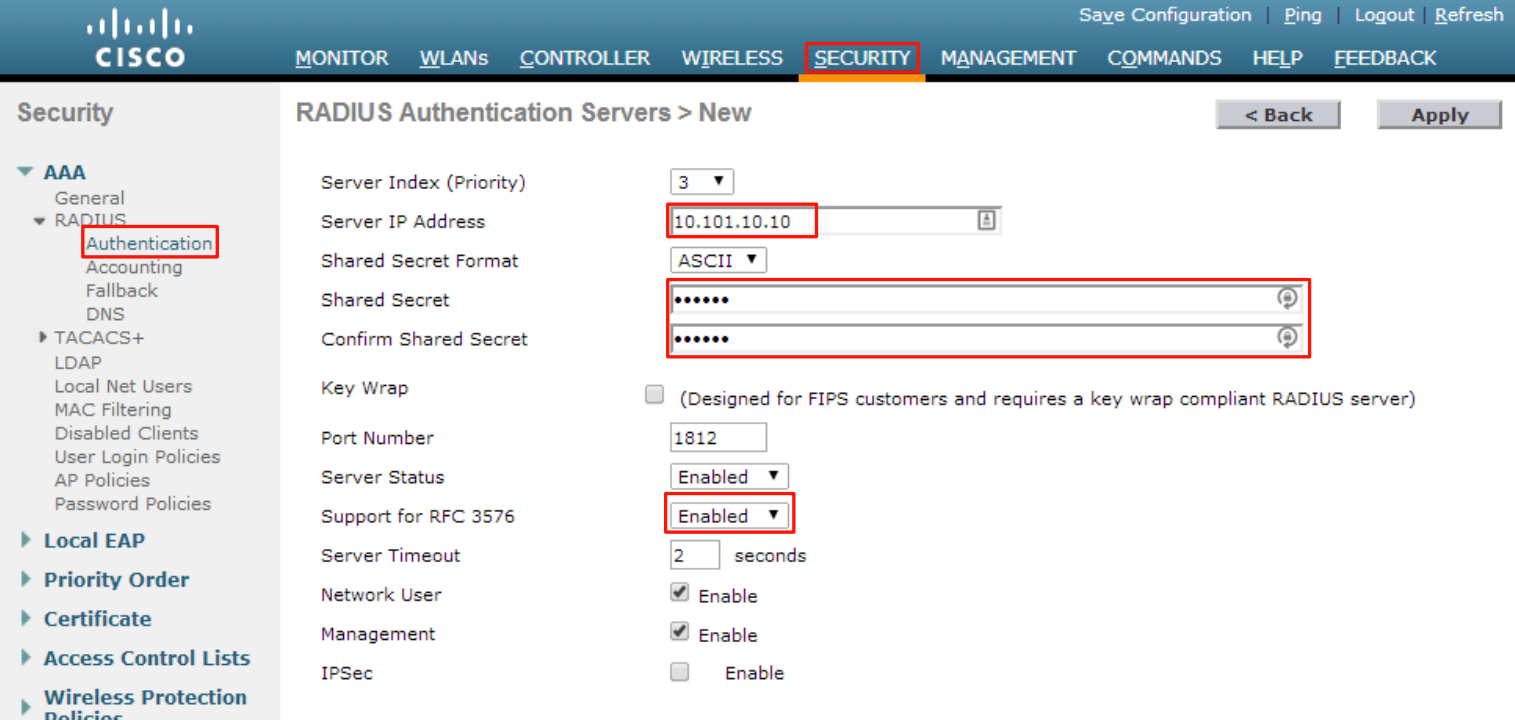
Click on Security and then on Authentication under AAA → RADIUS. Create a new Authentication Server. Ensure that ‘Support for RFC 3576’ is set to ‘Enabled’. In the following examples, the NAC Enforcer IP is 10.101.10.10*. Make a note of the IP address and shared secret as this information will need to be provided to your Impulse representative to complete the configuration on the appliance.
*If you have a separate RBE appliance, that IP should be used here instead of the Enforcer IP
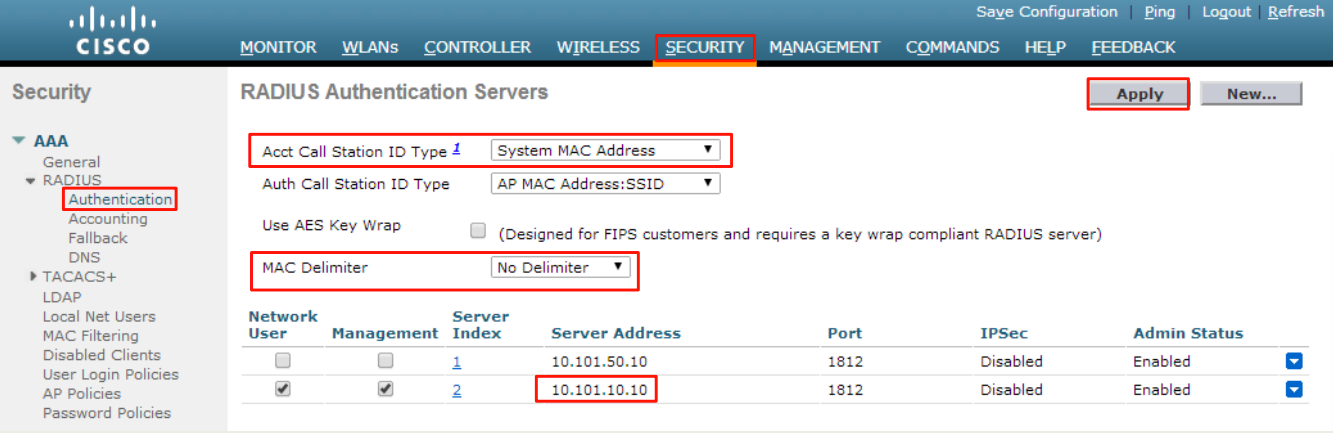
After creating the new server it will appear in the list. Before saving, ensure ‘Call Station ID Type’ is ‘System MAC Address’ and ‘No Delimiter’ is selected. Save the configuration by clicking the ‘Apply’ button.
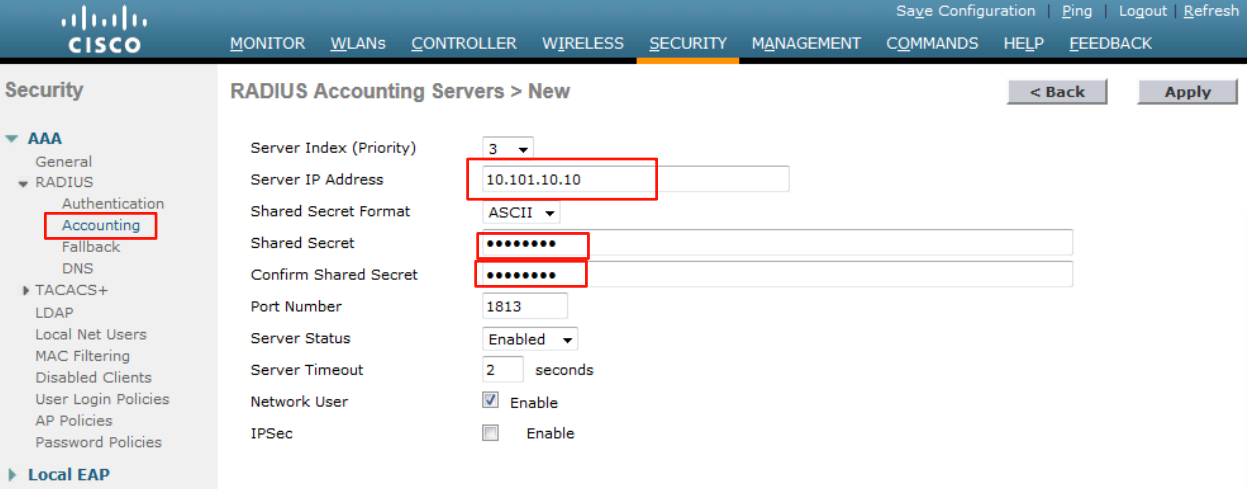
Add NAC Enforcer as a RADIUS Accounting server globally
Click on Security and then on Authentication under AAA → RADIUS. Click on Accounting and ensure under ‘MAC Delimiter‘, ‘No Delimiter’ is selected.
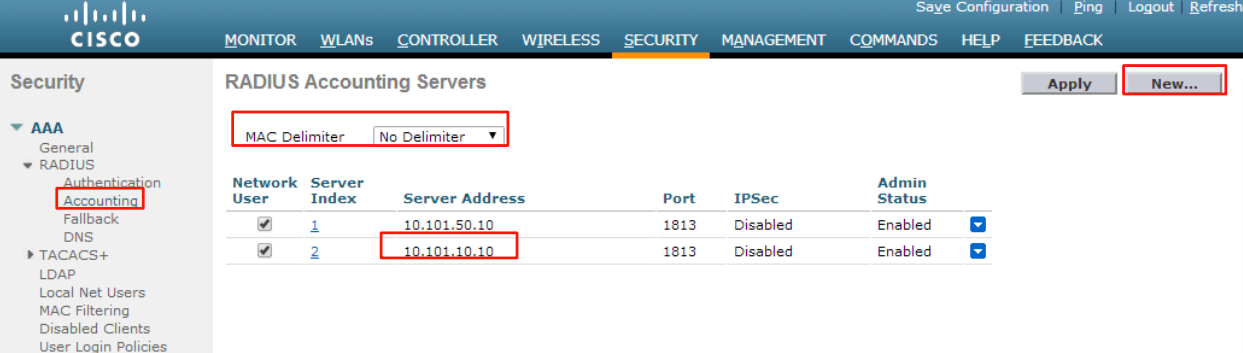
Create a new Accounting Server. In the following example, the NAC Enforcer IP is 10.101.10.10*. Make a note of the IP address and shared secret as this information will need to be provided to your Impulse representative to complete the configuration on the appliance.
*If you have a cluster, the Manager IP will be inserted here instead of the Enforcer IP
Enable Captive Portal Bypass on the controller
Captive Portal Bypass is enabled to improve the end user experience for mobile devices. More information on Cisco’s implementation of this feature can be found here:
http://www.cisco.com/c/en/us/td/docs/wireless/controller/7- 4/configuration/guides/consolidated/b_cg74_ CONSOLIDATED/b_cg74_CONSOLIDATED_chapter_01010101.html
The command for enabling this feature is:
ACL Configuration
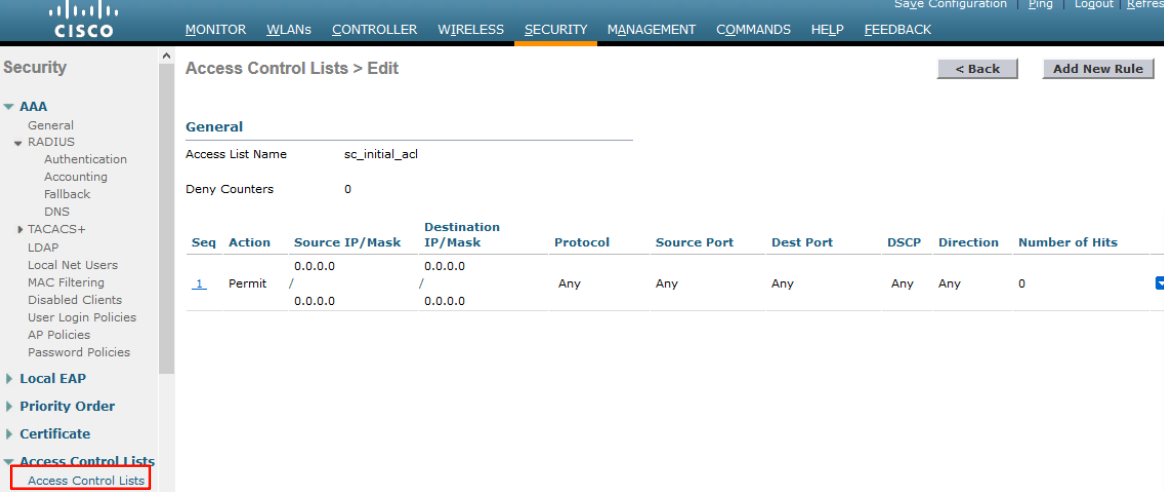
Configure sc_initial_acl ACL
Click on Access Control Lists and create a new ACL. The sc_initial_ acl ACL defines what access is permitted while an endpoint is being evaluated for policy. In the example below all access is permitted but restricted access may be configured as desired. NOTE – If the sc_initial_ NAC acl ACL is restricted, ensure DNS, DHCP, traffic for your Enforcer* and 198.31.193.211 are permitted. These are mandatory entries for restricted ACLs.
*If you have a separate RBE appliance, allow access to your NAC enforcer AND the RBE appliance IPs
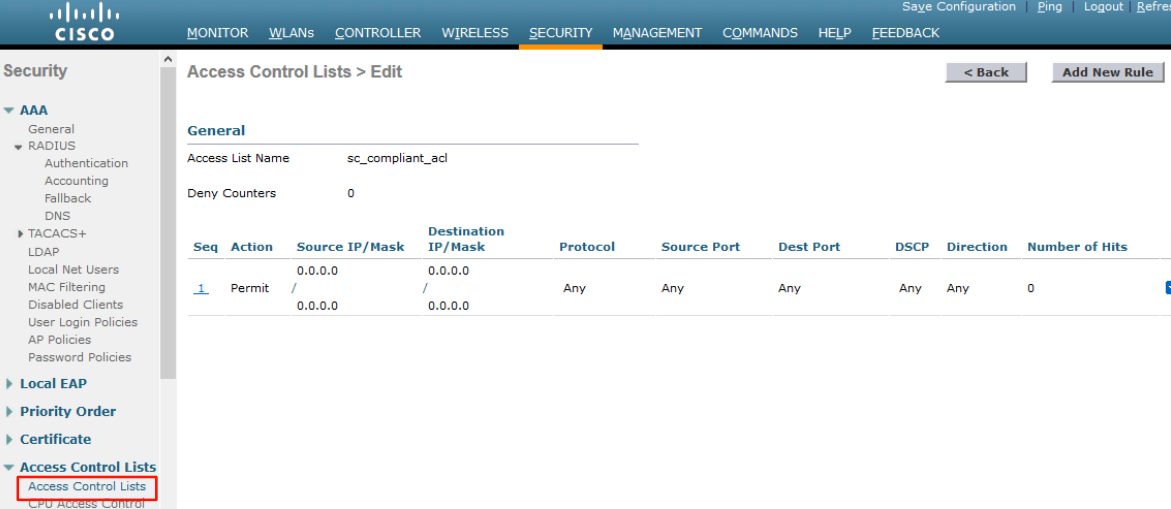
Configure sc_compliant_acl ACL
The sc_compliant_ acl ACL defines what access is allowed after successful authentication. In the example below full access is permitted but access may be configured as desired. NOTE - If additional different levels of access are to be defined for different roles, names must be unique. Example: “guest_compliant_acl”, “fac_compliant_acl”, “stu_compliant_acl”, etc.
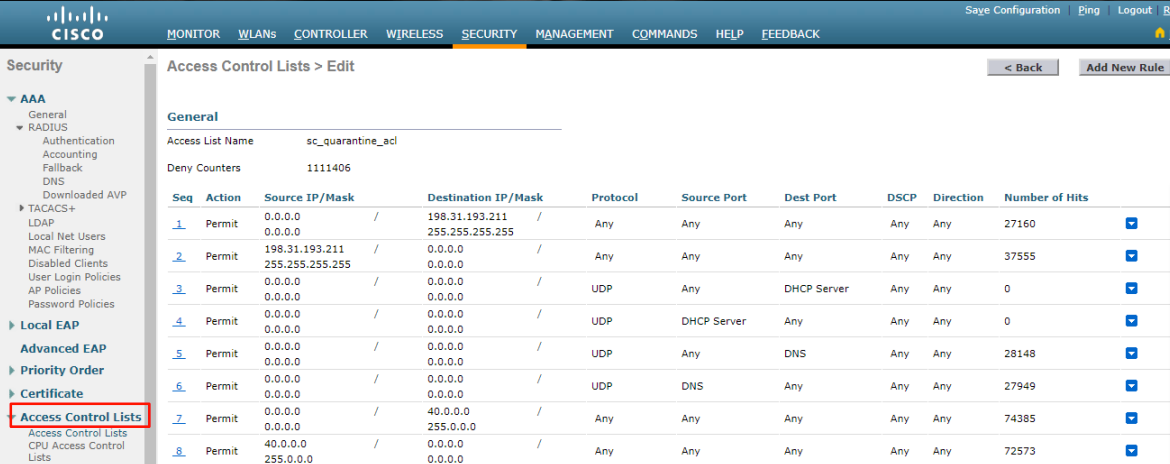
Configure sc_quarantine_ acl ACL
The sc_quarantine_ acl ACL defines what access is allowed while quarantined for a failed policy. NOTE - If different additional levels of access are to be defined for different roles, names must be unique. Example: “guest_quarantine_ NAC acl”, “fac_quarantine_acl”, “stu_quarantine_acl”, etc. NOTE – for custom quarantine ACLs, ensure DNS, DHCP, traffic for your Enforcer*, 198.31.193.211 and your SafeConnect Landing Page are permitted. These are mandatory entries for restricted ACLs.
*If you have a separate RBE appliance, allow access to your NAC enforcer AND the RBE appliance IPs
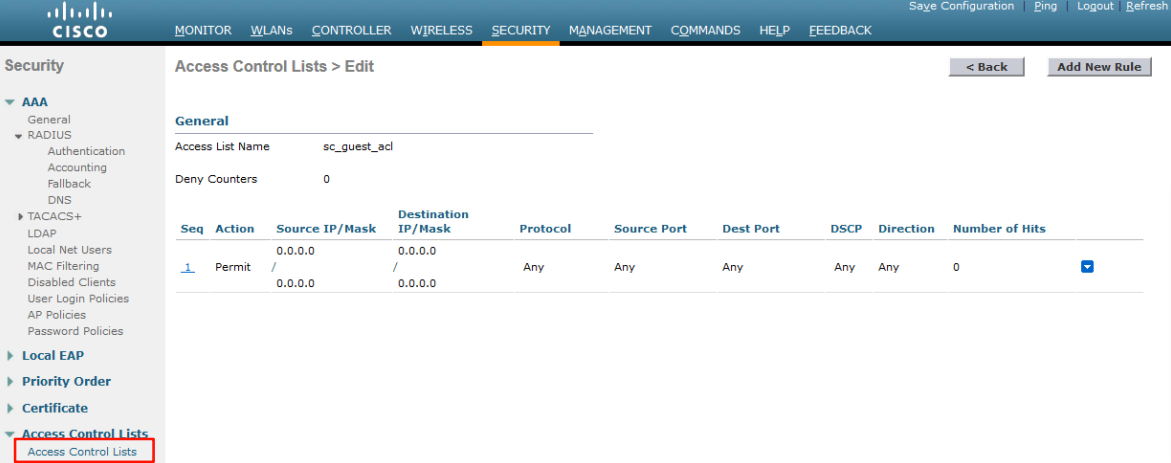
Configure sc_guest_acl ACL
The sc_guest_ acl ACL defines what access is allowed to compliant guest pass users. NOTE - If different additional levels of access are to be defined for different roles, names must be unique. Example: “VIP_guest_ NAC acl”, “vendor_guest_acl”, etc. NOTE – for custom guest ACLs, ensure DNS, DHCP, traffic for your Enforcer*, 198.31.193.211 and your SafeConnect Landing Page are permitted. These are mandatory entries for restricted ACLs.
*If you have a separate RBE appliance, allow access to your NAC enforcer AND the RBE appliance IPs
Secure WPA2E Wireless RBE Configuration
NOTE – For Open WLANs, skip to step 13. Before Proceeding with the Secure WPA2E Wireless configuration, ensure that steps 1-7 above have been completed.
Add NAC Enforcer IP to existing RADIUS Server
For integration with WPA2E/802.1x enabled WLANs, be sure to configure the NAC Enforcer IP as an authorized client within the existing RADIUS server. Make a note of the IP address and shared secret as this information will need to be provided to your Impulse representative to complete the configuration on the appliance.
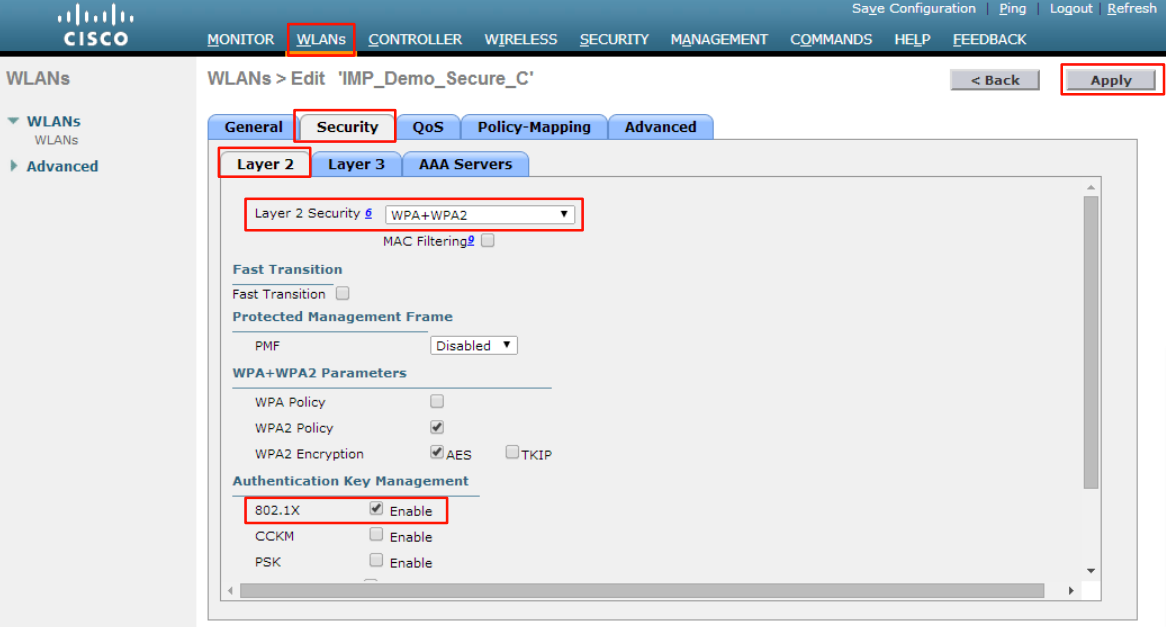
Configure Secure WLAN Settings – Layer 2
Click on WLANs then under the Security tab of the WLAN, click on the Layer 2 tab. Verify Layer 2 Security is set to ‘WPA+WPA2’ and Authentication Key Management is set to ‘802.1x’.
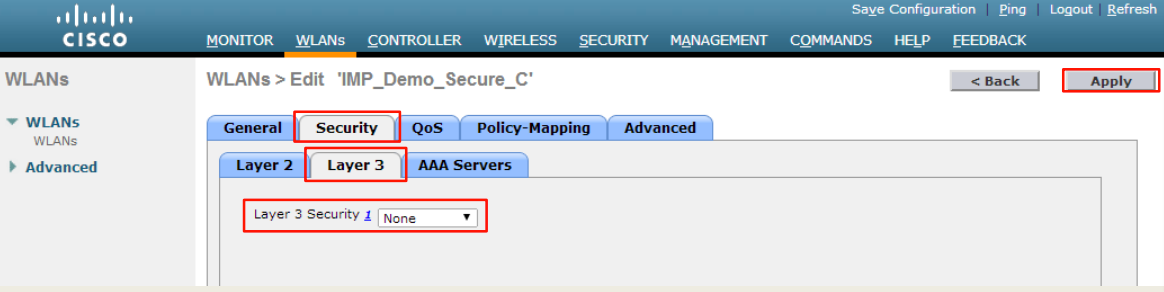
Configure Secure WLAN Settings – Layer 3
Under the Security tab of the WLAN, click on the Layer 3 tab. Verify Layer 3 Security is set to ‘None’.
Configure Secure WLAN Settings – AAA
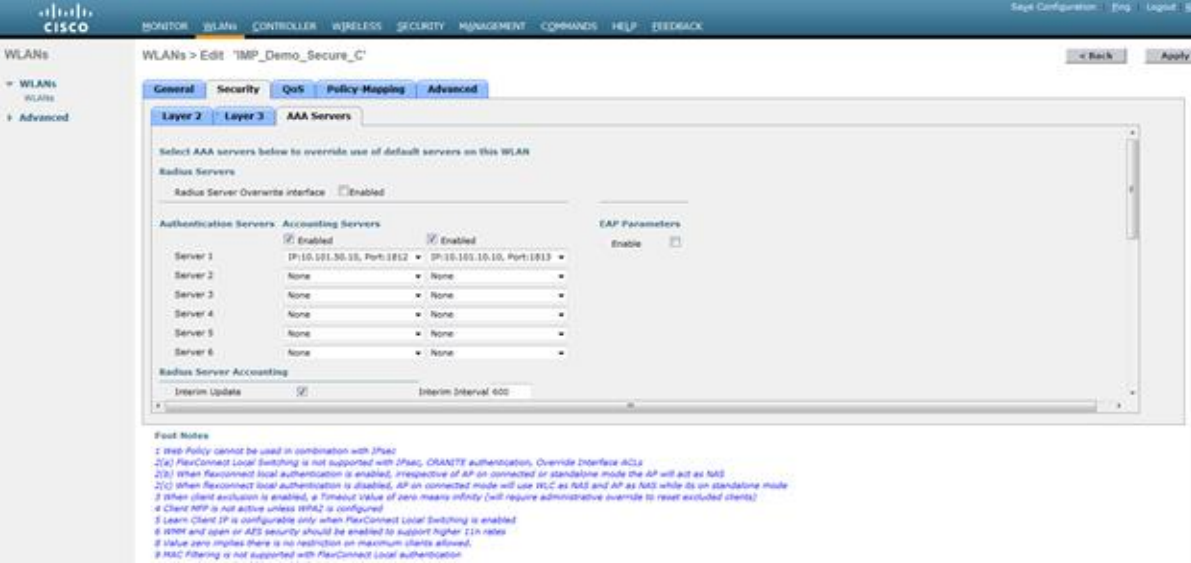
Under the Security tab of the WLAN, click on the AAA Servers tab. Add the NAC Enforcer IP as an Authentication and Accounting server using standard ports 1812 and 1813*. Ensure interim update is checked.
If you have a separate RBE appliance, that IP will be used for the Authentication Server and the Manager IP will be used for the Accounting Server.

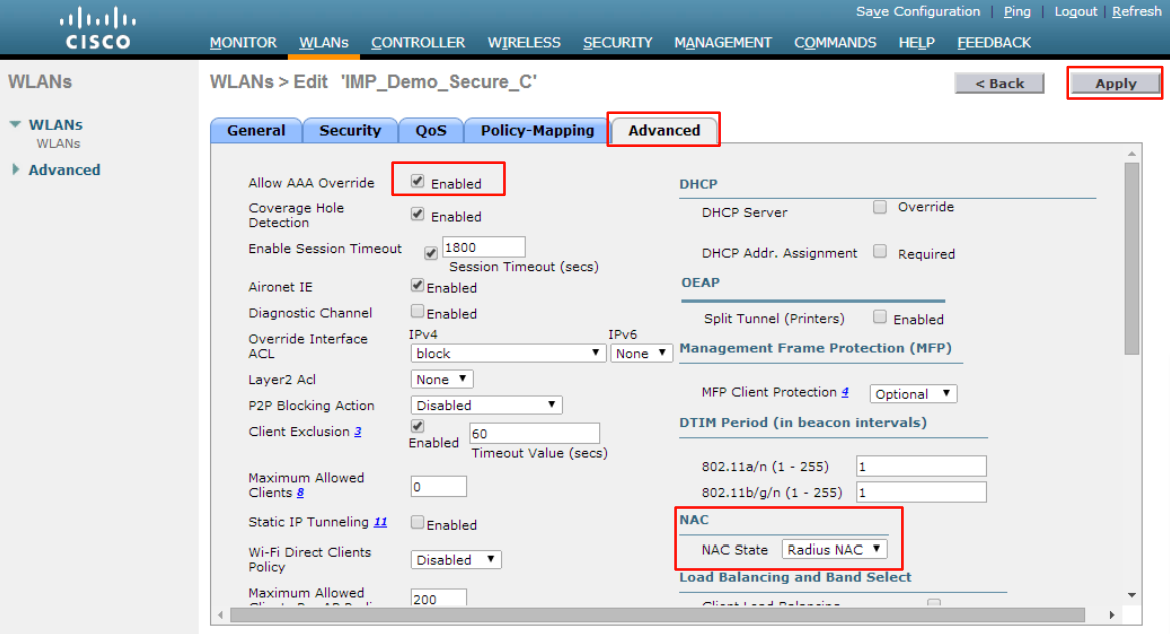
Configure Secure WLAN Settings – Advanced
Under the Advanced tab of the WLAN, ensure that AAA Override is enable, and ensure NAC State is set to ‘Radius NAC’. This setting may show up as ‘ISE NAC’ on certain AireOS versions which is also supported.
This concludes the Cisco WLAN Controller configuration for Secure WPA2E WLANs. For Open WLANs, proceed to the next section.
Open/PSK Wireless RBE Configuration
For Open or PSK WLANs, ensure that steps 1-7 are completed before proceeding with the steps below.
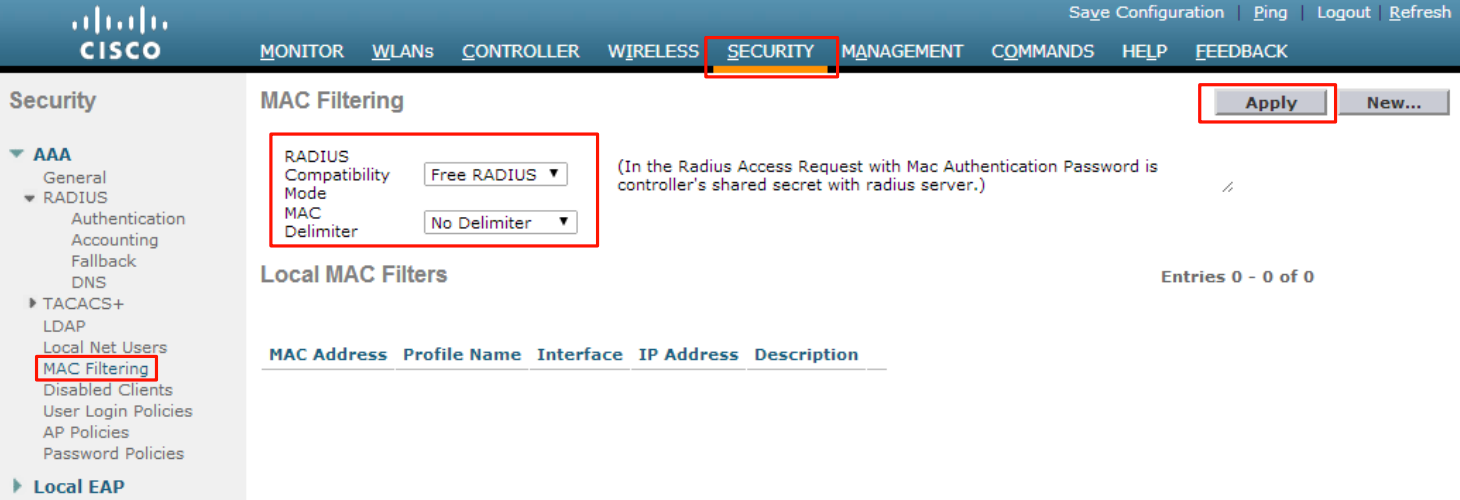
Configure MAC Filtering
Click on the Security Tab. Ensure RADIUS Compatibility Mode is set to ‘Free RADIUS’ and ‘No Delimiter’ is selected.
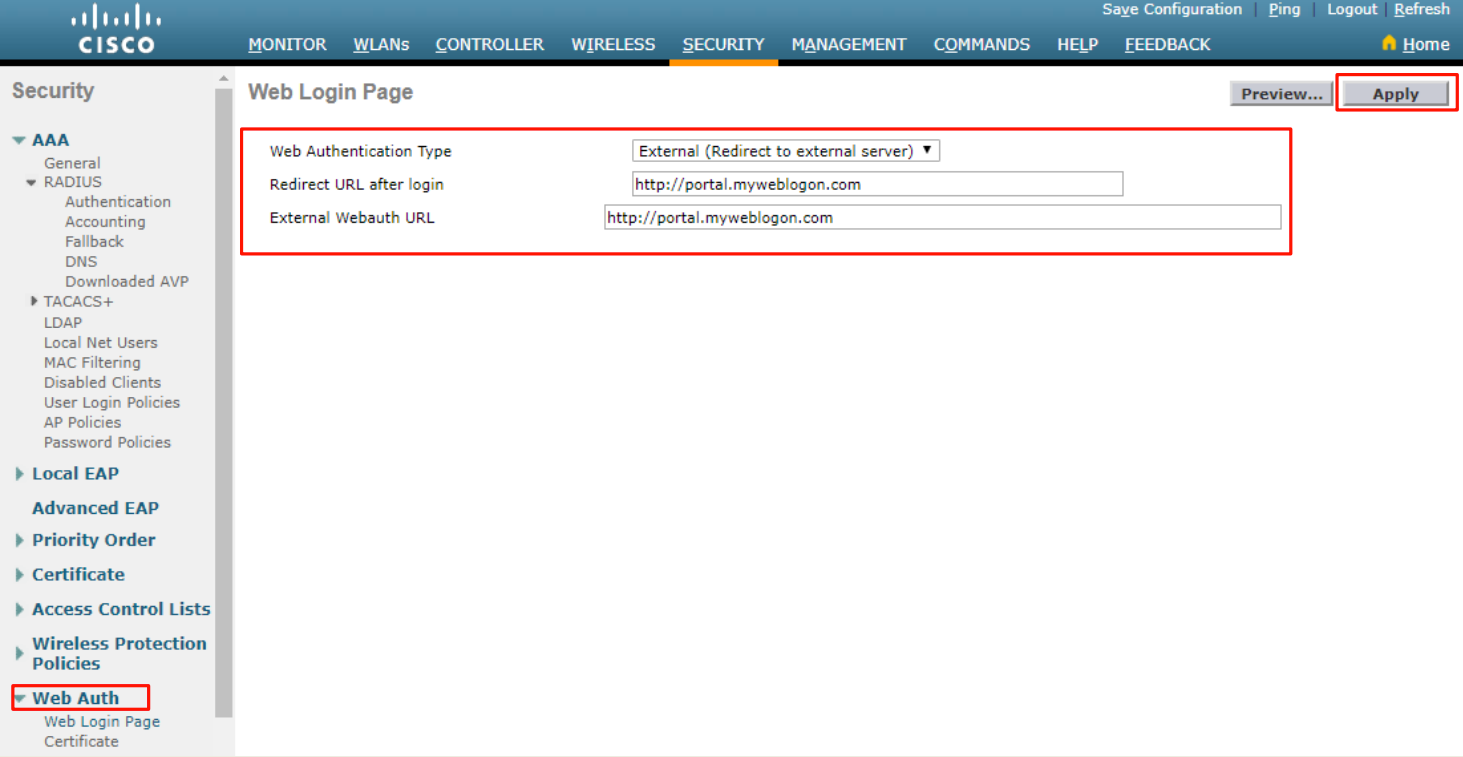
Configure Web Login Page (AireOS versions earlier than 8.3.102.0)
Note – If running AireOS 8.3.102.0 or later, skip to step 15 – Configure Open/PSK WLAN Settings – Layer 2.
Click on Web Auth → Web Login Page. Ensure Web Authentication Type is set to ‘External’ and URLs below are entered with your NAC Enforcer URL - http://portal.myweblogon.com.
Configure Open/PSK WLAN Settings – Layer 2
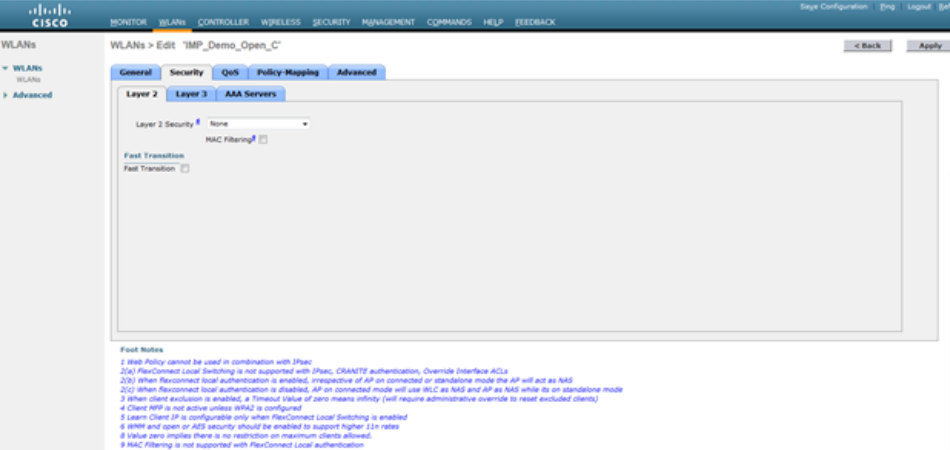
Click on WLANs then under the Security tab of the WLAN, click on the Layer 2 tab. Check the Mac Filtering check box. For Open SSIDs ensure Security is set to ‘None’, for PSKs select appropriate security settings for the PSK.

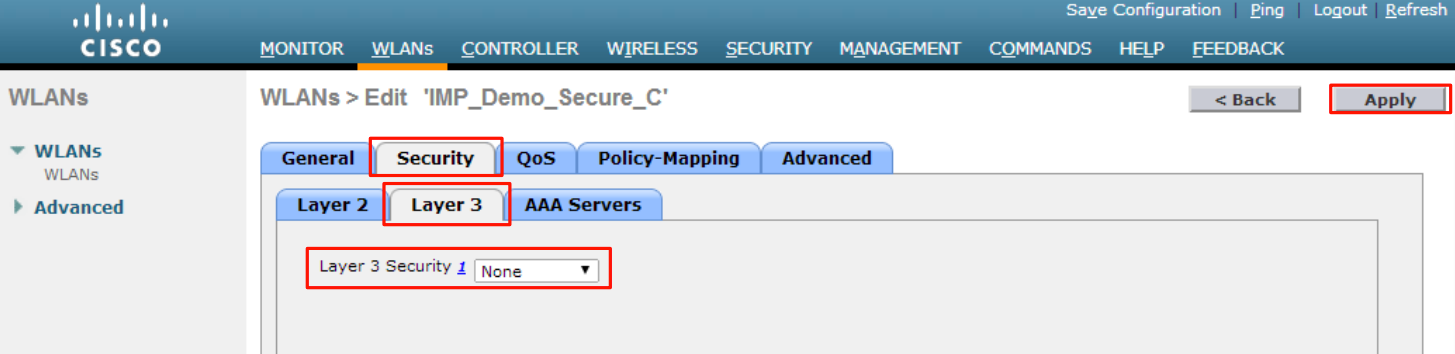
Configure Open/PSK WLAN Settings – Layer 3
Note – If running AireOS earlier than version 8.3.102.0 skip to step 17 – Configure Open/PSK WLAN Settings – Layer 3 (AireOS versions earlier than 8.3.102.0).
Under the Security tab of the WLAN, click on the Layer 3 tab. Verify Layer 3 Security is set to ‘None’.
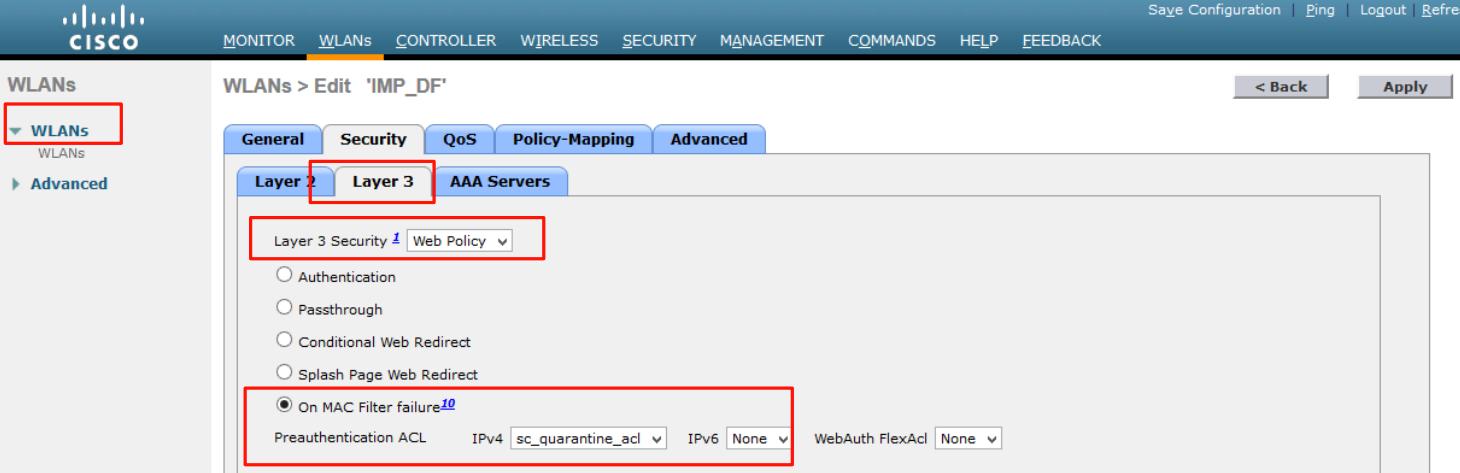
Configure Open/PSK WLAN Settings – Layer 3 (AireOS versions earlier than 8.3.102.0)
Under the Security tab of the WLAN, click on the Layer 3 tab. Verify Layer 3 Security is set to ‘Web Policy’, ‘On MAC Filter Failure’ is selected and the sc_quarantine_ acl ACL is selected.
Configure Open/PSK WLAN Settings – AAA
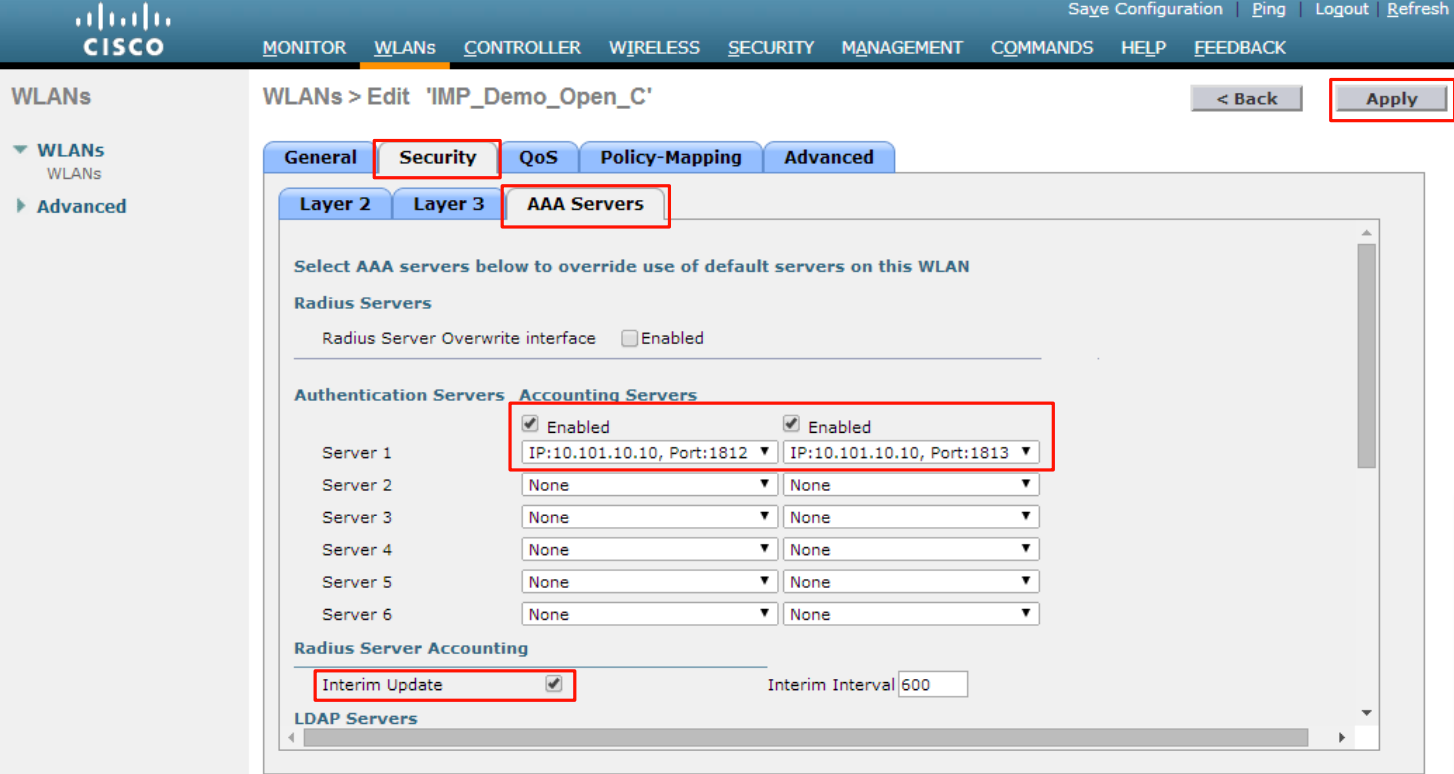
Under the Security tab of the WLAN, click on the AAA Servers tab. Add the NAC Enforcer IP as an Authentication and Accounting server using standard ports 1812 and 1813*. Ensure interim update is checked.
If you have a separate RBE appliance, that IP will be used for the Authentication Server and the Enforcer IP will be used for the Accounting Server.
Configure Open/PSK WLAN Settings – Advanced
Note – If running AireOS earlier than version 8.3.102.0 skip to step 20 – Configure Open/PSK WLAN Settings – Advanced (AireOS versions earlier than 8.3.102.0).
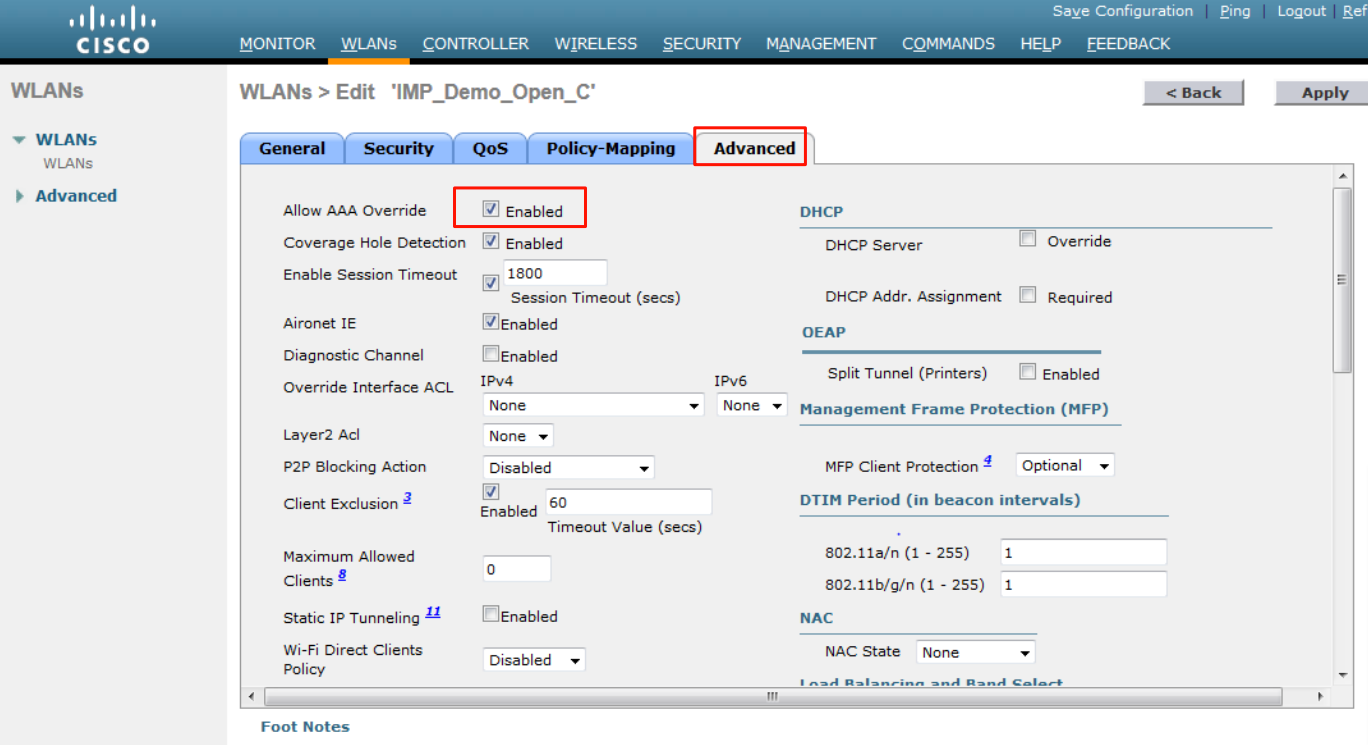
Under the Advanced tab of the WLAN, ensure that AAA Override is enable, and ensure NAC State is set to ‘Radius NAC’. This setting may show up as ‘ISE NAC’ on certain AireOS versions which is also supported.

Configure Open/PSK WLAN Settings – Advanced (AireOS versions earlier than 8.3.102.0)
Under the Advanced tab of the WLAN, ensure that ‘AAA Override’ is checked
Conclusion
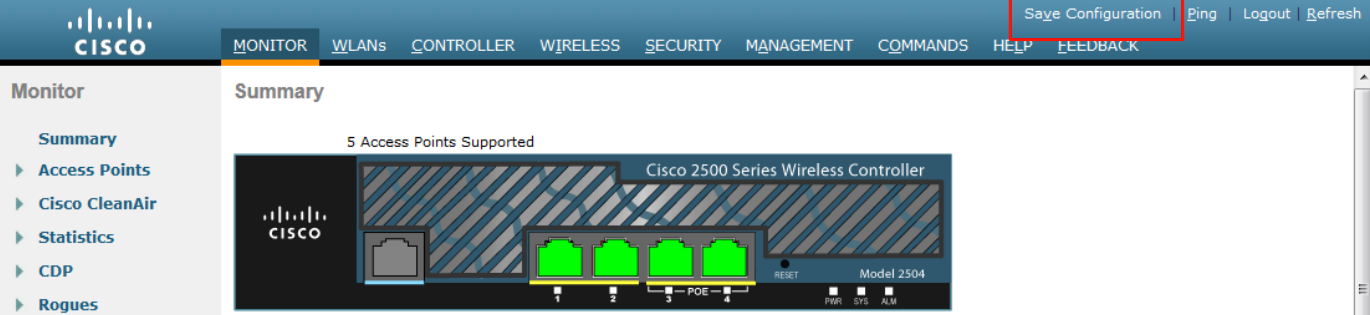
Please remember to save your configuration.
This completes the WLAN controller configuration. Please run the commands below, and send the results to your Impulse Network Engineer for next steps to complete integration validation testing.
Appendix – Disabling Enforcement
Cisco Open/PSK SSIDs
Turn MAC filtering off (click on wlan, security, layer 2, uncheck mac filtering box)
Cisco WPA2E SSIDS
Set radius authentication server to customer's radius server (wlan, security, aaa servers, set server 1 to their prod radius server)