
This section provides instructions for administrator to configure Microsoft Entra ID as SAML Identity Provider for authenticating to KIOSK UI and Web Management Console.
Procedure to set Microsoft Entra ID as login method for KIOSK UI or WebMC
The login configuration for KIOSK UI and KIOSK WebMC are distinct and should be set up separately, and all the steps should be repeated. This document outlines the same and unique configuration steps for both WebMC and UI. When configuring the KIOSK UI login, refer to the UI instructions and disregard the WebMC sections, and vice versa.
1. Application Registration
Step 1. Access the Microsoft Entra admin center using your administrative credentials.
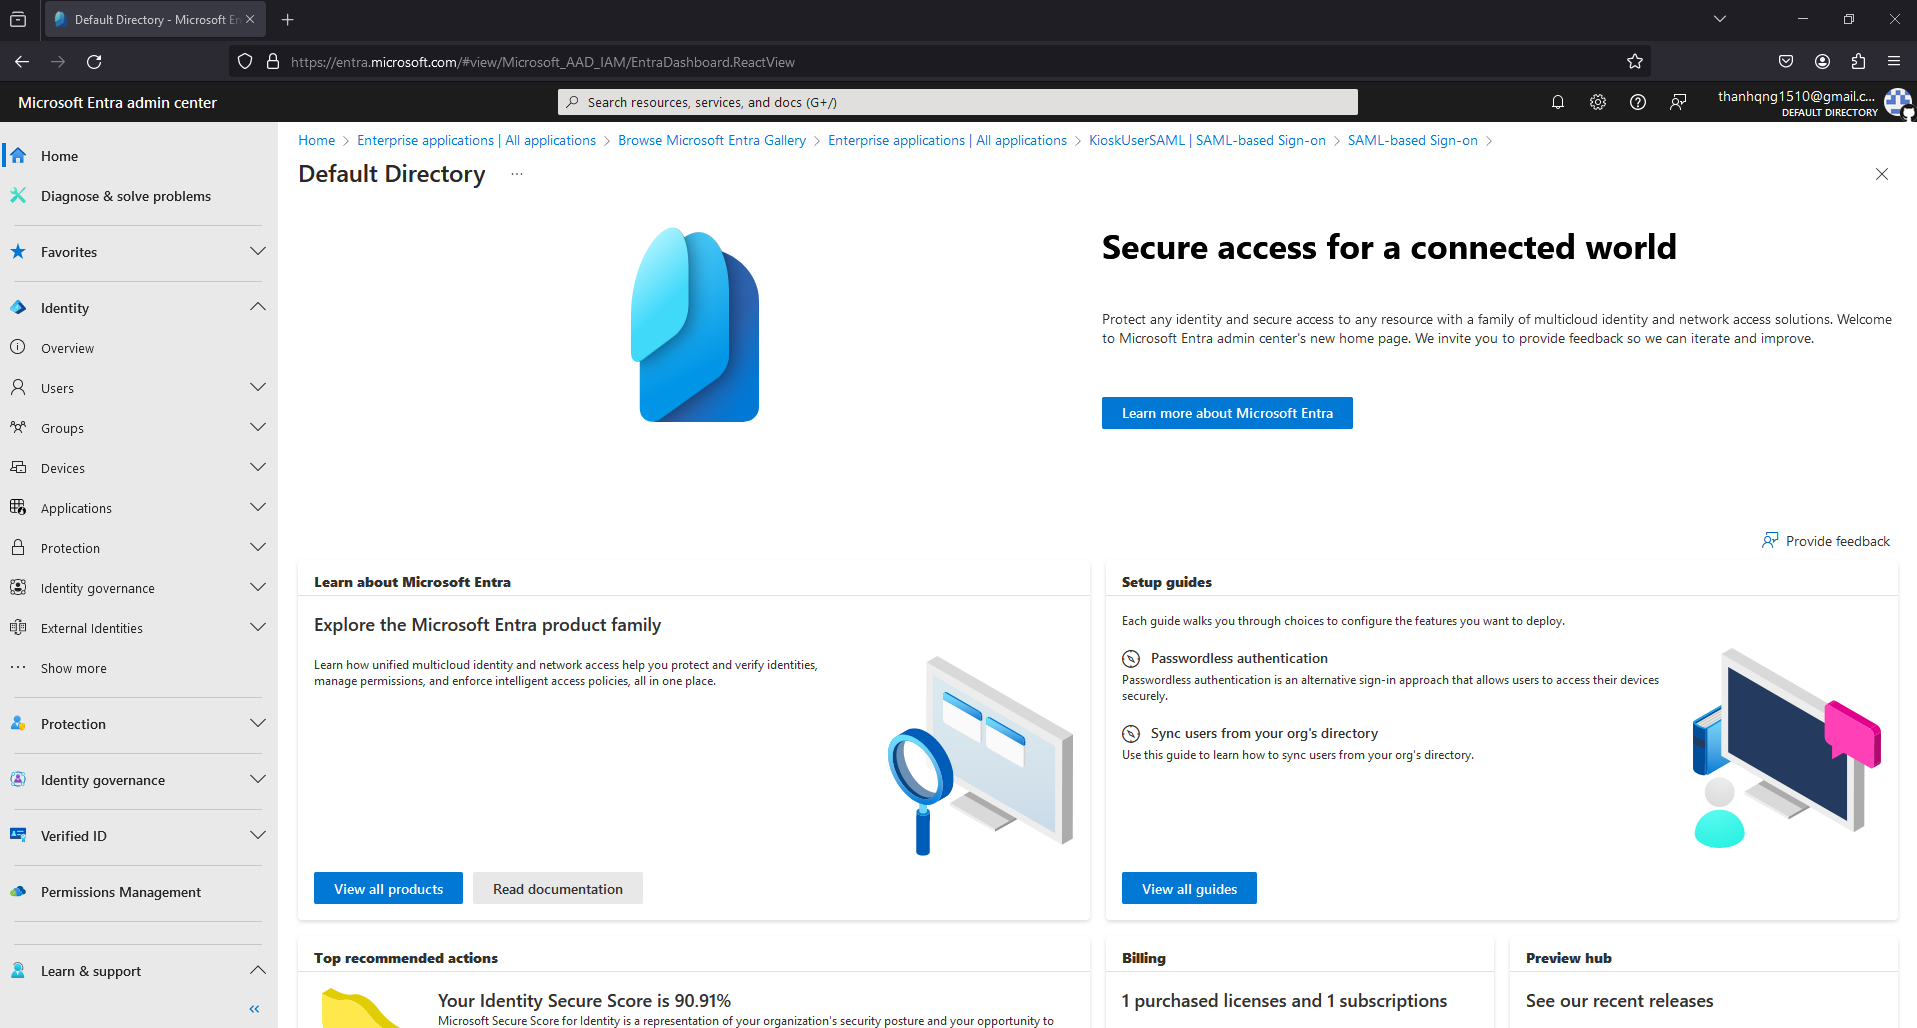
Step 2. Navigate to the Identity > Applications > Enterprise applications section.
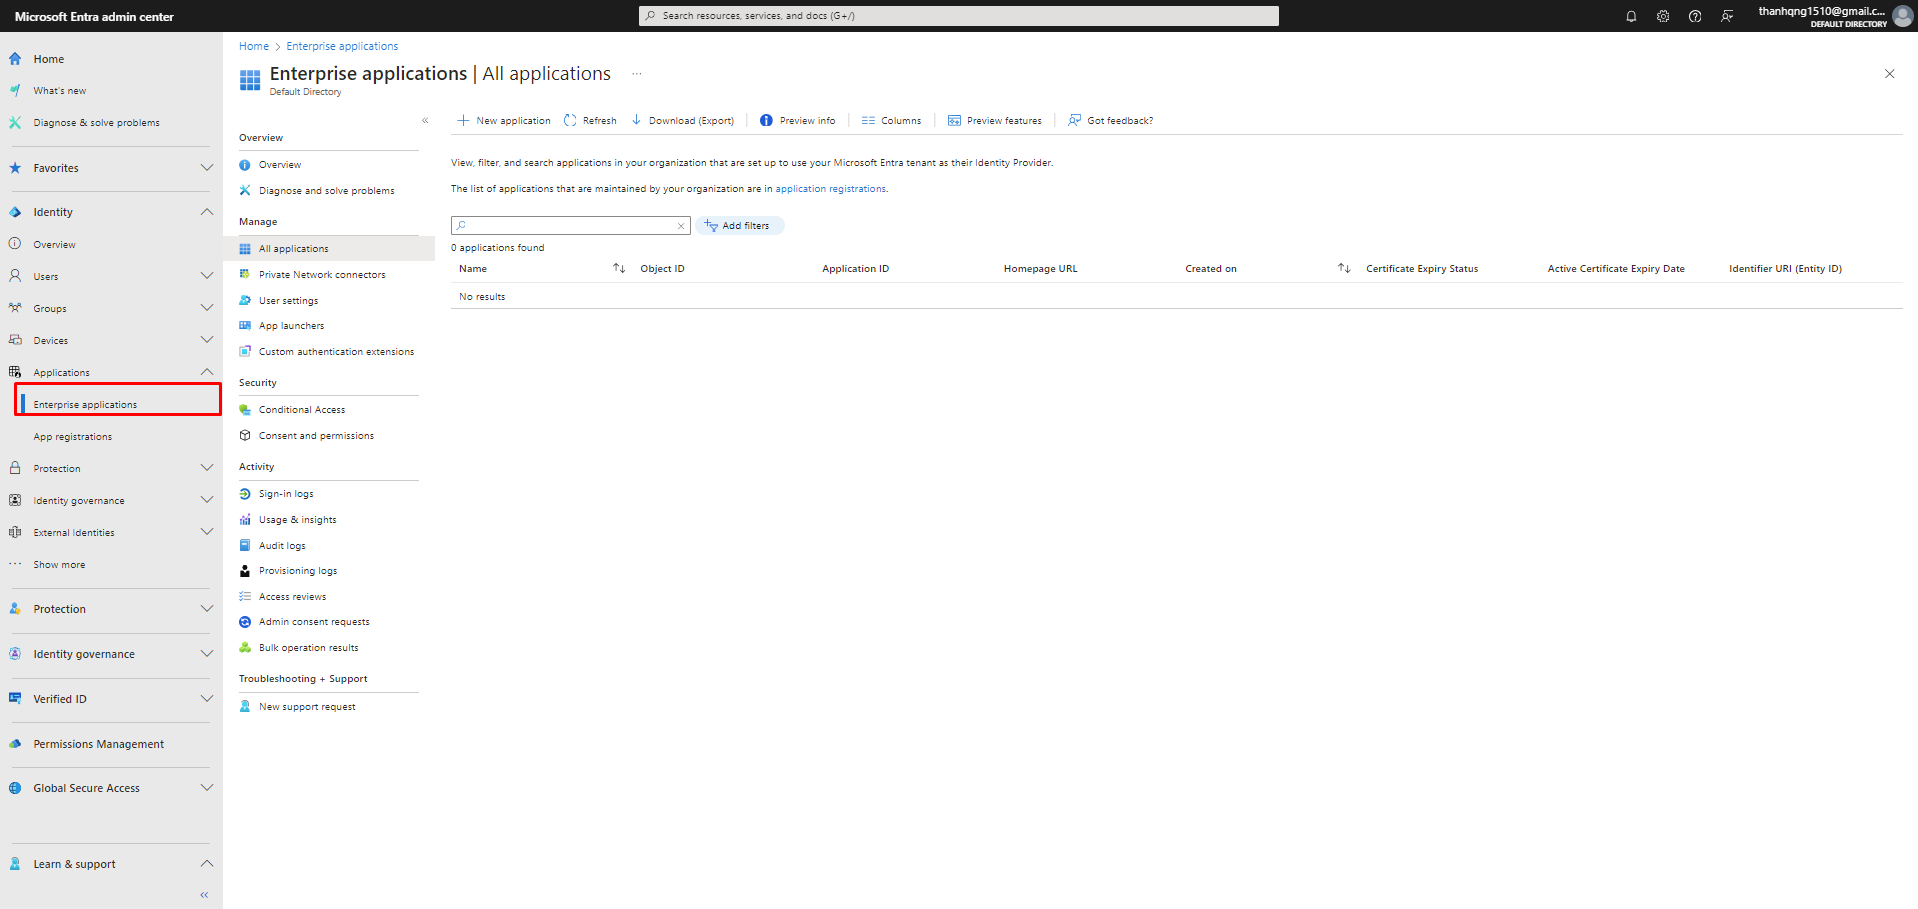
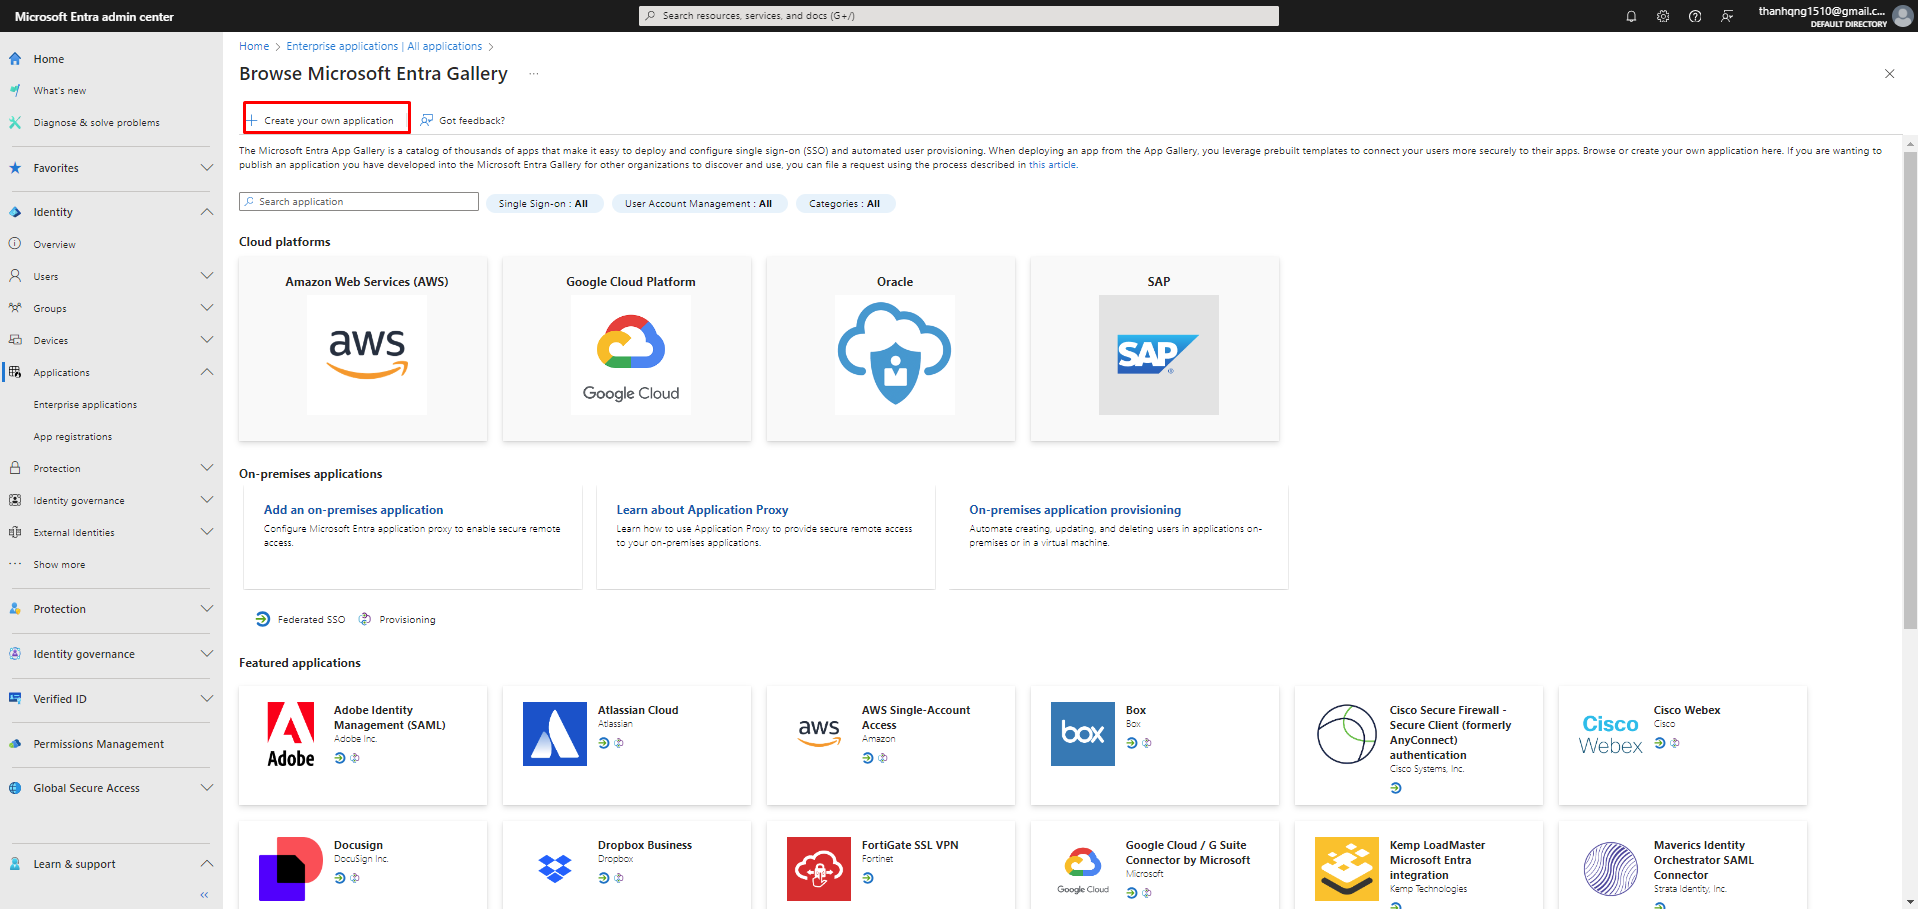
Step 3. Select New application and choose the Create your own application option.
Step 4. Assign a descriptive name for your application and select Integrate any other application you don't find in the gallery (Non-gallery).
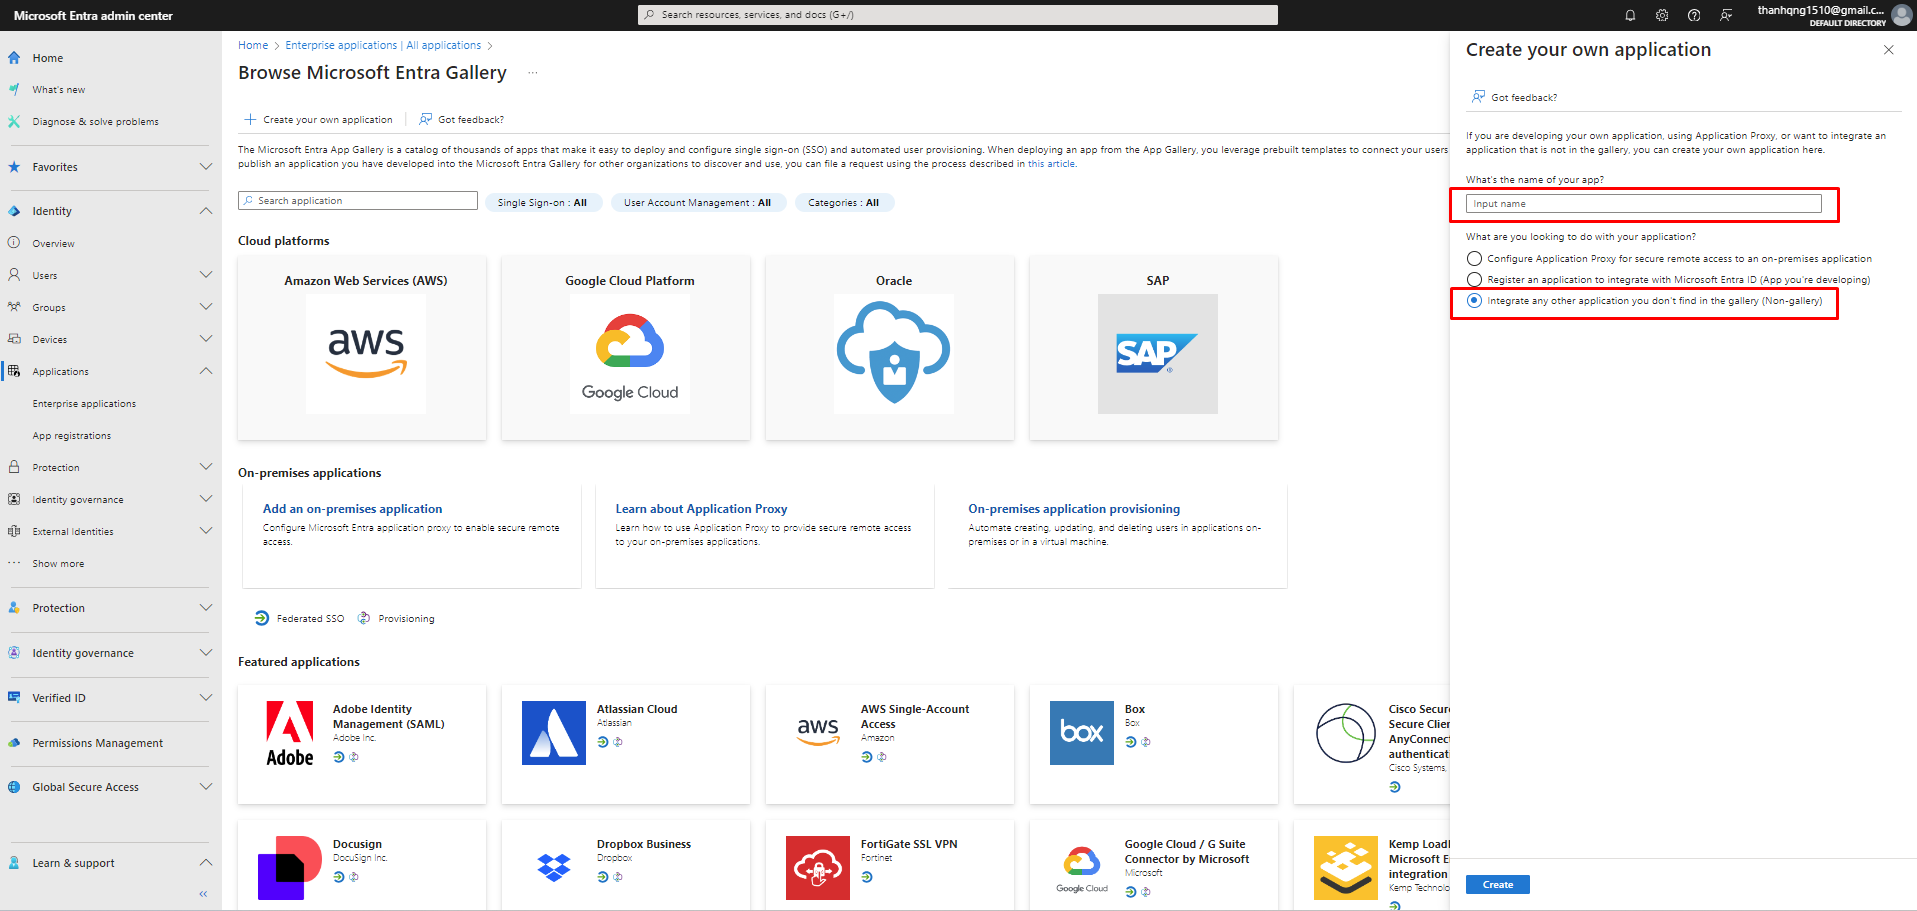
Step 5. Click Create to complete the application registration process.
2. User Assignment on Entra ID
Step 1. Navigate to the created application overview page.
Step 2. Select Users and groups.
Step 3. Click Add users/groups.
Step 4. Choose the users or groups you intend to grant access to the application and click Assign to complete the user assignment process.
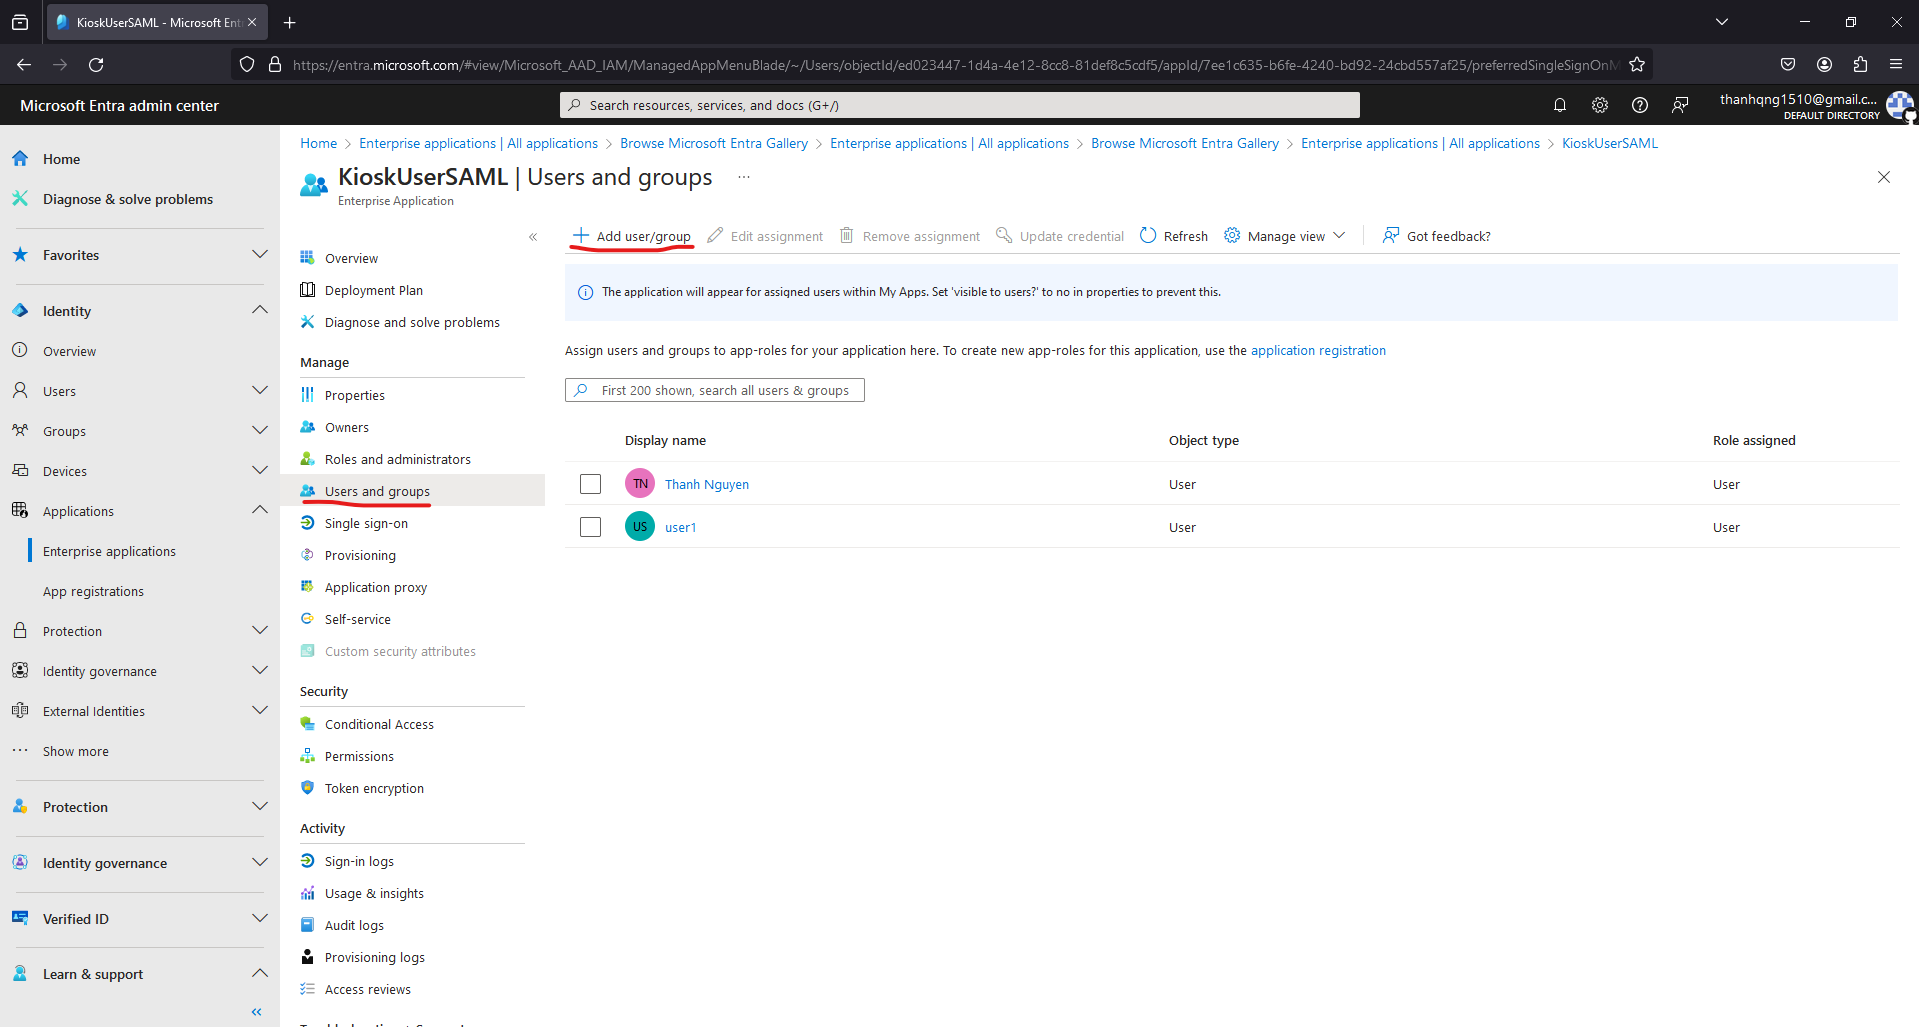
3. Get App Federation Metadata Url
Step 1. Within the application overview page, navigate to the Single sign-on section.
Step 2. Choose SAML as the designated mode.
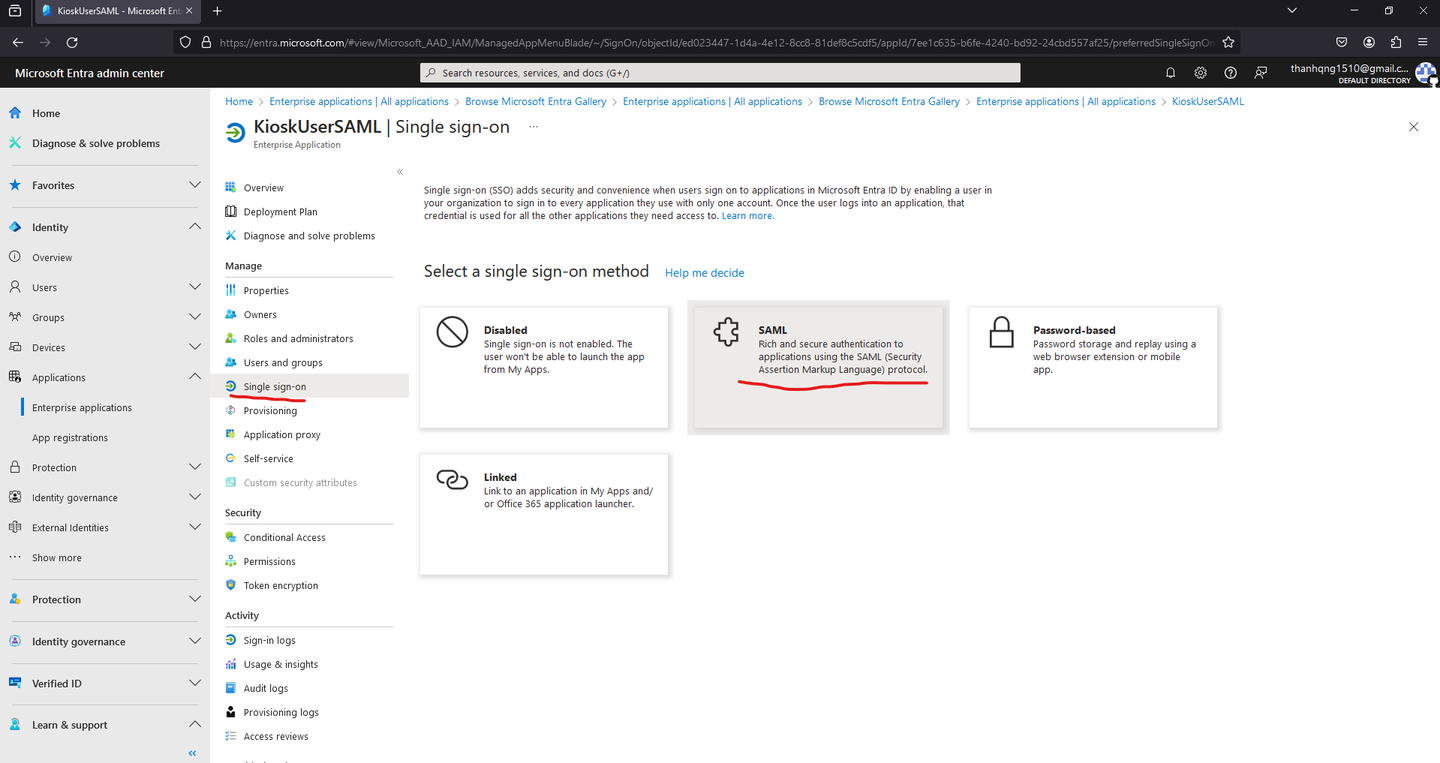
Step 3. Scroll down to section 3 (SAML Certificates), and copy the App Federation Metadata Url.
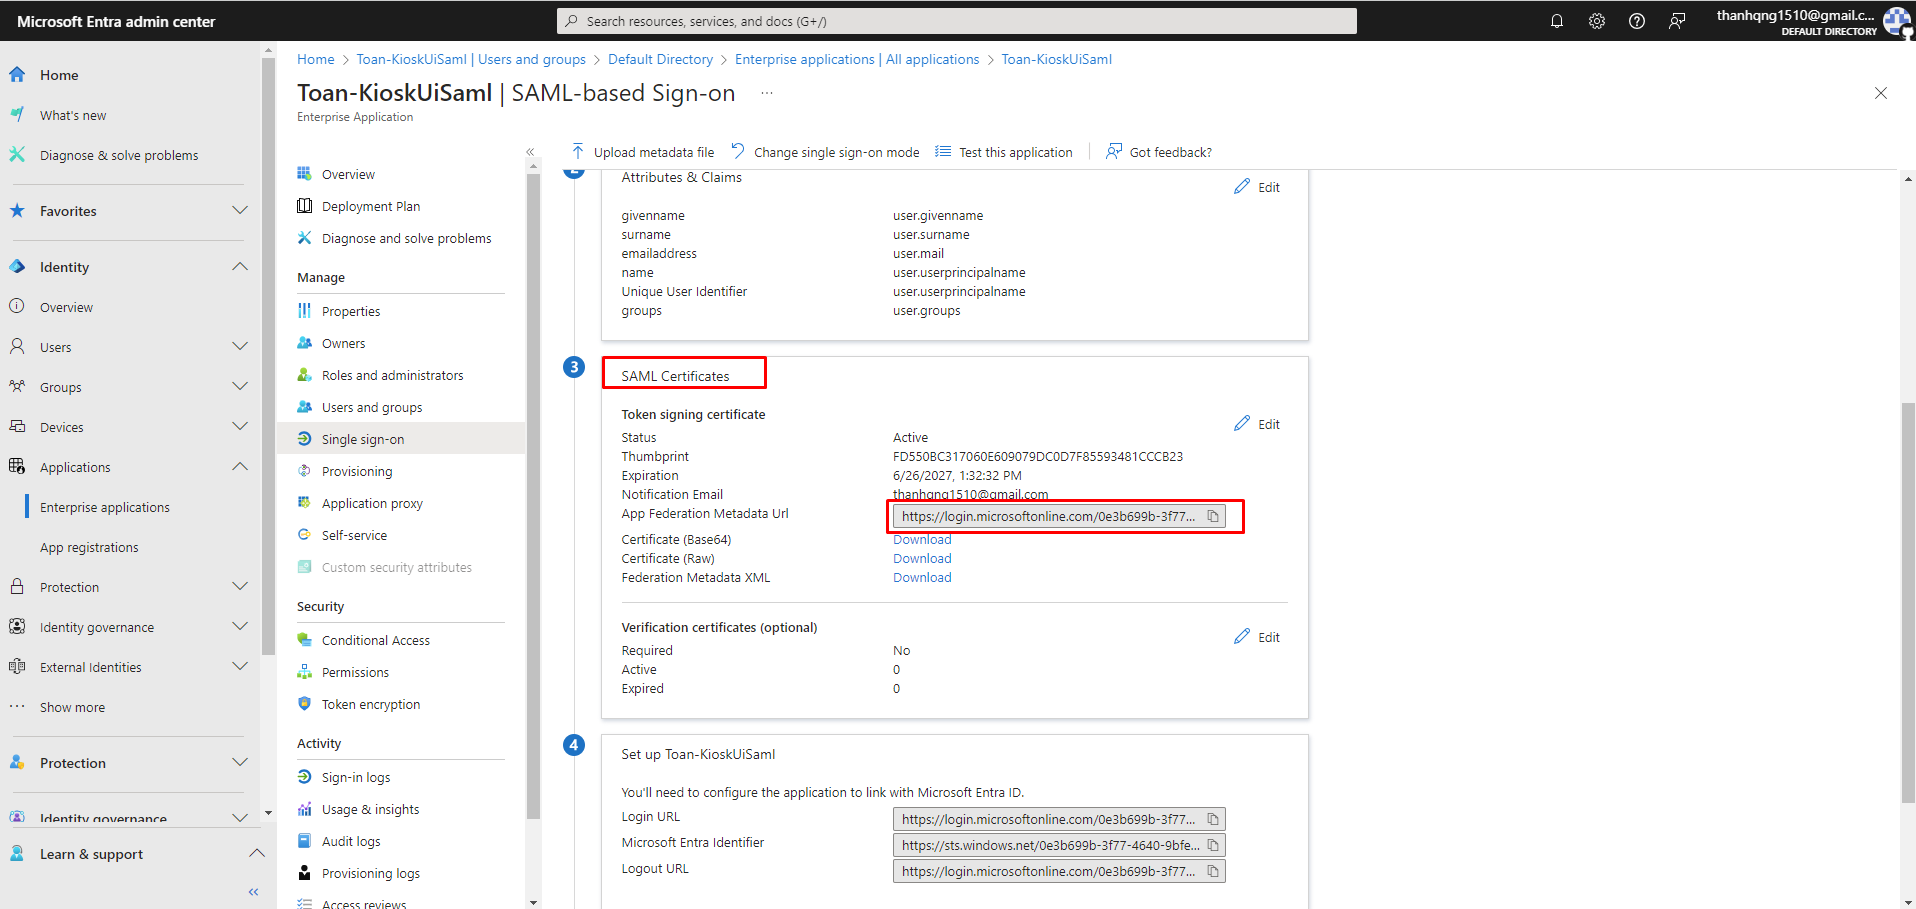
4. Configuration on WebMC
4.1. Set up authentication method for KIOSK UI
Step 1. Switch to the Kiosk Console Management, login with Administrative account, navigate to Workflows > Set Default Login Method
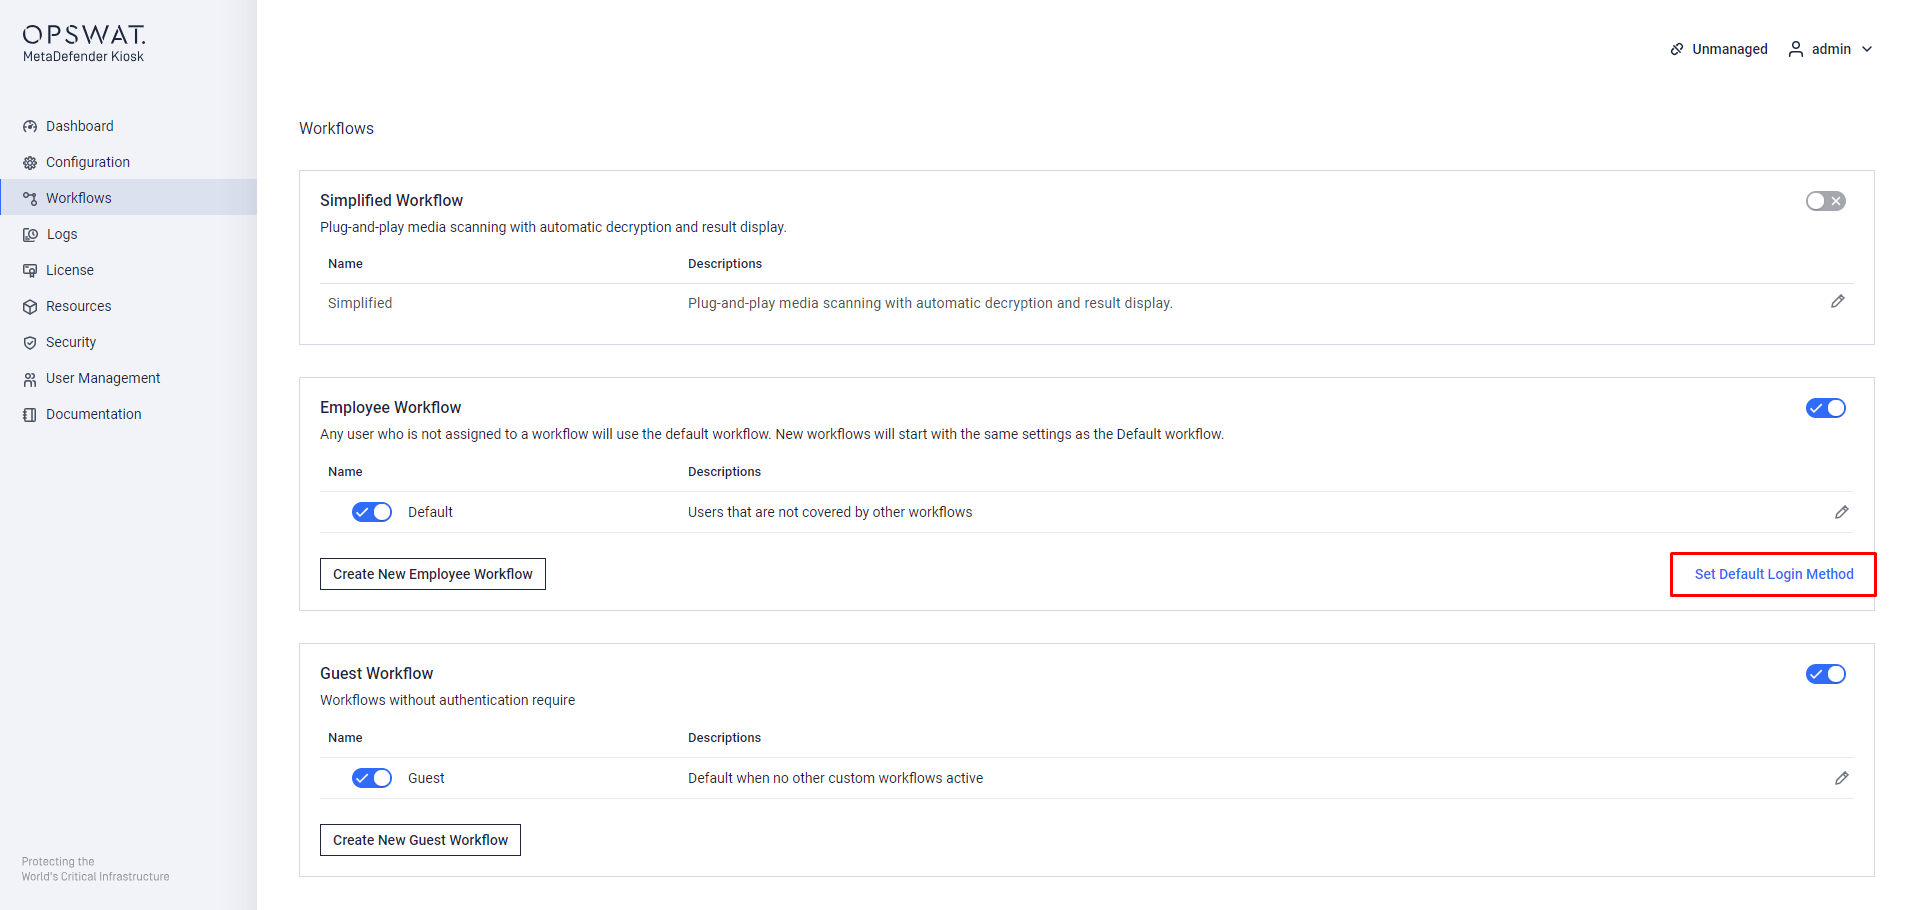
Step 2. Select Microsoft Entra ID on MetaDefender Kiosk Authentication
Step 3. Assign a descriptive name and paste the App Federation Metadata Url earlier to the Metadata URL. If setup properly, an identifier will appear.
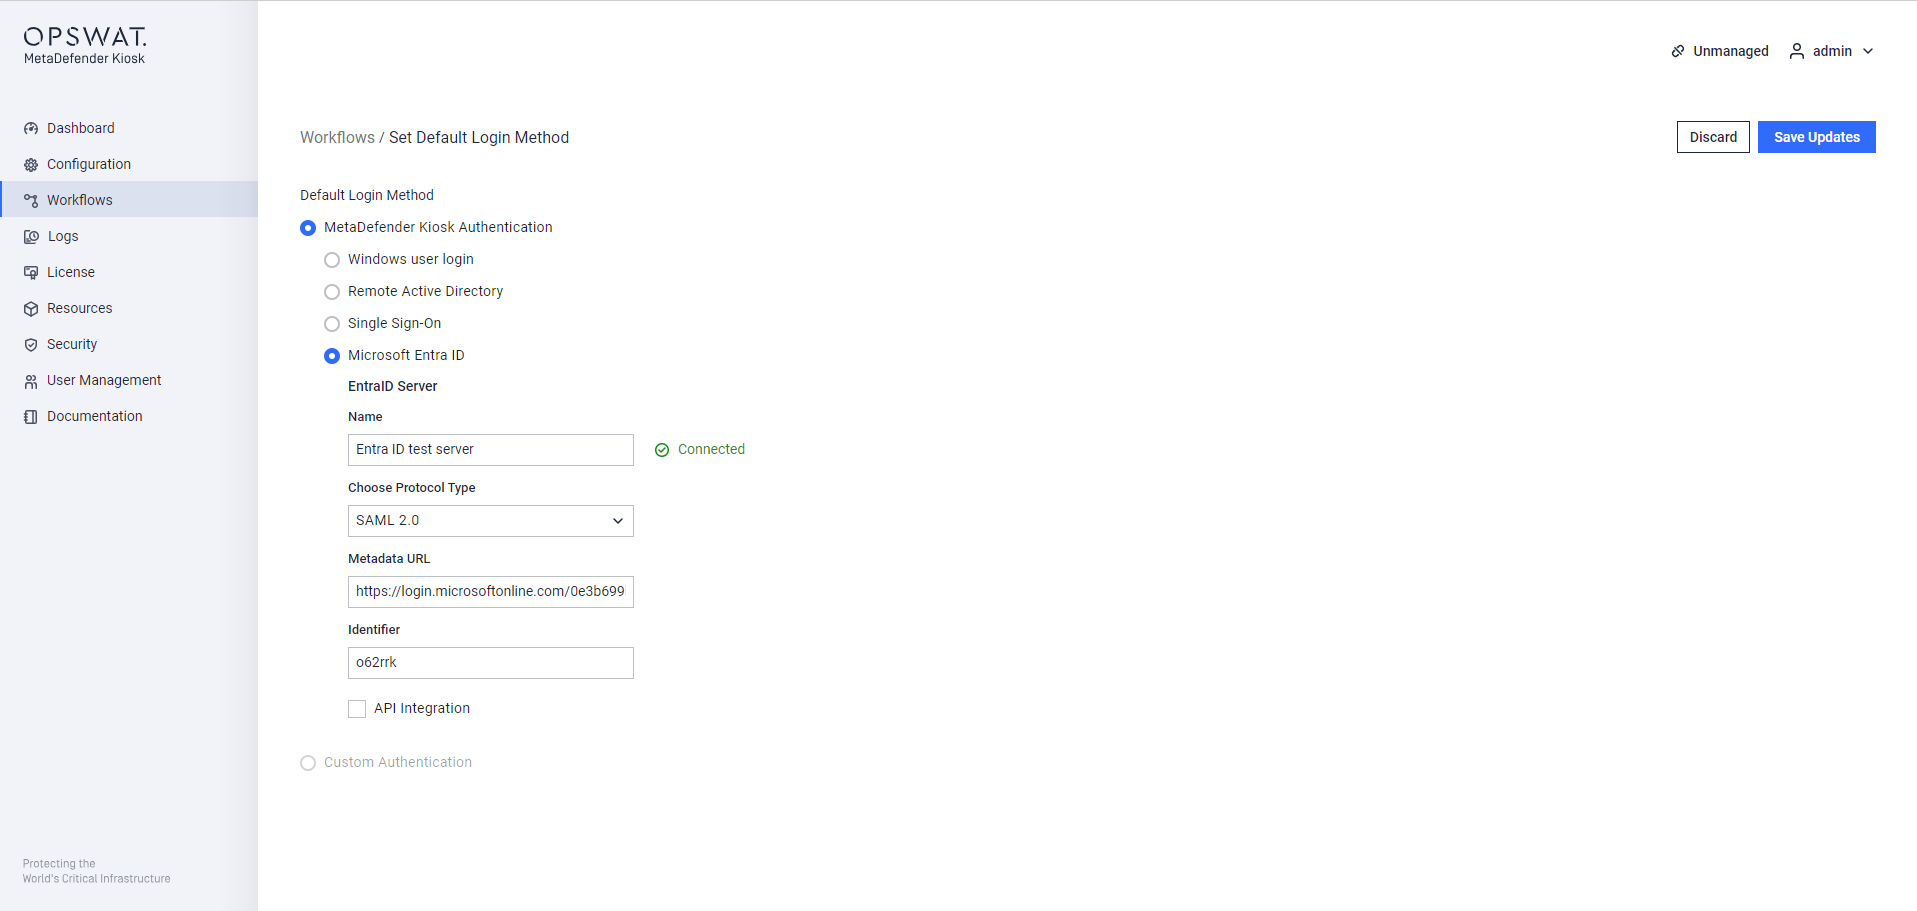
Step 4. Create the Login URL with the provided Identifier value following the format:
<http/https>://localhost:<port>/metadefender_rest/uissologin/saml/<Identifier>
Substitute the placeholder enclosed in angle brackets <> with the present configuration of the Kiosk Console Management server and the identifier value you previously copied. "localhost" must not be modified.
Step 5. Copy the Login URL for 5. Configuring SAML Single Sign-On
API Integration is an optional advanced feature to enable fetching users from Entra ID server for Workflows assignment and contact adding. See Integrate with Microsoft GraphAPI and fetching Users/Groups for more details.
Step 6. Click on Save Updates to apply the changes
4.1.1 Enable smartcard or Windows Hello sign-in for the Kiosk UI (optional)
Starting in MetaDefender Kiosk 4.8.3, you can let users sign in to the Kiosk through Microsoft Entra ID using a smartcard or Windows Hello instead of typing a password.
Step 1. On the Set Default Login Method page, with Microsoft Entra ID selected as the sign-in method for the Kiosk UI, turn on Enable passkey authentication.
Step 2. Click Save Updates to apply the change.
Turning this setting on or off signs the current Kiosk session out and restarts the Kiosk. This is expected — it happens once, right after you save the change, and lets the Windows sign-in prompt (for example, a PIN entry box) appear correctly during smartcard or Windows Hello sign-in afterward.
This option only appears when the Kiosk UI's sign-in method is Microsoft Entra ID or another Single Sign-On provider. Your Entra ID tenant (or other identity provider) must already be configured to accept smartcard or Windows Hello sign-in for the users who will use it — that setup happens on the identity-provider side and isn't part of Kiosk configuration.
4.2. Set up authentication method for KIOSK WebMC
Step 1. Switch to the Kiosk Console Management, login with Administrative account, Navigate to User Management > User Directories > Add new directory
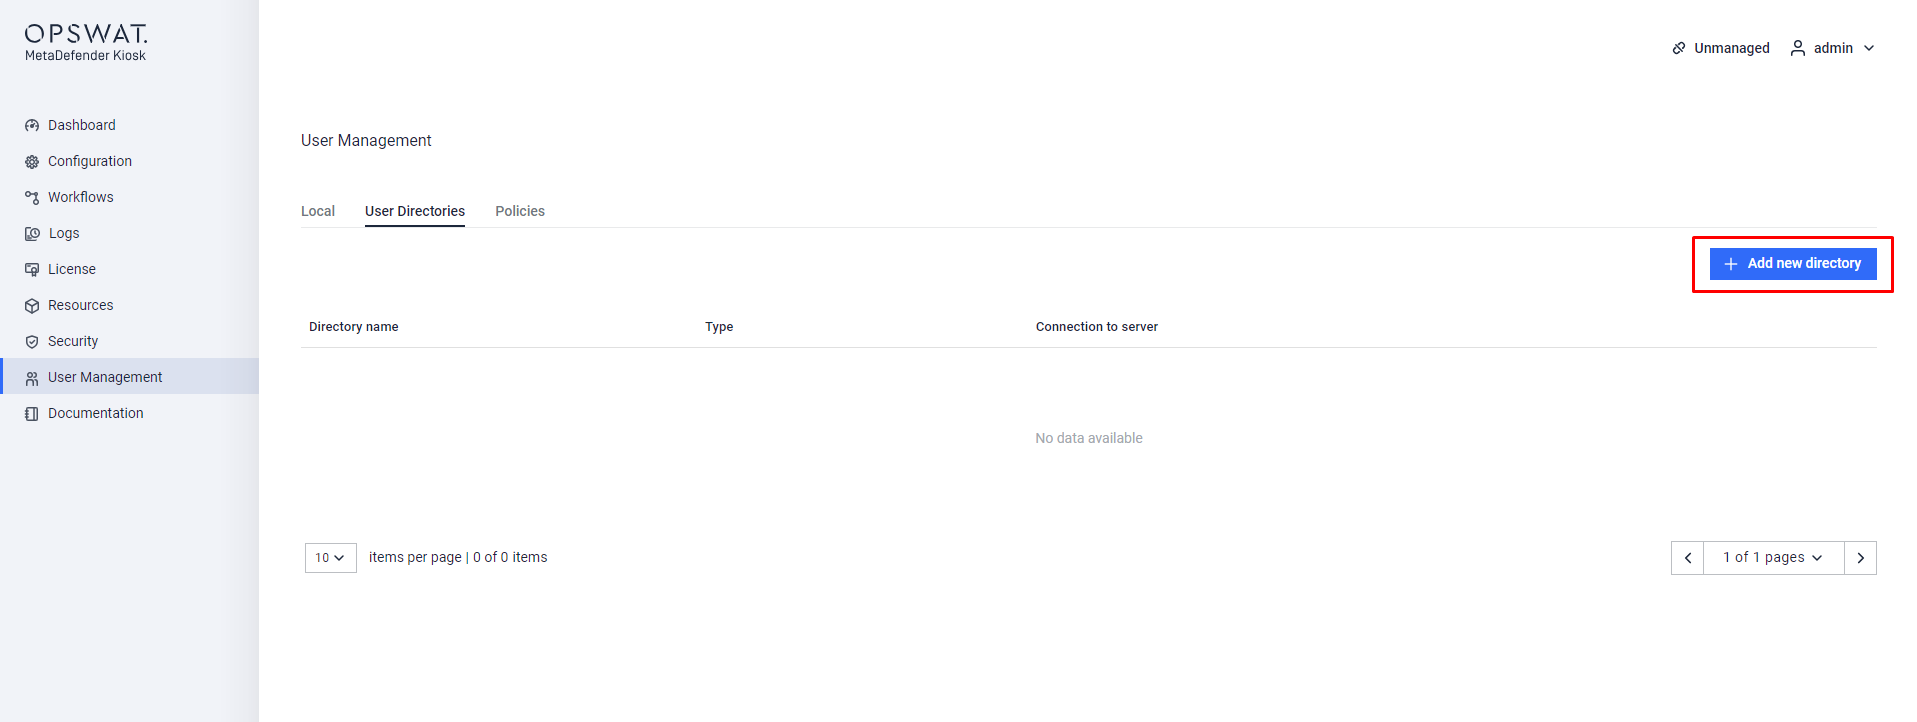
Step 2. Select Microsoft Entra ID type
Step 3. Assign a descriptive name and paste the App Federation Metadata Url earlier to the Metadata URL.
Step 4. Input Host or IP as your KIOSK WebMC remote access URL following the format:
<http/https>://localhost:<port>/metadefender_rest/ssologin/saml/<Identifier>
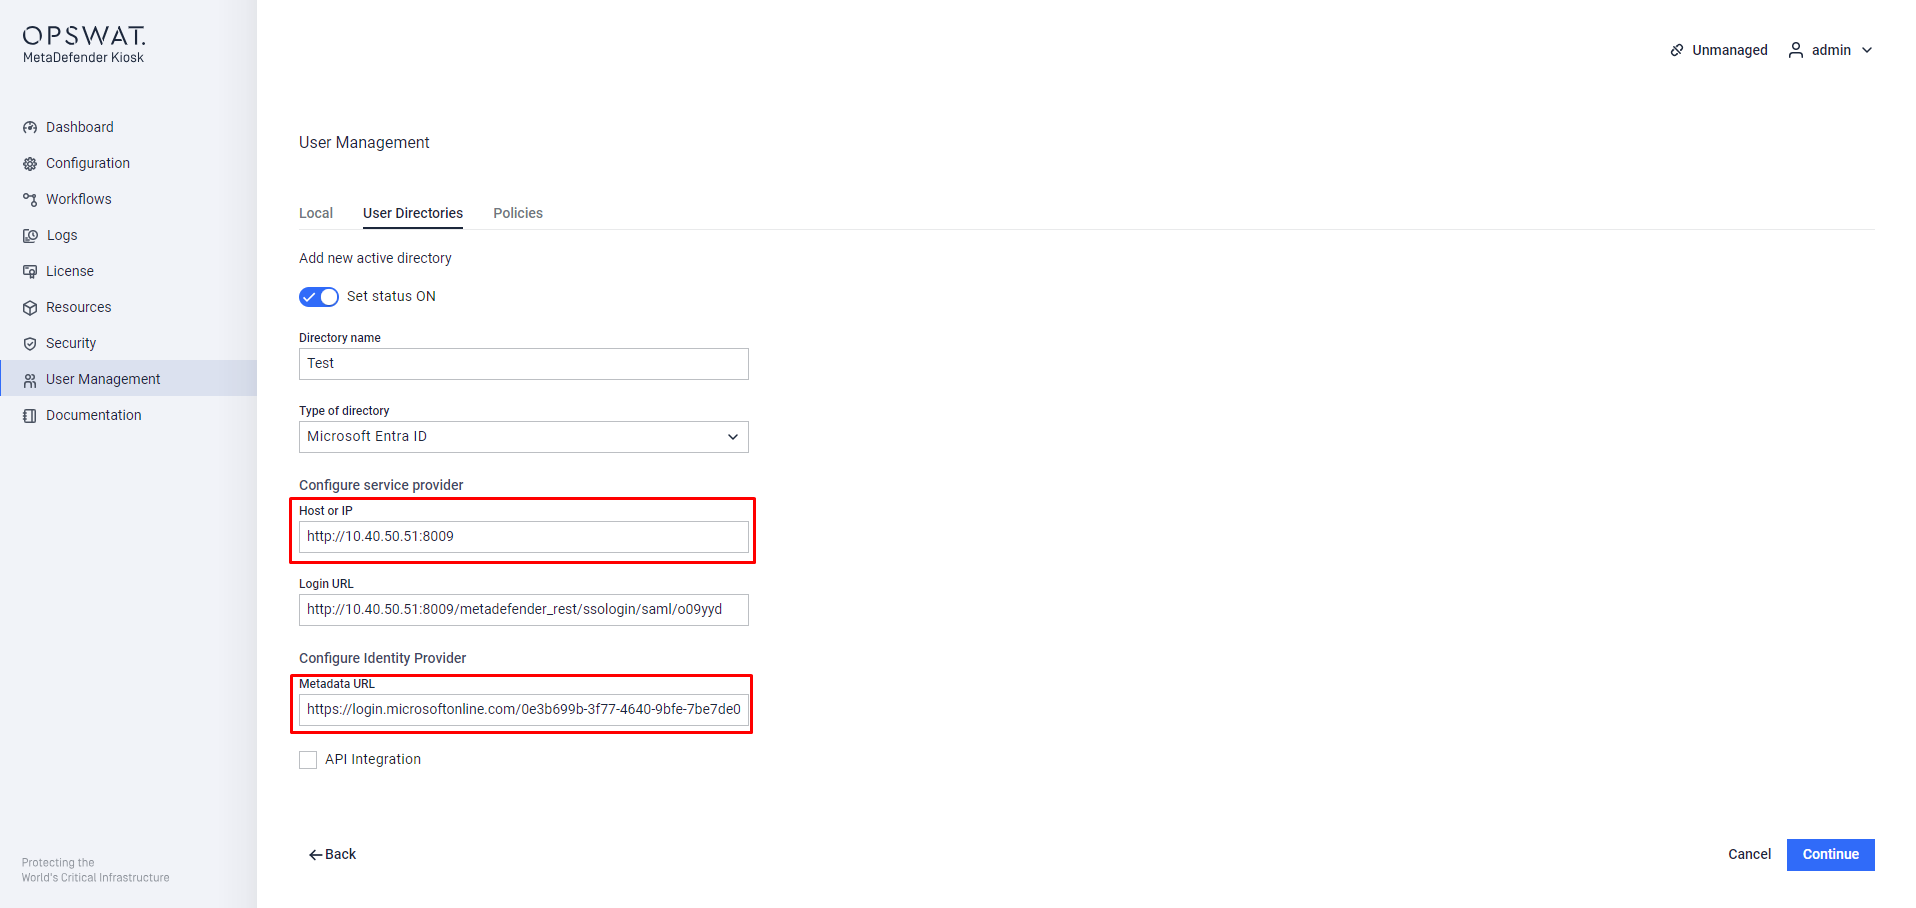
Step 5. Copy the Login URL for step 5. Configuring SAML Single Sign-On
API Integration is an optional advanced feature to enable fetching users from Entra ID server for Workflows assignment and contact adding. See Integrate with Microsoft GraphAPI and fetching Users/Groups for more details.
Step 6. Click Continue and finish steps for intial setup
5. Configuring SAML Single Sign-On
5.1. Basic SAML Configuration
Step 1. Switch back to the Microsoft Entra admin center, in the Single sign-on section. Scroll up to section 1 (Basic SAML Configuration), click on Edit.
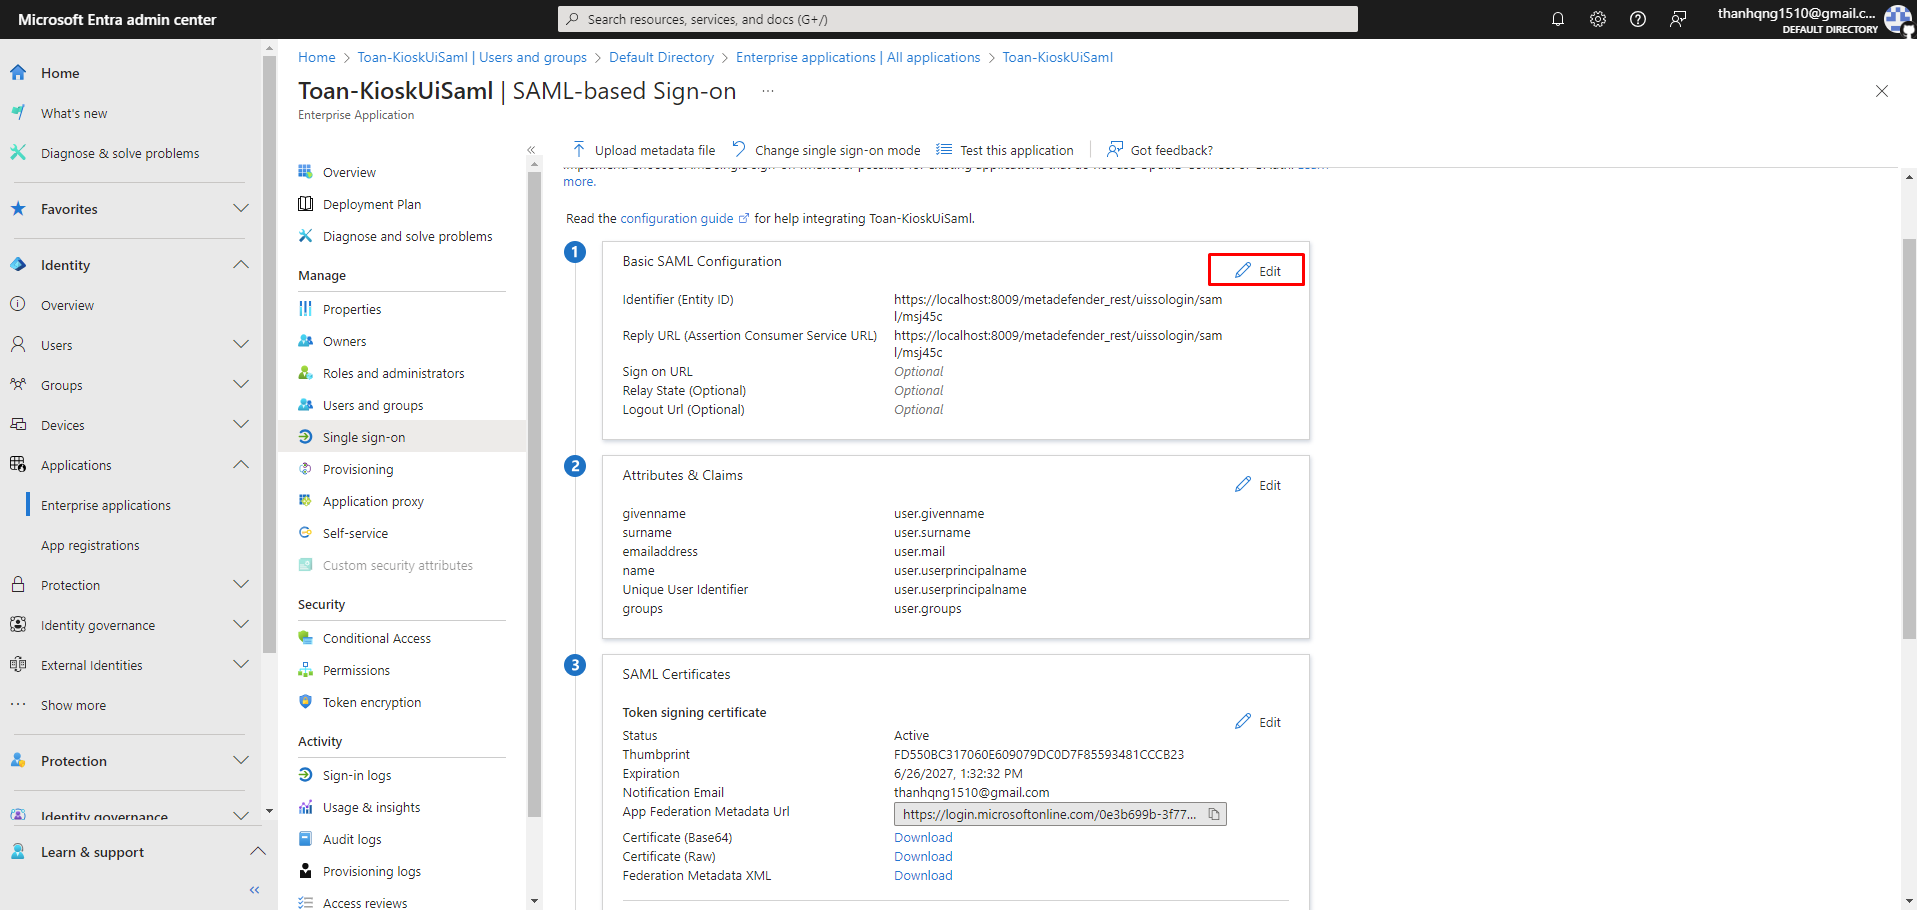
Step 2. Within field Identifier (Entity ID) and Reply URL (Assertion Consumer Service URL), enter the Login URL that copied earlier.
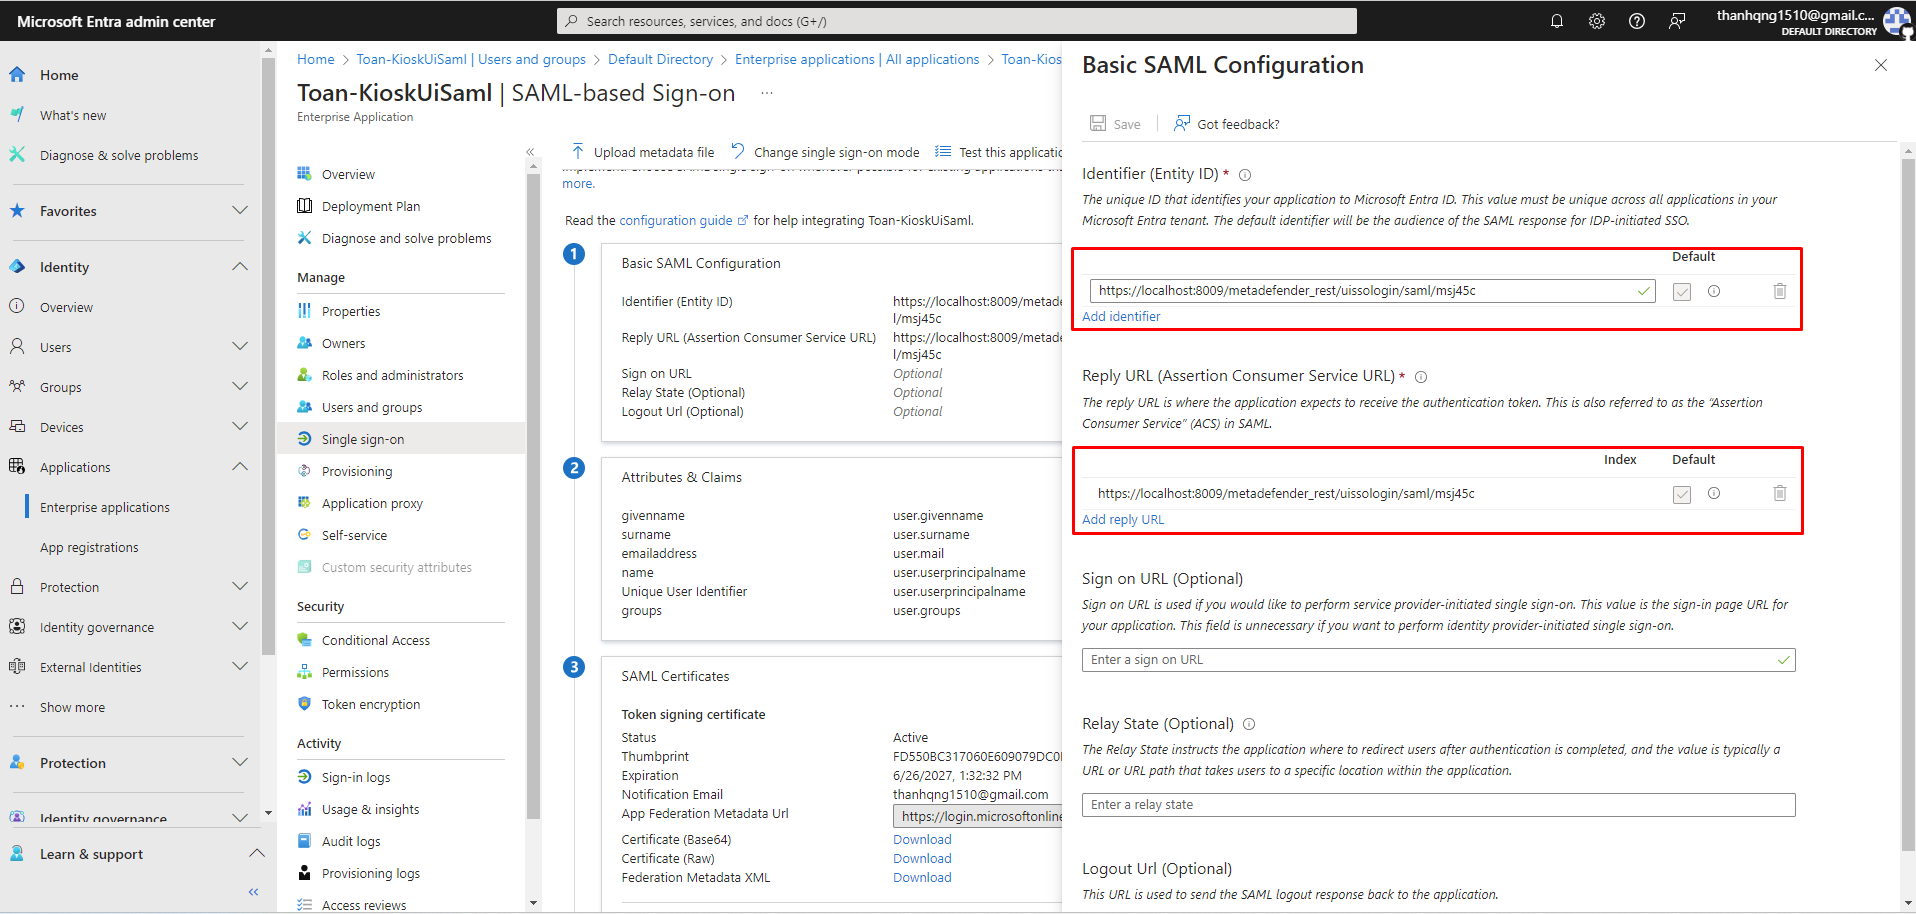
Step 3. Click Save to finalize the SAML configuration.
5.2 Enable groups to login to SAML SSO
The following steps need to be completed if you want all users of a group are able to login into your application
Step 1. Edit Attributes & Claims for Group assigning
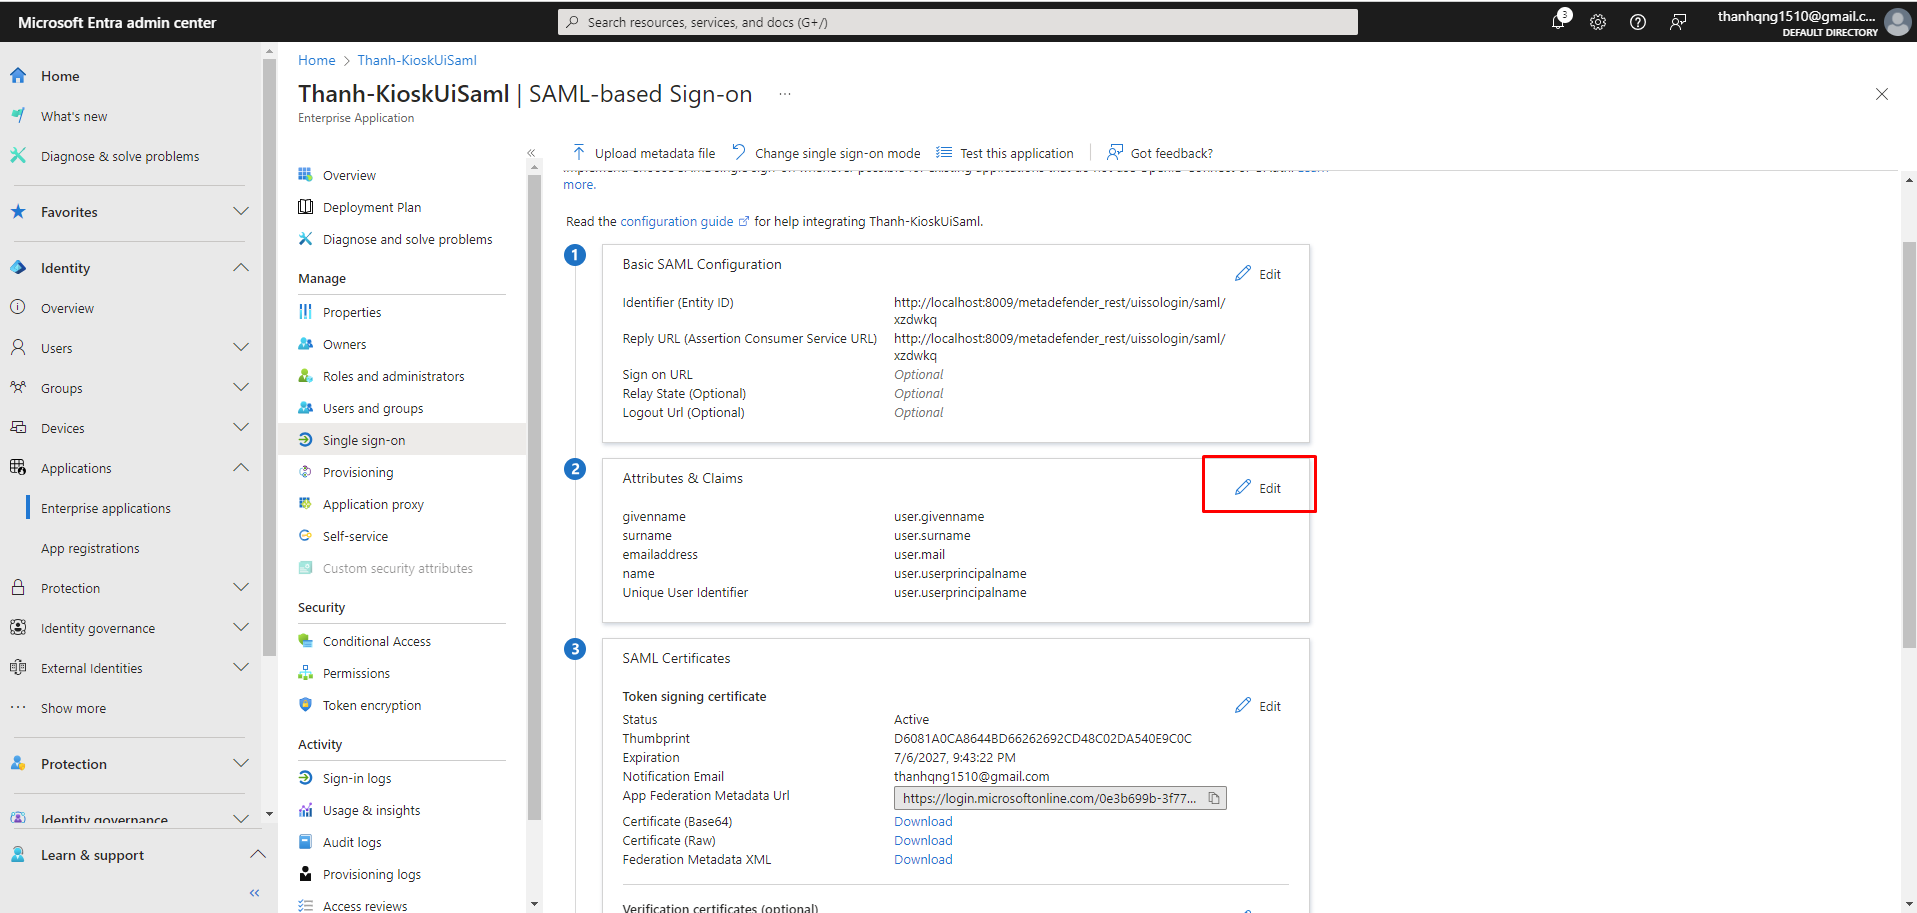
Step 2. Click on Add a group claim
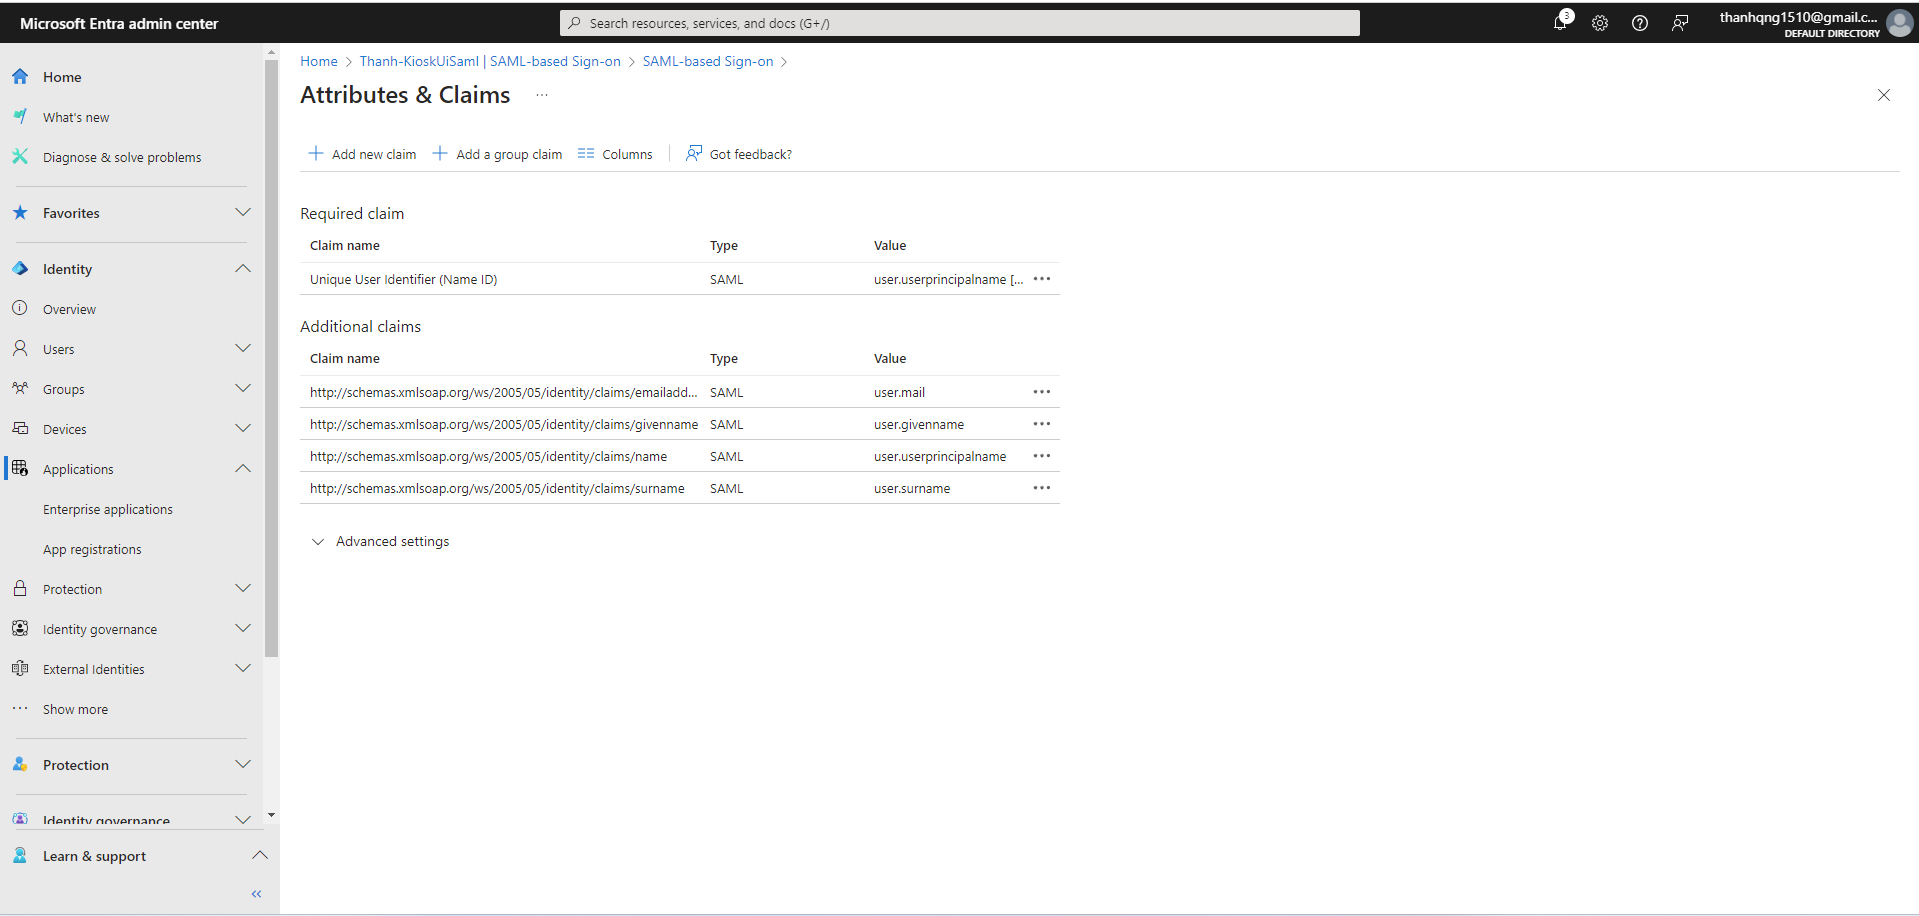
Step 3. Configure the Group Claims as following and click Save
6. User assignment configuration on WebMC
KIOSK supports user assignments after finishing the integration by:
Manual adding with the UPN and Display Name
Add from User/Group available to add with API Integration is enabled.
6.1. User Assignment for login to KIOSK UI
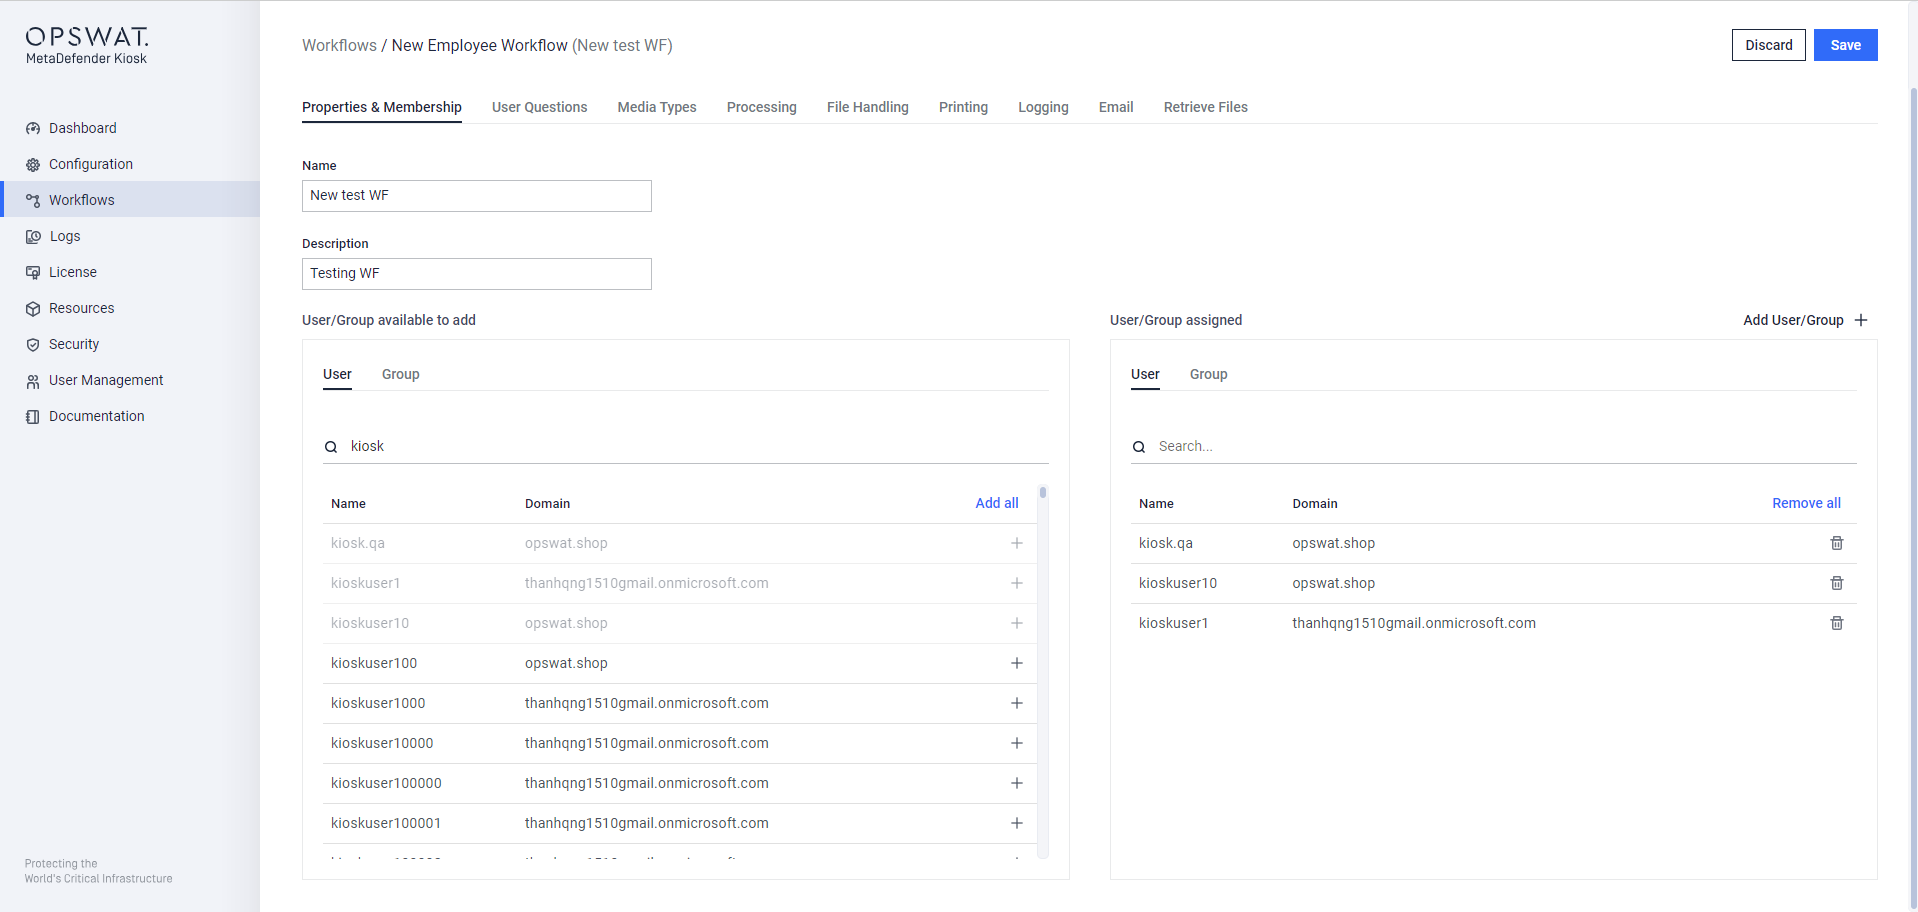
You can assign the user/group to the specific Workflows of KIOSK by adding on Workflows > Create/Edit Workflow > Properties & Membership
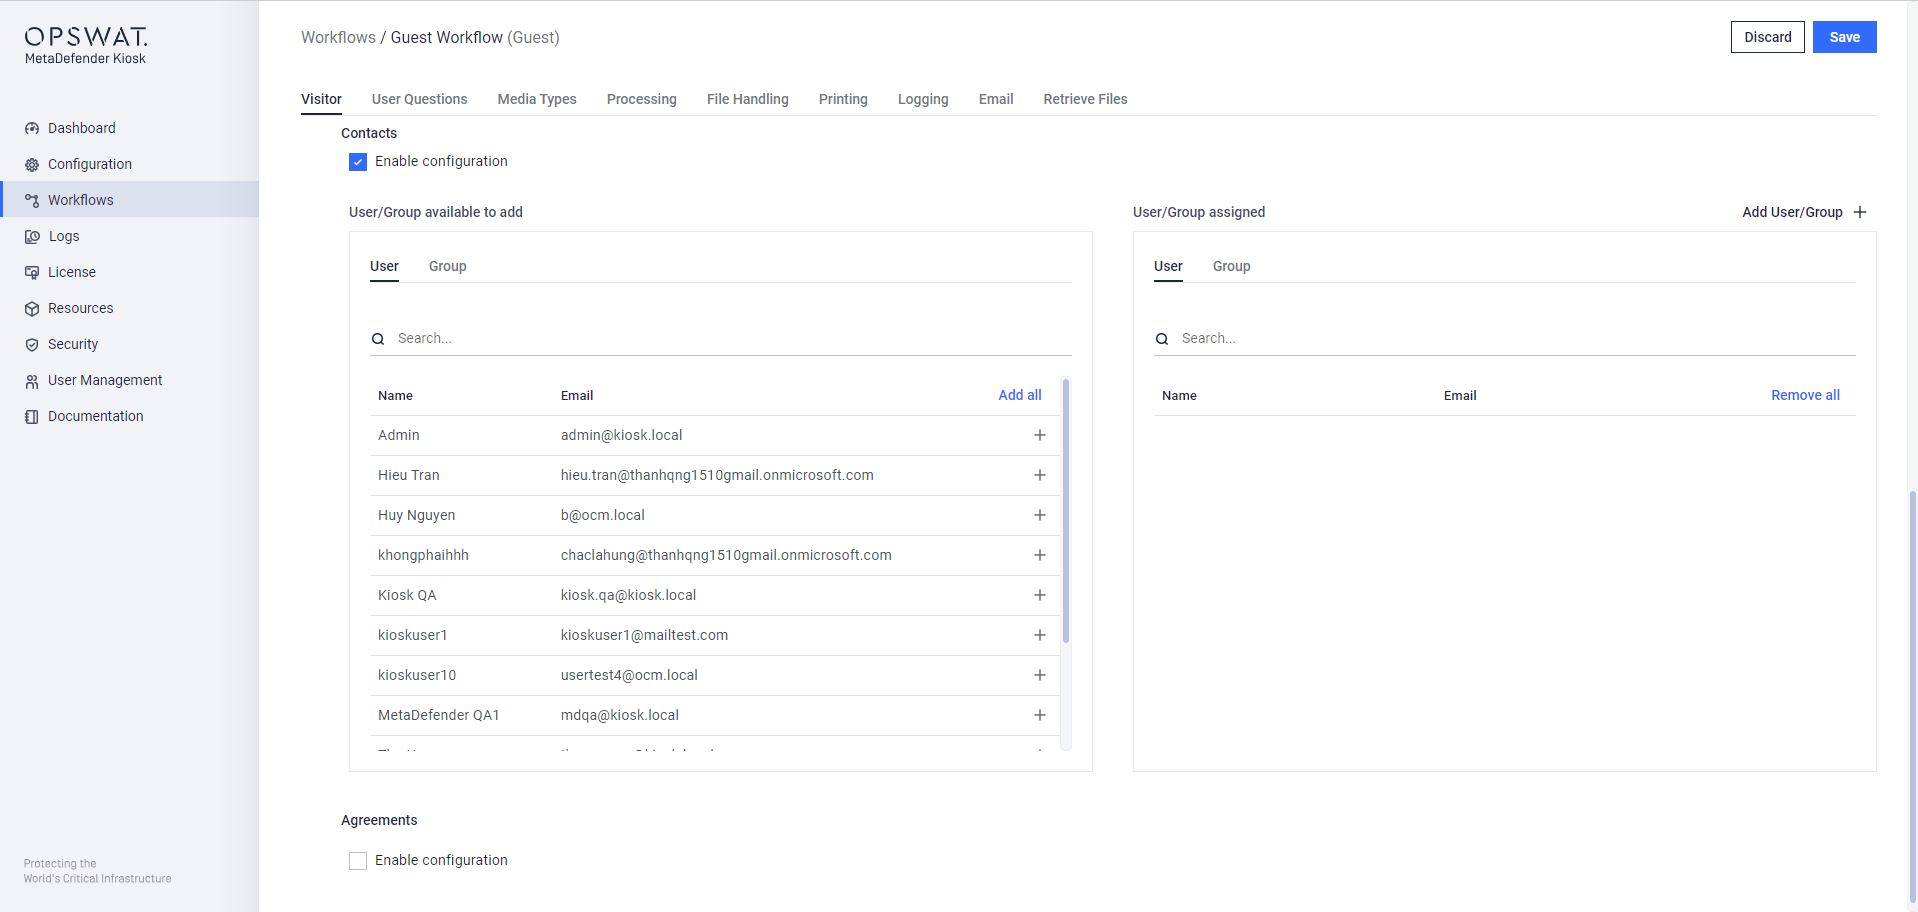
You can add the user/group as reference contact of visitor on KIOSK UI at Workflows > Guest workflows > Visitor > Contacts
6.2. User assignment for login to KIOSK WebMC
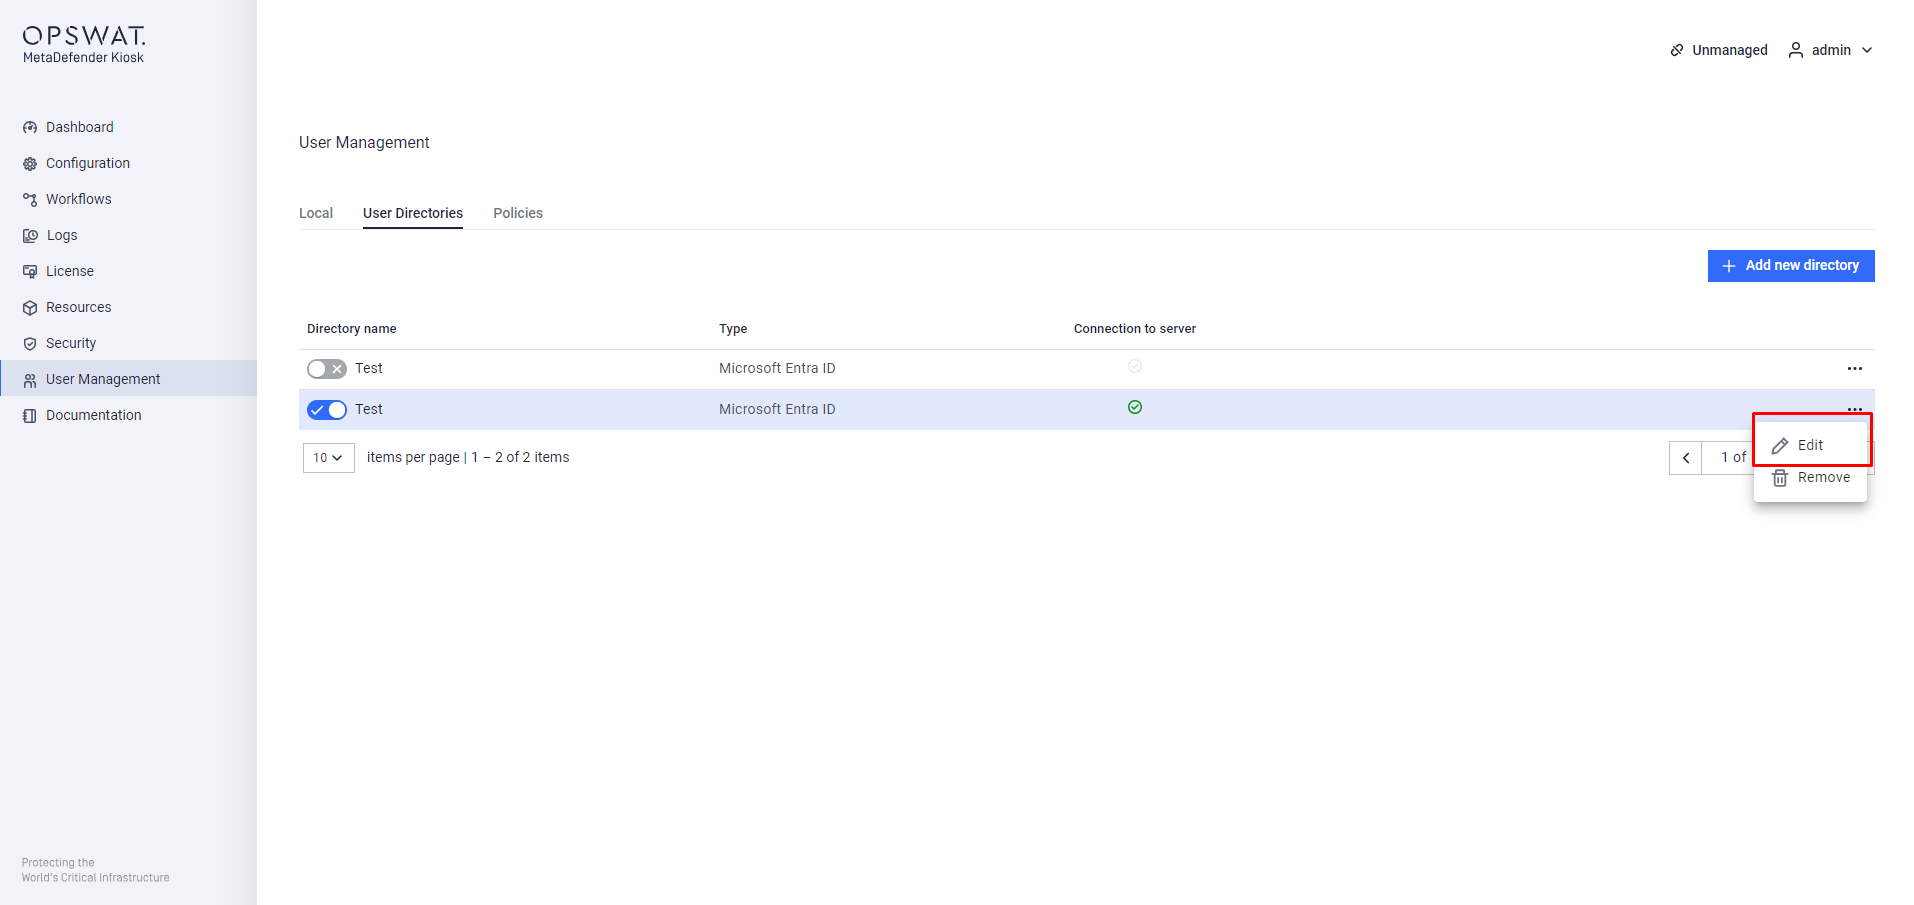
Step 1. Assign a user to specific role by navigating to User Managerment > User Directories > Edit
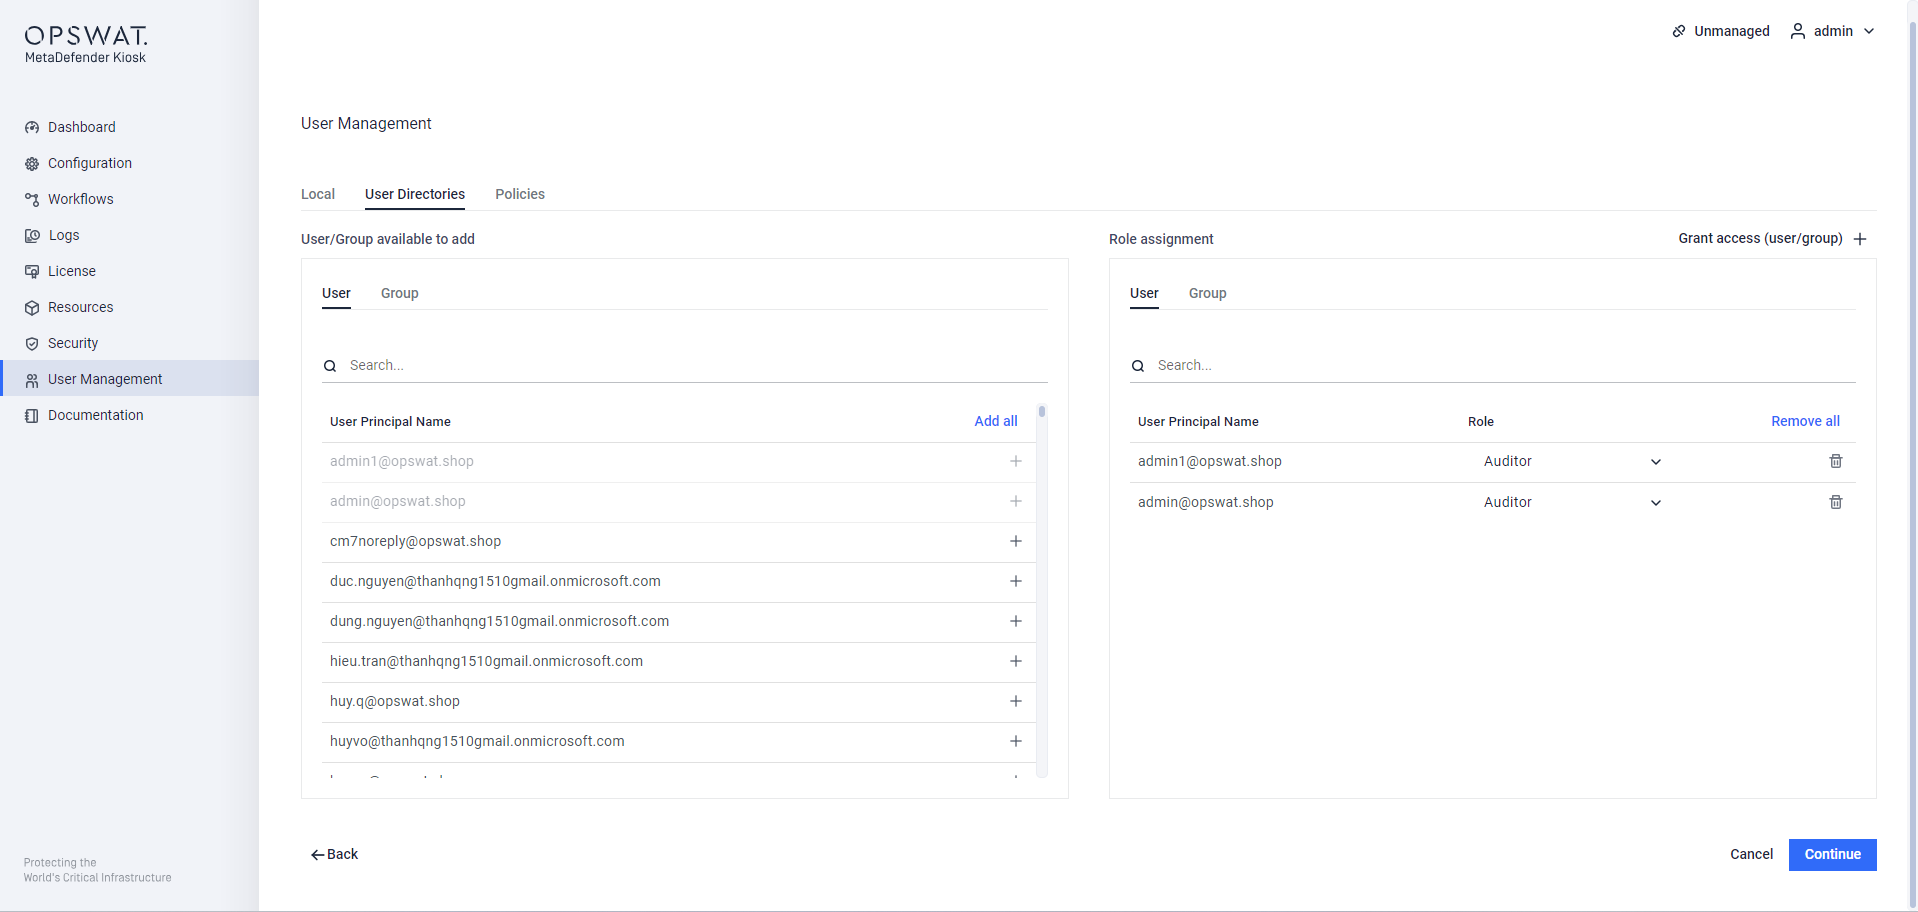
Step 2. Click on Continue, select Role matching option
Step 3. Click Coninue and finish the settings.
Integrate with Microsoft GraphAPI and fetching Users/Groups
The optional feature "API Integration" enables KIOSK deeply integrate with Microsoft Entra ID to get the users from the Microsoft Entra ID server and put to User/Groups available to add section for Workflows assignment or Contacts visitor adding.
Ensure proper permissions were configured for the API
User.Read.All permission to query users from the tenant.
Group.Read.All permission to query groups from the tenant.
GroupMember.Read.All permission to query users within groups.
1. GraphAPI Application Registration
KIOSK requires a separate application registration with specific permissions to access user and group information within a tenant.
Step 1. Access the Microsoft Entra admin center (Microsoft Entra admin center) using your administrative credentials. Navigate to the Identity > Applications > Enterprise applications section.
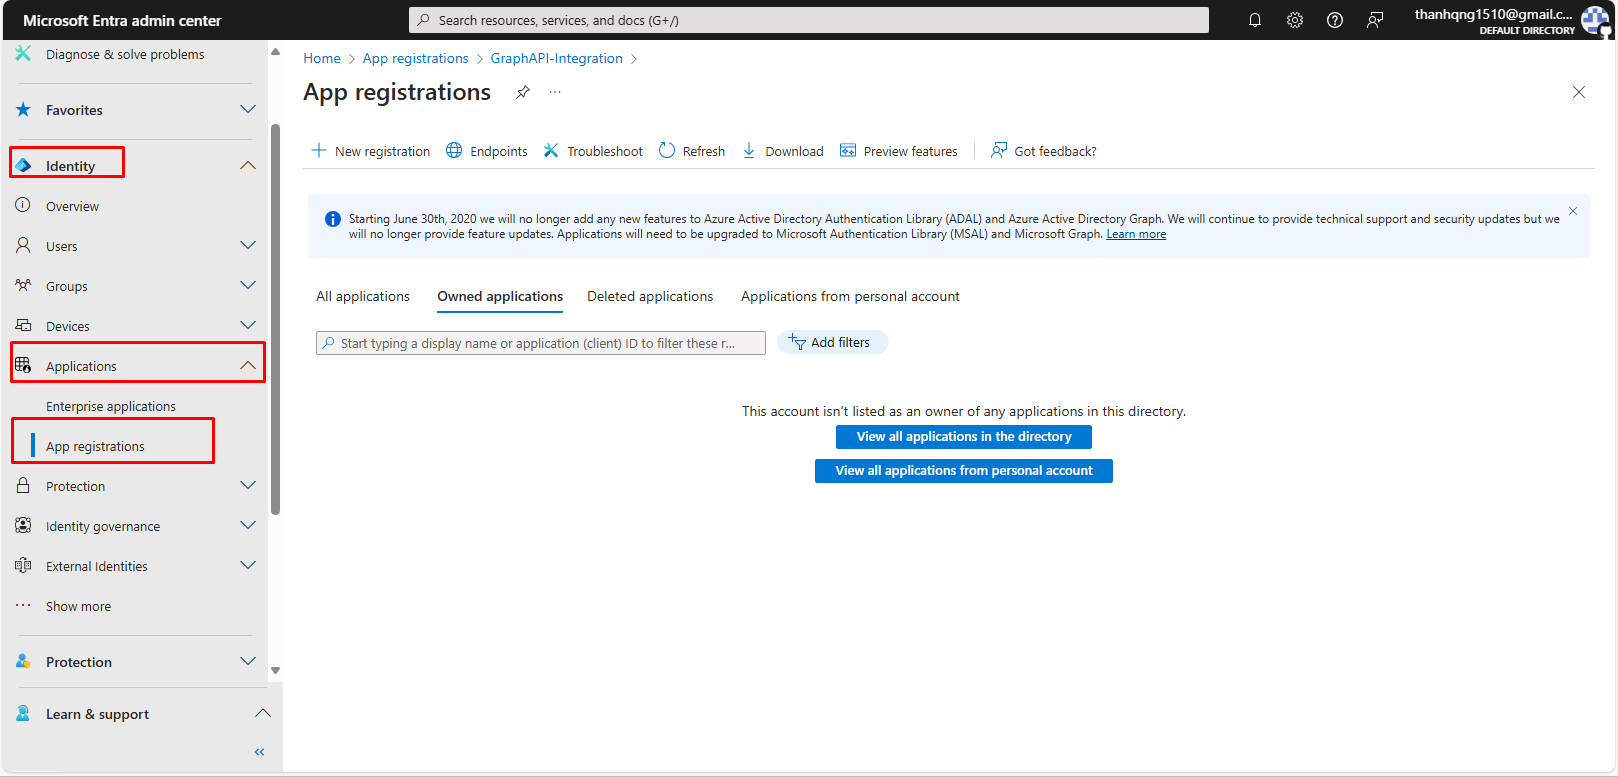
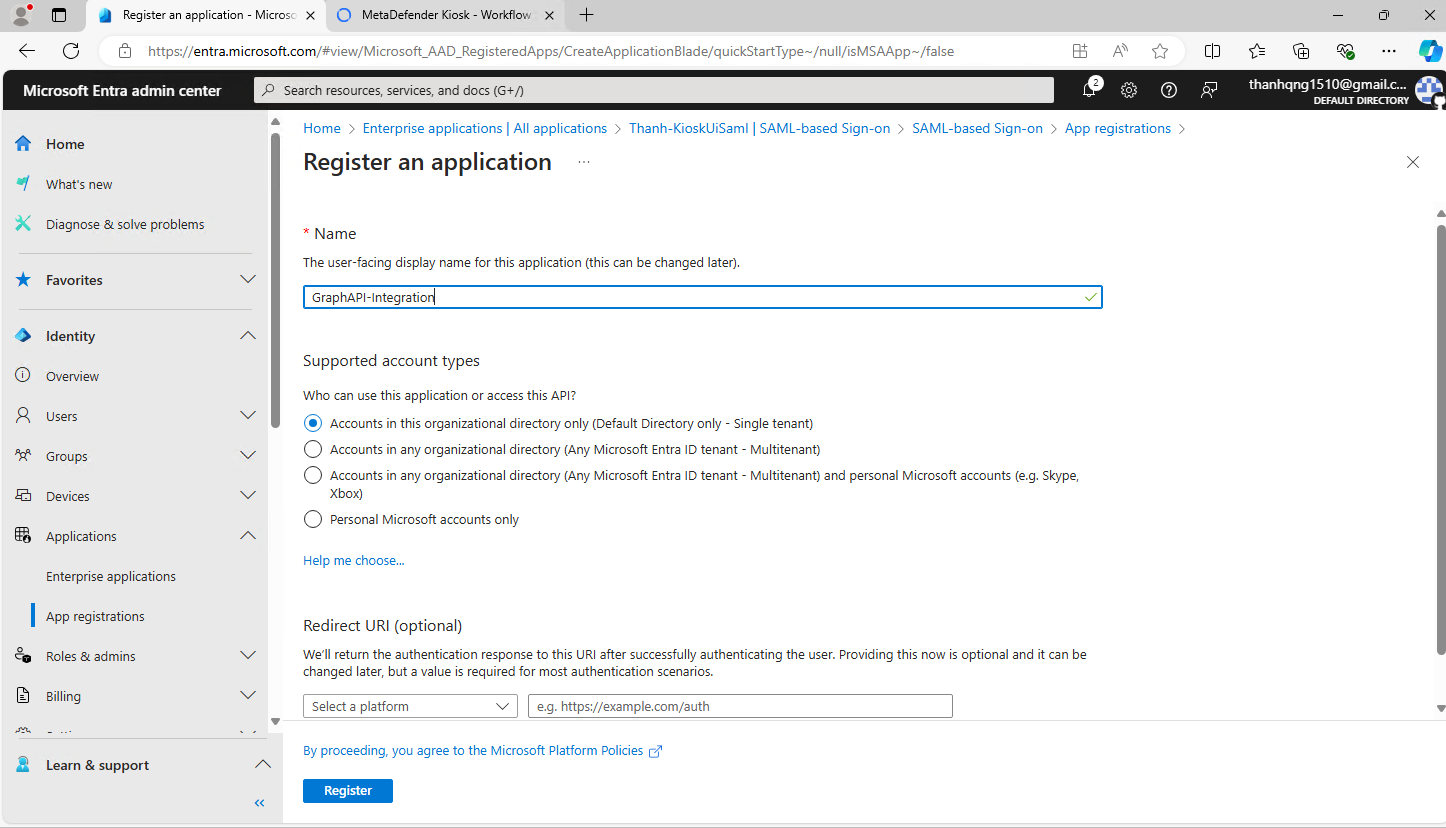
Step 2. Select New registration and choose a descriptive name for your registration, then hit Register.
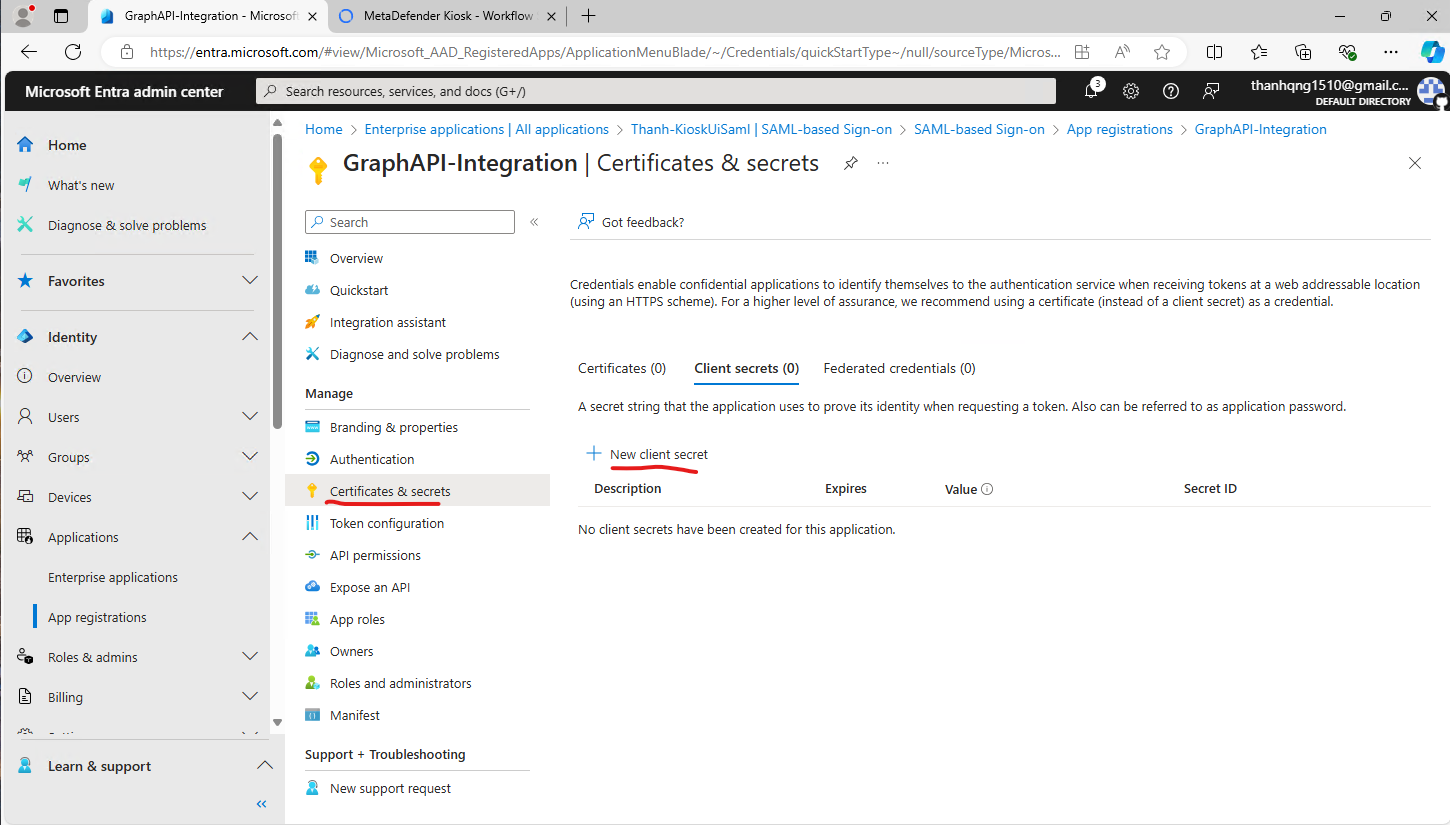
Step 3. Within the Registration Overview Page, click the Certificates & secrets blade, and hit New client secret.
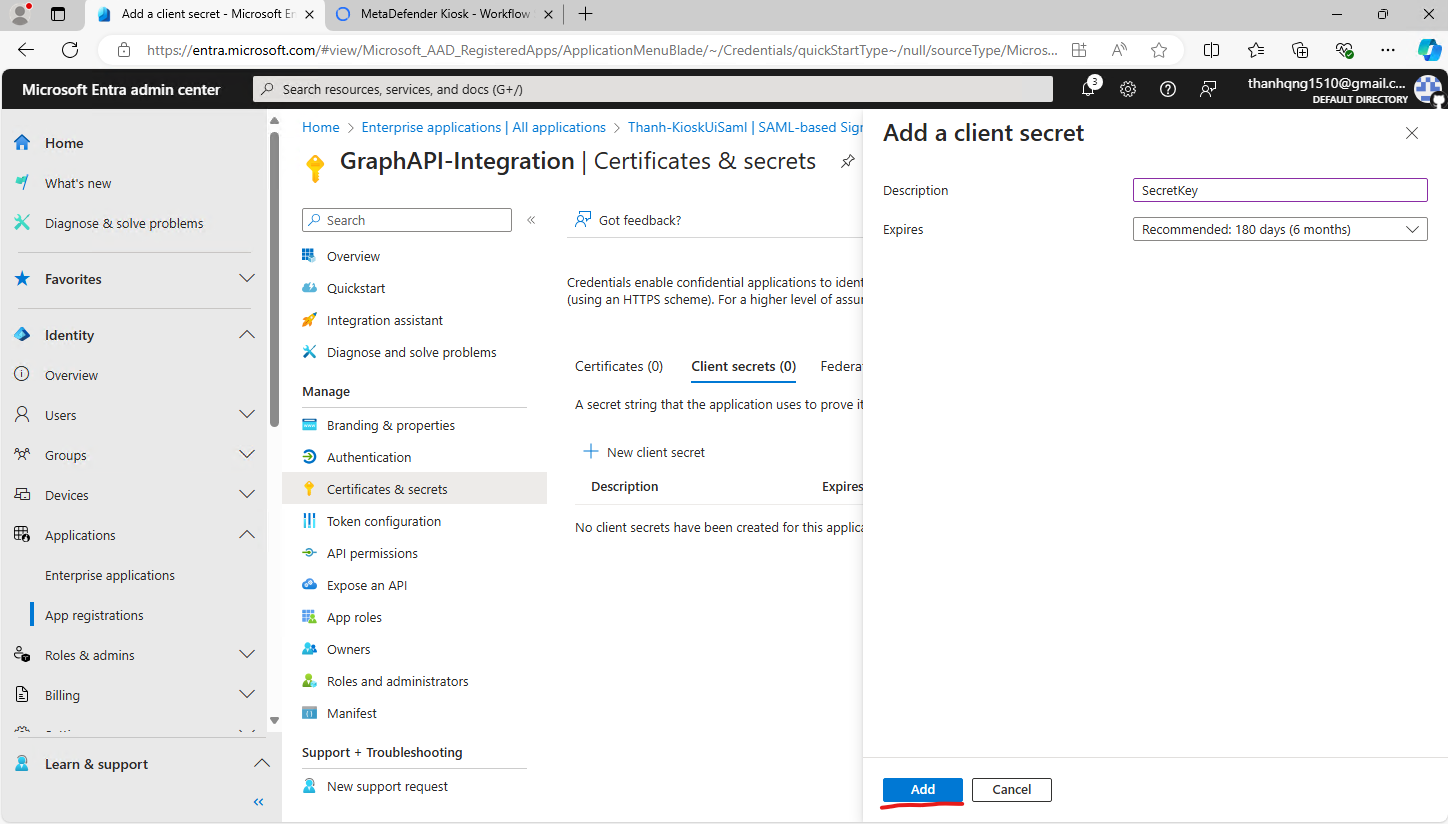
Step 4. Set the description and expires time for the secret, then hit Add. Note Client Secret down for using later.
The Client Secret is accessible for viewing immediately after creation, but subsequently hidden.
Step 5. Next, click the API permissions page and click Add a permission.
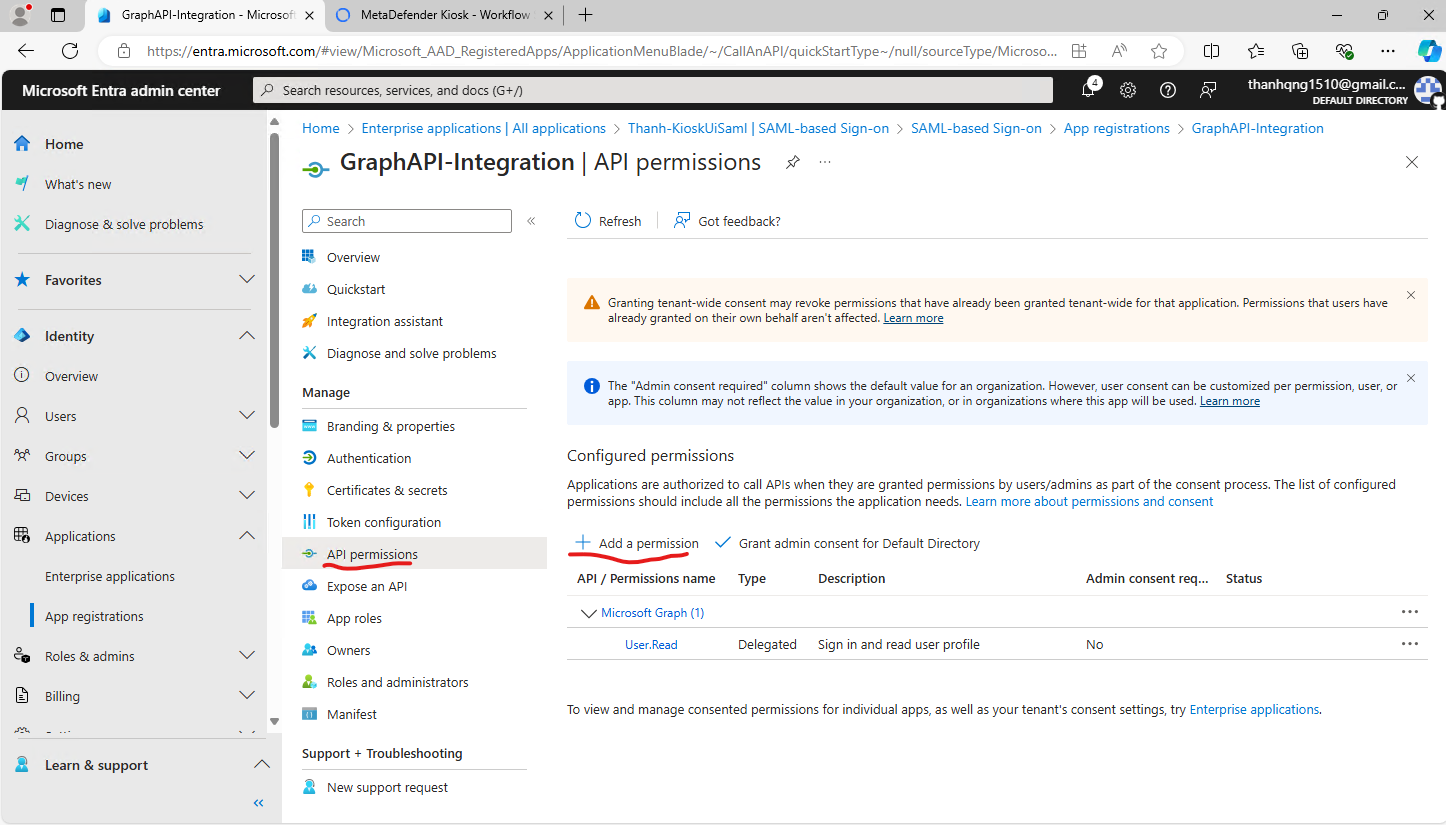
Step 6. Within tab Request API permissions, select Microsoft APIs > Microsoft Graph > Application permissions. Then search and add these permissions:
User.Read.All permission to query users from tenant.
Group.Read.All permission to query groups from tenant.
GroupMember.Read.All permission to query users within groups.
After adding all permissions, hit the button Grant admin consent for Default Directory. Review the permissions below.
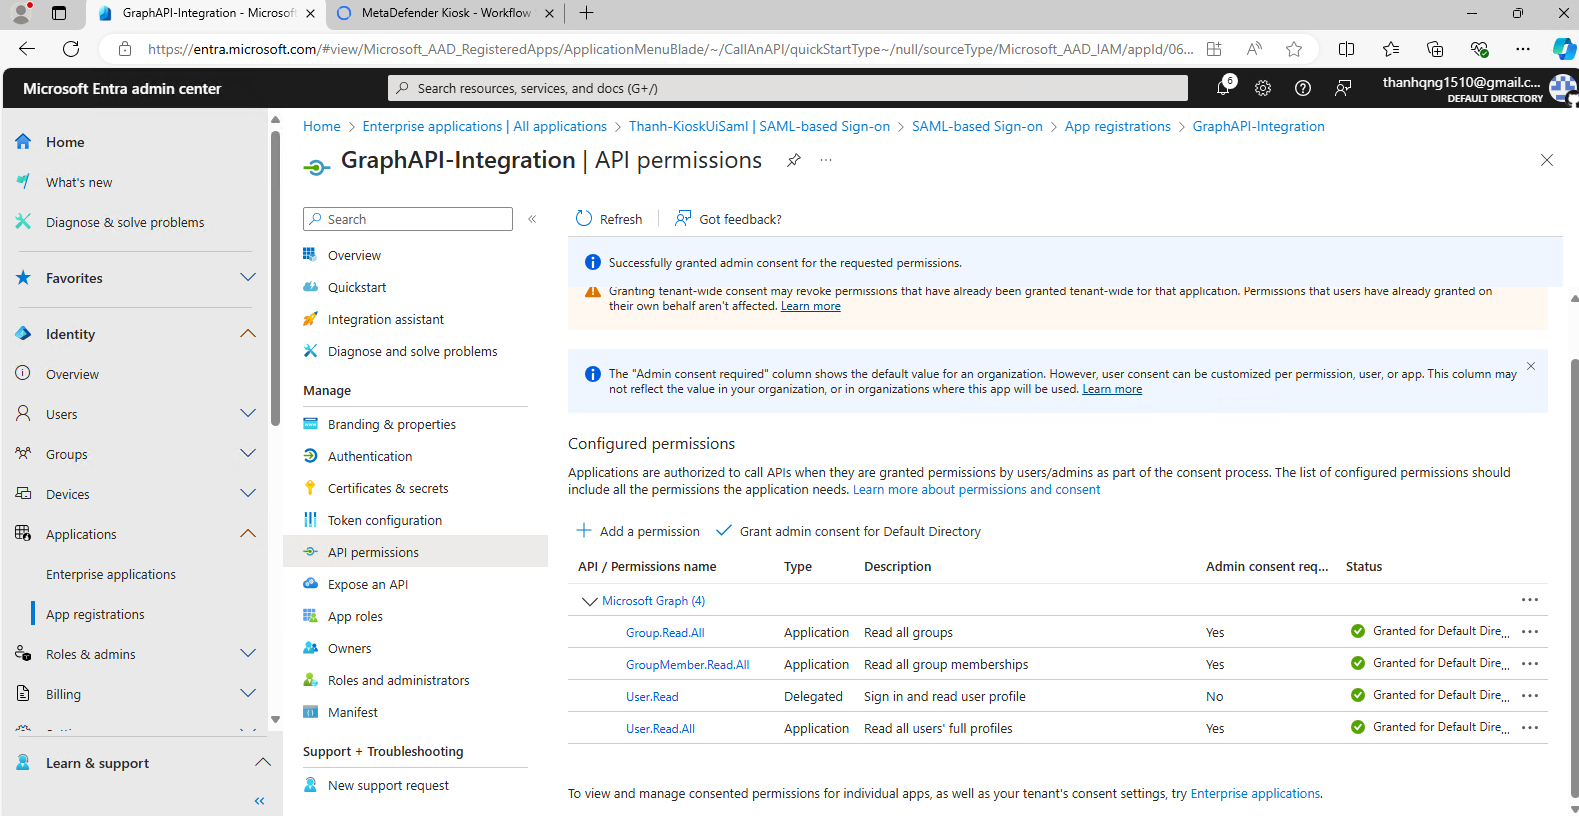
2. Configure GraphAPI Integration
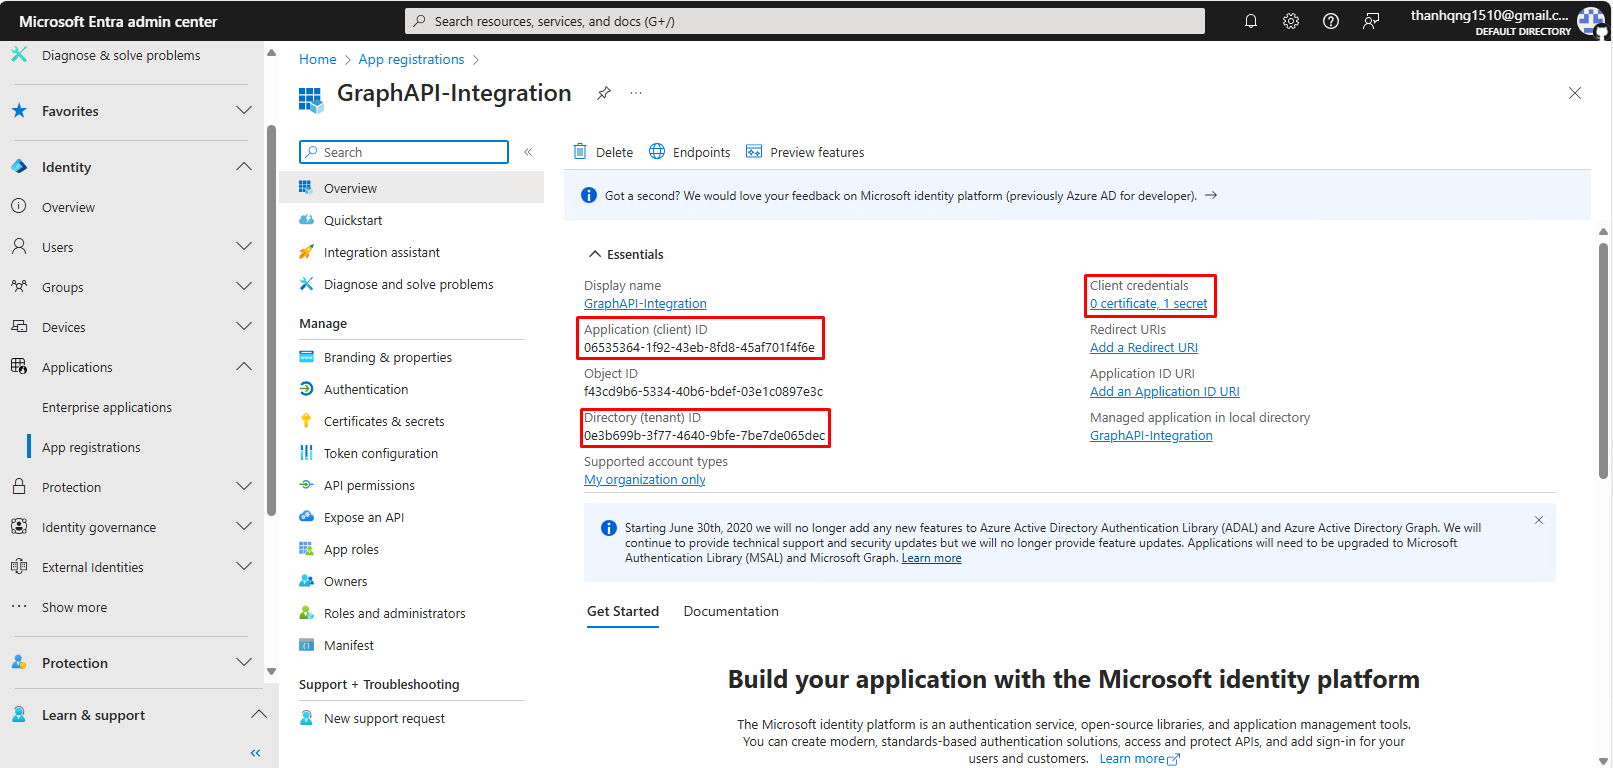
Step 1. Switch to the Overview Page, note down these values:
Application (client) ID.
Directory (tenant) ID.
Client secret.
Step 2. Switch to the Kiosk Console Management, login with Administrative account.
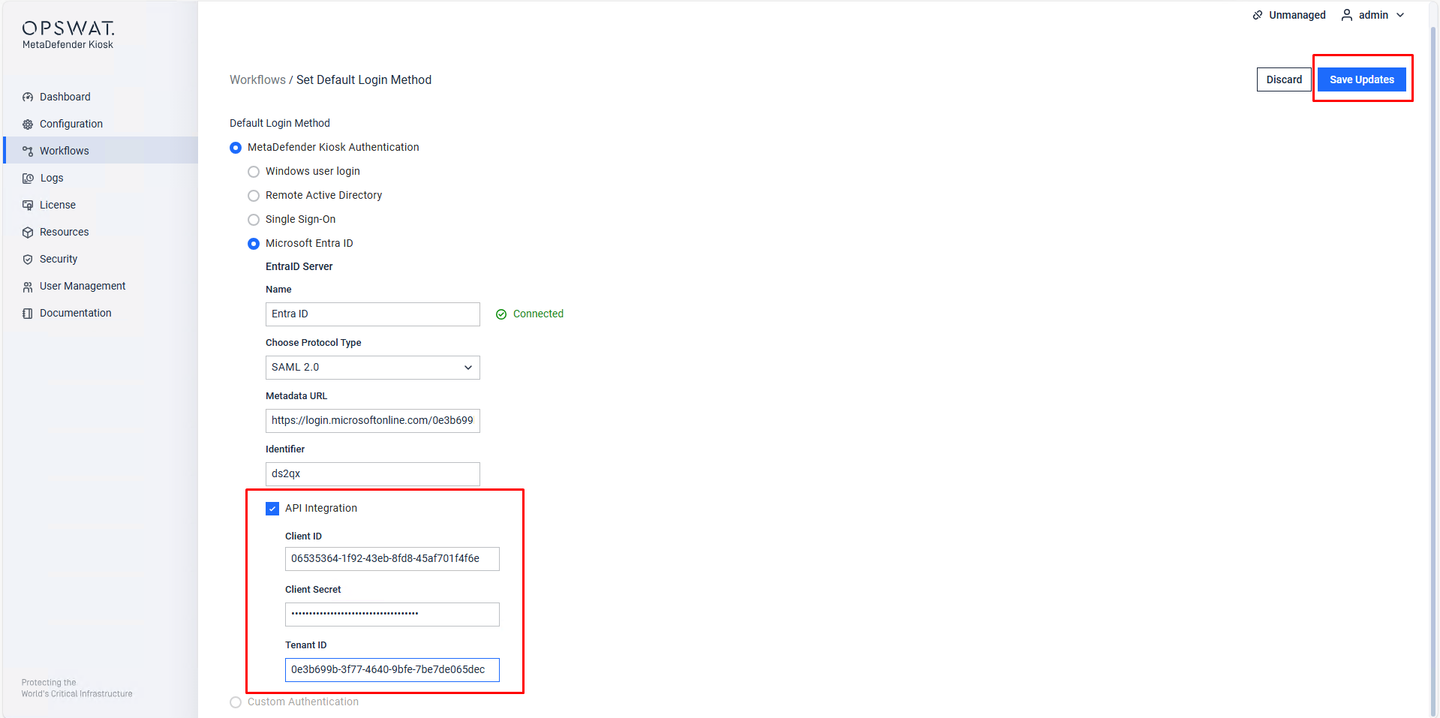
Step 3. Navigate to Workflows > Set Default Login Method > Microsoft Entra ID.
Step 4. Enable API Integration, then input 3 fields Client ID, Client Secret and Tenant ID. Then hit Save Update.
Sign in to the KIOSK using your Microsoft Entra ID account
When authorized user wants to login on the Kiosk Interface Application, they must provide their User Principle Name. This property has the format of <username>@<domain>.
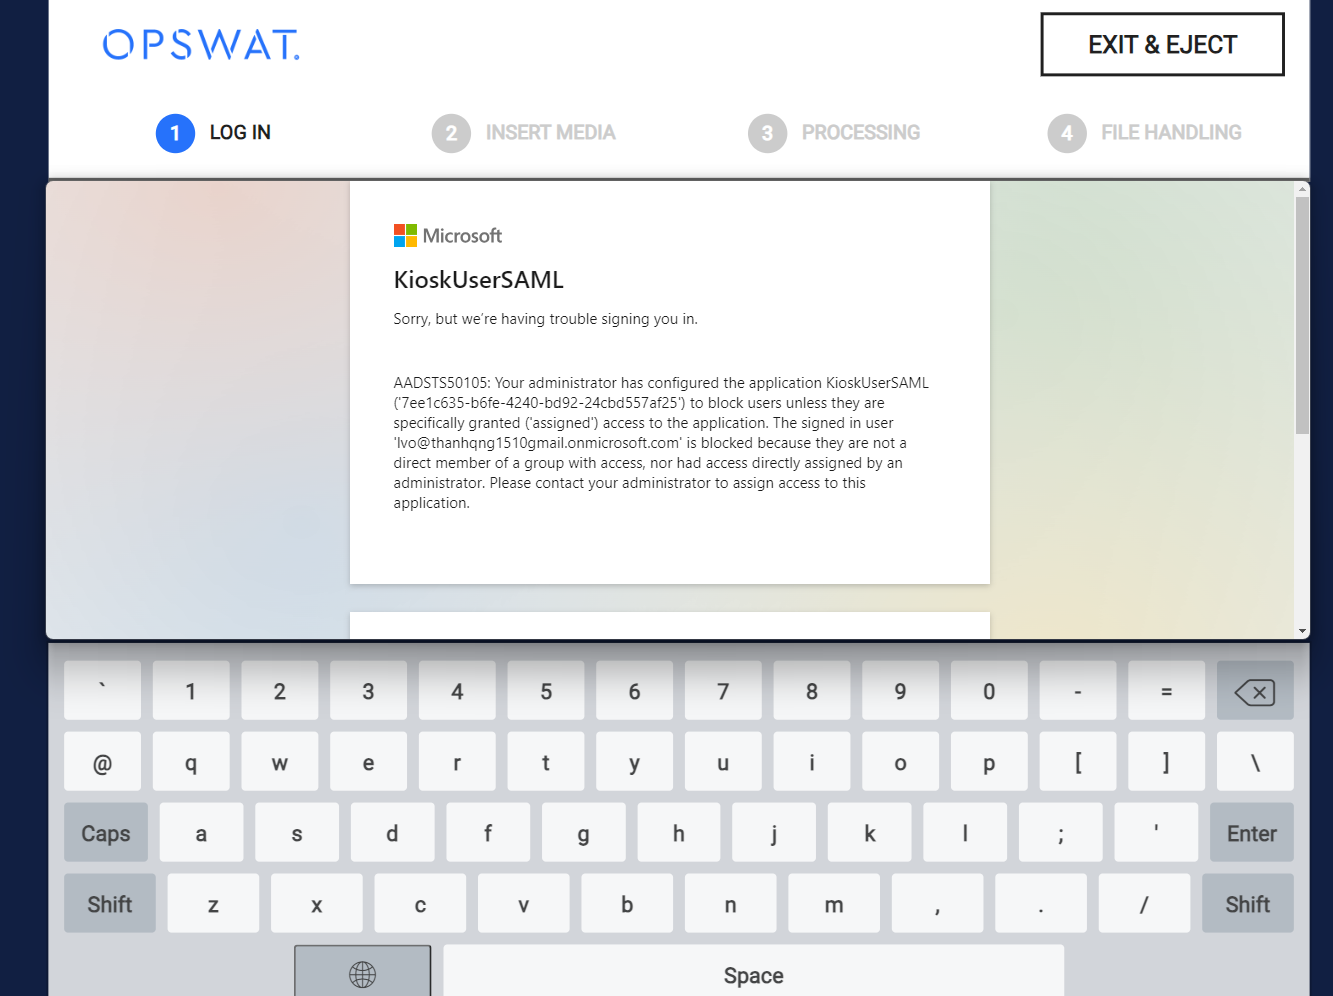
Un-authorized users tries to login to the Kiosk Interface Application will result in the following error.
Retrieving files from MFT or directory via SSO is not yet supported.
Signing in with a smartcard or Windows Hello
If your administrator has turned on passkey authentication:
Insert your smartcard, or respond to the Windows Hello prompt, when the sign-in screen asks for it.
A Windows sign-in prompt appears on top of the Kiosk screen. Enter your PIN, or complete your Windows Hello gesture, to continue.
If your smartcard holds more than one certificate, you may first be asked to choose which one to sign in with before the PIN prompt appears.
If passkey authentication is turned off, signing in works the same as before — with your Microsoft Entra ID username and password.
Set up for multiple KIOSKs using mass configuration on OCM/My OPSWAT
Mass configuration for managed/enrolled KIOSK instances can be accomplished by using the group setting functionality within OCM (OPSWAT Central Management) and My OPSWAT.
All KIOSKs within the group setting can authenticate with Microsoft Entra ID using identical Metadata URLs and Reply URL.