This article applies to a range of supported network management devices, the current NAC Enforcer and the Web UI.
To de-integrate or remove NAC from a Layer 2 or Layer 3 network, please follow the relevant instructions below.
Each set of instructions applied to a specific network management device and brand.
If you do not see your network device listed, please open a case with OPSWAT Support by following the instructions in the support box at the end of this article.
These steps should only be followed if approved by OPSWAT Support, or if enforcement has already been disabled in the NAC UI as defined in This Article.
RBE (Layer 2 - RADIUS Based Enforcement)
Aruba Controllers
Aruba Open or PSK SSIDS
Execute the following command on the master controller.
To prevent devices getting stuck in a blocked state, you can have the system mark all devices in quarantined states as compliant, by executing the following command.
To re-integrate NAC, type the following command.
Aruba WPA2E SSIDS
The following method is only applicable to infrastructures that include at least one RADIUS server in addition to NAC.
This method cannot be used in cases where NAC is the only RADIUS server, as there must be an alternate RADIUS server to point at.
To remove RBE from the RADIUS path of your network, you must remove or demote the entry pertaining to the RBE server from the controller’s RADIUS configurations.
Navigate to Configuration>Authentication>AAA Profiles, and select the 802.1X Authentication Server Group of the profile used by your SSID.
Either delete or demote the entry for the NAC RBE Device.
Alternatively, this can be done from the CLI by replacing devradius.pd.impulse.com with the NAC Appliance, and replacing rbetest2.pd.impulse.com with an alternate RADIUS server, as illustrated below.
To prevent devices getting stuck in a blocked state, you can have the system mark all devices in quarantined states as Compliant, by executing the following command.
To re-integrate NAC, enter the following command.
Cisco Controllers
Cisco Open SSIDS (AireOS versions prior to and including V 8.3.102.0)
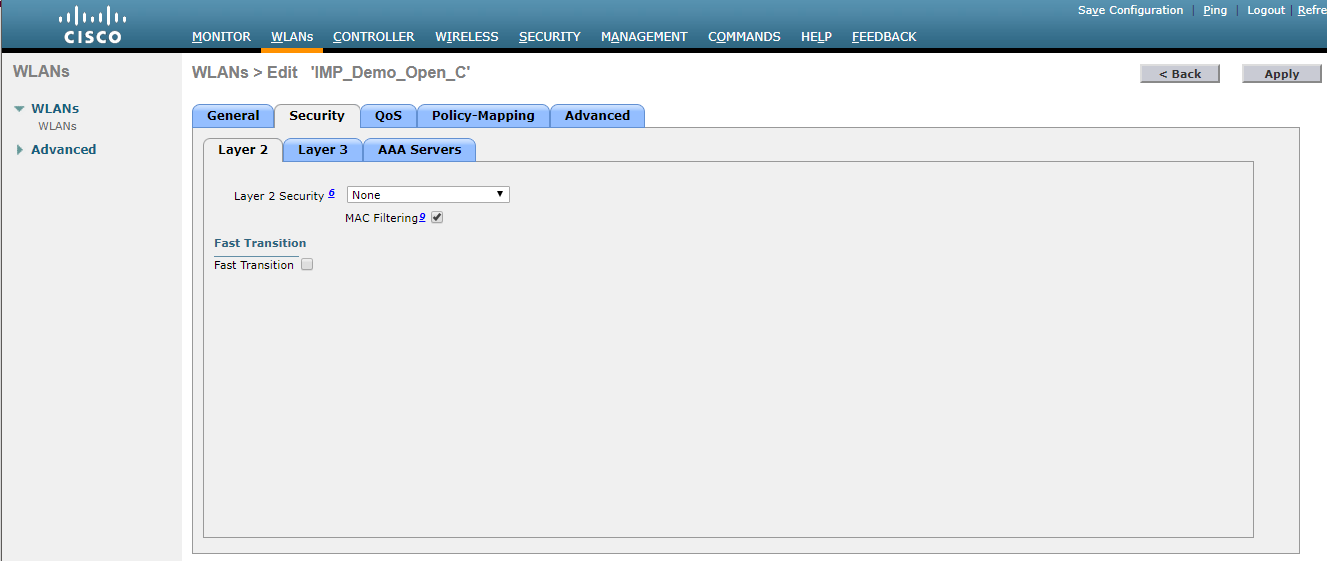
To turn MAC filtering off, click on WLAN>Security>Layer 2, then uncheck MAC Filtering.
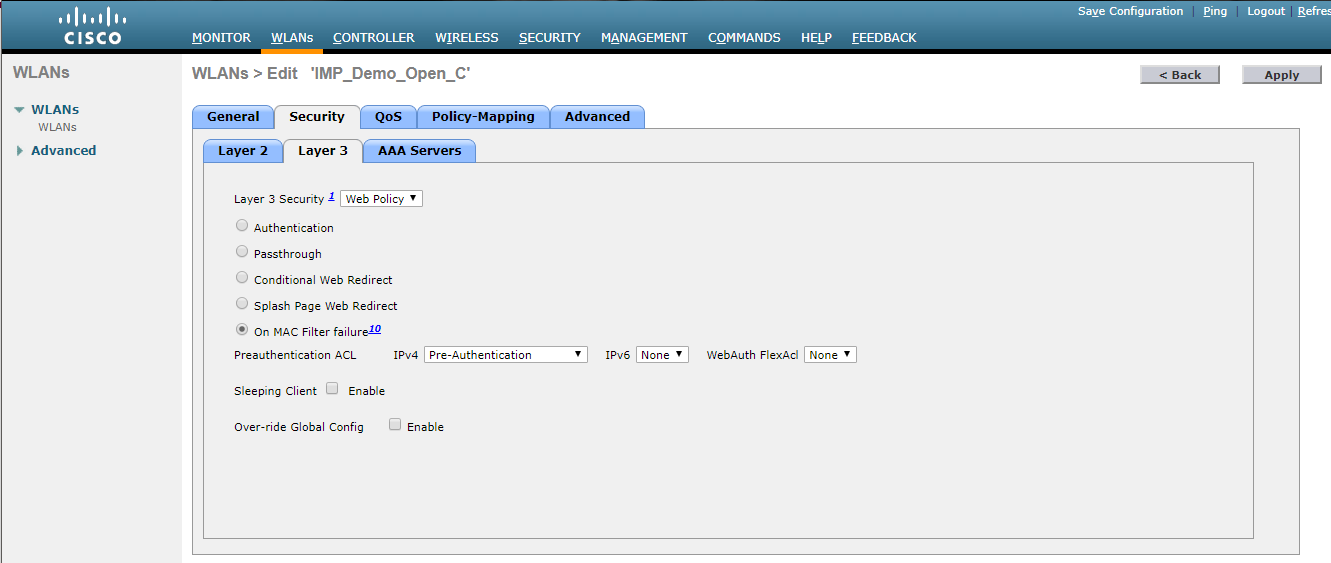
To set Layer 3 Security to None, click on WLAN>Security>Layer 3, then select None from the drop-down menu.
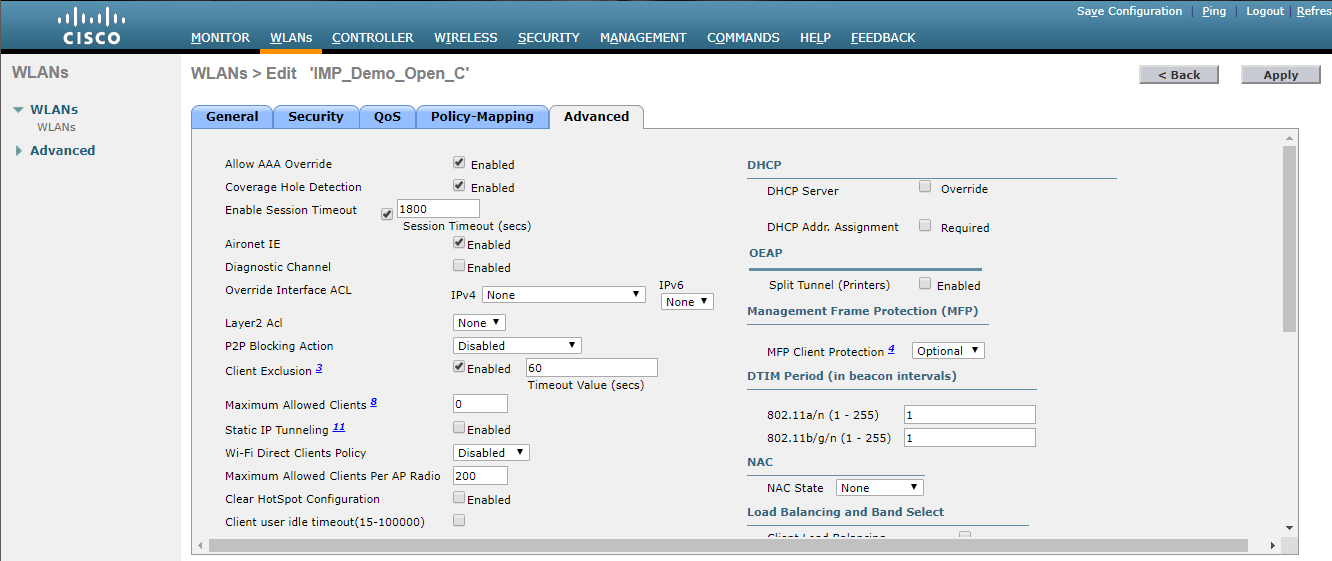
To uncheck AAA Override, click on WLAN>Advanced, then uncheck AAA Override, as illustrated below.

To re-integrate NAC, do the following.
To turn MAC filtering on, click on WLAN>Security>Layer 2, then check MAC Filtering.
To set Layer 3 Security to Web Policy, click on WLAN>Security>Layer 3, select Web Policy from the drop-down menu, then ensure that both On MAC Filter Failure and the sc_quarantine_acl ACL are selected.
To check AA Override, click on WLAN>Advanced, then check AAA Override.
Cisco Open SSIDS (AireOS versions subsequent to and including V8.3.102.0)
To turn MAC filtering off, click on WLAN>Security>Layer 2, then uncheck MAC Filtering.
To uncheck AAA Override, click on WLAN>Advanced, then uncheck AAA Override.
To re-integrate NAC, do the following.
To turn MAC filtering on, click on WLAN>Security>Layer 2, then check MAC Filtering.
To check AAA Override and set the NAC State, click on WLAN>Advanced, then check AAA Override and select Radius NAC or ISE NAC.
Cisco WPA2E SSIDS
The following method is only applicable to infrastructures that include at least one RADIUS server in addition to NAC.
This method cannot be used in cases where NAC is the only RADIUS server, as there must be an alternate RADIUS server to point at.
To set the RADIUS authentication server to an alternate RADIUS server, navigate to WLAN>Security>AAA Servers, then set Server 1 to Alternate RADIUS Server.
To set Allow AAA Override to Disabled and set the NAC state to None, navigate to WLAN>Advanced, then uncheck Allow AAA Override and set NAC State to None.
To re-enable NAC, do the following.
To set the RADIUS authentication server to NAC RADIUS server, navigate to WLAN>Security>AAA Servers, then set Server 1 to NAC RADIUS Server.
To check AAA Override and set the NAC State, click on WLAN>Advanced, then check AAA Override and select Radius NAC or ISE NAC.
Aerohive Controllers
Aerohive HM6 Open, WEP, WPAPSK WLANS
To disable MAC authentication, navigate to Configuration>SSIDs>(Name of Open / WEP or WPAPSK SSID), then uncheck Enable MAC Authentication, click Save and push the updated policy.
To re-integrate NAC, navigate to Configuration>SSIDs>(Name of Open / WEP or WPAPSK SSID, then check Enable MAC Authentication, click Save and push the updated policy.
Aerohive HM6 WPA2E/802.1X WLANS
Navigate to Configuration>SSIDs>(Name of Secure SSID), then change SSID Access Security to Open, click Save and push the updated policy.
To re-integrate NAC, navigate to Configure>SSIDs>(Name of Secure SSID), then change SSID Access Security to WPA/WPA2 802.1X (Enterprise), click Save and push the updated policy.
Aerohive HMNG Open, WEP, or WPAPSK WLANs
To turn off MAC authentication, navigate to Configure>(Name of policy)>Wireless Settings>(Name of Secure SSID)>MAC Authentication, then disable MAC Authentication, click Save and push the updated policy.
To re-integrate NAC, navigate to Configure>(Name of Policy)>Wireless Settings>(Name of Secure SSID)>Mac Authentication, then enable MAC Authentication, click Save and push the updated policy.
Aerohive HMNG WPA2E/802.1X WLANs
Navigate to Configure>(Name of Policy)>Wireless Settings>(Name of Secure SSID), then change SSID Access Security to Open, click Save and push the updated policy.
To re-integrate NAC, navigate to Configure>(Name of Policy)>Wireless Settings>(Name of Secure SSID), then change SSID Access Security to Enterprise, click Save and push the updated policy.
PBR (Layer 3 - Policy Based Routing)
To clear the opswat_block ACL, enter the device-relevant commands and instructions below.
NEXUS Router
Cisco/Brocade ICX Router (Non NEXUS Router)
Alcatel Router
For this router, you will need to confirm the policy network group, as the group may be named blockedhost rather than opswat_block on some legacy devices.
If this is the case, replace opswat_block with blockedhost (or the given name on your specific device) before executing the script.
HP Router
Huawei Router
MLX Router
If you encounter the following error:
telnet@BG-MLX8-Core2(config)#no ip access-list extended opswat_block
Cannot delete l4 access-list opswat_block : Currently in use by PBR.
error - ACL In Use.
Execute the following script:
acl-policy
force-delete-bound-acl
The following script is for removing the NAC route map, where X = the Layer 3 interface that has the route map applied.
X can be determined by issuing a show ip policy command, then reviewing the results to determine which interfaces have the route map applied.
Then, to restore the NAC route map, enter the following script.
If you have followed the instructions above but have been unable to De-Integrate NAC From A Layer 2 / Layer 3 (RBE/PBR) Network, please open a Support Case with the OPSWAT team via phone, online chat or form, or feel free to ask the community on our OPSWAT Expert Forum.