
What are Rules?
Rules in Metadefender NAC decide which devices can access what parts of your network based on specific conditions you set up. Think of it as creating a checklist - if a device meets all the requirements on your checklist, it gets the access you've defined.
How Rules Work
When a device tries to connect to your network, MetaDefender NAC checks your rules from top to bottom. The first rule that matches the device's characteristics determines what access the device gets.
Example: If you have a rule that says "All company laptops with MD Endpoint installed get full network access," any laptop meeting those conditions will automatically receive full access.
Getting Started with Rules
Step 1: Access the Rules Section
Log in to your My OPSWAT Central Management console
Click on "RADIUS NAC" in the left menu
Select the "Rules" tab
Click "Add New Rule" to create your first rule
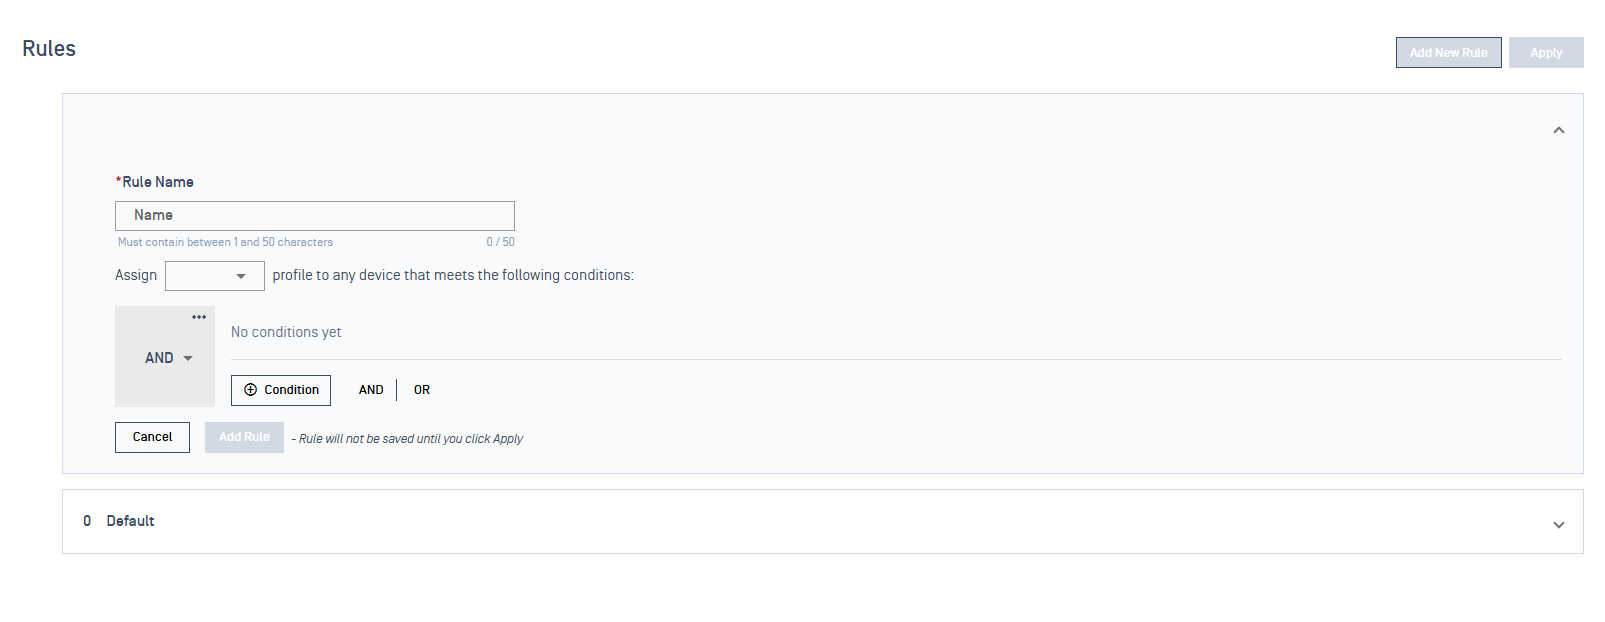
Step 2: Name Your Rule
Give your rule a clear, descriptive name that explains what it does.
Good examples:
"Company Laptops - Full Access"
"Guest Devices - Limited Access"
"IT Department - Admin Access"
Avoid vague names like:
"Rule 1"
"Test"
"New Rule"
Step 3: Choose What Actions to Apply
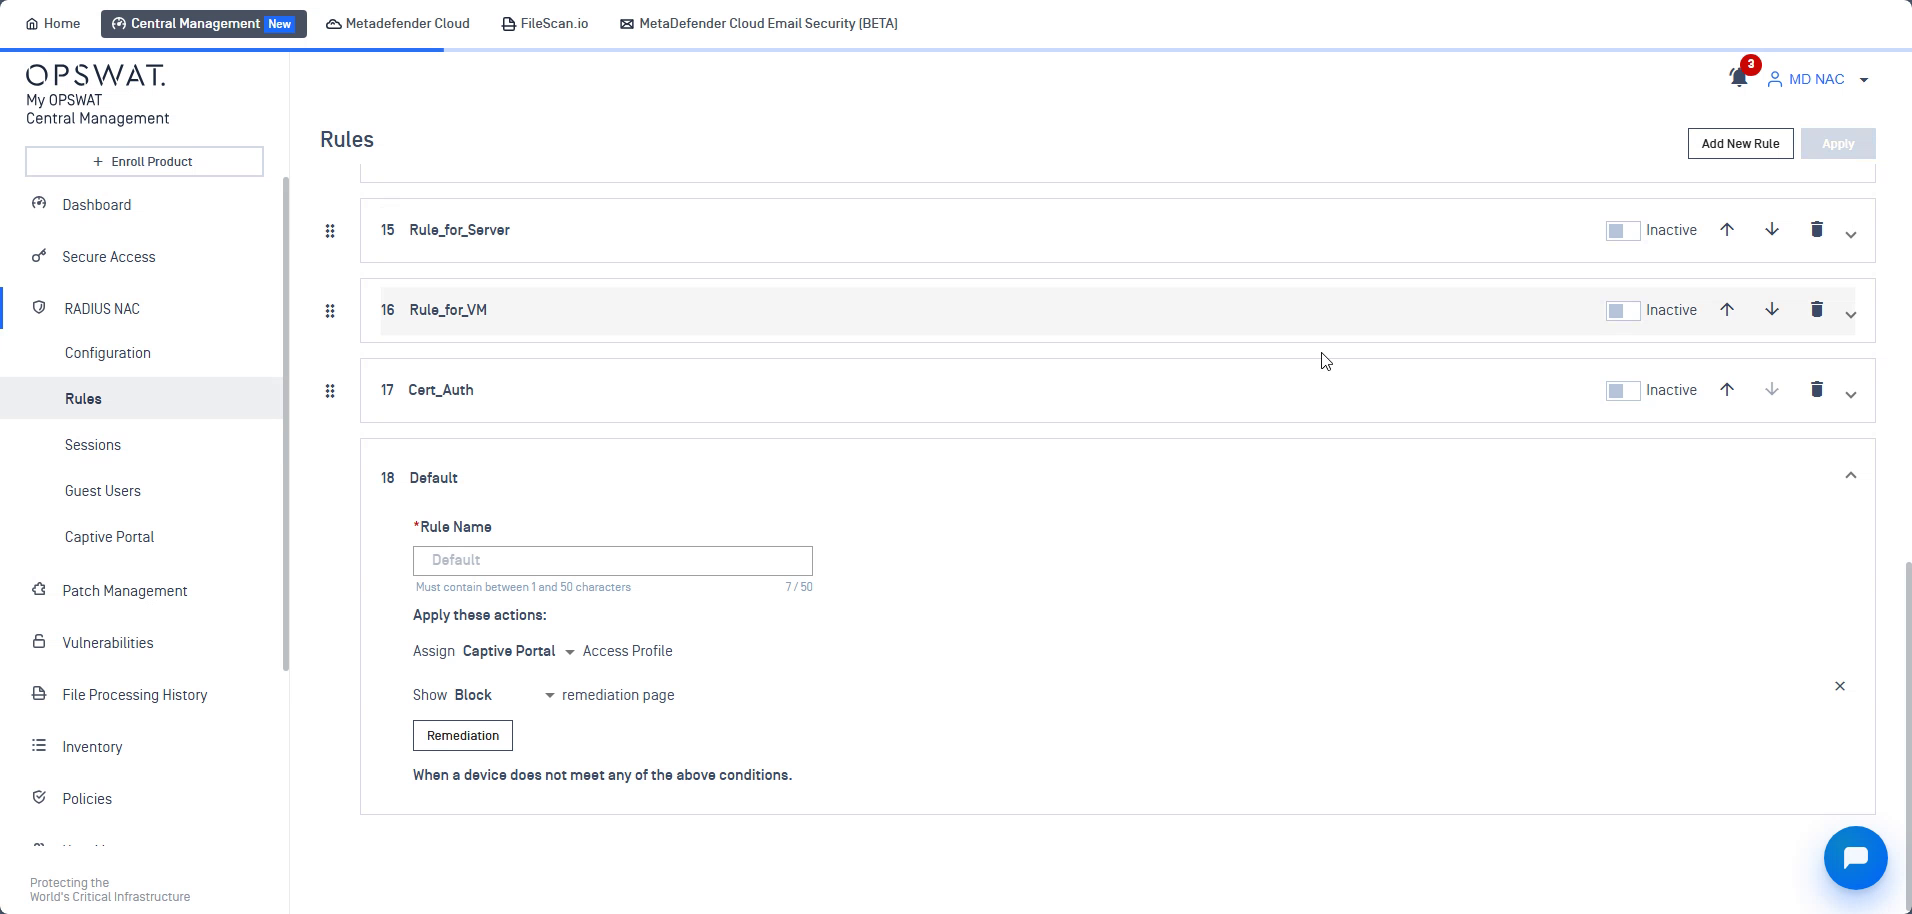
When a rule's conditions are met, MetaDefender NAC runs the list of actions you configure under Apply these actions. A rule can include one or both of the following action types:
Assign Access Profile — In the "Assign" dropdown, select which Access Profile devices should get when they match this rule.
Show remediation page (New) — Select a specific remediation page to display to the user (for example, when the device is placed on a captive portal). See Showing a Remediation Page below.
Actions are independent: you can add or remove each one on its own. For example, a rule can assign the Captive Portal access profile and show a specific remediation page. Use the ✕ next to an action to remove it from the rule.
Showing a Remediation Page
A rule can now display a remediation page to the user when the rule matches. A remediation page is the web page a user is shown after they are placed on a captive portal — for example, when they are unauthenticated, non-compliant, or blocked — and it tells them what to do next.
Previously, the remediation page a user saw was tied implicitly to the Unauthenticated status condition, and admins could not directly choose which page to show. With the new Show remediation page action, you now select the exact page as part of the rule itself — no complex conditions required.
Adding the Show Remediation Page Action
On the Rules tab, expand the rule you want to edit (or click Add New Rule).
Under Apply these actions, add the Show <page> remediation page action.
From the dropdown, select the remediation page users should see when this rule matches.
Click Apply to save the rule.
Info
A single rule can both assign an Access Profile and show a remediation page. For example, the Default rule can assign the Captive Portal access profile and show the Block remediation page.
Available Remediation Pages
When you open the remediation page dropdown, you can choose from the following built-in pages:
Remediation page | What the user sees |
|---|---|
SSO and Guest | Options to authenticate with single sign-on (SSO) or continue as a guest. |
SSO | A single sign-on login page (for example, the organization's SAML / Okta identity provider). |
Guest | A guest / captive-portal login page |
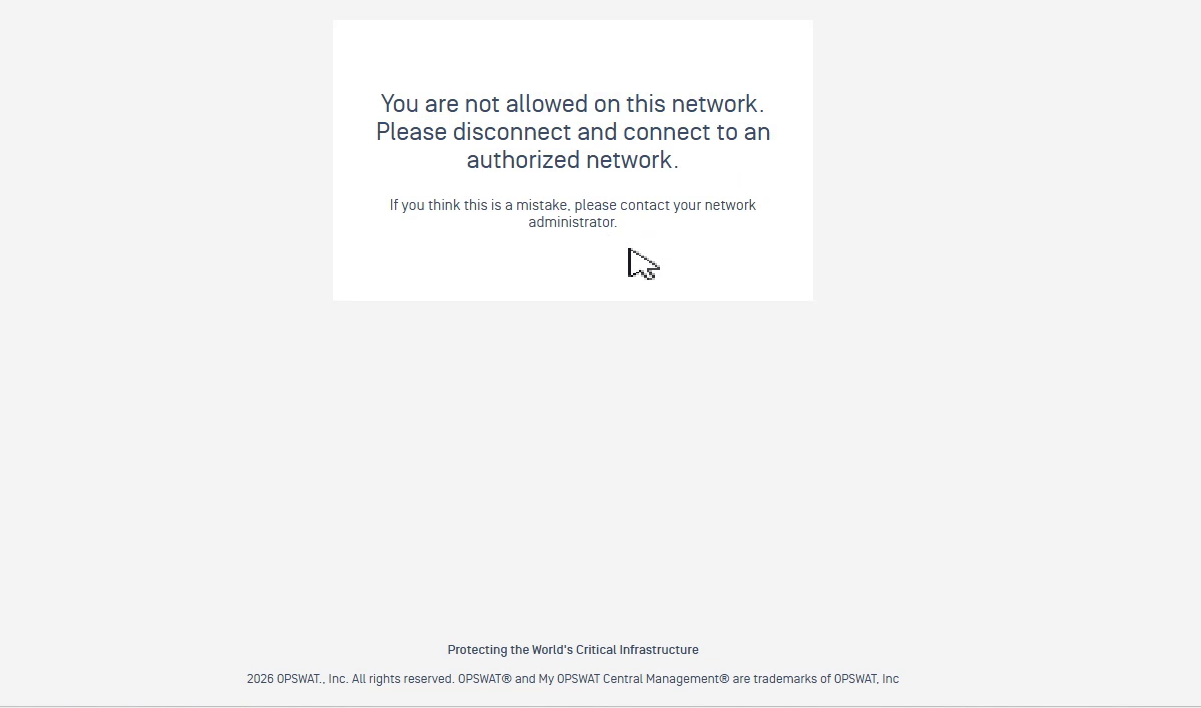
Block | A hard-stop page telling the user they are not allowed on the network, with no option to self-remediate. |
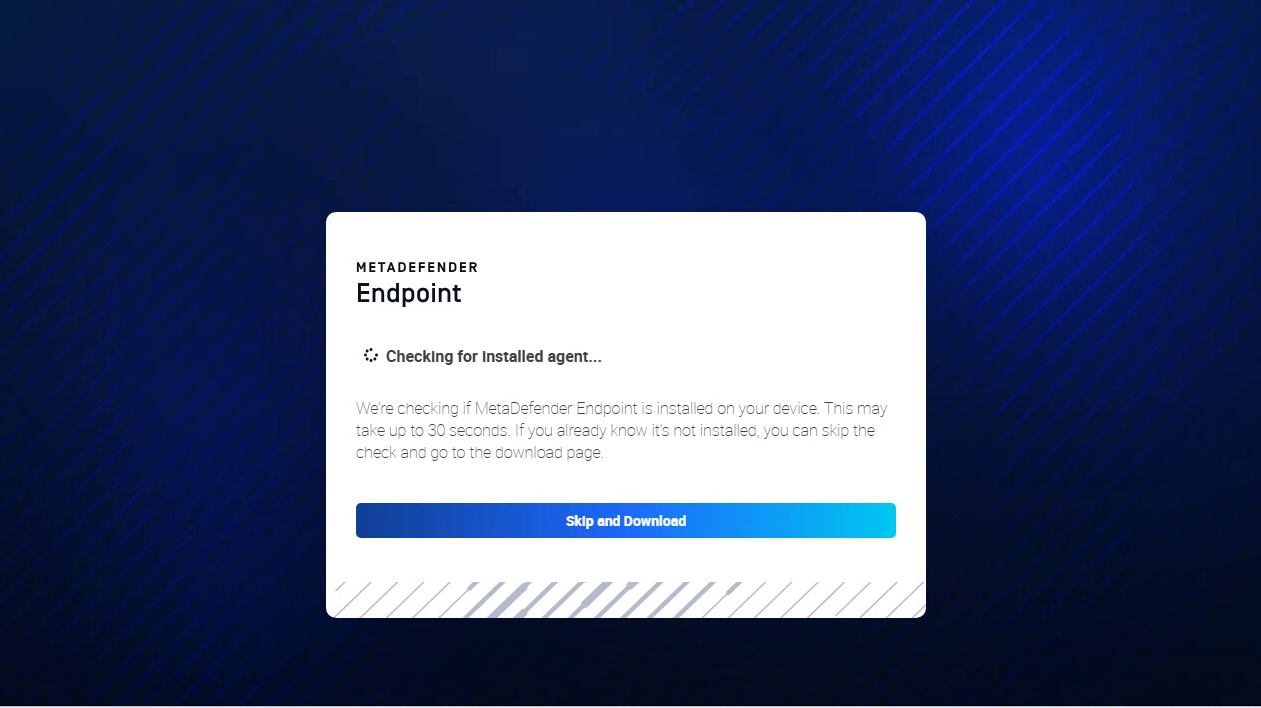
MDE required | The MetaDefender Endpoint page that checks for the agent and prompts the user to download and install it. |
What Each Remediation Page Looks Like
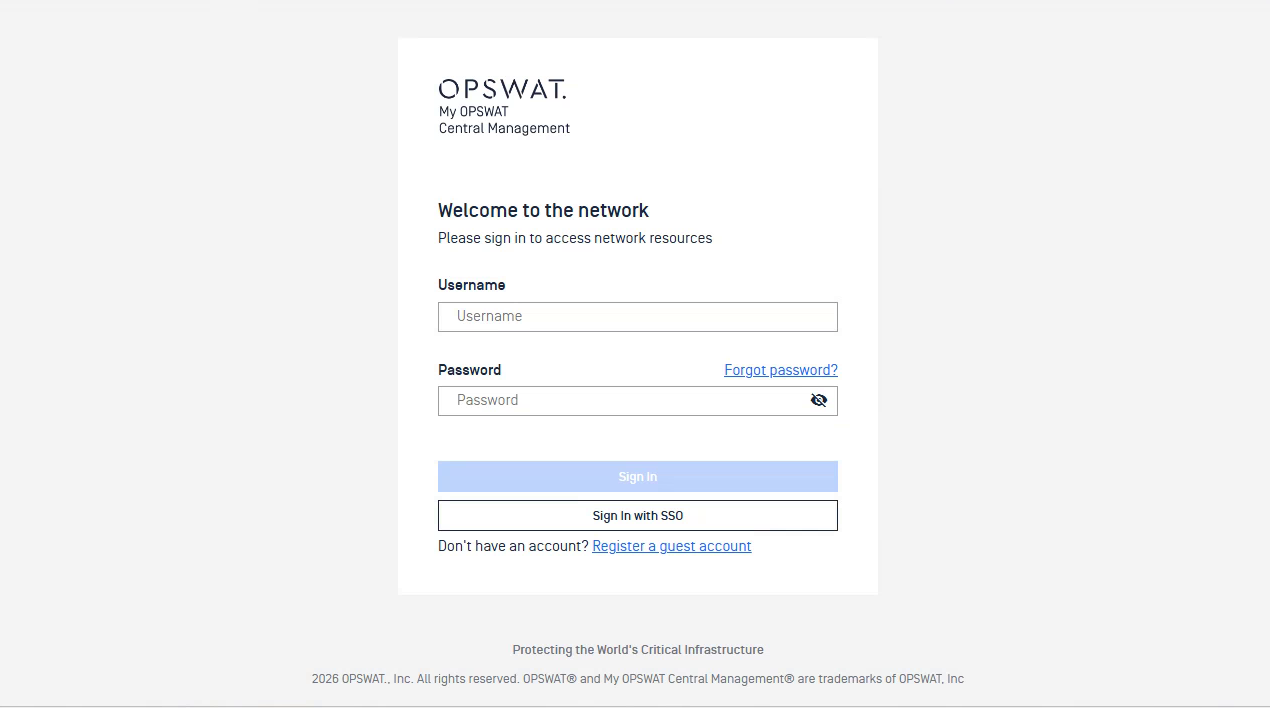
The pages below are what an end user sees on their device when a matching rule shows that remediation page.
SSO and Guest — the user can sign in with SSO or with a guest account.
SSO — the user is redirected to your identity provider (for example, Okta) to sign i
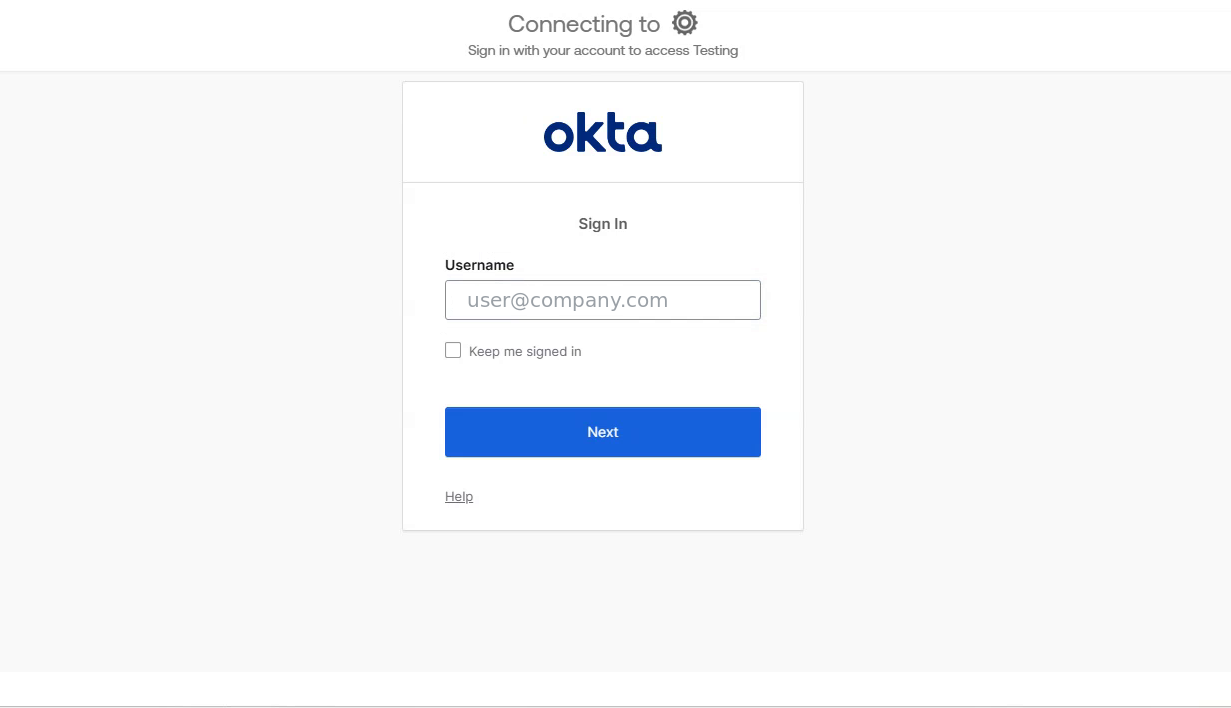
n.
Guest — the user signs in with, or registers, a guest account.
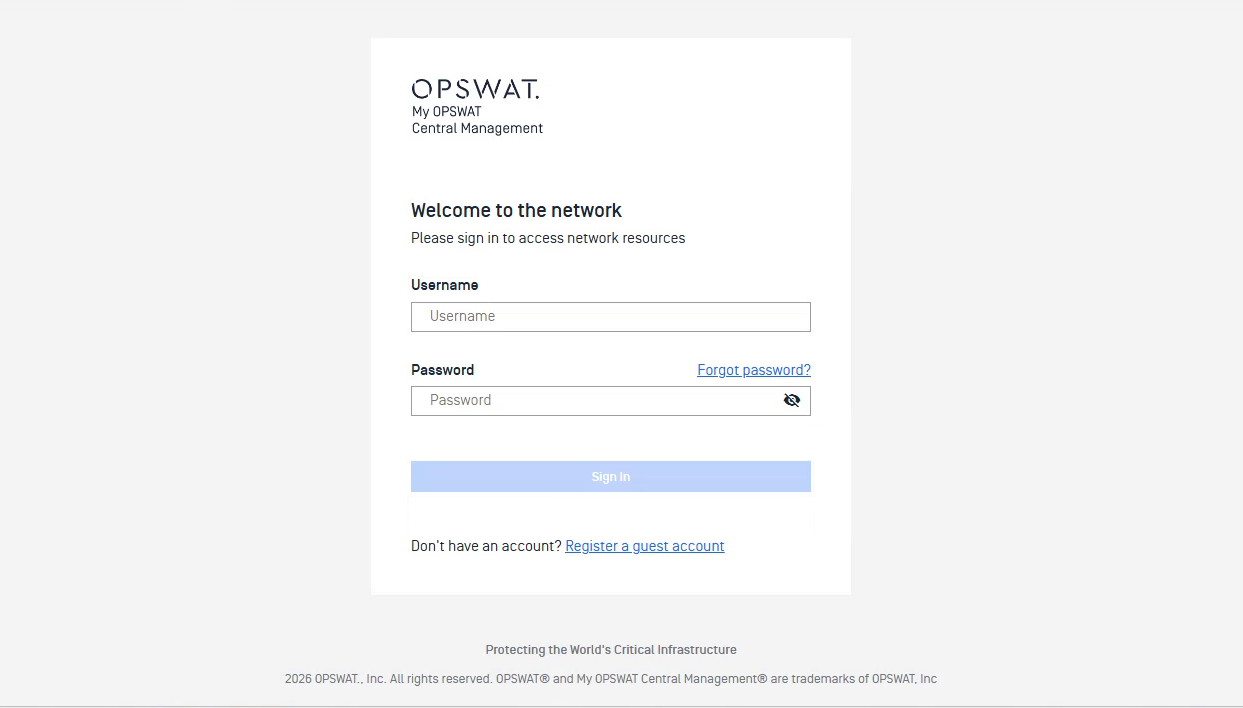
MDE required — the user is prompted to install the MetaDefender Endpoint agent before they can connect.
The Block Remediation Page
The Block page is a hard stop for unauthorized devices. It does not offer any way for the user to self-remediate — it simply informs them that access is denied. The page displays:
You are not allowed on this network. Please disconnect and connect to an authorized network.
If you think this is a mistake, please contact your network administrator.
Default Behavior for Captive Portal
When a device is placed on a captive portal and no matching rule explicitly configures a Show remediation page action, MetaDefender NAC automatically shows the Block page. This ensures users always receive clear, intentional messaging when access is denied.
If a matching rule explicitly sets a remediation page with the Show remediation page action, that selection takes precedence over the Block default.
The explicit Show remediation page action replaces the previous behavior, where the remediation page was determined implicitly by the Unauthenticated status condition.
Building Rule Conditions
This is where you define what devices must have or do to match your rule. The system lets you create from simple to complex conditions.
Understanding Condition Types
Your rules can check three main types of information about devices:
1. Device Information (Endpoint)
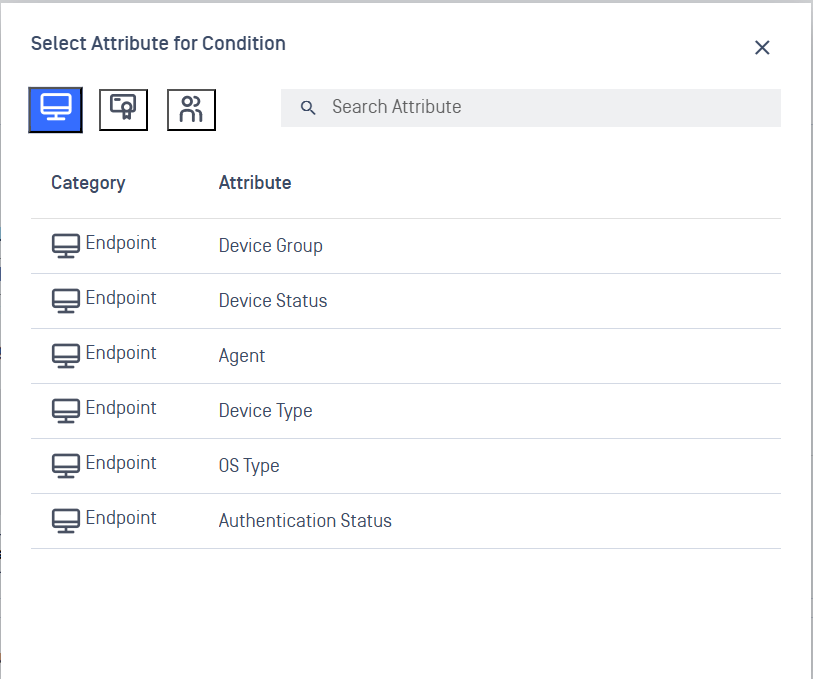
Basic information about the device itself:
Device Group: Which group the device belongs to
Device Status: Whether the device is compliant with your security policies
Agent: Whether your Metadefender Endpoint software is installed
Device Type: What kind of device it is (laptop, phone, tablet, etc.)
OS Type: The operating system (Windows, Mac, Android, etc.)
Authentication Status: Whether the user properly logged in
2. Certificate Information
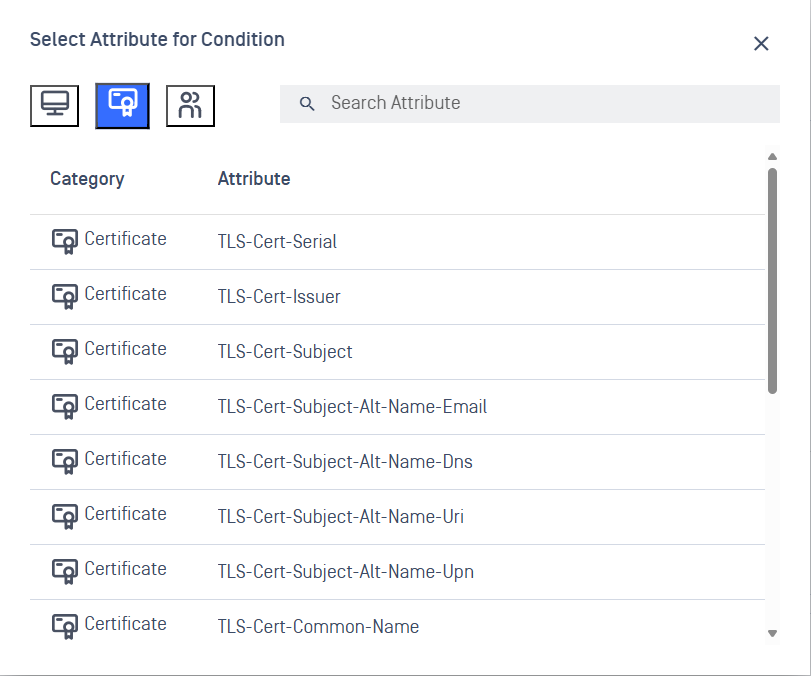
Security certificates the device presents:
Certificate details: Serial numbers, who issued it, subject information
Certificate names: Various name fields in the certificate
3. User Directory Information (LDAP)
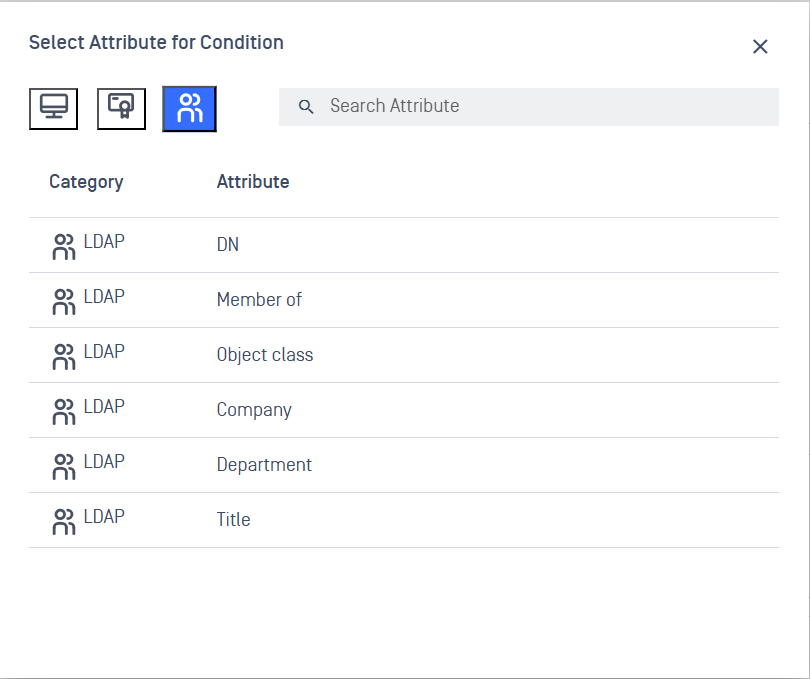
Information from your organization's user directory:
User Groups: Which groups the user belongs to
Department: User's department
Title: User's job title
Company: User's company affiliation
Important: Assigning a Profile to the Default Rule
By default, this rule has the access_reject profile associated with it, which means devices assigned to the access_reject profile will be denied network access.
Before adding your first custom rule, you should review and update the Default Rule's Access Profile assignment:
Devices that do not match any custom rule will fall into the Default Rule
Leaving it set to access_reject may result in unintended denials
To assign an Access Profile to the Default Rule:
Navigate to the Rules tab.
Locate the Default Rule in the list.
Click to expand it and select an appropriate Access Profile from the dropdown.
Click Apply to save changes.
Once this is done, you can proceed to create and configure custom rules with conditions.
Adding Your First Condition
Click the "+ Condition" button
Choose an attribute category from the popup:
Click the computer icon for Device/Endpoint attributes
Click the certificate icon for Certificate attributes
Click the people icon for LDAP/User attributes
Select the specific attribute you want to check
Set the condition (equals, contains, etc.)
Enter the value to check for
Creating Simple Rules (AND Logic)
AND means ALL conditions must be true.
Example: Device must be a laptop AND have Metadefender Endpoint installed AND belong to the "Staff" group.
To create this:
Add condition: Device Type equals "Laptop"
Add condition: Agent equals "Installed"
Add condition: Device Group equals "Staff"
All three must be true for the rule to match.
Actions:
Assign the Staff Access access profile
Optionally, add a Show remediation page action if matching devices should be sent to a captive portal (see Showing a Remediation Page)
Creating Flexible Rules (OR Logic)
OR means ANY of the conditions can be true.
Example: Device can be either a laptop OR a desktop to get access.
To create this:
Add condition: Device Type equals "Laptop"
Click "OR"
Add condition: Device Type equals "Desktop"
If either condition is true, the rule matches.
Actions:
Assign the appropriate access profile (for example, Workstation Access)
Optionally, add a Show remediation page action (see Showing a Remediation Page)
Creating Advanced Rules (Combined Logic)
You can combine AND and OR to create sophisticated rules.
Info
Example: Grant network access to devices that meet:
Device criteria: Must be a desktop or laptop with the MD Endpoint installed
User criteria: User must be either:
In the IT department, OR
A member of Management, OR
Have a TLS certificate containing "VN-NAC" AND issued by "VN-NAC-AD-CA
This rule would have the structure as below:
How to Build:
Initial Setup
Navigate to Rule Creation
Go to
RADIUS NAC→Rules→Add new Rules
Configure Basic Rule Information
Enter a descriptive Rule name (e.g., "IT-Management-Device-Access")
Under Apply these actions, assign an Access Profile to the rule — and, if matching devices should see a captive portal, also add a Show remediation page action (see Showing a Remediation Page)
Note: The default root operator is
AND(can be changed toORif needed)
Building the Condition Structure
Level 1: Device Requirements (AND Group)
Create Primary Device Condition Group
Click the
ANDbutton at level 1 to create a group condition with AND operatorThis group will contain device-specific requirements
Add Device Type Condition
Click
+conditionbutton at level 2 (inside the AND group)Select condition:
Device type isChoose multi-select options:
Desktop,LaptopNote: This allows either desktop OR laptop devices
Add Agent Installation Requirement
Click
+conditionbutton at level 2 (inside the same AND group)Select condition:
Agent is Installed
Level 1: User Authorization (OR Group)
Create User Authorization Group
Click the
ORbutton at level 1 to create a group condition with OR operatorThis group will contain alternative user authorization methods
Add IT Department Condition
Click
+conditionbutton at level 2 (inside the OR group)Select condition:
LDAP attribute Department equals IT
Add Management Group Condition
Click
+conditionbutton at level 2 (inside the same OR group)Select condition:
LDAP attribute Member of equals Management
Level 2: Certificate Authentication (Nested AND)
Create Nested Certificate Group
Click the
ANDbutton at level 2 (inside the OR group from step 6)This creates a nested AND condition within the OR group
Add Certificate Subject Condition
Click
+conditionbutton at level 3 (inside the nested AND group)Select condition:
Certificate TLS-Cert-Subject contains VN-NAC
Add Certificate Common Name Condition
Click
+conditionbutton at level 3 (inside the same nested AND group)Select condition:
Certificate TLS-Cert-Common-Name equal VN-NAC-AD-CA
Finalize Rule
Save the Rule
Click
Add Rulebutton to create the new ruleVerify the rule appears in the rules list
Common Rule Examples
Each example below lists both the conditions that make the rule match and the actions it applies. Remember that a rule can assign an Access Profile and show a remediation page — see Showing a Remediation Page.
Example 1: Company Employee Access
Goal: Give full access to company employees with proper security
Conditions:
User is in "Employees" group AND
Device has Metadefender Endpoint installed AND
Device is compliant
Actions:
Assign the Full Access access profile
No remediation page is needed — the device is granted access
Example 2: Guest Access
Goal: Give limited internet access to visitor devices
Conditions:
Authentication Status = "Authenticated via Guest Access" OR
Device Group = "Visitors"
Actions:
Assign the Captive Portal access profile
Show the SSO and Guest remediation page so visitors can sign in with SSO or register a guest account
Example 3: IT Department Special Access
Goal: Give IT staff administrative access from their work devices
Conditions:
(Department = "IT" OR User Group = "IT Admins") AND
Device Type = "Laptop" AND
Certificate Issuer = "Company CA"
Actions:
Assign the Admin access profile
No remediation page is needed — the device is granted access
Example 4: Mobile Device Policy
Goal: Allow mobile devices but with restrictions
Conditions:
(Device Type = "Phone" OR Device Type = "Tablet") AND
Agent = "Installed" AND
Device Status = "Compliant"
Actions:
Assign the Mobile Restricted access profile
No remediation page is needed — the device is granted (limited) access
Example 5: Require MetaDefender Endpoint (New)
Goal: Send devices that don't have the agent to install it before they can connect
Conditions:
Agent = "Not Installed" OR
Device Status = "Unknown"
Actions:
Assign the Captive Portal access profile
Show the MDE required remediation page, which prompts the user to download and install MetaDefender Endpoint
Example 6: Block Unauthorized Devices (New)
Goal: Clearly deny access to devices that don't match any other rule
Conditions:
Typically the Default rule, which has no conditions and catches every device left over
Actions:
Assign the Captive Portal access profile
Show the Block remediation page, which displays "You are not allowed on this network."
Info
If a device is placed on a captive portal and no matching rule sets a remediation page, the Block page is shown automatically.
Managing Your Rules
Rule Order Matters
Rules are checked from top to bottom. The first matching rule wins.
Best Practice: Put your most specific rules at the top, general rules at the bottom.
Example Order:
IT Admin Full Access (very specific)
Company Employee Standard Access (specific)
Guest Limited Access (general)
Default Block All (catch-all)
Editing Rules
View Details: Click on a rule to see its conditions
Move Up/Down: Use arrow buttons to reorder rules
Enable/Disable: Use the toggle switch to turn rules on/off
Delete: Click the trash icon to remove a rule
The Default Rule
There's always a "Default Rule" at the bottom. This catches any device that doesn't match your other rules. Make sure to set this to an appropriate access level (usually very limited or blocked).
You can also add a Show remediation page action to the Default Rule so users who fall through to it receive clear messaging. If the Default Rule sends devices to a captive portal without an explicit remediation page, the Block page is shown automatically. See Showing a Remediation Page.
Troubleshooting Tips
Device Not Getting Expected Access
Check rule order - Is a more general rule above your specific rule?
Verify conditions - Are all the conditions actually true for the device?
Test with simple rules - Start with one condition and add complexity
Rule Too Complex
Break complex rules into multiple simpler rules
Use descriptive names to track what each rule does
Document your logic in the rule name
Performance Issues
Avoid overly complex nested conditions
Place most commonly matched rules higher in the list
Regularly review and clean up unused rules
Best Practices
Start Simple: Begin with basic rules and add complexity as needed
Test Thoroughly: Always test new rules with actual devices
Document Everything: Use clear rule names that explain the purpose
Regular Reviews: Periodically review rules to ensure they're still needed
Security First: When in doubt, be more restrictive rather than permissive
Getting Help
If you need assistance with creating rules:
Start with the examples provided
Test rules in a safe environment first
Contact your system administrator for complex scenarios
Keep rule logic as simple as possible while meeting your security needs
Or contact OPSWAT support