
My OPSWAT Central Management supports OpenID Connect (OIDC) integration for Single Sign-On (SSO), enabling authentication via external Identity Providers (IdPs) such as Okta. This guide walks through configuring both My OPSWAT Central Management and Okta to establish the SSO integration.
Prerequisites
Admin access to My OPSWAT Central Management with SSO management permissions
Admin access to Okta with an Application Admin or Super Admin role
OIDC-supported IdP; this guide uses Okta
My OPSWAT Central Management must be accessible over HTTPS, because OIDC requires secure callback URIs
Network connectivity from My OPSWAT Central Management to Okta endpoints, such as
https://<your-okta-domain>/.well-known/openid-configurationThe following values from Okta: Client ID, Client Secret, and Issuer URL
Configure My OPSWAT Central Management (SSO Settings)
Navigation: Settings → User Management → SSO → Console Authentication
Step 1: Enable SSO and Select OIDC
Enable Single Sign On
Select OIDC
Step 2: Enter IdP Configuration
IdP Name: A display name for this SSO connection, such as
Okta ProductionIssuer URL: Your Okta issuer URL. Typical formats are:
https://<your-okta-domain>for the Okta Org Authorization Serverhttps://<your-okta-domain>/oauth2/defaultfor the Okta Default Custom Authorization Server
Client ID: From Okta, obtained after creating the application
Client Secret: From Okta, obtained after creating the application
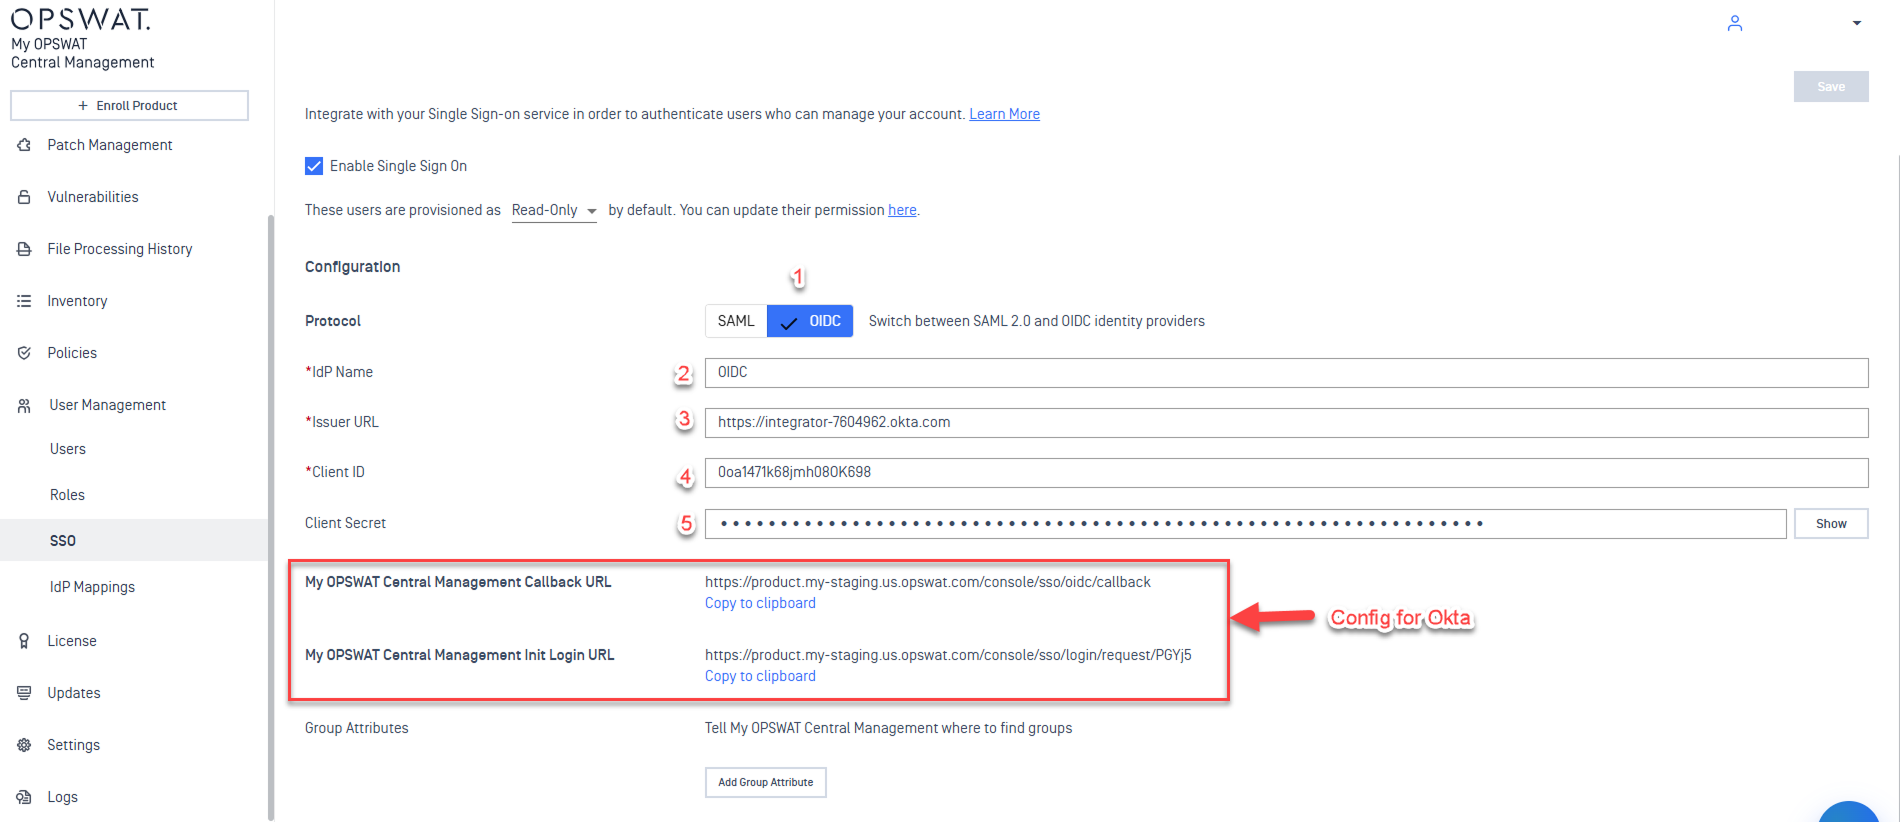
Step 3: Copy My OPSWAT Central Management URLs
After saving the configuration, My OPSWAT Central Management generates the URLs that must be entered in Okta.
Callback URL: https://<cm10-host>/console/sso/oidc/callback
Used in Okta as: Sign-in Redirect URI
Init Login URL: https://<cm10-host>/console/sso/login/request/<id>
Used in Okta as: Initiate Login URI
Note The <id> value is the SSO configuration identifier automatically generated by after you save the configuration. Return to this screen after saving to copy the complete Init Login URL.
Step 4: Save Configuration
Click Save. After saving, copy both the Callback URL and Init Login URL for use in Okta.
Configure Okta (OIDC Application)
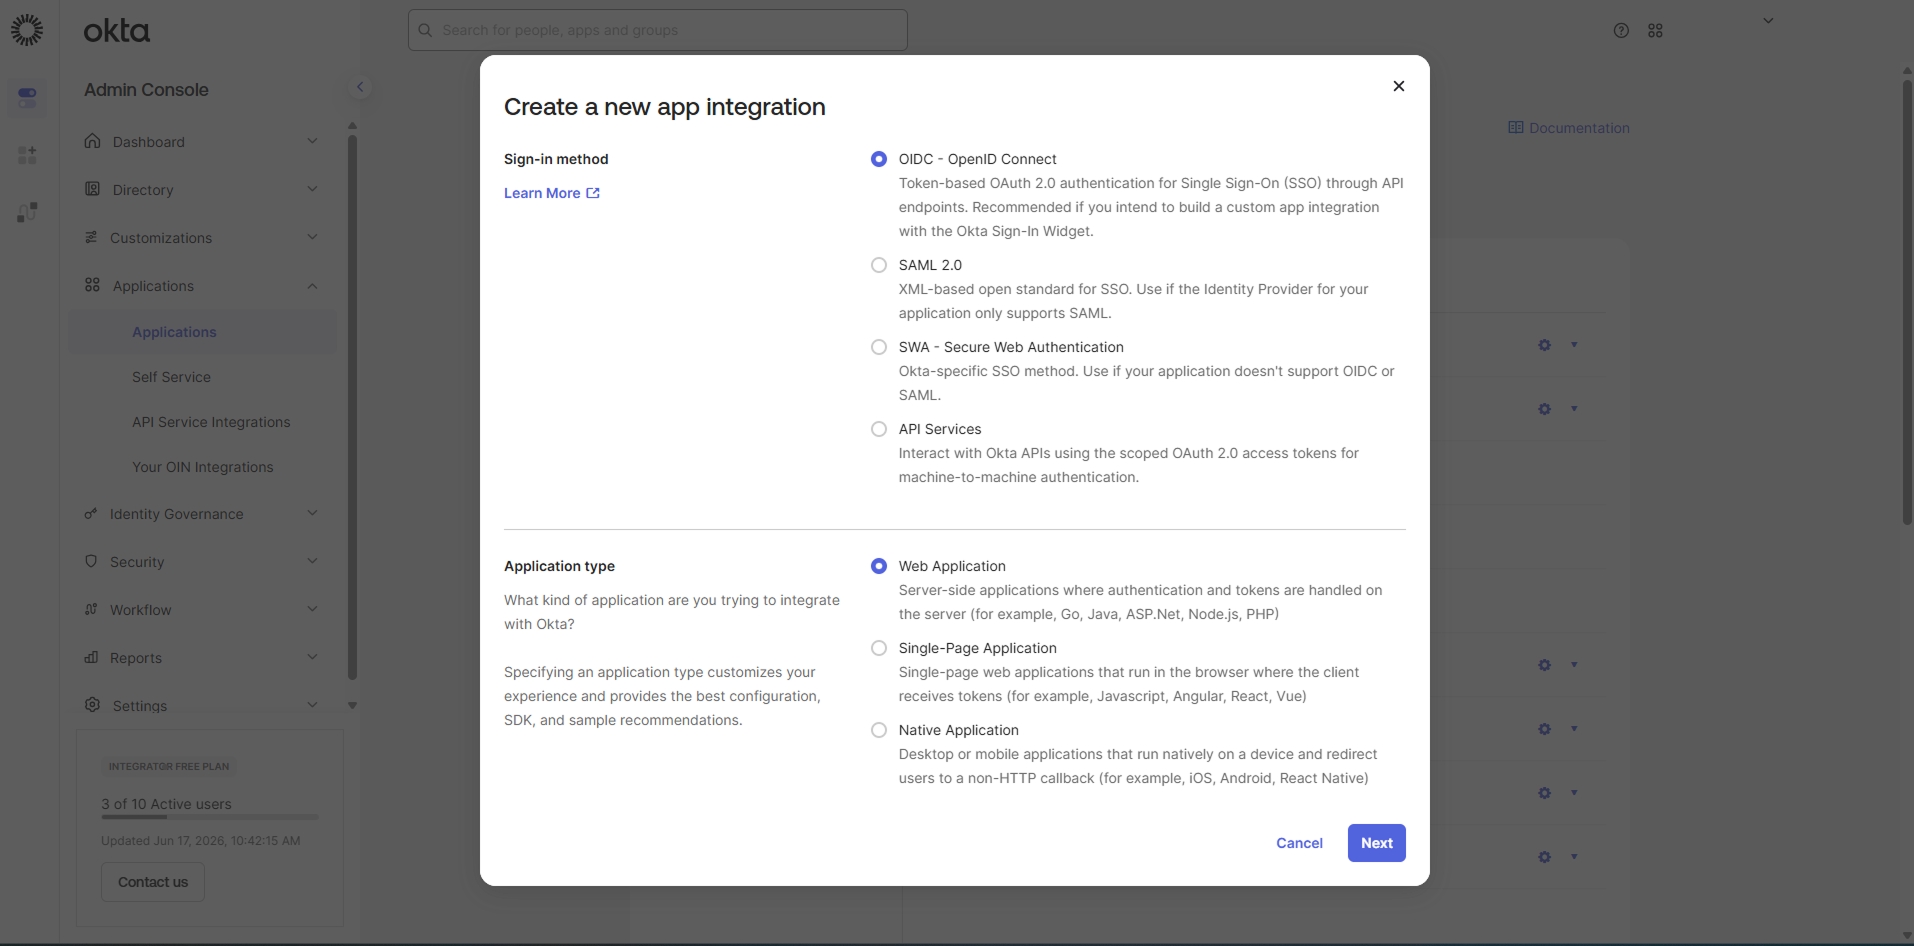
Step 1: Create OIDC Application
Navigation: Okta Admin Console → Applications → Create App Integration
Sign-in method: OIDC - OpenID Connect
Application type: Web Application
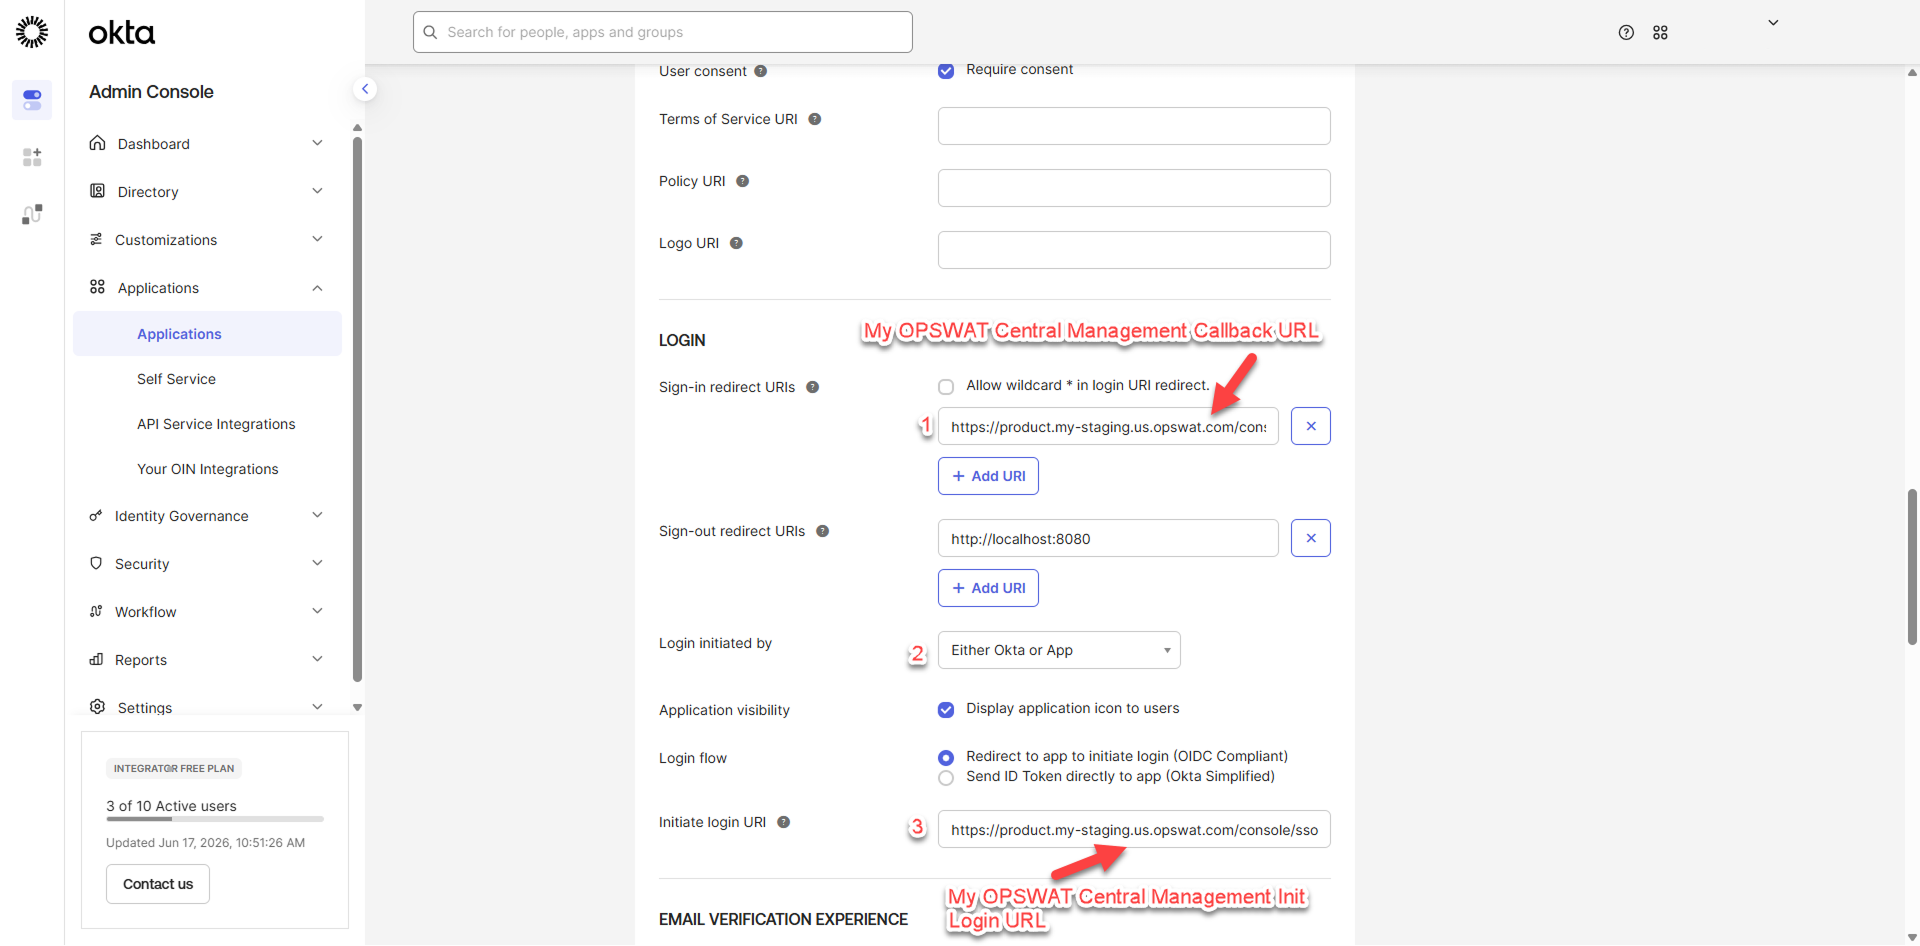
Step 2: Configure Login Settings
Sign-in Redirect URI: Callback URL from Step 3: Copy My OPSWAT Central Management URLs
Login initiated by
Select: Either Okta or App
Login flow
Select: Redirect to app to initiate login (OIDC Compliant)
Note This is the recommended option. It ensures the login flow is initiated via a redirect to My OPSWAT Central Management , which supports OIDC-compliant app-initiated and IdP-initiated login.
Initiate Login URI: Init Login URL from Step 3: Copy My OPSWAT Central Management URLs
Step 3: Configure Scopes
Ensure the following scopes are enabled for the application:
openid— Required for OIDC authenticationprofile— Required to provide user profile attributesemail— Required to provide the user's email address
These scopes ensure My OPSWAT Central Management receives the claims required to identify and authenticate the user.
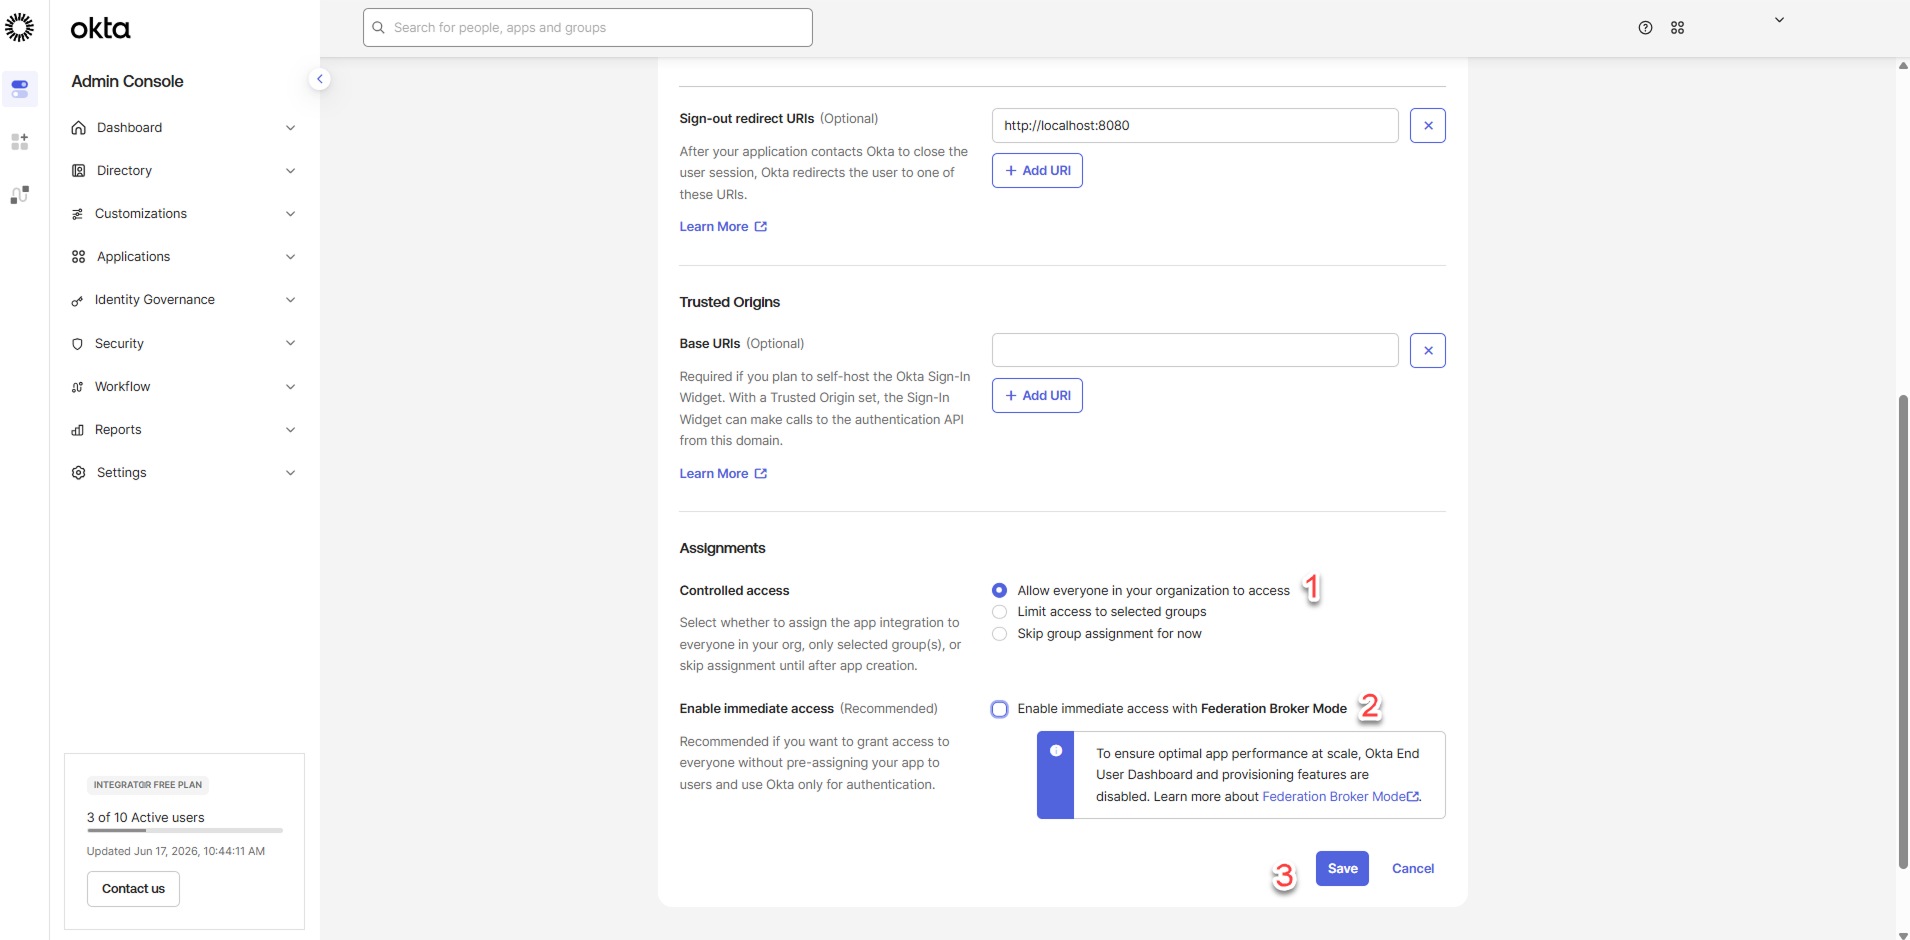
Step 4: Configure Assignment and Save
Allow everyone or restrict access to specific groups
Click Save
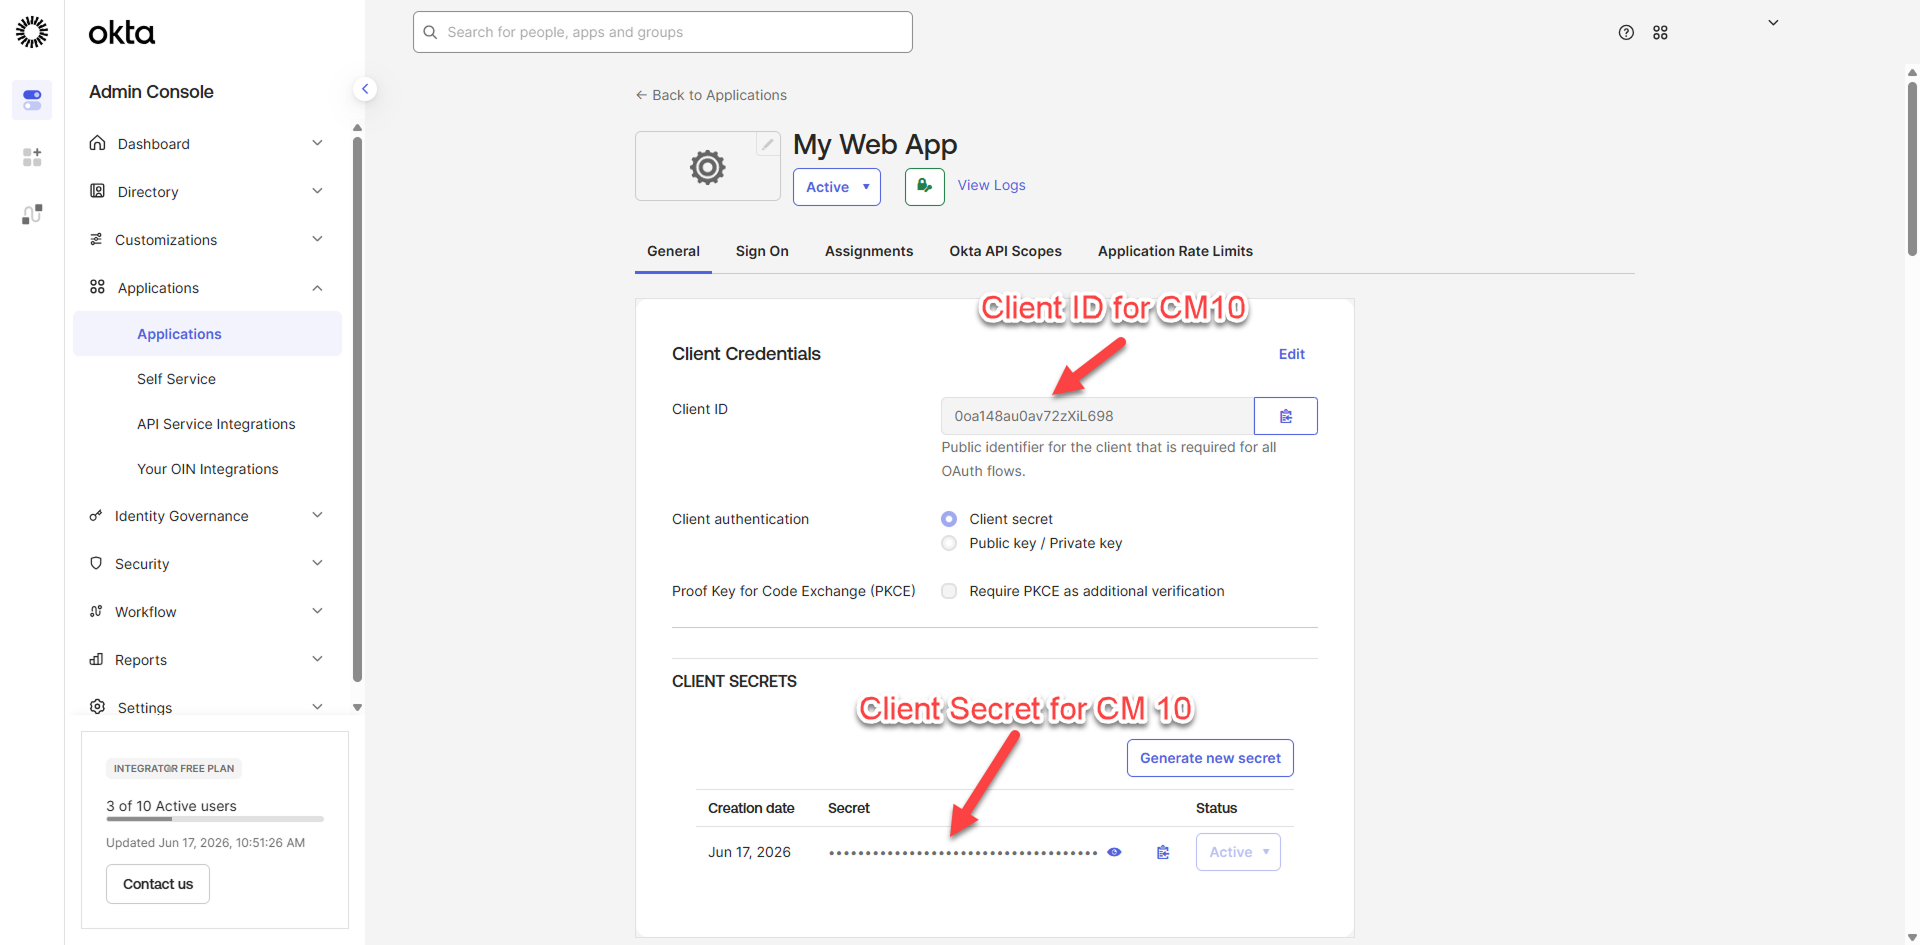
Step 5: Retrieve Client Credentials
Navigate to: Applications → Your App → General
Copy Client ID → Enter in CM10
Copy Client Secret → Enter in CM10
Then navigate to: Applications → Your App → Sign On
Copy the Issuer URL or Okta domain → Enter in My OPSWAT Central Management as the Issuer URL
Step 6: Assign Users
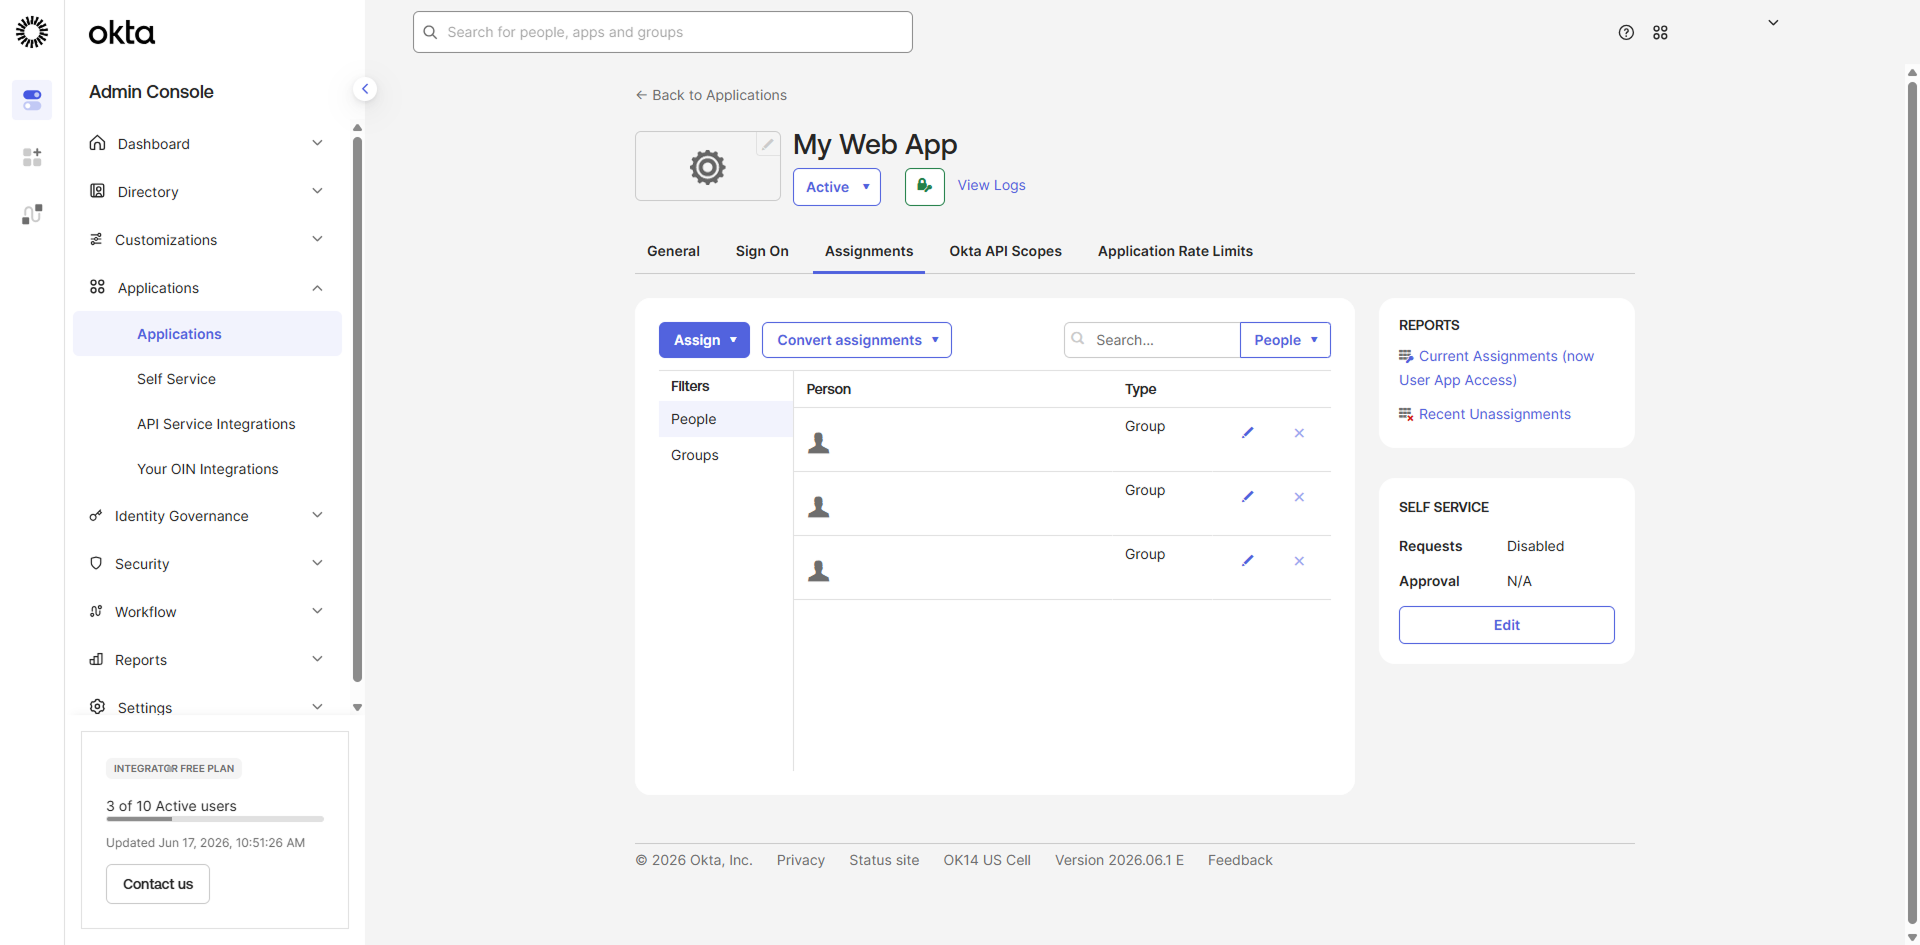
Navigate to: Applications → Your App → Assignments
Assign individual users or groups who should have SSO access to My OPSWAT Central Management
Configuration Mapping
My OPSWAT Central Management | Okta | Notes |
|---|---|---|
Callback URL | Sign-in Redirect URI | Must match exactly, including protocol, path, and trailing slash behavior |
Init Login URL | Initiate Login URI | Contains the auto-generated |
Issuer URL | Okta Domain / Issuer | Use the Org Authorization Server or Custom Authorization Server URL consistently |
Client ID | Client ID | From the Okta application General tab |
Client Secret | Client Secret | From the Okta application General tab |
User Provisioning
When a user authenticates via OIDC SSO for the first time:
If Just-In-Time (JIT) provisioning is enabled: The user account is automatically created in My OPSWAT Central Management using attributes from the OIDC token, such as email and name.
If JIT provisioning is not enabled: The user must be pre-created in My OPSWAT Central Management before they can log in via SSO.
Please refer to OCM Account Provisioning with Okta documentation for details.
Logout Behavior
My OPSWAT Central Management SSO logout terminates its session. It does not necessarily terminate the user's Okta session.
If the user remains authenticated in Okta, they may be able to re-authenticate to My OPSWAT Central Management without entering credentials again until the Okta session expires.
If your organization requires full Single Logout (SLO), confirm whether your My OPSWAT Central Management version supports it. Otherwise, users should log out of Okta separately.
End-to-End Flow (OIDC Authorization Code Flow)
User clicks "Login with SSO" on My OPSWAT Central Management
My OPSWAT Central Management redirects to Okta with an authorization request including client_id, redirect_uri, scopes, and response_type=code
User authenticates at Okta, including MFA if configured
Okta redirects back to the My OPSWAT Central Management Callback URL with an authorization code
My OPSWAT Central Management exchanges the authorization code for tokens via Okta's token endpoint
My OPSWAT Central Management validates the ID token, extracts user claims, and creates a session
User is logged into My OPSWAT Central Management
Testing and Verification
Open My OPSWAT Central Management in an incognito or private browser window.
Click Login with SSO. You should be redirected to Okta.
Authenticate with a user assigned to the Okta application.
Confirm you are redirected back to My OPSWAT Central Management and logged in successfully.
Verify the user's name and email in My OPSWAT Central Management match the Okta profile.
From the Okta dashboard, click the My OPSWAT Central Management application tile to test IdP-initiated login.
Troubleshooting
Issues | Causes | Solutions |
|---|---|---|
Redirect error | Callback URL mismatch between My OPSWAT Central Management and Okta | Verify the Callback URL in My OPSWAT Central Management matches the Sign-in Redirect URI in Okta exactly. |
Login loop | Incorrect login flow setting | Ensure Okta login flow is set to Redirect to app to initiate login (OIDC Compliant). |
Unauthorized | User is not assigned to the Okta application | Assign the user or their group in Okta under Applications → Assignments. |
Invalid token | Wrong Issuer URL | Verify the Issuer URL matches the Okta authorization server used by the application. |
SSL or certificate error | My OPSWAT Central Management cannot reach or trust Okta endpoints | Ensure My OPSWAT Central Management trusts the Okta TLS certificate and check proxy or firewall settings. |
Clock skew error | Token validation fails due to server time drift | Synchronize the My OPSWAT Central Management server time using NTP. Keep drift under five minutes. |
Missing user attributes | Required claims are not returned by Okta | Verify the |