AWS Lambda Function with S3 Trigger Setup Guide
Before proceeding with the setup, ensure the following requirements are met:
1. IAM User Permissions
Your IAM user must have the necessary permissions to:
Create Lambda functions
Assign IAM roles
Configure S3 triggers
Access the target S3 buckets
2. Account-Level Verification
Confirm there are no account-level naming restrictions that would prevent your chosen Lambda function name
Verify your AWS account has sufficient permissions and service quotas to create new Lambda functions in the desired region
Ensure you have access to the target AWS region where the Lambda function will be deployed
3. S3 Bucket Configuration
Verify that S3 bucket policies are configured to allow access from the Lambda function's execution role
Required S3 permissions may include:
s3:GetObject- to read objects from the buckets3:PutObject- to write objects to the bucket (if applicable)s3:DeleteObject- to delete objects from the bucket (if applicable)
4. IAM Execution Role
Ensure you have a pre-configured IAM role with:
Lambda execution permissions
S3 access permissions for your target bucket(s)
CloudWatch Logs permissions for function monitoring
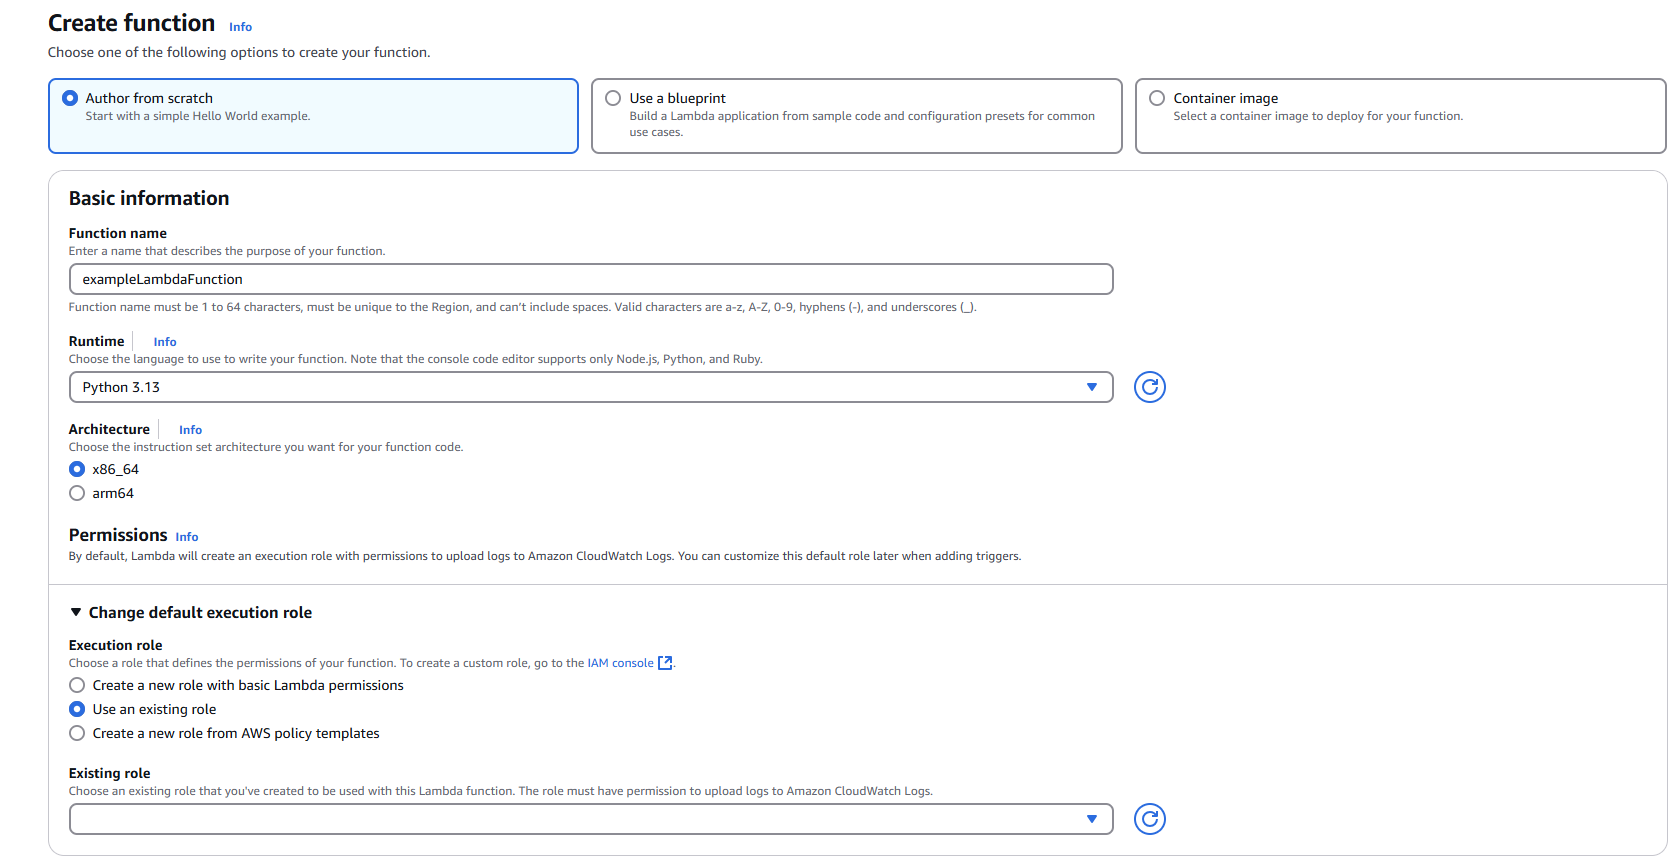
Step 1: Creating the Lambda Function
1.1 Navigate to Lambda Service
Open the AWS Management Console
Navigate to the Lambda service
1.2 Initialize Function Creation
Click "Create function"
Select "Author from scratch"
1.3 Configure Basic Settings
Function name: Enter a descriptive name for your Lambda function
Example:
MetaDefenderStorageSecurityProcessorEnsure the name complies with AWS naming conventions and any account-specific policies
Runtime: Select Python (choose the latest compatible version)
1.4 Configure Permissions
Under "Change default execution role", select "Use an existing role"
From the "Existing role" dropdown, choose your pre-configured IAM role
Verify role permissions:
Navigate to the IAM console and review the selected role
Confirm Permission policies include necessary access to S3, CloudWatch Logs, and other required services
Verify Trust relationships allow the Lambda service (
lambda.amazonaws.com) to assume the role
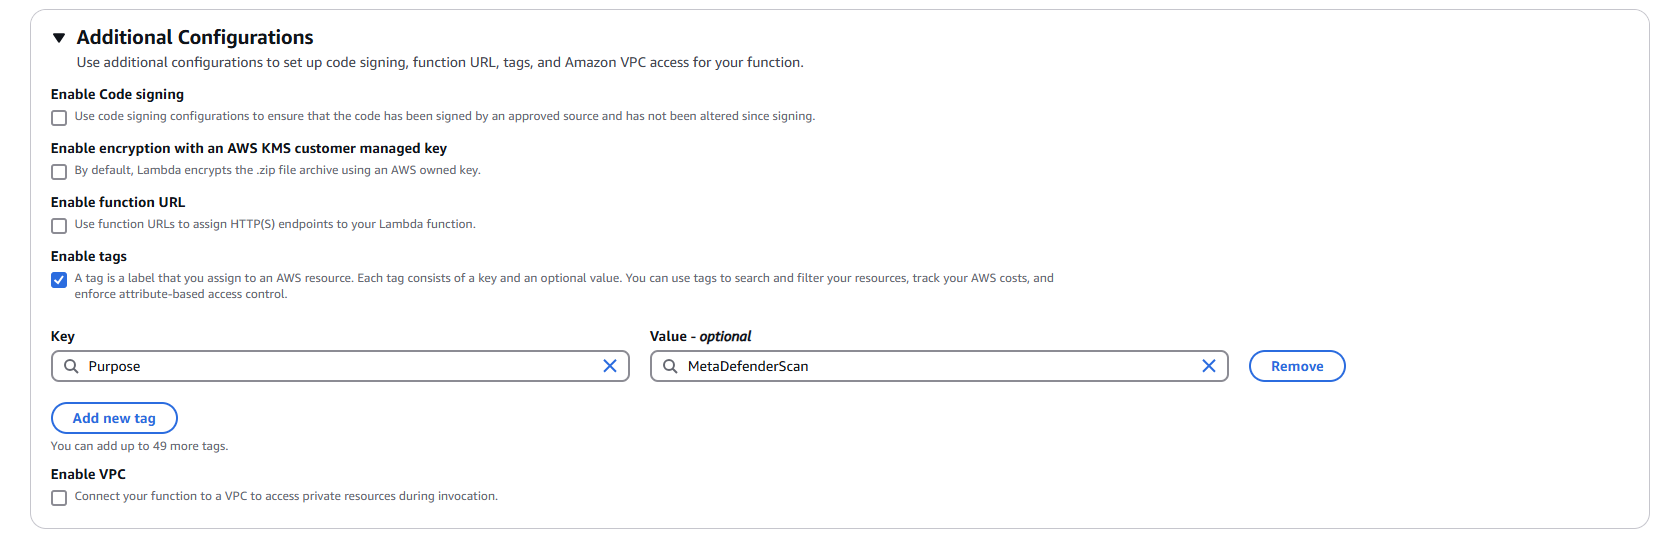
1.5 Configure Advanced Settings (Optional but Recommended)
Expand "Advanced configuration"
Enable "Tags"
Add relevant tags for resource organization:
Key:
Purpose| Value:MetaDefenderScanKey:
Environment| Value:Production/DevelopmentKey:
Owner| Value:[Your Team/Department]
1.6 Create the Function
Click "Create function"
Wait for the function to be successfully created
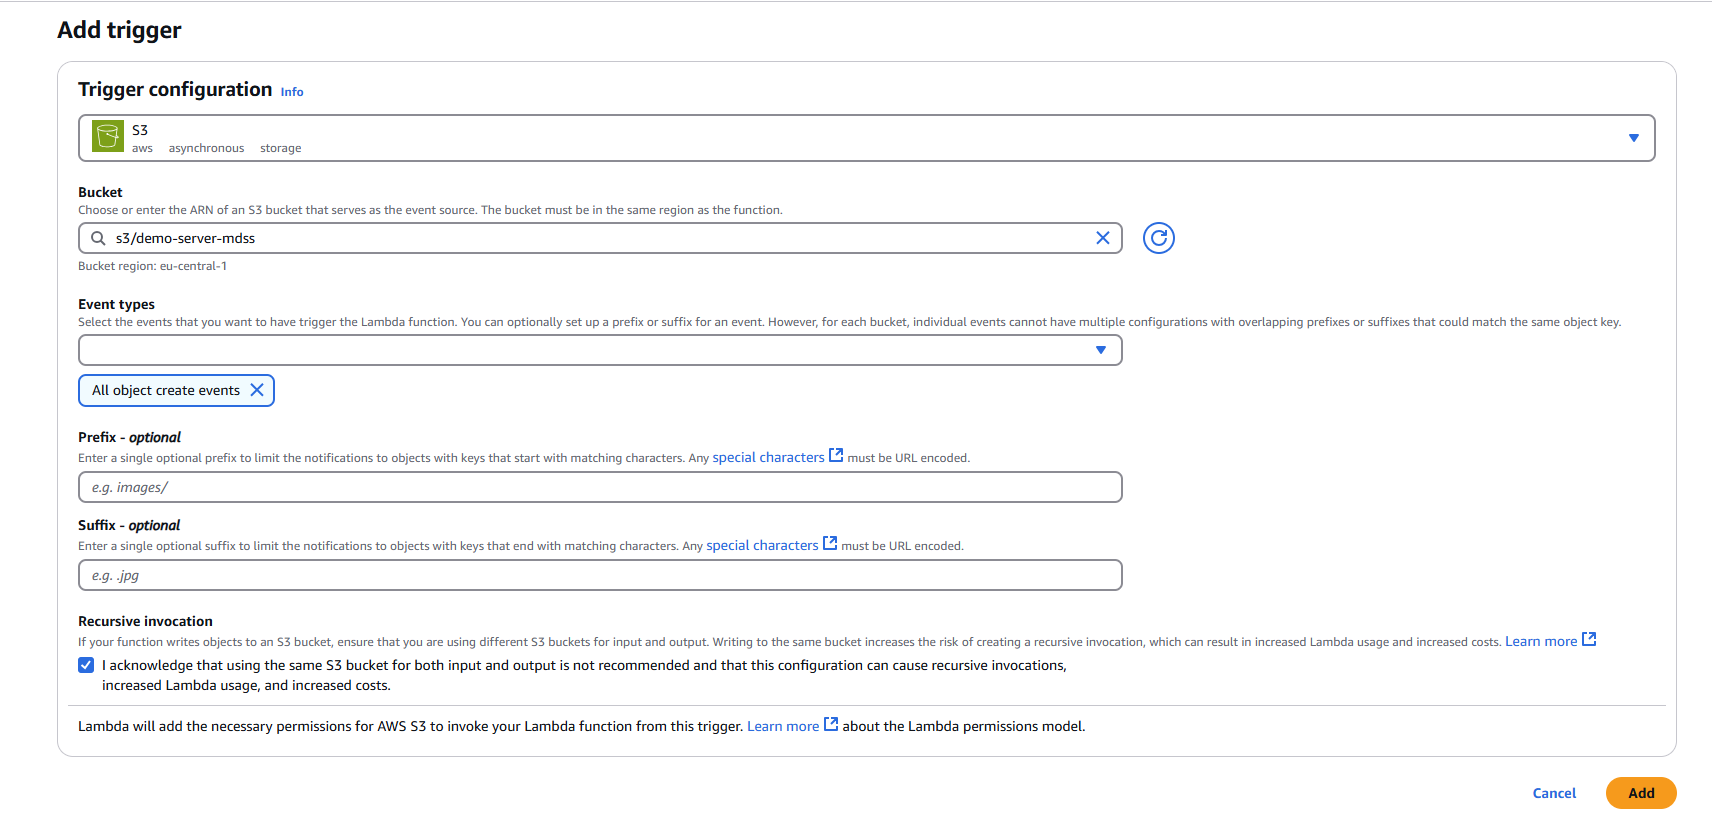
Step 2: Adding S3 Trigger
2.1 Add Trigger Configuration
In your newly created Lambda function, click "Add trigger"
Select "S3" as the trigger source
2.2 Configure S3 Trigger Settings
Bucket: Select your target S3 bucket from the dropdown menu
Event types: Choose the appropriate event type
Default: "All object create events"
Alternative options: Object create, delete, or restore events based on your requirements
Prefix (Optional): Specify a prefix to filter objects by path
Example:
uploads/to only trigger on objects in the uploads folder
Suffix (Optional): Specify a suffix to filter objects by file extension
Example:
.pdfto only trigger on PDF files
Recursive invocation: Check this option to acknowledge potential recursive invocations
2.3 Finalize Trigger Setup
Review your trigger configuration
Click "Add" to create the S3 trigger
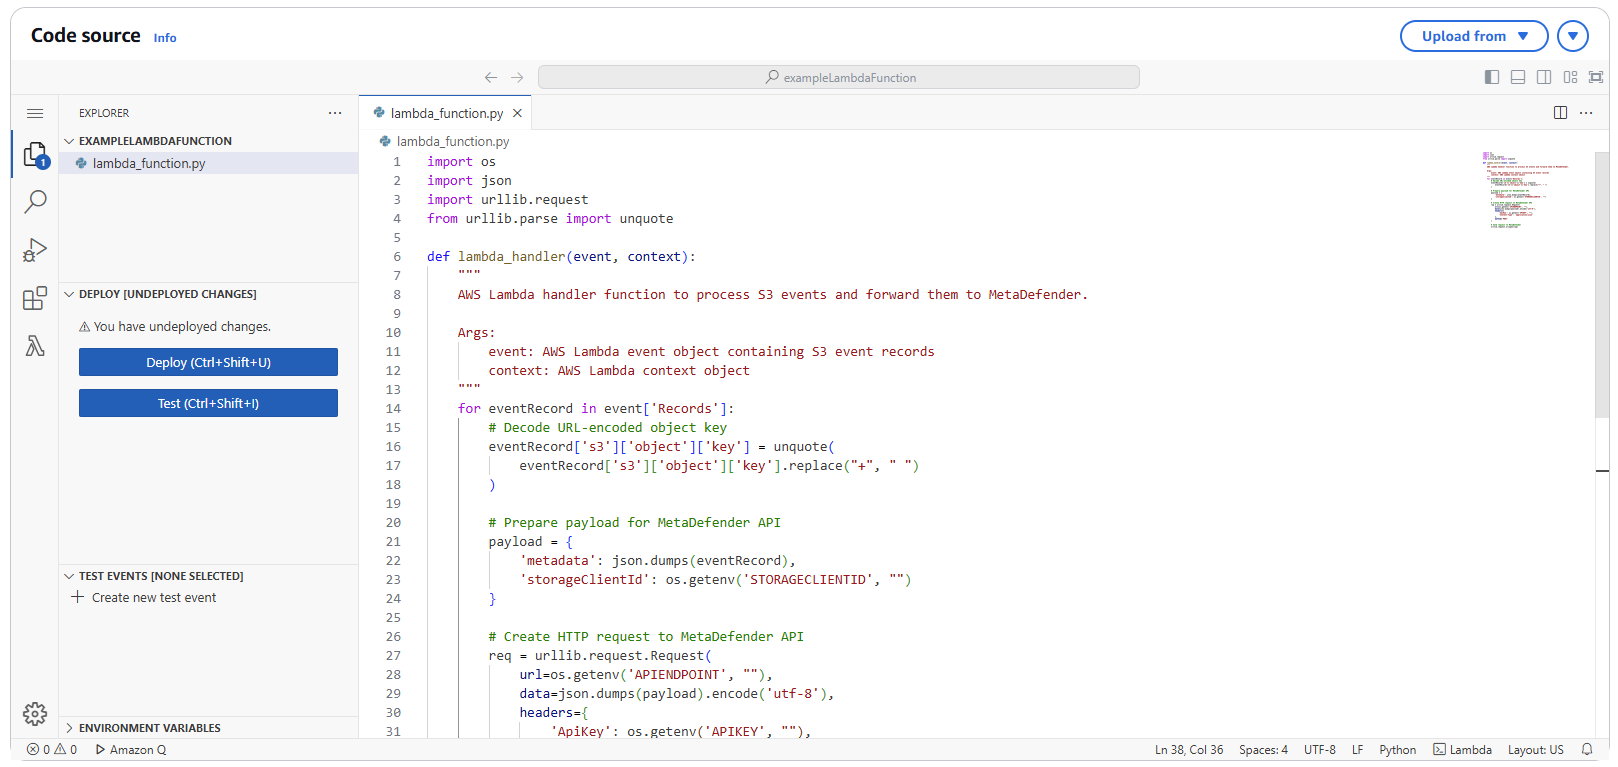
3.1 Navigate to Code Section
In your Lambda function console, navigate to the "Code" tab
Replace the default code with the following implementation:
3.2 Deploy the Code
Click "Deploy" to save and deploy your function code
Request Format (with examples)
The request body differs based on storage type. Below are the specifications for each supported storage:
Amazon S3 and S3 Compatible
Response Formats
Success
When a webhook is successfully processed, the system returns:
Field | Description |
|---|---|
correlationId | A unique identifier that references the submitted file in our database. You can use this ID for tracking the file's processing status or for future API calls related to this file. |
Error
When an error occurs during processing, the system returns:
Field | Description |
|---|---|
responseKey | Machine-readable error code that identifies the specific error condition. |
responseMessage | Human-readable explanation of the error. |
Common error responses
Response Message | Description | Recommended Action |
|---|---|---|
The storage could not be found | The specified storage client ID does not exist in the system. | Verify the storageClientId is correct and the storage has been properly configured in the system. |
Real-Time Process is not enabled. | Real-time processing has not been activated for this storage client. | Enable real-time processing for the storage client in your account settings. |
Real-Time Process is enabled, but it is not set to Event Based. | The storage is configured for real-time processing, but is using polling rather than event-based processing. | Stop the current RTP scan and start another one using Event-Based |
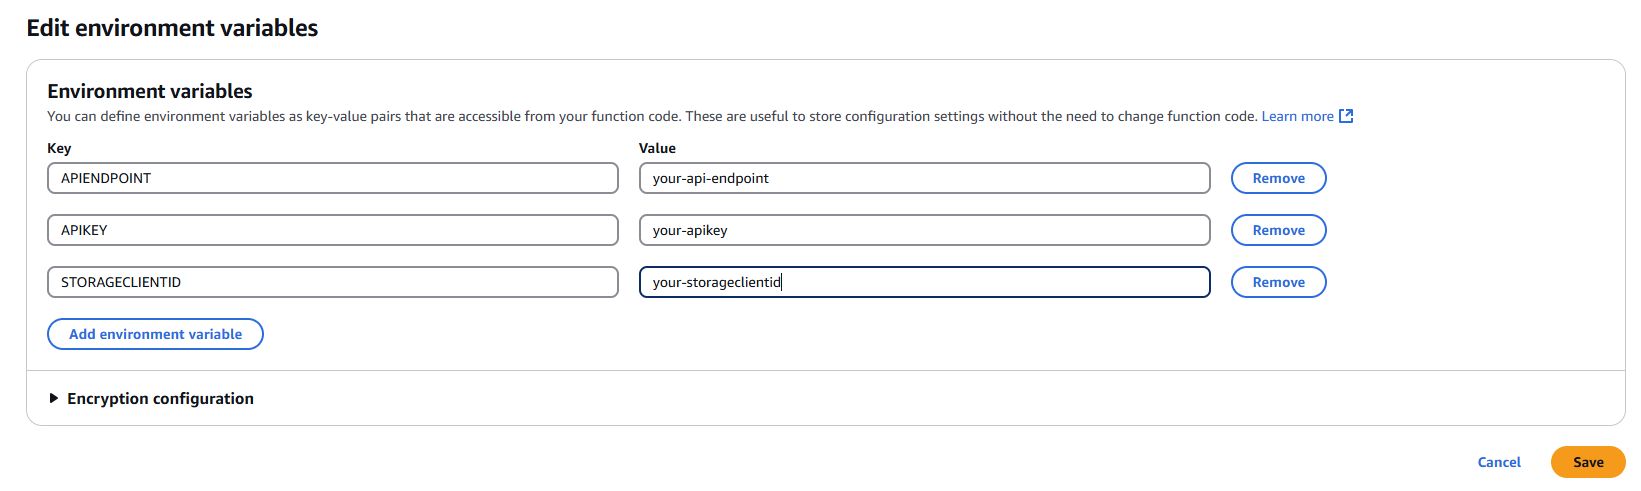
Step 4: Configuring Environment Variables
4.1 Navigate to Configuration
In your Lambda function console, click on the "Configuration" tab
Select "Environment variables" from the left sidebar
4.2 Add Required Environment Variables
Click "Edit" and add the following environment variables:
APIENDPOINT
Key:
APIENDPOINTValue: Your MDSS URL +
/api/webhook/realtimeExample:
https://mdss-example.com/api/webhook/realtime
APIKEY
Key:
APIKEYValue: Your MDSS user API key
Note: Ensure this key has appropriate permissions for webhook operations
STORAGECLIENTID
Key:
STORAGECLIENTIDValue: Your storage client ID from MDSS
To obtain: Navigate to your desired storage configuration and copy the
storageClientId
4.3 Save Configuration
Click "Save" to apply the environment variable changes
Step 5: Testing and Validation
5.1 Test the Function
Upload a test file to your configured S3 bucket
Monitor the Lambda function's execution in the "Monitor" tab
Check CloudWatch Logs for any execution errors or successful processing
5.2 Verify Integration
Confirm that file events are being sent to your MDSS instance
Verify that scans are initiated as expected
Review MDSS logs for successful webhook reception