Overview
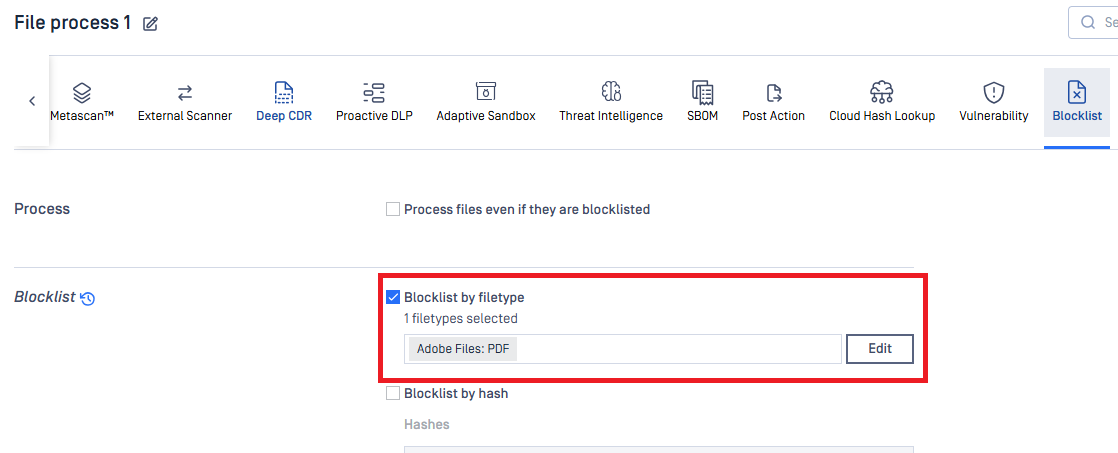
The Blocklist File Type feature allows you to block files from being processed based on their detected file type. When a file matches a blocklist rule, it is immediately marked as Blocked and skips all scan engines.
You can access this feature from the Blocklist tab in the workflow/rule configuration page.
Since version 5.18.0, MetaDefender Core introduces a brand-new UI. To align with the updated UI/UX, some minor logic and usability changes have been implemented.
Previously, users were required to select a group first and then choose file types within that group, which made the feature less intuitive. In the updated version, the boundary between groups and file types has been streamlined. While groups are still maintained for backend alignment, users can now directly input file types when adding new items, making the process significantly more user-friendly.
There is also a slight change in UX behavior:
- Before: If a user enabled a group, selected specific items, and later disabled the entire group, those sub-items would remain configured when the group was re-enabled.
- After: Starting from version 5.18.0, if a group is disabled, all sub-items within that group are cleared. When the group is re-enabled, users will need to reselect the desired items.
Please note that this change only affects the user experience. The underlying logic remains unchanged—when a group is disabled, its sub-items are not applied, so there is no impact on backend processing or final results.
Blocklist Modes
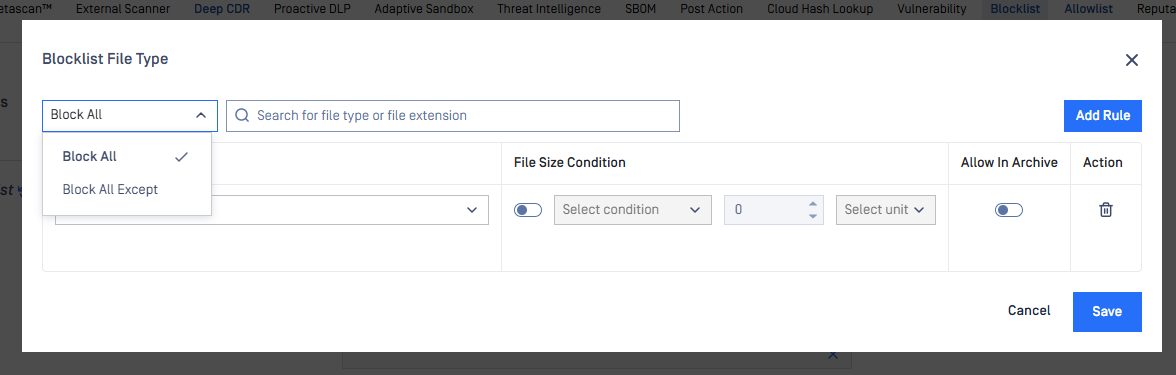
The blocklist operates in one of two modes, selected from the dropdown at the top-left of the dialog:
| Mode | Meaning |
|---|---|
| Block All | Every file type you add to the list will be blocked. All other file types are allowed through for normal processing. |
| Block All Except | Every file type not in the list will be blocked. Only the file types you add are allowed through for normal processing. |
Tip: Think of Block All as a deny-list (block specific types) and Block All Except as an allow-list (only permit specific types).
Common Controls
Regardless of which mode you choose, the dialog provides the following controls:
- Condition dropdown (top-left) - Switch between "Block All" and "Block All Except".
- Search bar - Filter the list of configured rules. Type a file type name or extension to quickly find existing rules.
- Add Rule button - Add a new file type rule to the list.
- Save / Cancel buttons - Save your changes or discard them.
Adding a Rule
- Click Add Rule
- A new row appears in the table.
- Select a File Type from the dropdown (e.g., "Archive Files: XZ", "Executable Files: EXE").
- Optionally configure a File Size Condition (see below).
- Configure the mode-specific option (Allow In Archive or Allow Child Files, depending on the mode).
- Click Save to apply.
To remove a rule, click the trash icon in the Action column for that row.
After saving and closing the window, reopening it will display the items reordered alphabetically (grouped accordingly). However, you can easily locate configured items using the search bar, ensuring quick access to your settings.
File Size Condition
Each rule can optionally include a file size condition, which narrows when the rule applies. This lets you block (or allow) a file type only when the file is above or below a certain size.
To enable a file size condition:
Toggle the File Size Condition switch to ON (blue).
Select a condition from the dropdown:
- If smaller than - The rule applies only when the file is smaller than the specified size.
- If bigger than - The rule applies only when the file is bigger than the specified size.
Enter a numeric value in the size field.
Select the unit: B (bytes), KB (kilobytes), or MB (megabytes).
Examples:
Note: When the file size condition is toggled OFF, the rule applies to all files of the selected type regardless of their size.
"Block All" Mode - Details
In Block All mode, the table columns are:
| Column | Description |
|---|---|
| File Type | The file type this rule applies to. |
| File Size Condition | Optional size-based narrowing of the rule. |
| Allow In Archive | Toggle to control behavior when this file type is found inside an archive. |
| Action | Delete the rule. |
Allow In Archive
This option is only available in Block All mode.
When a blocked file type is found inside an archive (e.g., an EXE inside a ZIP file), you may want to handle it differently than when it appears as a standalone file.
| Allow In Archive | Behavior |
|---|---|
| OFF (default) | The file type is blocked immediately, even if it is extracted from an archive. |
| ON | If the file is inside an archive, it is not blocked immediately. Instead, it proceeds through normal processing (all configured scan engines run on it). The final verdict is determined by the scan results, not the blocklist. |
When to use this:
- Turn ON Allow In Archive when you want to block standalone uploads of a certain file type (e.g., direct EXE uploads) but still want files of that type to be scanned normally when they are extracted from archives. This is useful when the context of being inside an archive changes the risk profile - for example, you might want to block raw EXE uploads but still allow AV engines to scan EXEs found inside ZIP files.
Example scenario:
- You add a rule: Block All + "Executable Files: EXE" + Allow In Archive = ON.
- A user uploads
malware.exedirectly -> Blocked (file is not inside an archive). - A user uploads
package.zipcontainingtool.exe-> The ZIP is processed normally. Whentool.exeis extracted, it is not blocked and proceeds through normal scanning. If an engine flags it as malicious, it will be marked accordingly.
"Block All Except" Mode - Details
In Block All Except mode, the table columns are:
| Column | Description |
|---|---|
| File Type | The file type this rule allows (everything else is blocked). |
| File Size Condition | Optional size-based narrowing of the rule. |
| Allow Child Files | Toggle to specify which child file types inside archives of this type should also be allowed. |
| Action | Delete the rule. |
Understanding "Block All Except"
This mode inverts the logic: you are building an allow-list. Only the file types you add to the list will be permitted. All other file types will be blocked.
Example: If you add only "Archive Files: ZIP" and "Document Files: PDF" to the list, then:
- ZIP files -> Allowed (in the list)
- PDF files -> Allowed (in the list)
- EXE files -> Blocked (not in the list)
- DOCX files -> Blocked (not in the list)
Allow Child Files
This option is only available in Block All Except mode and addresses an important question: What happens to files extracted from an allowed archive type?
Consider this scenario: You allow ZIP files, but a ZIP archive contains an EXE file. Since EXE is not in your allow-list, the extracted EXE would normally be blocked. The Allow Child Files option lets you specify exceptions for extracted files.
| Allow Child Files | Behavior |
|---|---|
| OFF (default) | Extracted files follow the normal blocklist rules. If their type is not in the allow-list, they are blocked. |
| ON | You must select one or more file types from the dropdown. Extracted files matching those selected types will be allowed through even though they are not in the main allow-list. |
To configure Allow Child Files:
- Toggle the Allow Child Files switch to ON (blue).
- From the dropdown that appears, select one or more file types that should be allowed when extracted from this archive type.
Example scenario:
- Mode: Block All Except.
- You add a rule: Allow "Archive Files: ZIP" with Allow Child Files = ON, and select "Executable Files: EXE" and "Document Files: PDF".
- A user uploads
package.zipcontainingtool.exeandreadme.pdfandscript.bat:package.zip-> Allowed (in the allow-list).tool.exe(extracted) -> Allowed (in the Allow Child Files list for ZIP).readme.pdf(extracted) -> Allowed (in the Allow Child Files list for ZIP).script.bat(extracted) -> Blocked (not in the allow-list and not in Allow Child Files).
Key insight: Allow Child Files only applies to files that are extracted from an archive. It does not affect files uploaded directly. A directly uploaded EXE would still be blocked if EXE is not in the main allow-list.
Searching Configured Rules
Use the search bar at the top of the dialog to filter rules that have already been configured. Type a file type name or file extension (e.g., "EXE", "Archive", "PDF") and the list will filter to show only matching rules. This is helpful when you have many rules configured and need to quickly find or verify a specific one.
Error section
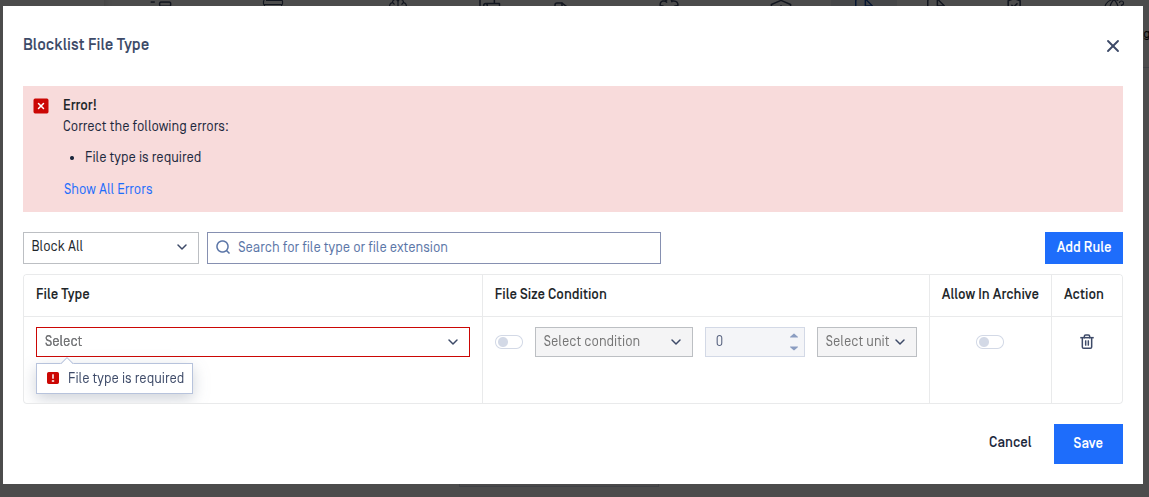
The Errors section will automatically disappear once all issues have been resolved.
Clicking the “Show All Errors” button will filter the list to display only rows containing errors. In this view, the Blocklist Condition field, Add Rule option, search field, and Save button will be disabled. The button label will also change to “Show All Rules.”
Clicking “Show All Rules” will restore the full list and re-enable all previously disabled controls, returning the interface to its normal state.