Preface
The OPSWAT Secure OT Access Installation and Administration Guide describes the procedures used to install and use the following Secure OT Access components:
Windows Client
Windows Service Client
Administration Graphical User Interface
Who should read this
This guide is for system administrators and security engineers responsible for the security of an organization's network.
Support
Contact OPSWAT support using:
<https://www.opswat.com/support>
Online Chat
Global Phone numbers
1. Introduction
Secure OT Access™ is a remote access tool that provides a platform for publishing and monitoring connections between Remote Users and industrial assets. The software contains built-in tools for security and manageability.

Secure OT Access features include:
The ability to deploy in the Cloud or onsite
The Cloud deployment has no required hardware and can be set up in one day or less.
The onsite Management Console is easy to install. This deployment can also be set up in one day.
Integrates with your Active Directory server for user and Security Group authorization
Enables Policy Enforcement per user and per session
Outbound-only connection from endpoint gateway to Secure OT Access Cloud or Management Console, with no inbound firewall exceptions required
Inexpensive and flexible pricing model on annual or monthly subscription
Cloud components are hosted on Amazon Web Services (AWS) for maximum reliability and performance
Secure OT Access deployments
Secure OT Access has two possible deployments:
Cloud: OPSWAT manages Secure OT Access configuration, including tasks such as uploading new software versions (personalities) and setting Management IPs.
Onsite: The Management Console allows the customer to perform Secure OT Access internal configuration tasks. All traffic inspection and policy enforcement are performed in the onsite server, making it suitable for offline deployments with no internet access.
Except for the Management Console, both deployments have the same functionality. You will receive the equipment, software, etc. appropriate to your deployment.
Supported protocols
Both Secure OT Access deployments support various IT and OT protocols. Refer to Appendix B for a table of protocols and their associated policies.
IT protocols
The following IT protocols are supported on non-clientless services only:
HTTP
VNC
The following IT protocols are supported on both clientless and non-clientless services:
HTTPS
RDP
SSH
Telnet
OT protocols
OT protocols are supported on non-clientless services only.
Ethernet IP
FINS
MODBUS
OPCUA
S7Comm
SLMP
Secure OT Access components
Secure OT Access components differ, depending on the deployment:
Admin UI (onsite and Cloud): Configures and manages connections between the Remote User's primary computer and their OT Endpoint Devices.
Windows Client (onsite and Cloud): Connect the Remote User's computer to the Cloud or the Management Console and ultimately to their OT Endpoint Devices.
Windows Service Client (onsite and Cloud): Windows system-level service that can be used as an alternative to the Windows Client. The service launches automatically when the system boots.
Management Console (onsite only): Performs Secure OT Access internal configuration tasks. Refer to the Management Console Guide for more information.
Order of Tasks
Secure OT Access installation and configuration require different tasks, depending on whether you are using the Cloud or onsite deployment.
Cloud deployment
Install and configure Windows Client or Windows Service Client on the Endpoint Gateway.
Install and configure Windows Client or Windows Service Client on the Remote User's computer. If the Remote User connects to clientless services only, this step is not necessary.
Log into the Admin UI to configure the connections between the Remote Users and their associated assets.
Onsite deployment
Install and configure the Management Console. Refer to the Management Console Guide.
Install and configure Windows Client or Windows Service Client on the Endpoint Gateway.
Install and configure Windows Client or Windows Service Client on the Remote User's computer. If the Remote User connects to clientless services only, this step is not necessary.
Log into the Admin UI to configure the connections between the Remote Users and their endpoint devices.
2. Windows Client
Windows Client connects the Remote User's computer to their OT Endpoint Devices through the Cloud or the Management Console.
Important
Install Windows Service Client if you plan to use the S7 or Ethernet IP protocol.
Do not install Windows Client and Windows Service Client on the same system.
Prerequisites
Windows 7 Professional Service Pack 1 or above
If Windows 7 is used, install the following:
.NET 4.5.2
You can install the Microsoft Security updates shown in "Windows Service Client" prerequisites, but this is not necessary.
For Windows 7 OR Windows 10, download the 32-bit version (even on a Windows 64 machine) of the VC_redist.x86 redistributable shown below, and select the appropriate Windows 7 or Windows 10 Binary:
Administrators must have created Endpoint Owner or Remote User accounts.
Before Remote Users can install Windows Client on their computers, Endpoint Owners must install Windows Client on the Endpoint Gateway and provide Remote Users access to services.
Installation
Windows Client is installed on the Endpoint Gateway and on the Remote User's computer. If the Remote User only connects to clientless services, Windows Client needs to be installed on the Endpoint Gateway, but not the Remote User's computer.
You or your Administrator will receive a link through e-mail to download the _OPSWAT_Secure Access for OT.msi installer file. Close out all software before you start installation.
Double-click the installer file to start the program.
Accept the license terms.
Follow the instructions in the installer windows. Click Finish to exit the software.
Start the Secure OT Access software through the desktop icon or your start menu.
Enable Services (Endpoint Owners)
Services provide Remote Users access to assets on endpoint devices at a site. These services are created on the Admin UI. Refer to "All Services" for more information.
The Endpoint Owner must enable services on the Endpoint Gateway before Remote Users can use the services to access the assets.
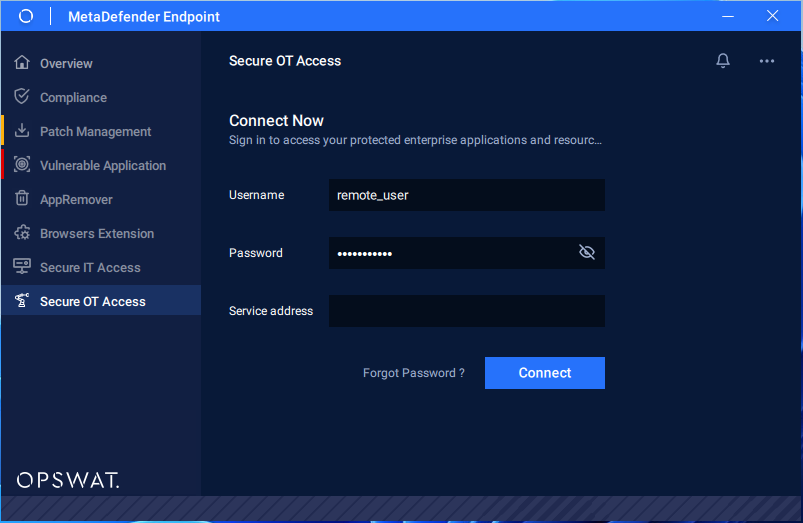
After starting the Secure OT Access software, the following window displays. Complete the boxes and click OK to log in to the Windows Client.
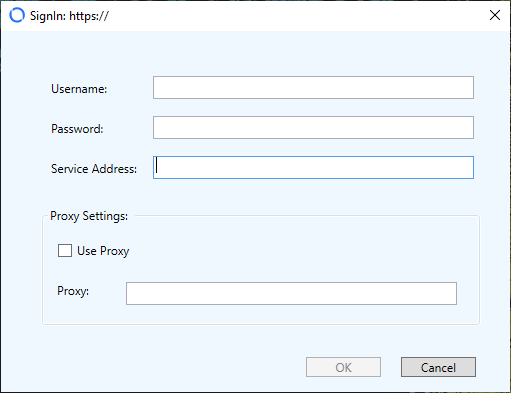
The Administrator supplies Endpoint Owners with identification to log on to the Windows Client. The software can send two-factor authorization (2FA), but OPSWAT recommends disabling 2FA for endpoints at trusted, unmanned locations.
Note
When a user account is created, 2Fa is enabled and set to SMS by default. Only a superadministrator can change this value.
The username provided to the Endpoint Owner should be the same as the value selected for Owner/Provider when creating the service on the Admin UI.
The Service Address box displays only for onsite deployment. This IP address is used to connect the Gateway to the Management Console and must match the Service Address on the Console UI (refer to the Management Console Guide for more information).
The Service Address box remains populated with the value you entered, even if you log out of Windows Client. You can change the address if you wish.
Important
If you change the address on the Management Console, you also need to change the address on Windows Client.
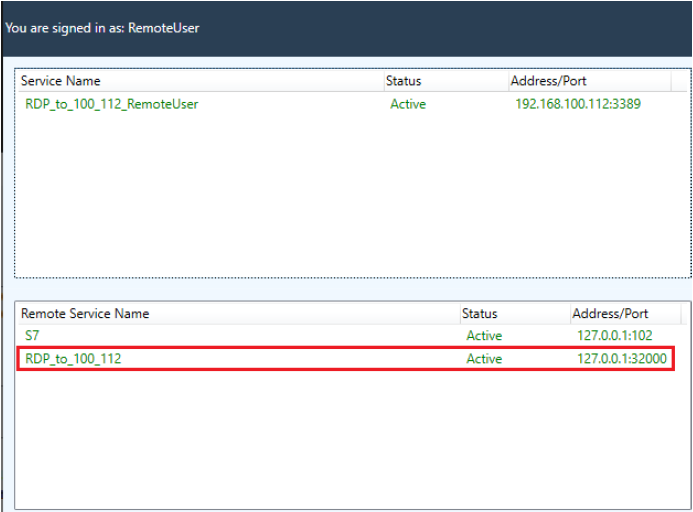
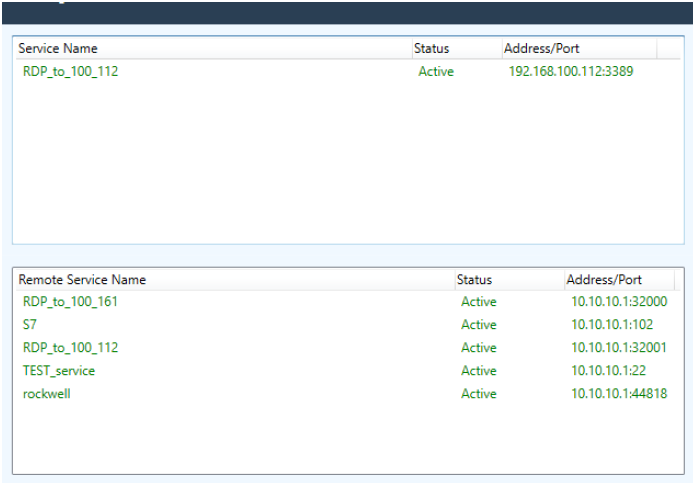
After clicking OK, Endpoint Owners will see any services that have been configured and assigned on the Admin UI. The services display the name, have an initial status of Active, and the address / port of the service.
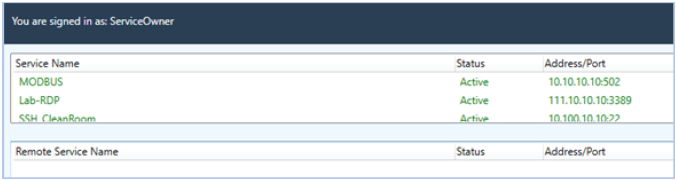
Endpoint Owners can control how and when their services are available. Double-click the service name to disable the service.
The Endpoint Owner must remain logged on to the Endpoint Gateway for Remote Users to be able to access the services.
Warning
OPSWAT recommends Administrators control service availability at the Admin UI, not at the local client.
Firewalls and routing may block access to services between the endpoint and network perimeter.
Endpoint Owner and Administrator must make sure the Endpoint Gateway can communicate with Endpoint Devices.
Access services (Remote Users)
This section does not apply if the Remote User is connecting to a clientless service.
Prerequisites
Before the Remote User can access the services:
The Endpoint Owner must be logged into the Endpoint Gateway as the service owner/provider.
The service must be enabled.
Accessing services
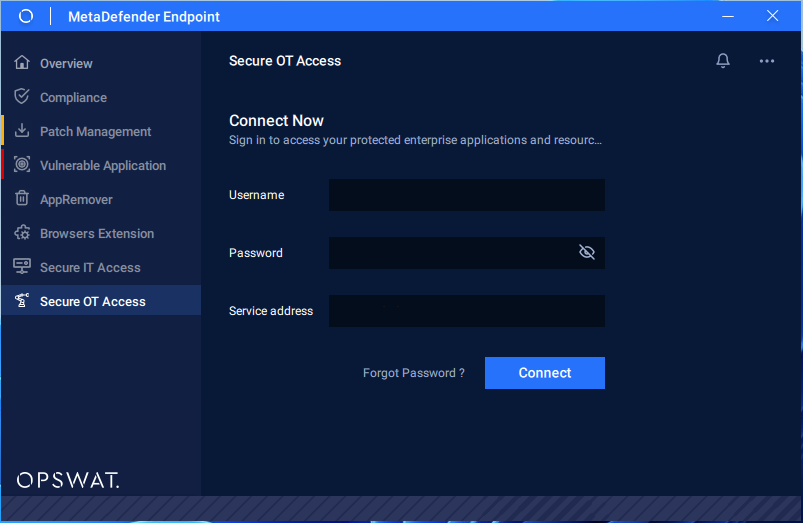
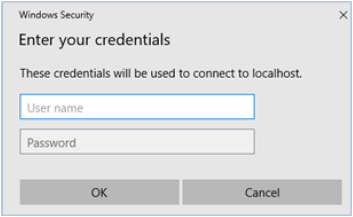
After starting the Secure OT Access software, the following window displays. Complete the boxes and click OK to log in to the Windows Client.
The Administrator supplies Remote Users with identification to log on to the Windows Client. If 2FA is enabled, the software will send 2FA authorization to a cell phone number or email for the Remote User account.
The Service Address box displays only for onsite deployment. This IP address, followed by Port 443, connects the Remote User's machine to the Management Console. Type the Service IP configured on the Console UI. Refer to the Management Console Guide for more information.
The Service Address box remains populated with the value you entered, even if you log out of Windows Client. You can change the address if you wish.
Important
If you change the Service IP on the Management Console, you also need to change the Serivce IP on Windows Client.
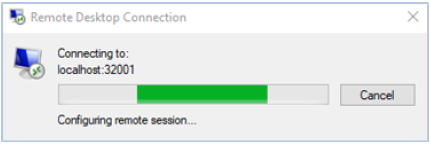
The software shows the available services. For Remote Desktop Protocol (RDP, shown below), you can double-click on a service to initiate it. For all other services, such as Modbus, you must launch the client from your desktop because Secure OT Access does not know which client the endpoint device operates.
Always connect to the LocalHost IP and Port so Secure OT Access translates the IP and encrypts the transmission.

Notes
Endpoint Owners must make sure required application for the service exists and service is running.
If you cannot see your Remote Service, but you are sure it is active and you have access, make sure the port is available on your machine. If the port is not available, you can tell the Administrator to change the port to Dynamic mode.
Enter your user name and password for this service. This identification can be different from your Secure OT Access credentials.
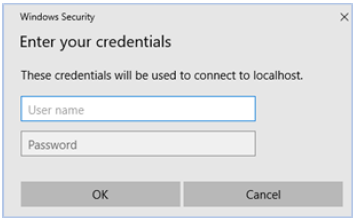
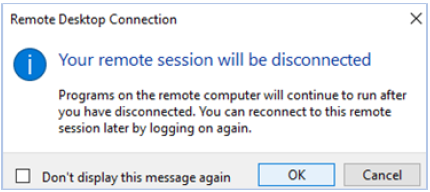
After you click OK, the remote session initiates.

The Remote User account is connected to the remote machine through the RDP_Demo service.
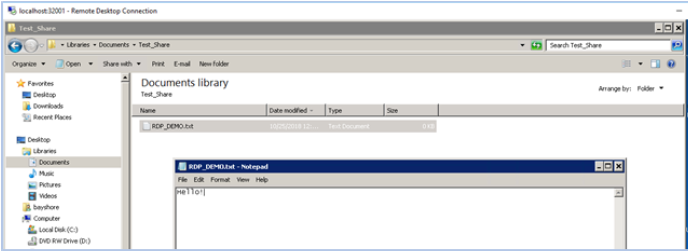
When you complete your task, close the Remote Desktop Connection window.
3. Windows Service Client
Windows Service Client is a Windows system-level service that can be used as an alternative to Windows Client.
The service launches automatically when the system boots, runs separately from any normal user space, and provides a persistent connection through Secure OT Access to the services assigned to the Remote User.
Important
Windows Service Client is required to use the S7 or Ethernet IP protocol.
Do not install Windows Client and Windows Service Client on the same system.
Prerequisites
Windows 7 Professional Service Pack 1 (SP1) or above
If Windows 7 SP1, is used, the following must be installed:
.NET 4.5.2
Microsoft Security Updates:
KB4474419 (SHA256): MUST HAVE: 64-bit. STRONGLY RECOMMEND: 32-bit
KB4490628 (SHA256): RECOMMEND: 64-bit. STRONGLY RECOMMEND: 32-bit
KB2901907 (.NET Framework 4.5.2)
Windows Service Client may be incompatible with VPN software, such as Open VPN. Uninstall VPN software before installing Windows Service Client.
For Windows 7 or Windows 10, download the 32-bit version (even on a Windows 64 machine) of the VC_redist.x86 redistributable shown below, and select the appropriate Windows 7 or Windows 10 Binary:
Administrators must have created Endpoint Owner or Remote User accounts.
Endpoint Owners must have installed Windows Service Client on the Endpoint Gateway and provided Remote Users access to services before Remote Users can access services.
Users installing the service in Silent or Passive mode must have elevated Administrator rights. On Windows 10, type 'cmd' in the search bar and select Run as Administrator from the option menu.
Installation
Windows Service Client is usually installed on the Endpoint Gateway and on the Remote User's computer. If the Remote User only connects to clientless services, Windows Service Client must be installed on the Endpoint Gateway but not on the Remote User's computer.
There are several ways to install Windows Service Client:
Installer wizard
The Endpoint Owner or Remote User can use the Wizard to install the client on the Endpoint Gateway or their computer. Download and double-click the OPSWATMetaDefenderOTSvc.msi file. Follow the instructions to install the service.
Silent mode
Administrators can use Silent mode to push the client to the desired location. This mode has no GUI. Open a command window and enter the following command:
msiexec SVC_USERNAME=username SVC_ PASSWORD=password LC_UPLINK=<IP address> /quiet /i "<pathway>\OPSWATMetaDefenderOTSvc.msi"
If you do not have elevated Administrator rights, the command will fail.
Passive mode
Administrators can use Passive mode to push the client to the desired location. In this mode, the installer displays a progress bar but doesn't ask any questions during install.
Open a command window and enter the following command:
msiexec SVC_USERNAME=username SVC_ PASSWORD=password LC_UPLINK=<IP address> /passive /i "<pathway>\OPSWATMetaDefenderOTSvc.msi"
If you do not have elevated Administrator rights, the system will ask for the privileges.
Endpoint Owners
Endpoint Owners can use Windows Service Client to monitor all services that have been configured and assigned on the Admin UI. The Endpoint Owner cannot make any changes to these services from Windows Service Client.
Double-click the icon to open the Windows Service Client GUI. The services display the name, have an initial status of Active, and the address / port of the service.

Warning
OPSWAT recommends Administrators control service availability at the Admin UI, not at the local client.
Firewalls and routing may block access to services between the endpoint and network perimeter.
Endpoint Owner and Administrator must make sure the Endpoint Gateway can communicate with Endpoint Devices.
Remote Users
Remote Users can use Windows Service Client to monitor their available services and access RDP services.
Note
This section does not apply if the Remote User is connecting to a clientless service.
The Remote User can access any available services through the Windows Service Client on their computer. Double-click the icon to open the Windows Service Client GUI.
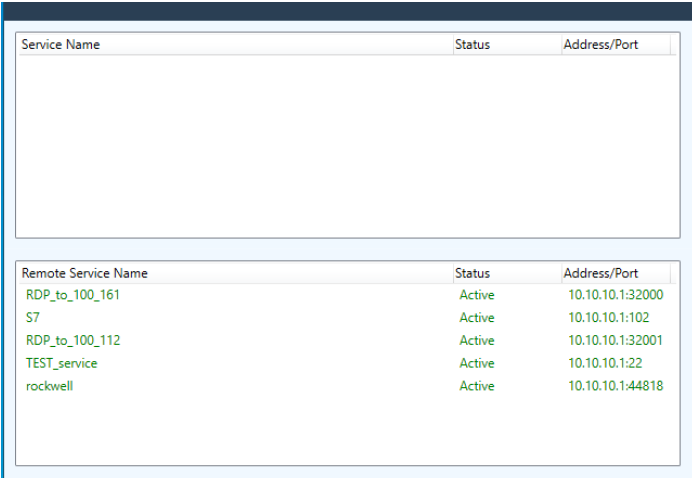
The GUI shows the services available to the Remote User. For Remote Desktop Protocol, you can double-click on a service to initiate it. For all other services, such as the Modbus client, you must launch the client from your desktop because Secure OT Access does not know which client the endpoint device operates.
Always connect to the IP and Port shown in the Windows Service Client, so Secure OT Access translates the IP and encrypts the transmission.
Notes
Endpoint Owners must make sure the application for the service exists and the service is running.
If you cannot see your Remote Service, but are sure it is active and you have access, make sure the port is available on your machine. If the port is not available, you can tell the Administrator to change the port to Dynamic mode.
Enter your username and password for this service. This identification can be different from your Secure OT Access credentials.
After you click OK, the remote session initiates.
The Remote User account is connected to the remote machine through the service.

When you complete your task, close the Remote Desktop Connection window.
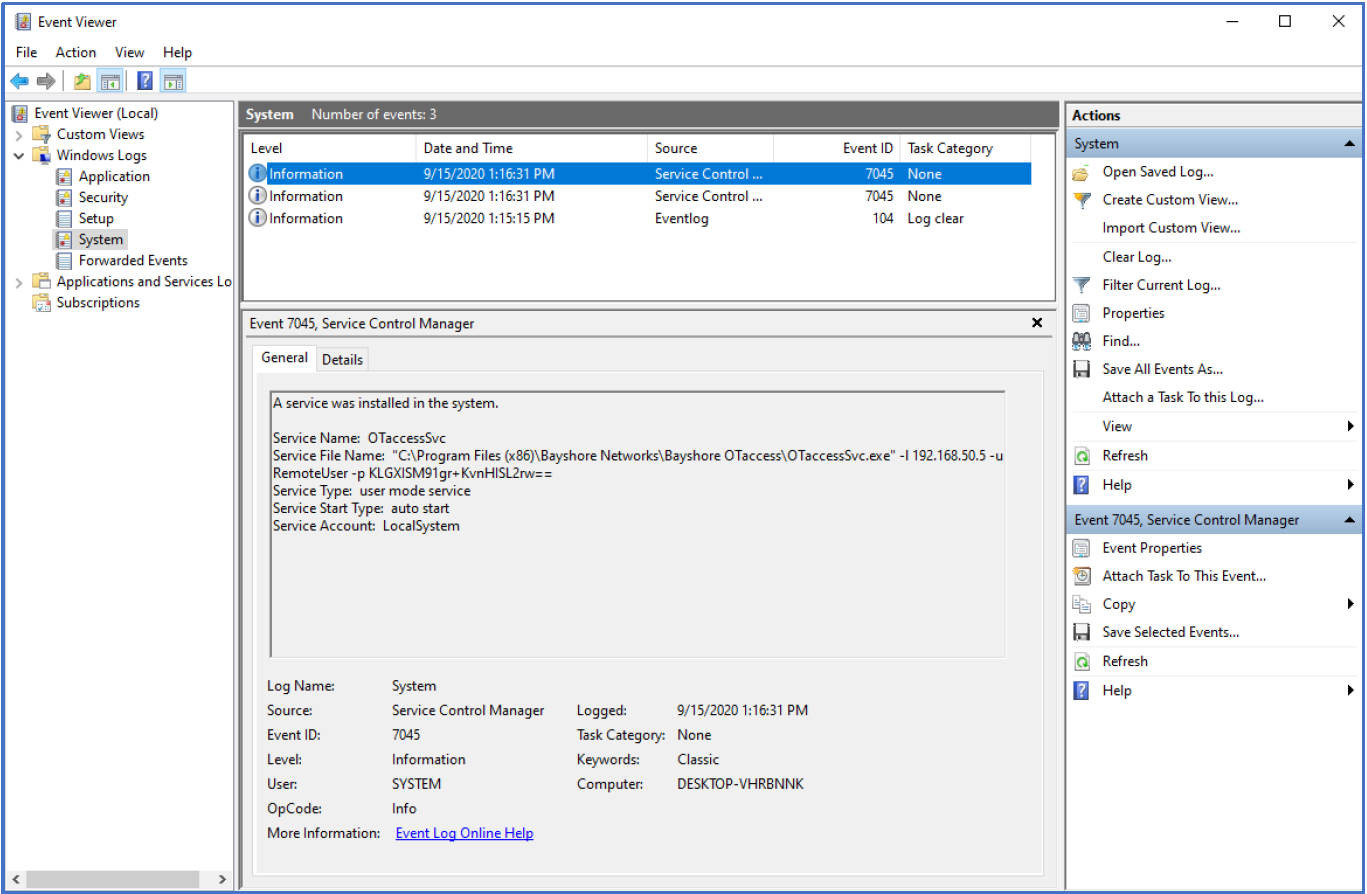
View events
Use Windows Services to view events related to Secure OT Access.
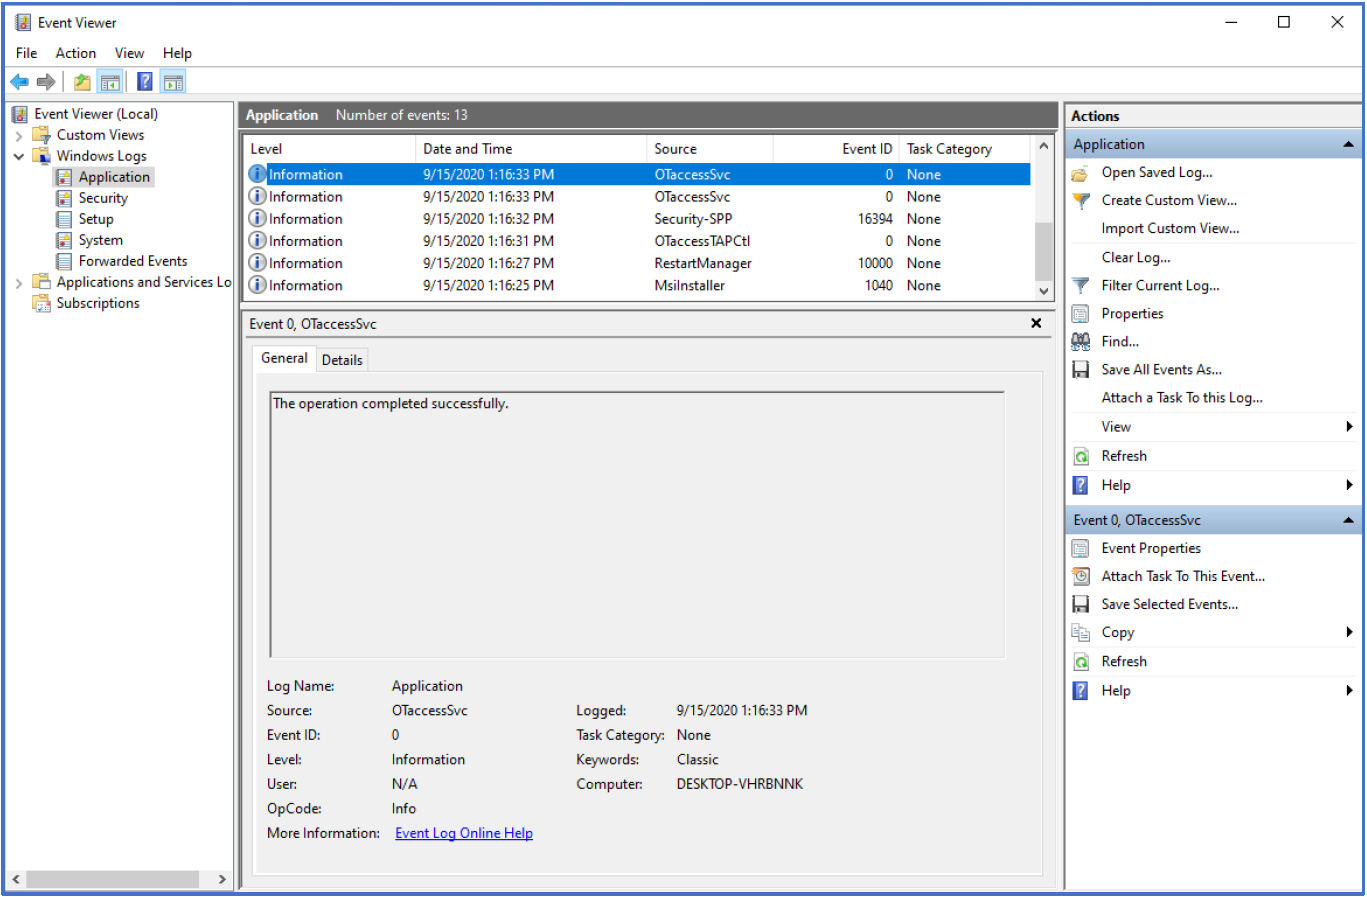
When the service starts, a notification displays.
4. Log on to Secure OT Access
Before you start
Users can only be added to a site by an Administrator or a Superadministrator.
User names cannot be edited.
Each user needs an email address and cell phone number for 2FA.
Users must use Windows 7 to 10 operating system and a major internet browser such as Microsoft Edge, Internet Explorer, Chrome, or Safari.
Log on to the Admin UI with your organization's custom web link. Enter your username, (usually your e-mail address) and your Secure OT Access password.
Click Continue. If enabled, the 2FA verification code is sent to your cell phone number by SMS or your email account.
Enter the code where prompted.
The system locks out users after three unsuccessful logons. Speak to your system administrator to unlock your access.
Change your password
Click Change Password on the login page. The UI displays a message that an email has been sent to the email address of the logged-in user (if that user exists).
The email will contain a link to change the password. When the user receives the email, they will have 10 minutes to click the link and change their password.
Inactivity timeout
If you are logged into Secure OT Access but are inactive for the period configured by a superadministrator, you are returned to the login page and must log into Secure OT Access again.
Access levels
Secure OT Access has user, administrator (admin), and superadministrator (superadmin) access levels. The Admin UI primary page opens with links to the procedures that persons do most often and a menu pane that is specific to the access level:
Superadmins see Create a Site, View All Sites, and Create a User
Admins see Create a Service, View All Services, and View My Services
Users see the My Services page
To open the primary page from any other page, click the OPSWAT logo in the menu pane.
The access levels define the tasks each level can do:
Superadmin has access to all functions on all sites and instances
Admin or site admin has access to most functions on an instance
Users can change their personal information and use services that an admin or superadmin has assigned to them
While the levels have some overlap on some tasks, others show different information depending on your access level.

Reset your password
Click on Forgot your password under the login boxes. If enabled, the 2FA verification code is sent to your cell phone number through SMS or your e-mail account.
Enter the code where prompted.
Enter a new password in the Change Password page.
Enter the same password a second time to verify.
Click Save. The Welcome screen opens. Click Sign In to log on to the Admin UI.
View license
On the License page, administrators can check the number of total user/service licenses purchased and number of licenses being used. If limits are reached, a warning is displayed.
6. My Account Settings
Secure OT Access user profiles only contain a user's name and Personally Identifiable Information (PII) used for Two-Factor Authorization (2FA).
Before you start
Only an admin or superadmin can change a user's cell phone number.
All users can change their name, email address or password through their profile.
Change your password, name, or E-mail
Log on to the Secure OT Access Admin UI.
Click your name at the top right, and then click My Account. The My Account Settings page displays.
To change your password, click Change next to Password. Enter your current and new passwords. Click the Save button.
To change your name and e-mail address, click Edit next to My Account Settings. Enter your changes, and click the Submit button.
6. All Sites
A site allows you to group assets. After assets are added to a site, enabling or disabling the site will enable and disable all assets at the site.
Before you start
Only superadmins can create, view, edit, or delete a site.
Click the All Sites menu to open the Sites pane. You can sort the data in each column or use the Search option to display sites containing a specified text string. Click a site name to view details for the site.
Create a site
Click the Create a Site button on the Secure OT Access primary pane. The Create a Site pane displays.
Type information in all the boxes:
Site Name: Alphanumerical name. This must be different from all other site names in your network.
Description: Alphanumerical description. Refer to your regulations which can include the physical location or other information.
Enabled: If checked, the site will be online and running as soon as it is made. If you plan to enable this site later, then uncheck this box.
Click the Create the Site button. The Sites pane displays the new site in the table.
Enable or disable a site
You can create a site and then enable it later. You can also disable a site to prevent users from connecting to it. Secure OT Access does not protect disabled sites.
Click the All Sites menu. The Sites pane displays.
In the Enabled column, check or uncheck the box for each site you want to change. A banner at the top of the page displays briefly if successful.

Edit or delete a site
Click the All Sites menu and click on the site you want to change. A detail pane displays.
To edit the site, open the Action menu and click Edit. The Edit a Site pane displays. Edit the values as necessary. Click the Save your changes button. A banner at the top of the page displays briefly if successful.
To delete the site, open the Action menu and click Delete. A banner at the top of the page displays briefly if successful. The site is removed permanently.
7. Active Directory
You can create or manage a Remote User's connection to a customer's Active Directory Server, allowing authentication and authorization of all users of the Admin UI.
Before you start
Only superadmins can perform Active Directory tasks. Admin and regular users will not see the Active Directory settings in the Admin UI.
After an Active Directory is configured, admins and superadmins can grant access to Active Directory services and groups.
Okta can also be used as an Identity source for LDAP authentication. To setup Okta’s LDAP Interface follow the instructions provided on the Okta help center: https://help.okta.com/en-us/Content/Topics/Directory/LDAP-interface-main.htm. Specific values required to fill in the configuration can be found here: https://help.okta.com/en-us/Content/Topics/Directory/LDAP-interface-connection-settings.htm. Attention should be paid to the values of “Hostname” and “Username” for your Okta organization as they will be required for the configuration of the “Server” and “Username” fields, respectively. Secure OT Access does not support LDAPS on port 636, however StartTLS on port 389 provides an encrypted communication between Okta and Secure OT Access.
A service must be created using the Active Directory Server IP and port 389 (LDAP). The OPSWAT_services account must be granted access to the created service (refer to "Grant access to Active Directory service"). Click the Active Directory menu to open the Active Directory Config pane.
Add configuration
Only one configuration is allowed. Once that is added, the Add Config button disappears.
Open the Active Directory menu and click the Add Config button. The Create New Active Directory Config pane displays.
Type values in the following boxes (examples shown):
Server: localhost (Connects to Active Directory service used by the OPSWAT_services account)
Port: 3389
Base: Base search domain for your AD, such as DC=OPSWAT, DC=local
User Search DN: DN of the users, such as CN=Users, DC=OPSWAT, DC=local
Admin Group: If a user is a member of this group, the user will be granted administrator rights. For example, CN=Secure OT Access Admins, CN=Users, DC=OPSWAT, DC=local
Username: Valid Active Directory user
Password: Password assigned to the user name
Okta LDAP Interface: Check this box if you are using Okta’s LDAP Interface to provide authentication
Edit Active Directory Config
Open the Active Directory menu and click on the server row. A detail pane displays.
Open the Action menu and click Edit. The server's Active Directory Config page displays.
Edit the values as necessary.
Click the Submit button.
Test Active Directory Config
This test verifies a user's information is in the Active Directory. The test simulates the user's access and displays the results.
Open the Active Directory menu and click on the server row. A detail pane displays.
Open the Action menu and click Test. The Active Directory Test pane displays.
Enter the username and password for the user access you want to test.
Click the Test button. The results display in the lower box.
Click the Clear Results button to delete the results information in the box.
Click the Return button to return to the Active Directory Config pane.
Delete Active Directory Config
Open the Active Directory menu and click on the server row. A detail pane displays.
Click Delete. If successful, a banner briefly displays at the top of the pane and the All Services page opens. All information about the configuration is removed.
Grant access to Active Directory service
Refer to "All Services" for information on granting access to the Active Directory service.
8. SAML App Integration
You can create or manage a Remote User's connection to a customer's IdP Identity provider (Ex: Microsoft Entra ID, Okta ...) allowing authentication and authorization of all users of the Admin UI.
Before you start
Only Superadmins can perform SAML App Integration tasks. Admin and regular users will not see the SAML App Integration settings in the Admin UI.
After an SAML App Integration is configured, admins and Superadmins can grant access to SAML App Integration services and groups.
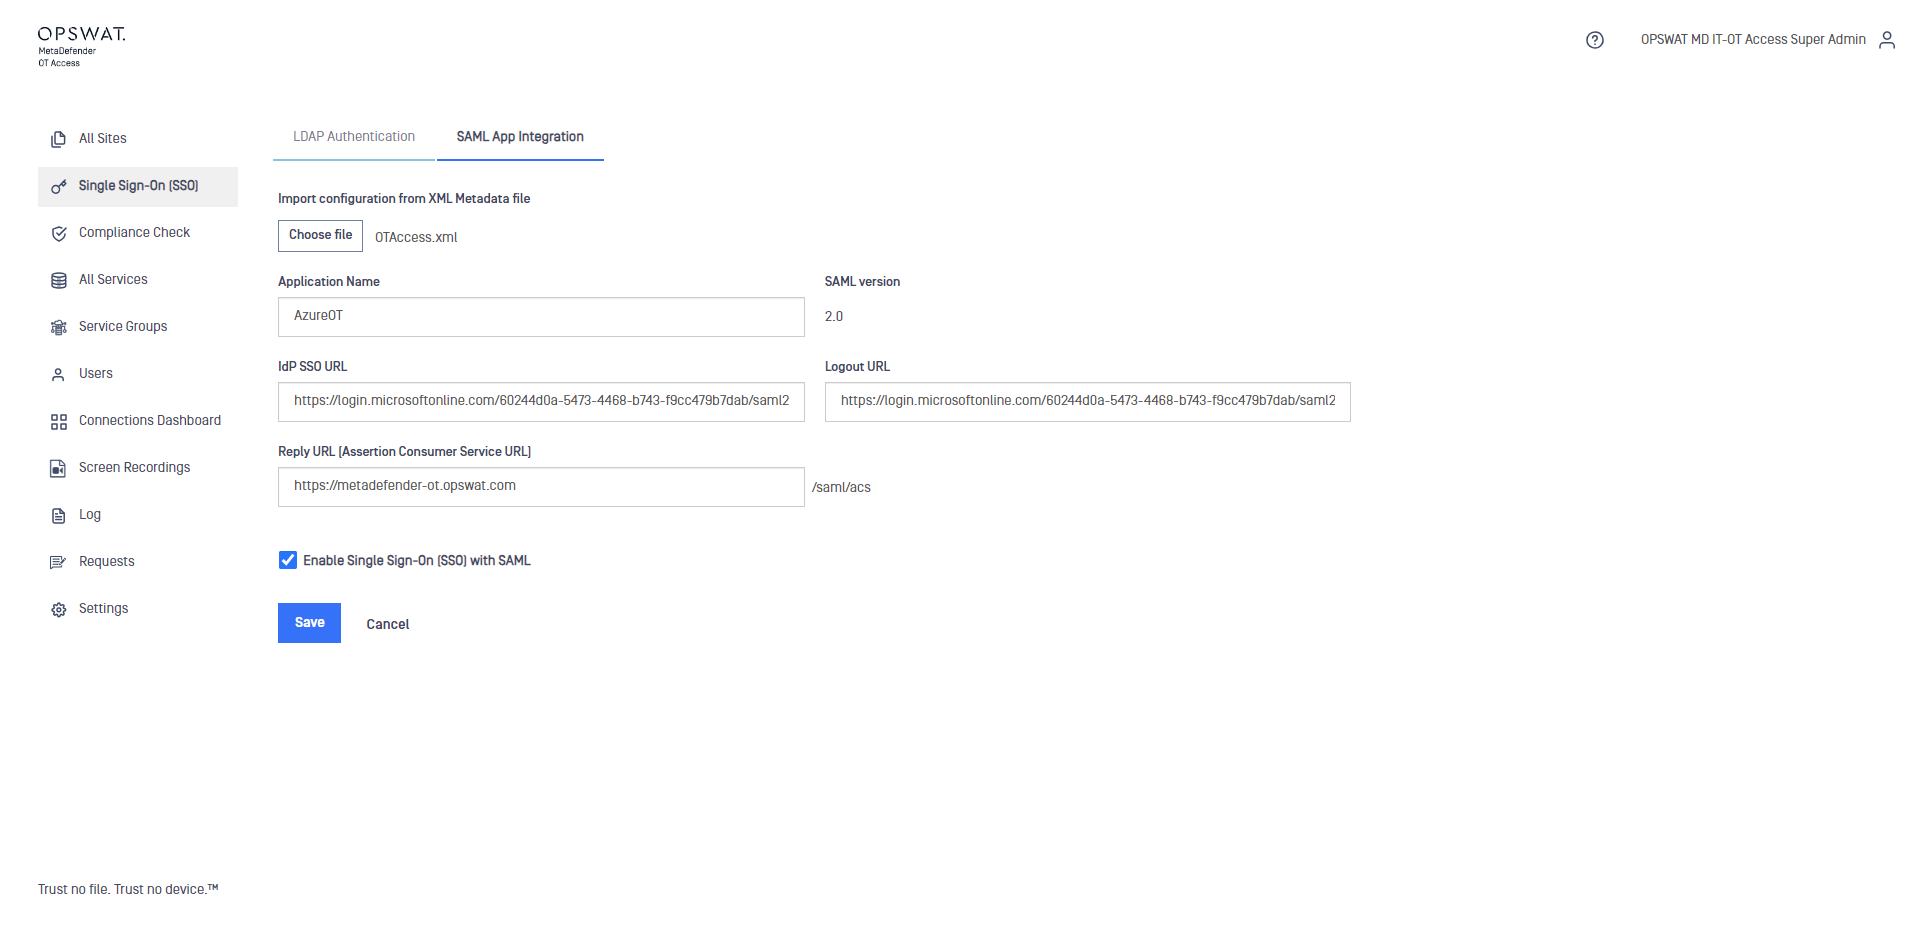
Add configuration
Only one configuration is allowed. Once that is added, the Add Config button disappears.
Open the Single Sign-On (SSO) menu then switch to SAML App Integration tab and click the Add Config button. The Create New SAML App Integration Config pane displays.
Type values in the following boxes (examples shown):
Import configuration from XML Metadata file: Import metadata file provided from Identity provider
Application Name: Name of your Application is associated with your app which registered in IdP.
SAML version: SAML protocol version ( 2.0 by default).
IdP SSO URL: Login URL in IdP ( auto fill after importing metadata file).
Logout URL: Logout URL in IdP ( auto fill after importing metadata file).
Reply URL (Assertion Consumer Service URL): The URL where OTA handles the SAML response. ( normally the Management IP or the DNS ) . Then you will need to copy this URL and paste it in your IdP configuration.
Edit configuration
Open the Single Sign-On (SSO) menu then switch to SAML App Integration tab. A detail pane displays.
Open the Action menu and click Edit. The server's SAML App Integration Config page displays.
Edit the values as necessary.
Click the Submit button.
9. All Services
A service allows a user to access an asset.
Click the All Services menu to open the All Services pane. A superadmin or admin will see a list of the services a user can be invited to connect to. A user will see all services they can connect to. You can sort the data in each column or use the Search option to display services containing a specified text string. Click on a service to view details for that service.
Clientless services
A Remote User can reach a clientless service through the Admin UI without having Windows Client or Windows Service Client installed on their primary computer although one of the clients must be installed on the Endpoint Gateway.
Clientless services display a Connect button in the Browser access column on the All Services pane. A Remote User can click this button to access the associated service.
To configure a clientless service, click the Browser Access checkbox when creating a service (see below) and enter the correct values on the "Settings" pane.
If you use clientless services with the onsite deployment and HTTPS protocol, you must perform additional configuration. Refer to "HTTPS clientless services" for more information.
Create service
Before you start
A superadmin can create a service on any instance. An admin can create a service on their sites.
Open the All Services menu and click Create a Service. The Create a Service pane displays.
Type values in the following boxes:
Service Name: Required; a unique name for each instance
Owner/Provider: Required; the Secure OT Access user who will expose services
Site: Required; Select from the list of sites that you administer
Browser Access: Click to configure the service as a clientless service. If you click this checkbox, the Remote Client Port box disappears.
Protocol: Required; Your service's protocol. If you click Browser Access* and select RDP, a group of Clientless Settings boxes and a Screen Recording checkbox display. Perform the following tasks:
Enter the Remote User's username and password
Select the method the Remote User will use to connect to the service. The default is NLA.
Click the Ignore Cert checkbox if you want them to be able to connect without an SSL certificate.
Click Advanced configuration to configure how the clientless service will display on the Remote User's computer. You can configure keyboard layout, resize method, height, width, color, and DPI.
Click Screen Recording to enable screen recording for the service within an Onsite deployment. If enabled, the activity of any user who accesses this service will be recorded. Refer to "Screen recording" for more information.
Remote Client Port: Required unless you click Browser Access; Port the Remote User connects to. A default value is set for the protocol selected in the dropdown but can be changed.
Policy: In some protocols like MODBUS, you can apply policies to prevent service consumers from writing on the provider side. Refer to Appendix B for a table of protocols and their associated policies.
Enforcement Mode: Policies can be Enforced or can Report violations of the policy
IP Address or Hostname: Required; corresponding to the machine providing the service.
Service Port: A value is automatically selected depending on the service protocol selected but can be changed.
Description (optional)
Enable Scheduling: You can set time slots for when the service is enabled. Out of these slots, the service won't be available.
Note
All fields are optional, but if a field is left blank, the service will run constantly for that period. For example, if you set the dates from January 1 to May 31, with the hour as 3 but leave week day blank, the service will run at 3:00 AM every day. If you set the week day as 1-5, then the service will run at 3:00 AM on Monday-Friday only.
Schedule Timezone: Select the time zone of the endpoint
Schedule Start: A calendar pops up; select the desired start date (as YYYY-MM-DD) and time (in 24-hour format), then click Apply
Schedule End: A calendar pops up; select the desired end date (as YYYY-MM-DD) and time (in 24-hour format), then click Apply
Schedule Hours: Select the hour that you want the service to run the within dates selected. Midnight (12:00 AM) equals 0, and 11:00 PM equals 23.
Schedule Week Days: Select the day or days that you want the service to run within the dates selected. Monday equals 1, and Sunday equals 7.
Schedule Month Days: Select the calendar day that you want the service to run within the dates selected. The first day equals 1, and the last day varies with the month. If you specified week days, make sure that the week days and month days correlate.
Schedule Months: Select the months that you want the service to run within the dates selected. January equals 1, and December equals 12.
Enabled: You can manually enable or disable the service by this checkbox. The default is Enabled.
Group: You can assign the service to a group of services. See "Service Groups" for more information.
Click the Create the Service button. If successful, a banner briefly displays at the top of the pane and the All Services pane displays.
Once a service is created, it displays in All Services for administrator views and My Services for user views.
Edit service
Before you start
A superadmin can edit a service on any instance. An admin can edit a service on their sites.
Open the All Services menu and click a record. A detail pane displays.
Open the Action menu and click Edit. The Edit a Service pane displays.
Edit the values as necessary.
Click the Save your changes button.
Delete service
Open the All Services menu and click a record. A detail pane displays.
Open the Action menu and click Delete. The All Services pane displays with the service removed. All information about the service is removed from the system.
Grant access to local users
You can grant one or more local users access to a specific service. You can also grant an admin access to edit or delete a service.
Open the All Services menu and click the desired record. A detail pane displays.
Open the Action menu and click Grant Access to Local User. The Grant Access to Local User to Service pane displays.
Select a user from the Grant Access To list. You can also start typing a user name in the Grant Access To box to narrow the search. You can select multiple users, one at a time, by repeating this process for each user.
Click the Grant Access button to provide access to all selected users. A banner indicating status briefly appears at the top of the page, and the Service detail page opens.
Remove user access to a service
Open the All Services menu and click a record. A detail pane displays.
Click the X beside the user you want to remove from this service.
Grant access to Active Directory user
You can grant an Active Directory user access to a specific service. You can also grant an Active Directory admin access to edit or delete a service.
Note
If you have not configured Active Directory, you will see "Grant Access to a User".
Open the All Services menu and click a record. A detail pane displays.
Open the Action menu and click Grant Access to Active Directory User. The Grant Access to Active Directory User to Service page opens.
Select a user from the Grant Access To list.
Click the Grant Access button. A banner indicating status briefly displays at the top of the page, and the Service detail pane displays.
Note
If you have not configured Active Directory, you will see "Grant Access to a Group".
Open the All Services menu and click a record. A detail pane displays.
Open the Action menu and click Grant Access to Active Directory Group. The Grant Access to Active Directory Group to Service pane displays.
Select a user from the Grant Access To list.
Click the Grant Access button. A banner indicating status briefly displays at the top of the pane, and the Service detail pane displays.
10. Service Groups
A service group allows you to associate a user with multiple services at one time. Granting a user access to a service group automatically grants the user access to all services in the group.
Before you start
You must have admin or superadmin access to do Service Group tasks.
Click the Service Groups menu to open the All Service Groups pane. You can sort the data in each column or use the Search option to display service groups containing a specified text string. Click a service group to display details for the group.
Create service group
Open the Service Groups menu and click the Create a Service Group button. The Create a Service Group pane displays.
Type information in the boxes:
Service Group Name: A specific name for this instance
Description: Text that can tell the administrator of the request purpose
Site: Select from the list of sites that you administer
Click the Create the Group button. A green banner across the top of the pane indicates success.
After creating a Service Group, use the All Services menu to add new or existing services to the group. Refer to "All Services" for more information.
Edit service group
Open the Service Groups menu and click a group name. A detail pane displays.
Open the Action menu and click Edit.
Edit the values as necessary.
Click the Save your changes button. A green banner across the top of the pane indicates success.
Delete service group
Open the Service Groups menu and click a group name. A detail pane displays.
Open the Action menu and click Delete. The Service Groups pane displays without the service group. All information about the service group is removed from the system.
Grant access to user
Open the Service Groups menu and click a group name. A detail pane displays.
Open the Action menu and click Grant Access to User. The Grant Access to Service Group pane displays.
In the Grant Access To box, select the user.
Click the Grant Access button. A green banner across the top of the pane indicates success.
Grant access to Active Directory user
Open the Service Groups menu and click a group name. A detail pane displays.
Open the Action menu and click Grant Access to Active Directory User. The Grant Access to Active Directory User to Service Group pane displays.
In the Grant Access To box, select the user.
Click the Grant Access button. A green banner across the top of the pane indicates success.
11. Users
A superadmin can add, edit, audit, or delete users on any site; an admin can add, edit, audit, or delete users on the site they administrate. Users can view the list of services assigned to them and change their profile content.
Before you start
At least one site must be created before creating users.
Only a superadmin can create and perform tasks on admin or superadmin user accounts.
Click the Users menu to open the Users pane. This pane displays all users currently on a site for admins or on an instance for superadmins. You can sort the data in each column or use the Search option to display user information that contains a specified text string. Click a user account to view details for that user.
Create user account
Open the Users menu and click the Add User button.
Type information in all the boxes:
Username: Must be unique across all sites in an instance. This value cannot be changed once it is saved.
Email: Must be unique across all sites in an instance
First Name of user
Last Name of user
Cell Phone Number of user, including the country code with a +, but without spaces or additional symbols. Example: +19195555555
Site the user will be assigned to; multiple sites are supported (admins can only choose from sites that they administer).
Password and Password Confirmation for the user
Preferred Notification Service for Windows Client: Choose
None, SMS,* or Email from the drop-down menu for 2FA. The default value is SMS and can only be changed by a superadmin. If you are creating an account for an Endpoint Owner, we recommend you select None.
Preferred Notification Service for Secure OT Access Website: Choose
None, SMS,* or Email from the drop-down menu for 2FA. This value default value is SMS and can only be changed by a superadmin. If you are creating an account for an Endpoint Owner, we recommend you select None.
Check Superadministrator or Administrator for the access level; Only superadmins can create superadmin or admin users. If neither is checked, the default is User.
Click the Submit button. A green banner at the top of the pane indicates success. The Users pane displays.
Edit user account
Open the Users menu.
Click a user. A detail pane for the user displays.
Open the Action menu. The options vary depending on your access levels. Click Edit.
Edit the values as necessary. You cannot edit the Username.
Click the Submit button. A green banner across the top of the pane indicates success.
Disable user account
When you create a user account, it is enabled by default, and the user can access the remote services. If you disable the account, the user still exists in Secure OT Access, but cannot perform any of the following tasks:
Login to the Admin UI or Windows Client
Access services through Secure OT Access
Create requests
Do admin or superadmin operations
Open the Users menu.
Click a user. A detail pane for the user displays.
Open the Action menu in the detail pane and click Edit.
Click to clear the Enabled checkbox on the user detail pane.
Click the Submit button.
You can re-enable the account by clicking the Enabled checkbox in the user detail pane.
Audit user activity
The Connected Since column on the Users pane displays the date and time the user connected to a system through Secure OT Access.
Delete user account
Click the Users menu.
Click a user. A detail pane displays.
Open the Action menu and click Delete. A green banner at the top of the page indicates success. All information about the user is deleted.
Grant access to a service or a service group
Before you start
A superadmin can grant access to any service across all sites. An admin can grant access to the sites that they administer.
Open the Users menu.
Click a user. A detail pane for the user displays.
Open the Action menu and click Grant Access to Service or Grant Access to Service Group.
Select a service or group from the Grant Access To menu and click the Grant Access button. A green banner at the top of the page indicates success. The User detail pane displays the name of the service or service group beside Service Access or Service Group Access.
12. Connections Dashboard and Live Session Monitoring
The Connections Dashboard shows the active connections hosted by the Secure OT Access instance.
Before you start
Superadmin and Admin can view the Connections Dashboard.
Live Session monitoring is only available for clientless service.
Click the Connections Dashboard menu to display the Dashboard.

The dashboard displays the following information for each connection:
Site: Name of the site hosting the connection
Service: Service the connection is reaching
Provider: Name of the owner of the service
Username: User accessing the connection
Start date: Date the connection was initiated
Stop Date/Remove Access: Displays a Remove Access button. Click this button to end the connection for the user and revoke user access to the service. After revoking access, the connection does not display on the dashboard.
Live monitor: Display the Access button. Click this button to access and view users' session with live monitoring.
Use the Show dropdown list to configure the number of entries displayed on the dashboard. If the dashboard contains more than one page of entries, use the Previous and Next buttons to move through the entries. You can sort the data in each column or use the Search option to display entries that contain a specified text string.
13. Screen recording
Secure OT Access can be configured to record user activity for any clientless service that uses the RDP protocol in an Onsite deployment. After screen recording is enabled for a service, all user activity that occurs after connecting to that service is recorded and stored.
Before you start
Only a superadmin can enable and disable screen recording, configure storage parameters, and access recorded sessions.
Screen recording is supported on Cloud and On-premise deployments.
Enable screen recording
Click the Screen Recording checkbox on the "Create service" or "Edit service" pane to enable screen recording for that service.
User warning
When a user accesses a service where screen recording is enabled, a pop-up displays, stating their session is being recorded. The user must click Yes before they can connect to the service.
Custom recording policy
A company can set a custom recording policy for an RDP service. A superadmin can use the Custom Recording Policy option on the "Settings" pane to enter the URL for the policy. A link to the URL will display on the warning the user sees when they connect to the service, and the user can click the link to view the policy.
View recordings
Use the Screen Recordings menu to view a library of recorded sessions.
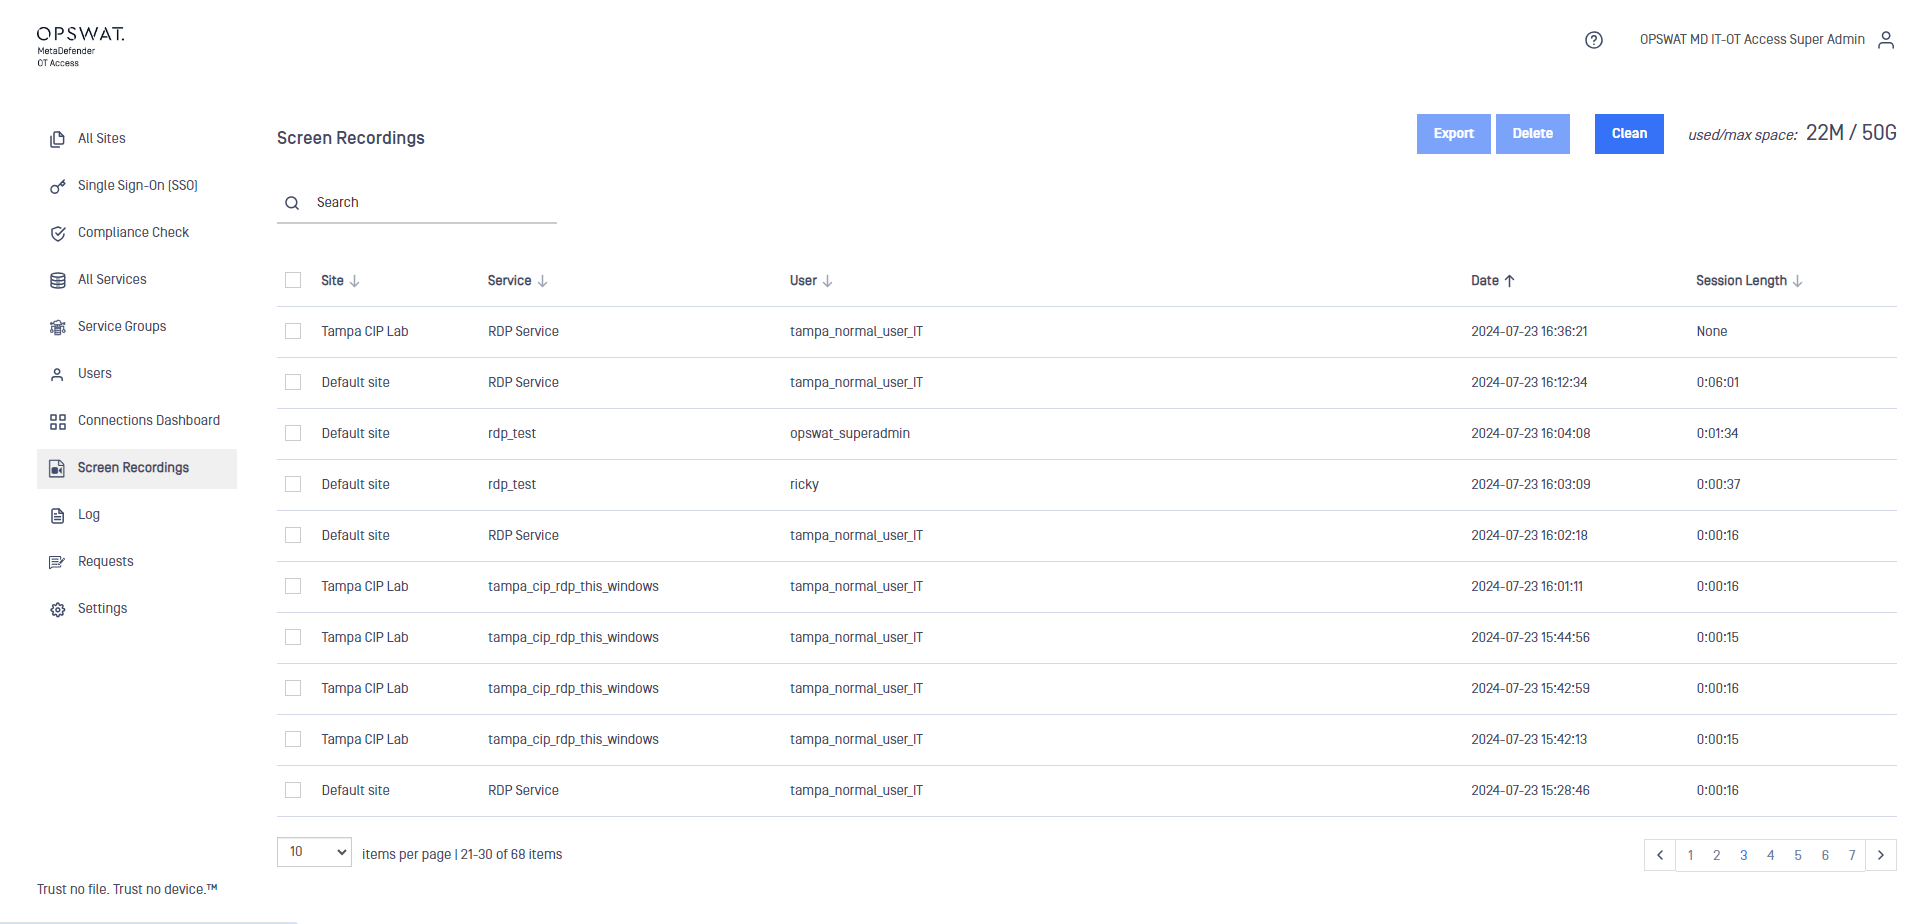
OPSWAT sets a maximum size of 50G for all screen recordings (exported and non-exported). This value cannot be changed. The available space displays at the top of the Screen Recordings pane.
The following information is displayed for each recording:
Site where the service is located
Service Name
User who accessed the service
Date the service was accessed
Length of the service
Export recording
Select a recording and click the Export button to export the recorded session as an encrypted .m4v file. When you click the button, a popup displays that allows you to set the Resolution and Bitrate for the recording. Selecting a lower resolution and bitrate reduces the space taken up by the exported recording.
Warning
Remain on the Screen Recordings pane until the export completes. Leaving the pane halts the export.
If you leave the Screen Recordings pane before an export completes, the export halts and the amount of space used by the recording increases. Click the Clean button to delete the incompletely exported file (the original recording is not deleted). You can then click the Export button to export the recording.
Delete recording
To delete the original recording, select it, click the Delete button, and confirm your action.
14. My Services
My Services lists the services that a user has been assigned to. Users without administrator access will only see the services they have access to; they cannot edit or delete the services.
Admins can click a service and edit or delete it for themselves, and can grant, edit, and delete other users' services for the sites that they administer.
Superadmins have access to all services and sites on an instance. They do not have a separate My Services page; they can access their services by clicking All Services, and any changes there will affect all users.
See your services
To see the services that you can access, click the My Sites menu.
The My Services page shows a table with the following columns:
Name: Service name
Owner username: Username of the service owner
Policy: If a policy is applied to this service, the policy name shows
Enforcement Mode: The choices are None, Enforce, Report
Address: IP Address
Port: Port used to make this connection
Group: Group name if the service is part of a group
Site: Site that this user is assigned to
15. Log
A superadmin can view or export system-log (syslog) events.
Click the Syslog menu to open the Syslog pane. This pane displays a list of system-log (syslog) events. You can use the Search option to display events that contain a specific text string.
See logs
Open the Log menu. The Syslog pane displays.
Select a value from the drop-down menu by Show entries to set the number of logs displayed on a pane. The default is 25.
Click Refresh at the top left corner to refresh the Syslog entries.
Type text in the Search window in the top right corner to search the logs.
Export logs
Open the Log menu. The Syslog pane displays.
Click the Export button. A popup displays. You cannot change the file name of the export.
Choose to Open or Save the file.
All Secure OT Access syslogs download to the designated folder on your current computer. For Windows, the default folder is the C:\Users<username>\Download folder.
Remote syslog
OPSWAT does not provide a permanent archive of log messages. However, you can create a service that allows you to access Secure OT Access syslog data on a syslog server that you maintain on your own network. This server allows you to build your own archive of log messages.
Follow the steps in "Create service", and use the following values for the parameters:
Owner/Provider: User providing the remote syslog service.
IP: IP address of the syslog server you want to access remotely
Port: Port of the syslog server you want to access remotely (
After setting up the service, you can use it to access the remote syslog on your network.
16. Requests
A local user can request access to a service for a specified period. An administrator must approve or reject the request.
Click the Requests menu to open the All Requests pane. You can sort the data in each column or use the Search option to display requests containing a specified text string. Click the request to display details for the request.
Request access to a service
Open the Request menu. The All Requests pane displays.
Click the Create a Request button. The Create a Request pane displays.
Type information in the boxes:
Consumer: User who is making the request
Service: Select the desired service
Description: Text that can tell the administrator of the request purpose
Enable Scheduling: If the box is checked, you can see the time boxes
Note
All fields are optional, but note that if a field is left blank, the service will run constantly for that period. For example, if you set the dates from January 1 to May 31, with the hour as 3 but leave week day blank, the service will run at 3:00 AM every day. If you set the week day as 0,1,2,3,4, then the service will run at 3:00 AM on Monday-Friday only.
Schedule Timezone: Select the time zone of the endpoint
Schedule Start: A calendar pops up; select the desired start date (as YYYY-MM-DD) and time (in 24-hour format), then click Apply.
Schedule End: A calendar pops up; select the desired end date (as YYYY-MM-DD) and time (in 24-hour format), then click Apply
Schedule Hours: Select the hour that you want the service to run within the dates selected. Midnight (12:00 AM) equals 0, and 11:00 PM equals 23.
Schedule Week Days: Select the day or days that you want the service to run within the dates selected. Monday equals 0, and Sunday equals 6.
Schedule Month Days: Select the calendar day that you want the service to run within the dates selected. The first day equals 1, and the last day varies with the month. If you specified week days, make sure that the week days and month days correlate.
Schedule Months: Select the months that you want the service to run within the dates selected. January equals 1, and December equals 12.
Click the Create a Request button. The All Requests pane displays with your request's Resolution showing as Pending. You can see the request details when you click a cell in the row. An email is sent to the administrators for the requested service and to you.
An administrator must approve the request. If the request is approved, you can access the service only on the dates and times that you requested.
Resolve a service request
You must have admin or superadmin access to approve service requests.
Open the Request menu. The All Requests pane displays.
Find the service request from the user listed in your email notice.
Click in the request row to see details of the request. If the request meets your organization's requirements, click the Accept button. If the request is not acceptable, click the Reject button.
The All Requests pane displays with the new Resolution status. The system sends an email to you and the requester with your decision.
17. Settings
Before you start
Only a superadmin can change the settings for an instance.
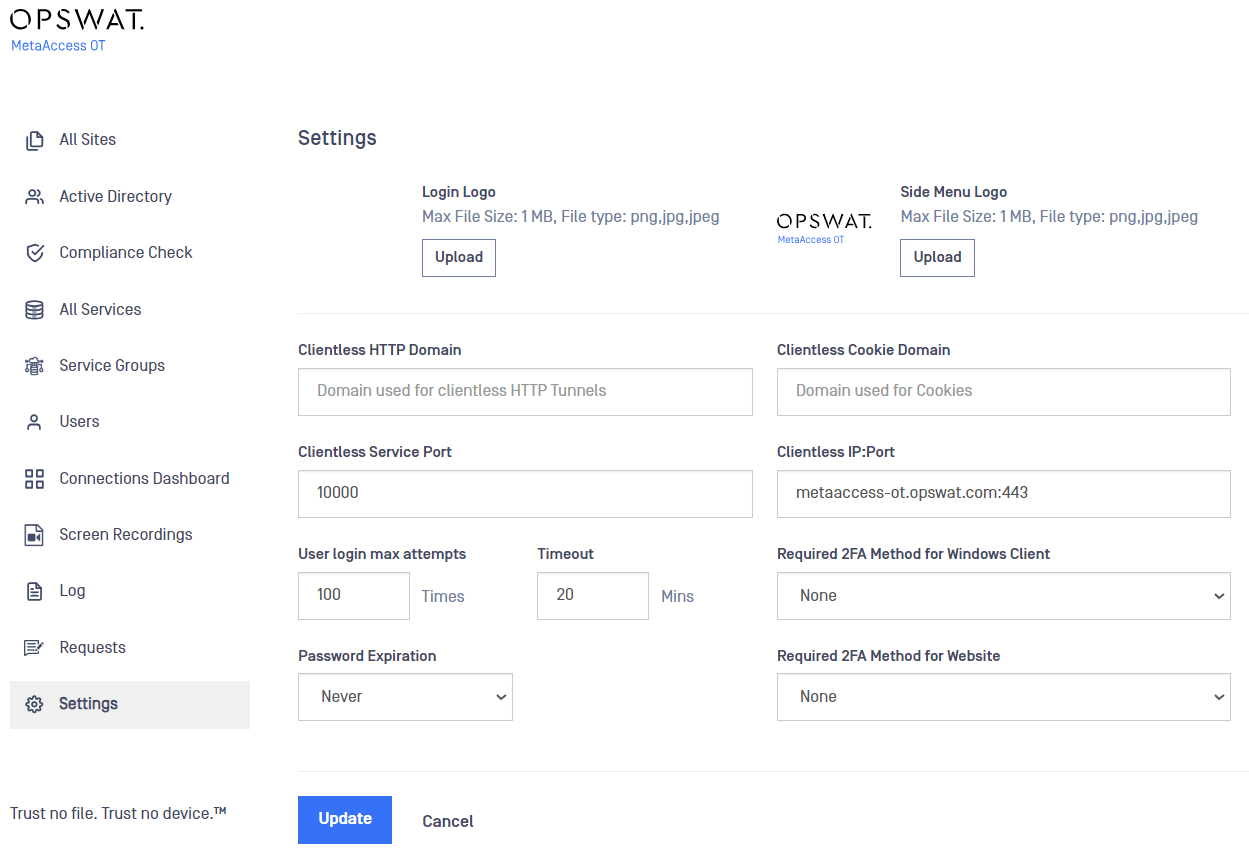
Use the Settings pane to change the following:
User login max attempts: Number of attempts a user can make before being locked out of the account
Custom Recording Policy: URL of the customer's recording policy. This URL displays on the warning message the user sees when they access a service where "Screen recording" is enabled.
Timeout: Default inactivity timeout for the Admin UI. You can set any value between 5 -- 120 minutes, in 5-minute increments. If there is no activity for this period, the user is returned to the login page and must log in to Secure OT Access again.
Clientless HTTP Domain: Subdomain used to manage clientless services. Type this value ONLY if you are using clientless services with onsite deployment and the HTTPS protocol.
Login logo: Logo that displays on the Secure OT Access login pane. Files must have a .png or .jpg format.
Clientless Service Port: Port number from which clientless services will be automatically assigned.
Side Menu logo: Logo that displays above the side menu. Files must have a .png or .jpg format.
Cookie Domain: Top-level domain. This box is related to the certificate you create for the HTTPS protocol and must include the subject/CN of your certificate. Type this value ONLY if you are using clientless services with the onsite deployment and the HTTPS protocol.
Small Side Menu logo: Logo that displays beneath the Side Menu log. Files must have a .png or .jpg format.
Clientless IP:Port: IP address and port number for clientless services. The IP address value should correspond to the Management IP or the corresponding URL if assigned in the DNS server. For onsite deployments, this value is automatically populated with the Management IP that was configured on the Management Console. Refer to the Management Console Guide for more information.
Click the setting you want to change. An edit pane displays where you can make the change. Click the Submit button. A green banner at the top of the page indicates success.
Clientless service domains
If (and only if) you are using clientless services and the HTTPS protocol, you must enter values for the Clientless HTTP Domain and Cookie Domain settings. The Clientless HTTP Domain and Clientless IP:Port are subdomains of the top-level Cookie Domain.
All three values must incorporate the same URL. You must also create an entry for this URL on your internal DNS server. If you do not create this entry, the user will not be able to log in to the Management Console.
An example of the domain settings when clientless services and the HTTP protocol are used is shown in the following graphic.
Appendix A HTTPS clientless services
Important
This section applies only if you are using clientless services with onsite deployment and the HTTPS protocol.
Prerequisites
One top-level domain. This value will correspond to the Cookie Domain value on the Settings pane.
Two subdomains: one for the Console UI and one for the HTTPS clientless services. These values will correspond to the
Clientless IP:Port** and Clientless HTTP Domain values, pane.
A specific certificate for each subdomain or one wildcard certificate that is valid for both subdomains
Configuration process
Perform the following procedures to configure clientless services with the HTTPS protocol.
Configure internal DNS server
Configure your internal DNS server with the top-level domain and subdomains to associate the Management IP with the subdomains you create. This procedure will vary, depending on your network configuration.
Associate certificates
Create a signed certificate for the HTTPS protocol and associate the certificate with the Management Console and Administration GUI. You will perform this process on the Management Console. Refer to "SSL/TLS Credentials" in the Management Console Guide for these procedures.
Configure domains
Configure domain values on the Settings pane. Refer to "Settings" and "Clientless service domains" for more information.