Overview and Scope
This guide explains how to deploy the My OPSWAT Central Management stack on AWS using OpenTofu for infrastructure, Amazon EKS for Kubernetes, Helm/Helmfile for application release, and Ansible executed over AWS Systems Manager for MongoDB on EC2. It is a copy/paste, step-by-step deployment runbook from initial provisioning through application verification.
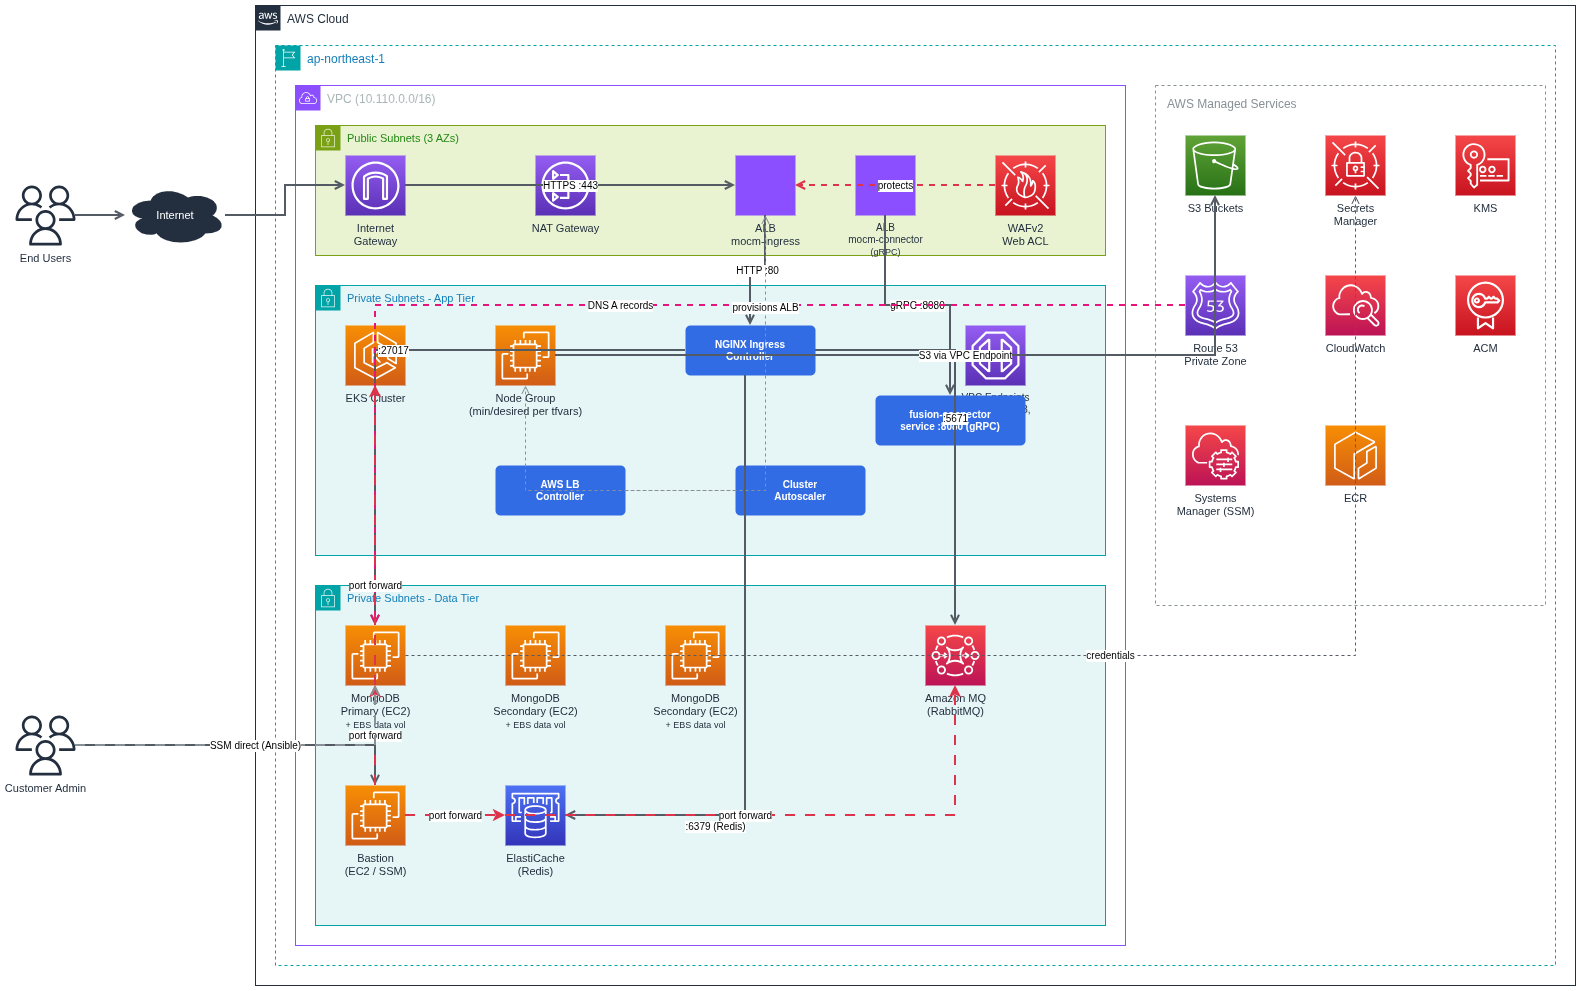
What you deploy: VPC, subnets, NAT gateways, EKS cluster, core addons (ALB controller, Ingress NGINX, Cluster Autoscaler), MongoDB replica set on EC2 (via Ansible + SSM), Amazon MQ (RabbitMQ), Valkey (ElastiCache), S3 buckets, ACM certificate, and the MOCM application via Helm/Helmfile.
Out of scope: detailed monitoring/alerting design, long-term backup/DR runbooks. See the Backup & Restore runbook for MongoDB snapshot strategy and options beyond EBS/DLM.
Architecture Summary
Networking: 1 VPC, 3 public subnets, 3 private subnets, Internet Gateway, NAT (single or per-AZ), VPC Endpoints (ECR dkr/api, STS, SSM, SSMMessages, EC2Messages, S3 Gateway).
EKS: 1 cluster, 1 managed node group, addons (CoreDNS, kube-proxy, EBS CSI, Pod Identity), plus Helm-installed addons (ALB Controller, Ingress NGINX, Cluster Autoscaler).
Data services: MongoDB Replica Set on EC2 (3 nodes, TLS), Amazon MQ for RabbitMQ, ElastiCache for Valkey, S3 buckets for product artifacts and data.
Ingress: AWS ALB with TLS certificate from ACM.
Category | Resource | Count | Notes |
|---|---|---|---|
Networking | VPC | 1 | CIDR defined by |
Public subnets | 3 | ||
Private subnets | 3 | One per AZ | |
Internet Gateway | 1 | ||
VPC Endpoints (Interface) | 6 | ECR dkr, ECR api, STS, SSM, SSMMessages, EC2MessagesVPC Endpoints (Interface) | |
VPC Endpoints (Gateway) | 1 | S3 Gateway (free)VPC Endpoints (Gateway) | |
Security Groups | 7 typical | EKS Node, ALB, VPC Endpoint, ElastiCache, Bastion, MongoDB, RabbitMQ — if | |
EKS | EKS cluster | 1 | Includes EKS-managed cluster security group |
Managed Node Group | 1 | Capacity type and instance types differ by profile (see table below) Managed Node Group | |
Node count | 8 | desired 8, min 8, max 20 (same in both | |
OpenTofu-managed addons | 4 | kube-proxy, CoreDNS, EBS CSI Driver, Pod Identity Agent (kube-state-metrics optional, default off)OpenTofu-managed addons | |
Compute / Data | MongoDB EC2 instances | 3 | 1 primary + 2 secondary, each with root + data EBS volume; instance type varies by profile (see below) |
MongoDB EBS data volumes | 3 | 1 per node, mounted at | |
IAM / Secrets / KMS | IAM roles + policies | multiple | EKS cluster, node group, Bastion (if enabled), MongoDB EC2, Pod Identity |
Secrets Manager secrets | 2 | MongoDB admin, RabbitMQ admin (auto-generated passwords)Secrets Manager secrets | |
KMS key + alias | 1 + 1 | EKS secrets encryptionKMS key + alias | |
DNS / Certs | Route53 Private Hosted Zone | 1 | If |
Route53 A records | 3 | mongo-01, mongo-02, mongo-03 -> private IPsRoute53 A records | |
ACM certificate | 1 | If | |
Storage | S3 buckets | 7 | gears-fusion-files, gears-cloud, gears-custom-scripts, mdcore, fusion-updater, mdfusion-vpack, ansible-ssm-logs |
Logs | CloudWatch Log Groups | 4 | Amazon MQ general + connection, EKS cluster, RabbitMQ |
Differs by profile (reference .example files)
Category | Resource | Cost-optimized ( | HA multi-AZ ( |
|---|---|---|---|
Networking | NAT Gateway + Elastic IP | 1 + 1 ( | 3 + 3 ( |
Route tables | Typically 1 public + 1 private shared across private subnets (single NAT) | 1 public + 3 private (one private route table per AZ is common with multi-NAT) — exact layout varies by | |
EKS | Capacity + instance types | SPOT; | ON_DEMAND; |
Datastores | Amazon MQ (RabbitMQ) | 1 broker, | Cluster, |
ElastiCache (Valkey) | 1 node, | 1 node, | |
Compute / Data | MongoDB EC2 instance type |
|
|
Compute | Bastion EC2 | 0 ( | 1 ( |
Prerequisites
AWS Account & Permissions
AWS Account (new or existing)
IAM User with Administrator permissions or specific permissions for:
AdministratorAccess
Local Environment
Tool | Version | Install |
|---|---|---|
OpenTofu | >= v1.11.* |
|
AWS CLI | >= 2.0 |
|
kubectl | >= 1.34 |
|
Helm | >= 3.x.x , (Helm v4 is not supported) |
|
Helmfile | >= 1.0.x |
|
helm-diff | latest |
|
Inputs and Variables to Customize
terraform.tfvars (OpenTofu)
Domain and certificate: domain_name, enable_certificate_validation, route53_zone_id (if validating via Route 53).
EKS and networking: region, vpc_cidr, public/private subnets (or count), eks_service_ipv4_cidr, node group instance types and sizes, NAT settings (single vs multi).
Security and access: bootstrap_cluster_creator_admin_permissions = true; KMS usage for secrets encryption.
mocm/values.yaml (Helm)
Image registry and tag: set your container registry (ECR, Harbor, or any OCI registry) and image tag. The tag should match the images provided in the release package.
Ingress: host (your external DNS name), ingressClassName (e.g., nginx).
Global secrets: MongoDB, RabbitMQ, Valkey, and admin-user. If Terraform created MongoDB and RabbitMQ, retrieve their credentials from AWS Secrets Manager (instructions below) and fill them here.
Step-by-Step Deployment Infrastructure
Phase 1: OpenTofu Infrastructure
Working directory: terraform/aws
Configure AWS CLI credentials
Extract Package
Download MOCM Kubernetes from My OPSWAT Portal and extract the MOCM on-premise package and verify the directory structure:
Navigate to the AWS IaC Directory
All infrastructure commands in this guide run from the terraform/ directory.
Working Directory: terraform/aws -- you will stay here until explicitly told to navigate elsewhere.
Configure Remote Backend (Optional but Recommended)
If you want to store OpenTofu state remotely on S3 (recommended for team collaboration):
Note: Replace your-company-terraform-state with a unique bucket name. S3 bucket names must be globally unique across all AWS accounts.
Then configure OpenTofu to use it:
Replace YOUR_BUCKET_NAME with the S3 bucket name you created above.
Note:
S3 backend uses
use_lockfileto prevent conflicts when multiple people run tofu simultaneouslyState file is NOT encrypted by default (
encrypt = false) - change totruefor production if neededIf you skip this step, OpenTofu will store state file locally (terraform.tfstate)
Create terraform.tfvars Configuration File
Step 5a — Pick a Profile and Copy the Example
Choose the scenario that fits your requirements, then copy the corresponding example:
Update the configuration values according to your environment.
Step 5b — Pin EKS Cluster + Managed Add-on Versions
EKS requires five managed add-ons whose versions must match your chosen eks_version . Run the command below in your target Region to retrieve the latest compatible versions:
Copy the output versions into your terraform.tfvars using the mapping below:
Example (EKS 1.34):
Step 5c — Configure S3 CORS for Browser Downloads
You must provide your portal’s domain to explicitly allow CORS access on S3 for browser-based downloads from either gears-fusion-files or gears-cloud . Each bucket has its own variable in terraform.tfvars ; both require the same CORS rule format (allowing only GET/HEAD, with ExposeHeaders including ETag and Content-Disposition.
Each variable controls CORS only for its respective bucket
gears-fusion-filesor gears-cloudYou must provide a domain value here if the user needs to download files via browser.
Do not leave this as [ ] if browser download is required, otherwise downloads will fail or filenames will be incomplete.
Step 5d — Configure AWS WAF (Web Application Firewall)
WAF is always created with 3 baseline managed rules by default AWSManagedRulesAmazonIpReputationList , AWSManagedRulesCommonRuleSet , AWSManagedRulesKnownBadInputsRuleSet
Configure managed rules.
They are pre-configured in terraform.tfvars . To add more rules, append to waf_managed_rules :
Step 5e — Configure SSL Certificate
Choose the appropriate configuration based on where your domain is managed:
Option 1: Domain managed in Route 53 (AWS)
Certificate will be automatically validated in 2-5 minutes
Option 2: Domain managed externally (GoDaddy, Cloudflare, Namecheap, etc.)
Certificate will be created but Pending Validation — you must manually add DNS validation records in your DNS provider.
> Warning: If enable_certificate_validation = true , you must provide route53_zone_id (the Hosted Zone ID, not the domain name).
> Note: Use a wildcard cert *.yourdomain.com or a single-domain cert for mocm.yourdomain.com . A single ALB handles both REST and gRPC traffic on the same domain.
Phase 2 - Deploy Infrastructure (OpenTofu)
Initialize OpenTofu
Plan Deployment
Debug Tip: If you encounter issues, enable debug logging:
Apply Infrastructure
Phase 3 - Configure EKS and Ingress
Install essential EKS addons:
Cluster Autoscaler
AWS Load Balancer Controller
Ingress NGINX Controller
Application Load Balancer (ALB) with HTTPS
Step 1: Configure kubectl and Export Environment Variables
Working Directory: terraform/aws (where you ran tofu apply)
Configure kubectl and export all environment variables needed for helmfile before navigating away.
Step 2: Install EKS Addons + MOCM Ingress
Working Directory: terraform/aws/eks-addons/
Troubleshooting: If deployment fails, capture debug logs and send to support:
Optional (from 2nd run): helmfile diff shows only changes before syncing. On the first run it prints the full manifest.
Key flags:
--enable-live-output— show real-time Helm stdout/stderr (essential for seeing progress)--debug— verbose output for troubleshooting2>&1 | tee file.log— capture all output to a file for support
Customization (optional): Edit these files before running helmfile sync if you need custom configurations:
helm/cluster-autoscaler/values.yamlhelm/aws-load-balancer-controller/values.yamlhelm/ingress-nginx/values.yaml
Step 3: Verify Addons
Expected output:
Step 4: Verify ALB Ingress
If you exported the ALB env vars (CERTIFICATE_ARN, PUBLIC_SUBNET_IDS, ALB_SECURITY_GROUP_ID) in Step 1, the ALB Ingress was deployed automatically by helmfile sync in Step 2.
After 2-3 minutes, you should see:
Phase 4 - Deploy MongoDB (Ansible)
Deploy MongoDB 8.0 replica set (3 nodes) using Ansible via AWS SSM.
Prerequisites
Ensure you have the following tools installed before proceeding:
Tool | Version | Installation |
|---|---|---|
uv | Latest | |
AWS Session Manager Plugin | Latest | |
jq | Latest | JSON processor for parsing OpenTofu outputs |
Step 1: Export OpenTofu Outputs
Working Directory: terraform/aws (where you ran tofu apply)
Export all values needed for Ansible. These environment variables are used in all subsequent steps.
Important: Keep this terminal open -- all subsequent Ansible commands reference these environment variables.
Step 2: Install Dependencies and Prepare Inventory
Working Directory: terraform/aws/ansible/ (you will stay here for all remaining Ansible steps)
Ansible Deployment Options
There are 3 roles: common (EBS mount), mongodb, and node_exporter. The common role must run first because MongoDB uses /mnt/data.
Option | When to use |
|---|---|
Option 1 -- Run all at once | First deployment or full deployment |
Option 2 -- Run role by role | Debug, retry a single role, or update one role only |
Option 1 -- Run all at once:
Run
playbook.yml(common + mongodb)Run
playbook-node-exporter.yml(node_exporter)
Option 2 -- Run role by role:
playbook.yml --tags common(required first)playbook.yml --tags mongodbplaybook-node-exporter.yml
Idempotent: Both playbooks are safe to re-run multiple times -- they do not overwrite data or cause errors.
Required variables by playbook:
Playbook | Required variables |
|---|---|
|
|
|
|
Cluster 3 nodes use the same mongodb_instance_type (OpenTofu). Set mongo_numa based on instance type:
mongodb_instance_type | mongo_numa | Playbook |
|---|---|---|
t3.large, t3.xlarge | false (default) | No change needed |
r5.4xlarge+, r7i, r7iz | true | Add |
Note: Enabling NUMA on a running cluster triggers a sequential restart of all 3 nodes.
Verify NUMA on EC2 (SSM): lscpu | grep -i numa, grep ExecStart /usr/lib/systemd/system/mongod.service, cat /proc/$(pgrep mongod)/numa_maps | head -5
Step 3: Test Connection (Optional)
Expected output: SUCCESS for all 3 nodes.
Step 4: Deploy MongoDB Cluster
Tip:
All values come from the
exportcommands in Step 1 -- no manual copy-paste needed.mongodb_private_zone_nameensures TLS certificates include SANs for your private DNS hostnames.Playbooks are idempotent -- safe to re-run.
Step 4b: Deploy Node Exporter (Optional but Recommended)
Node Exporter exposes metrics on port 9100 for Prometheus. Run this playbook if you need MongoDB instance metrics (e.g., for EKS monitoring).
Note: Requires internet access (downloads Node Exporter from GitHub).
Step 5: Verify Cluster
Note: These commands use AWS CLI and can be run from any directory.
Retrieve password later:
Step 6: Verify MongoDB Private DNS (Route53)
If enable_mongodb_private_dns = true (default), OpenTofu created a Route53 Private Hosted Zone inside your VPC with A records for each MongoDB instance.
Zone name format: internal.mongodb.<name_prefix>.<environment>
The mongodb_hostnames output from Step 1 contains the values you need for Helm. Copy the mongodb_hosts value and use it for MONGODB_HOSTS in mocm/values.yaml:
Tip: If you closed the terminal or lost the output from Step 1, you can retrieve it again:
Example mocm/values.yaml configuration:
Verify DNS resolution from an EKS pod:
Note: The Private Hosted Zone is only resolvable from within the VPC (EKS pods, EC2 instances). It is not accessible from the public internet.
Phase 5 - Infrastructure Summary
Your infrastructure is now ready:
AWS Resources: VPC, EKS 1.34, MongoDB (3 nodes), RabbitMQ, Valkey, S3 buckets, ACM certificate
EKS Addons: Cluster Autoscaler, ALB Controller, Ingress NGINX
MongoDB: 3-node replica set with TLS/SSL authentication
VPC Endpoints: ECR (x2), STS, S3 (Interface + Gateway), SSM (x3)
Next step: Deploy Application with Helm Charts