MetaDefender Kiosk allows you to audit the users that transfer data to and from the organization as well as to create a secure dataflow. Commonly used as a checkpoint to protect infrastructure from the risk of removable media devices (such as USB drives, CDs/DVDs, and other portable media), MetaDefender Kiosk allows you to configure detailed content filters for unknown removable devices brought in by employees, contractors, vendors and others.
This section provides instructions for developers who intend to build or integrate their own authentication method of these users into MetaDefender Kiosk. We recommend that you have a strong understanding of C/C++ before reading this section.
The bundled code included in this section is a sample of how the authentication module can be implemented. You should modify the contents in each method described in this section to accommodate your integration needs. You can remove any additional methods in the sample code not described in this section if not needed.
Important: Any configuration pertaining to the custom authentication module are not saved if you uninstall and re-install MetaDefender Kiosk. You must keep a copy of your module before uninstalling and then copy it back to the same directory once your installation or upgrade is complete.
System requirements
The system requirements for implementing custom authentication are as follows:
MetaDefender Kiosk 3.2.0 or later
Visual Studio 2017 or later
NET 4.5 or later for running the Custom Authentication Sample for the sample UI (optional)
Deploying and configuring custom authentication
The steps necessary to deploy custom authentication are as follows:
Obtain a custom authentication template package from the OPSWAT Portal downloads Note: Use the template for C++ custom authentication module (vc15).
Implement the custom authentication interface & build the custom authentication module (authenticationModule.dll)
Deploy the custom authentication module
Configure MetaDefender Kiosk to load and use the custom authentication
Configuring custom authentication
After successfully building the custom authentication module, you can configure the module.
Place the module (authenticationModule.dll) in the expected directory (e.g. <MetaDefender Kiosk Install Directory>\Client\Authentication)
Open the MetaDefender Kiosk Management Console and go to the Configuration tab
Go to the User Authentication section and click "View and configure user authentication"
Select User Authentication, then select Custom Authentication and click Apply Note: If Custom Authentication does not appear, the authentication module is either named incorrectly or not in the expected directory.

Understanding C++ code in the custom authentication template
The following section describes the C++ code in the custom authentication template.
Init
This is the first method called. It allows you to initialize your authentication module.
Arguments
Argument | Description |
|---|---|
showUI | Output indicates if the authentication module has a UI to display to the user.
|
Return value
Value | Description |
|---|---|
0 | The module initialized correctly. |
Non-zero | Initialization failed and the module cannot be used. |
Verify
This method initiates the authentication process to run. The return value has nothing to do with if the user is authenticated or not. It indicates if the authentication process was successful or not.
Arguments
Argument | Description | Notes |
|---|---|---|
verifiedID | The ID associated with the user that successfully authenticated. If a user is denied, then this is empty. | Implementer must allocate the memory required. |
desktopName | MetaDefender Kiosk uses a second desktop for security reasons. If your authentication process has a UI to display to the user, this will indicate the desktop in which your authentication process will be launched. | Disregard if your authentication process does not require a UI. |
password | The verified user’s credentials which allows MetaDefender Kiosk to handle post processing permissions. If you don't want MetaDefender Kiosk to have the user’s permissions, leave this empty. | Implementer must allocate the memory required. |
Note: From 3.5.0, if verifiedID is empty, Guest workflow will be used.
Return value
Value | Description |
|---|---|
0 | Verification ran successfully. |
Non-zero | Verification failed to run. |
Denit
This method is called when MetaDefender Kiosk is shut down. Any resources acquired by your module should be released and any unsaved data should be stored.
Arguments
No arguments are required for this function.
Cancel
This method is called when the user tries to cancels while verification is running.
Arguments
No arguments are required for this function.
Return value
Value | Description |
|---|---|
0 | The cancel request was accepted. |
Non-zero | The cancel request was denied. |
FreeString
This method is called to free allocated memory for wchar_t **. MetaDefender Kiosk calls this function when finished with the values allocated by your functionality.
Arguments
Argument | Description | Notes |
|---|---|---|
stringToFree | Double pointer to wchar_t | This function must be de-allocated in the same way that memory is allocated. |
Return value
Value | Description |
|---|---|
0 | The allocated memory was successfully released. |
Non-zero | The allocated memory failed to be released. |
Using the custom authentication tester
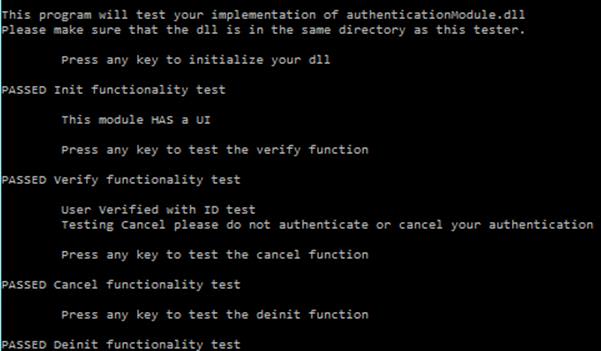
The custom authentication testing package includes a file called TestCustomAuthentication.exe that lets you test and troubleshoot your authentication module before using it with MetaDefender Kiosk.
TestCustomAuthentication.exe behaves similarly to the component MetaDefender Kiosk uses to load the authentication module. Since MetaDefender Kiosk runs under a SYSTEM context, you should run the authentication module under SYSTEM as well. Attempting to run the authentication module under any other user may invalidate the module's results. You must run TestCustomAuthenticationModule.exe under SYSTEM to properly load authenticationModule.dll and test the methods.
You can use Windows Sysinternals to run the tool as SYSTEM.
To run the custom authentication tester:
Download PsExec
Open a command prompt (as an administrator) to where PsExec is installed and enter "PsExec.exe -s cmd.exe"
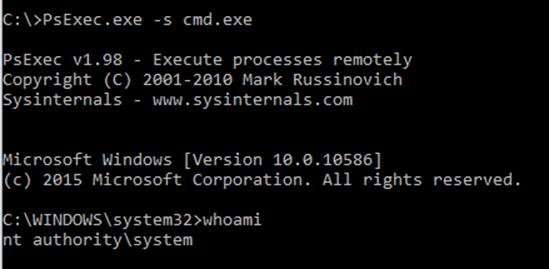
Navigate to the <MetaDefender Kiosk Install Directory>\Client\Authentication directory
Run TestCustomAuthentication.exe. At all points of method testing, the tester pauses and allows you to control when to move on to the next test
A PASSED or FAILED result appears
pcProx Plus RFID Reader Custom Authentication Module
Overview of Module
This documentation describes usage of the pcProx Plus RFID Reader custom authentication module. This authentication module can be used with any version of MetaDefender Kiosk version 3.2.0 or later to allow RFID cards to be used for MetaDefender Kiosk authentication.
Required Components
Installed MetaDefender Kiosk system (version 3.2.0 or later)
Installer available on OPSWAT's portal at https://portal.opswat.com/products/high-security-networks
pcProx Plus RFID Reader
pcProxConfig reader configuration tool
Download available at https://www.rfideas.com/support/product-support/pcprox-plus
Documentation available at https://www.rfideas.com/files/downloads/manuals/Enroll_Plus_Wiegand_Manual.pdf
pcProx Plus RFID Reader Custom Authentication Module
Compiled binaries and source available on the OPSWAT Portal at https://portal.opswat.com/sample-code/metadefender-kiosk-custom-authentication-module
Configuration
MetaDefender Kiosk Configuration
If MetaDefender Kiosk has not already been installed on the system, the installer is available on the OPSWAT Portal at https://portal.opswat.com/products/high-security-networks.
Reader Configuration
pcProxConfig Installation
Download the pcProxConfig installer from https://www.rfideas.com/support/product-support/pcprox-plus
Run the installer to install the pcProxConfig configuration tool
Connect the pcProx reader to the Metadefender Kiosk system and wait for the driver to be installed. The LED on the reader will turn red
Launch the pcProxConfig tool, the device should be automatically detected
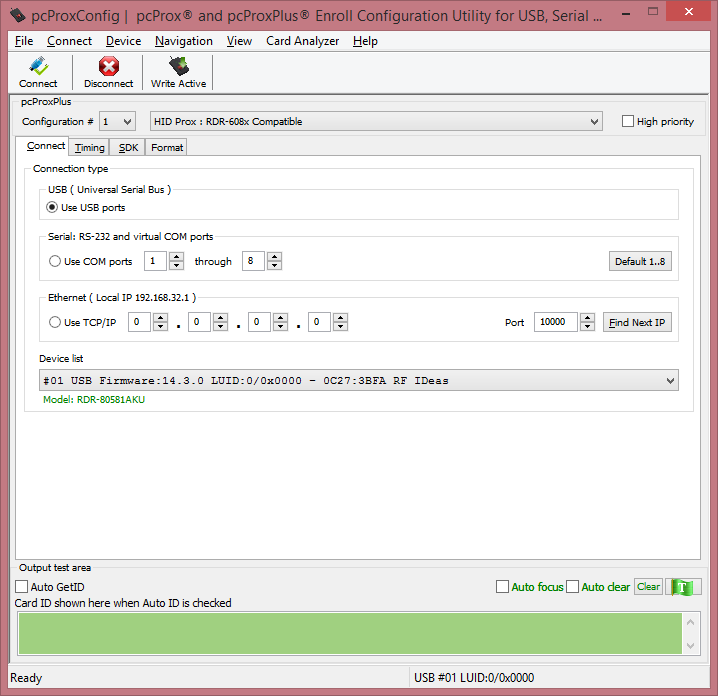
2. If the reader is not automatically detected you can click on the 'Connect' button to detect the reader
3. The reader should be shown in the device list
Select 'Card Analyzer' from the menu
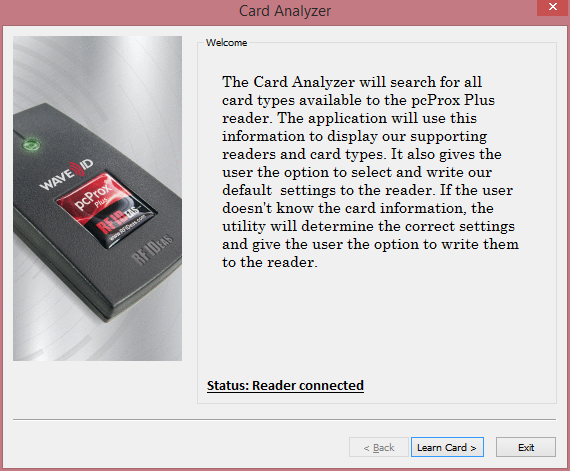
Click 'Learn Card'
Click Start Scan, and when prompted put the RFID card that you want the device to learn on the scanner. The card will need to stay on the reader until the scanning is complete.
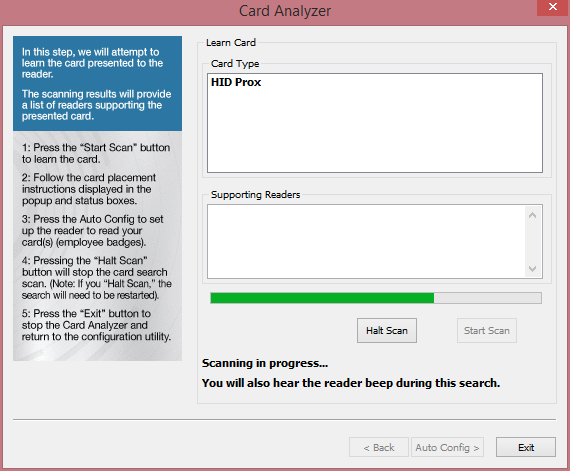
3.

Click the 'Auto Config>' button
Select the Configuration # to set and click the 'Write' button

After the configuration has been written click 'Exit' to close the Card Analyzer dialog or click the 'Learn Card' button to learn another card type
Confirm that the configuration has the 'High priority' checkbox selected
1.
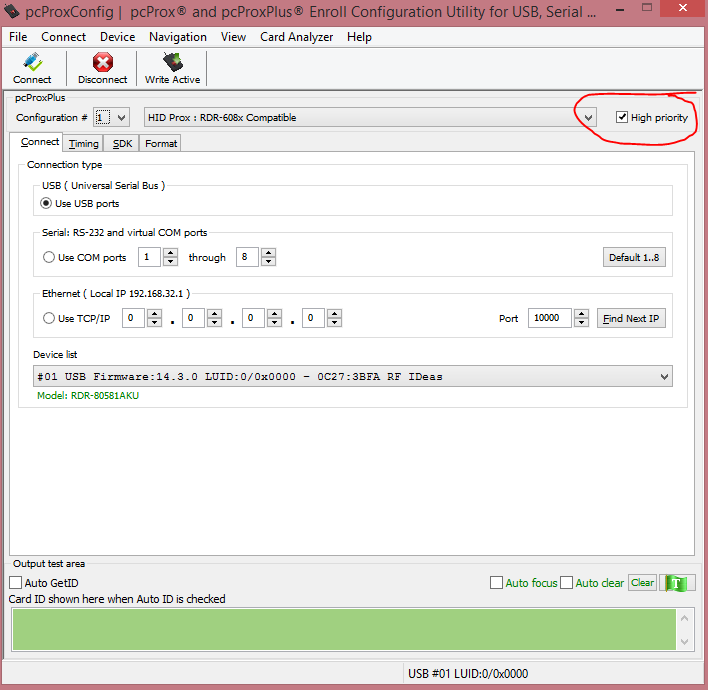
2. If two configurations are saved make sure this is selected for both
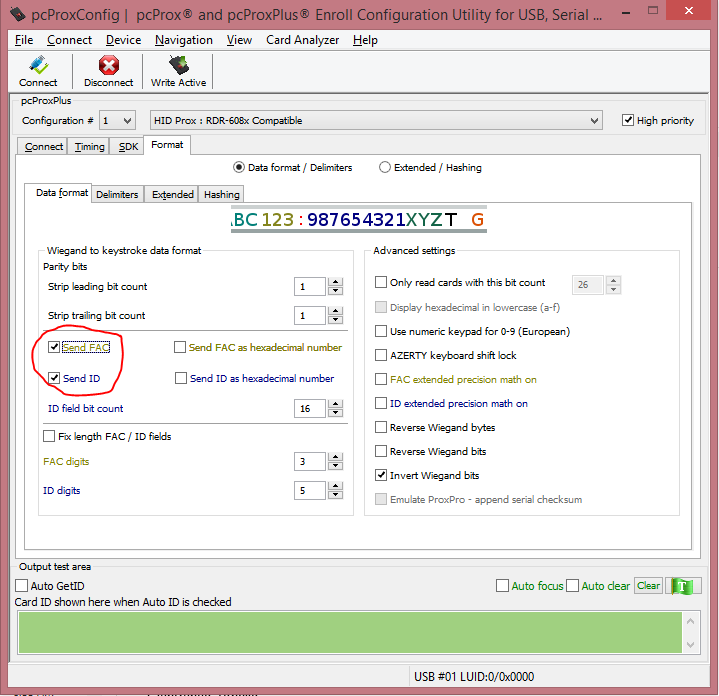
Select the 'Format' tab. On the 'Data Format' subtab do the following.
1. Confirm the 'Send ID' checkbox is selected
2. OPSWAT recommends that the 'Send FAC' checkbox is also selected
3.
On the 'Delimiters' subtab, do the following
1. Confirm the Pre-data delimiter is set to <NONE>
2.
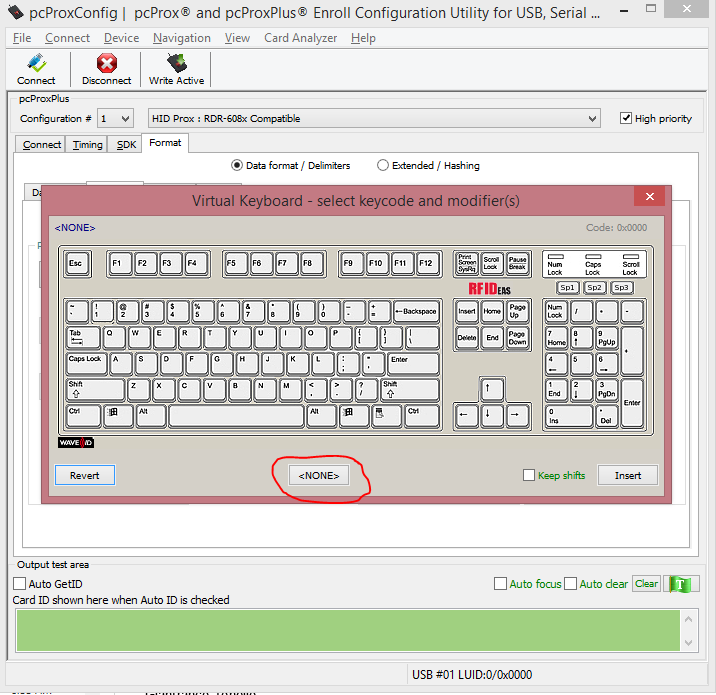
3. Confirm the Post-data delimiter is set to <NONE>
4. Confirm the Termination Keystroke is set to <ENTER>
5.
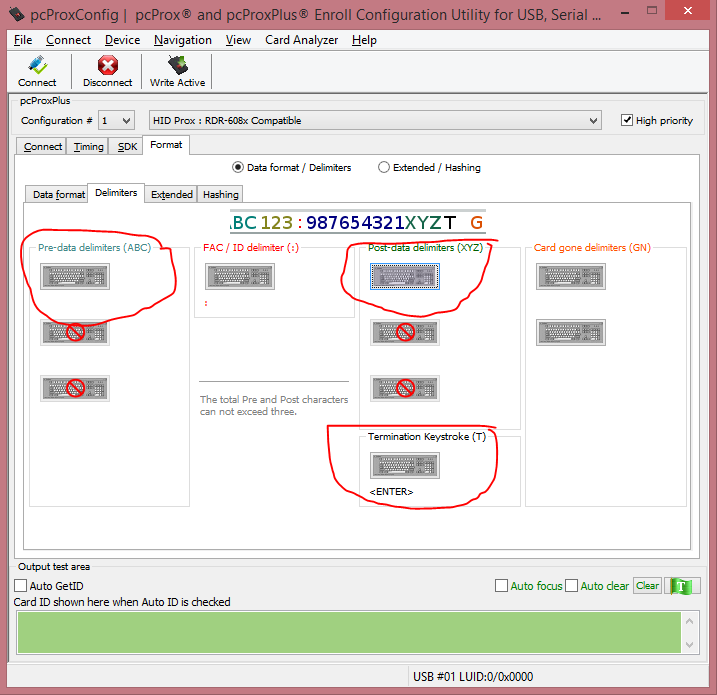
Click the 'Write Active' button to save the configuration. If there are two configurations set this needs to be done for both configurations.
Test the configuration by opening the Notepad application and scanning a card. The card ID should be written into Notepad.
Adding pcProx Custom Authentication Module to MetaDefender Kiosk
Copy the following files from the custom authentication module download package into your C:\Program Files (x86)\OPSWAT\Metadefender Kiosk\Client\Authentication directory
authenticationModule.dll
CustomAuthExample.exe
omsConfig_CAM.ini
db
If you would like to restrict users to the RFID cards that are listed in the database
Set the property validate_ID=1 in omsConfig_CAM.ini
Open the 'db' file with a text editor, such as Notepad. Update/add the valid card IDs (can be read by pcProxConfig tool, step 14) with the corresponding user names in the format <Card ID>:<Name>. Only card IDs that are listed in this file can be used for authentication.
In the MetaDefender Kiosk Management Console, enable Custom Authentication. Configuration → User Authentication → View and configure user authentication → User Authentication → Custom Authentication
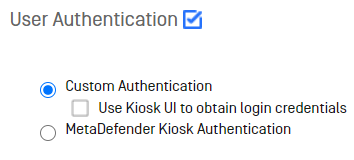
2. Click the 'Apply' button
Using the pcProx Custom Authentication Module
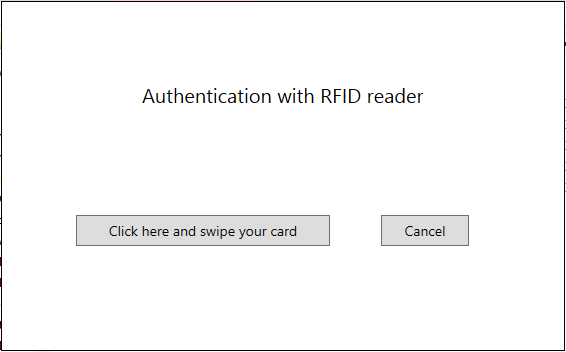
Users will be prompted to scan their RFID badge
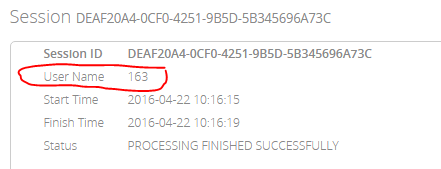
The ID from the card will be saved as the user ID for the session
In the session log viewable through the Management Console
2. On the scan receipt
3. In the saved text log file