This documentation is based on GoAnywhere MFT version 7.0.1 and is the minimum configuration required to integrate GoAnywhere MFT and MetaDefender ICAP Server.
Prerequisites
GoAnywhere MFT is installed and licensed
MetaDefender ICAP Server is installed and license is activated
- For installation and configuration quick guidelines see: 1. Quick Start with MetaDefender ICAP Server. For detailed instructions see: 2. Installing or Upgrading MetaDefender ICAP Server and: 3. Configuring MetaDefender ICAP Server.
- MetaDefender ICAP Server must have a valid license to function correctly. For license configuration details see 2.4. MetaDefender ICAP Server Licensing
MetaDefender Core is installed and license is activated
Web browser access to the GoAnywhere (GA) MFT web GUI. (Please refer to the GoAnywhere documentation for details on how to access the MFT UI. This guide was written with a presumption that you have already completed configuration of the MFT device for basic usage.)
Configuring Goanywhere MFT
Goanywhere version 7.0.1 has not supported ICAP Secure Connection (ICAPS) yet
Goanywhere MFT 7.0.1 supports antivirus setting with ICAP protocol for upload services (FPT, FPTS, SFTP, GoDrive, Secure Folders, Go Fast, PeSIT, AS2, Secure Forms, Secure Mail) or for custom workflow.
This document will guide to setup ICAP for both upload service and custom workflow.
Setup Anti-Virus for Upload Services
Enable ICAP Server for Antivirus Settings
Go to System → Antivirus Settings → ICAP Server tab
URL: icap://{HOST}:1344/OMSScanReq-AV
- E.g: icap://10.40.161.199:1344/OMSScanReq-AV
Client IP: Can be the IP address of GoAnyWhere system
Enable the Preview
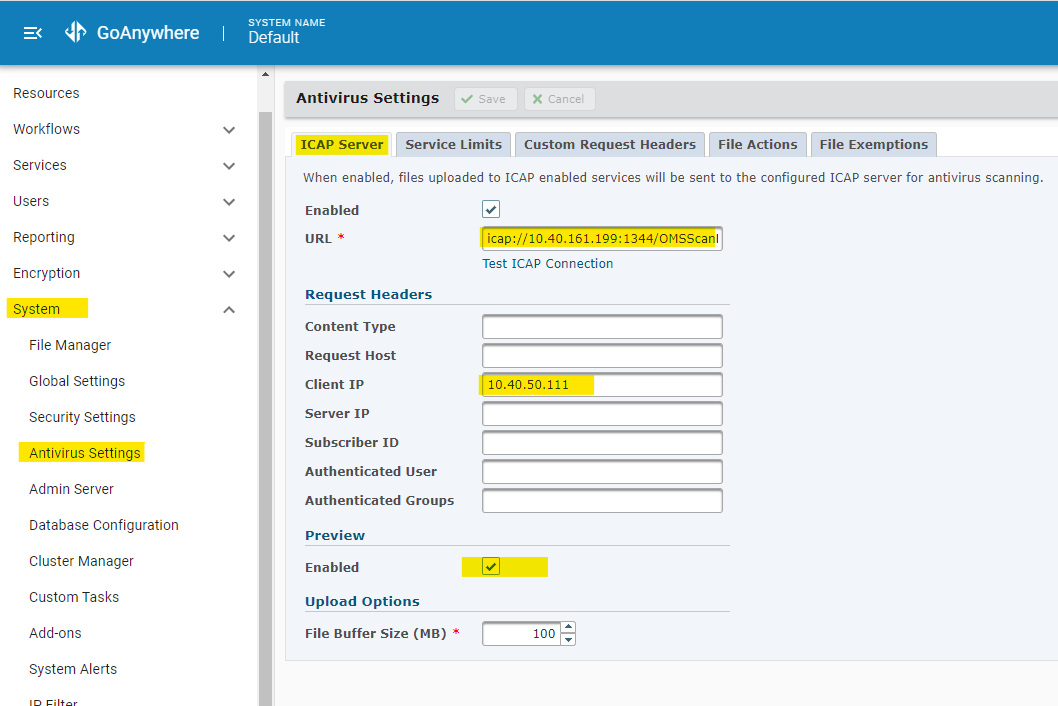
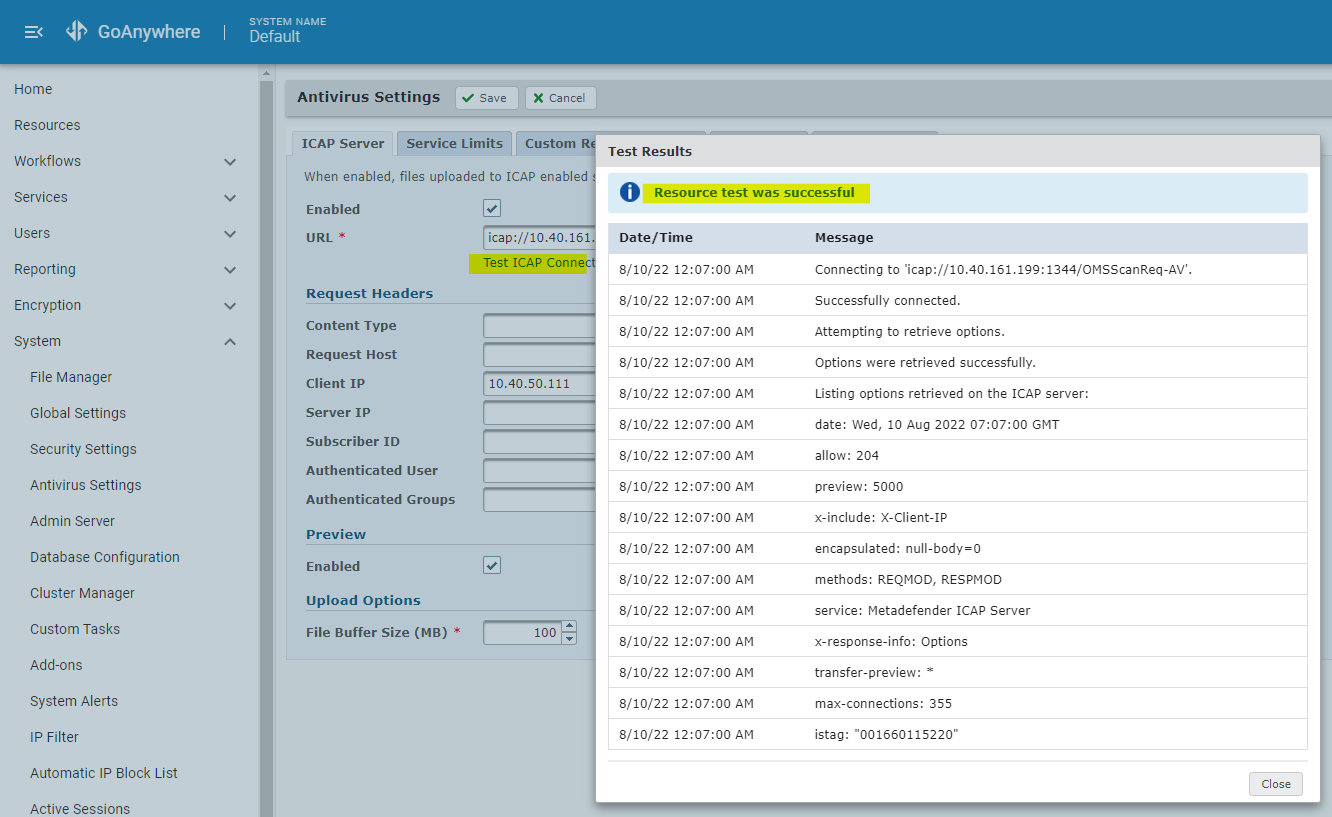
Check the connection with MD ICAP Server by hitting “Test ICAP Connection”
Select the Service will use the Antivirus scan
- Default Assign Service Limits is unchecked then all upload service of Goanywhere will be used the antivirus scan, otherwise the service can be selected
- For example: As below setting, the service FTP, SFTP, Secure Folders, Go Drive will be used antivirus service

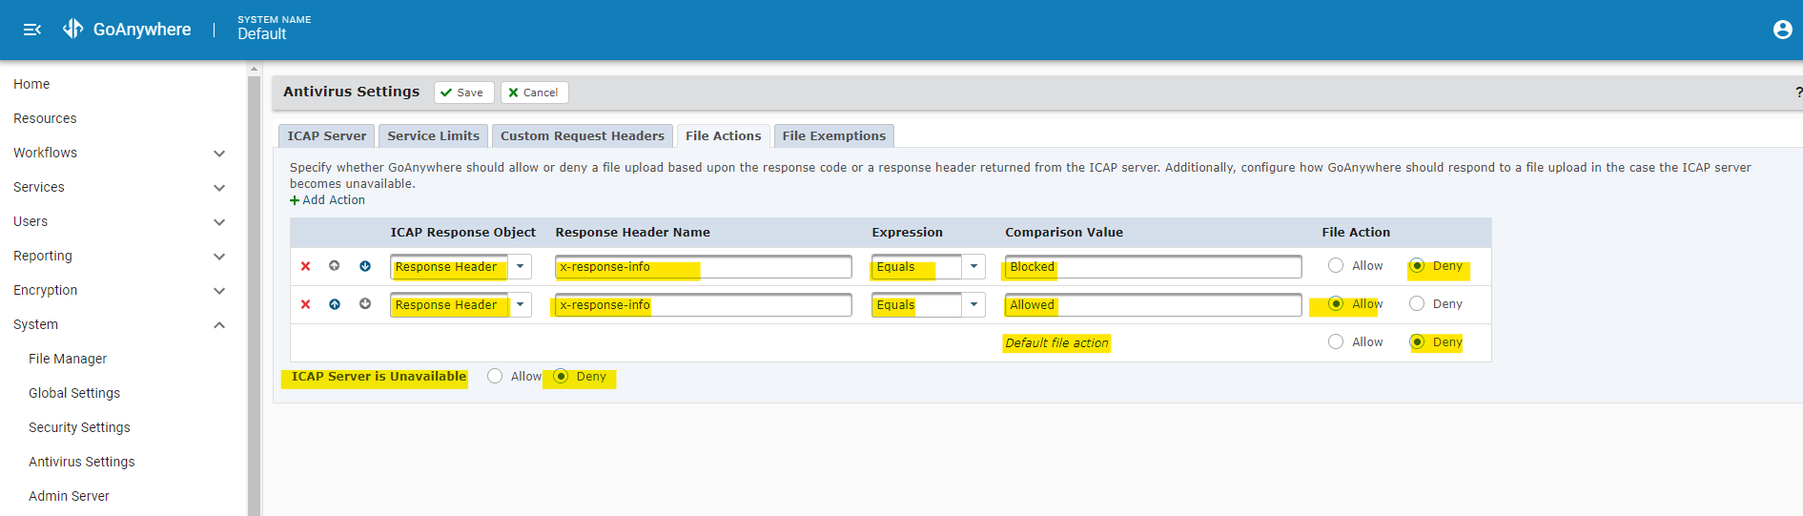
Configure the file action corresponding with respond from MD ICAP Server
Goanywhere support validate by both response code and response header
This example, the response header is used
- x-response-info header equal Blocked then deny the file upload
- x-response-info header equal Allowed then allow the file upload
- Default file action is Deny
- ICAP Server is unavailable: Deny
Refer to icap-response-header for more info
All header must be input in all lowercase
e.g: x-response-info
Setup Custom Workflow With ICAP
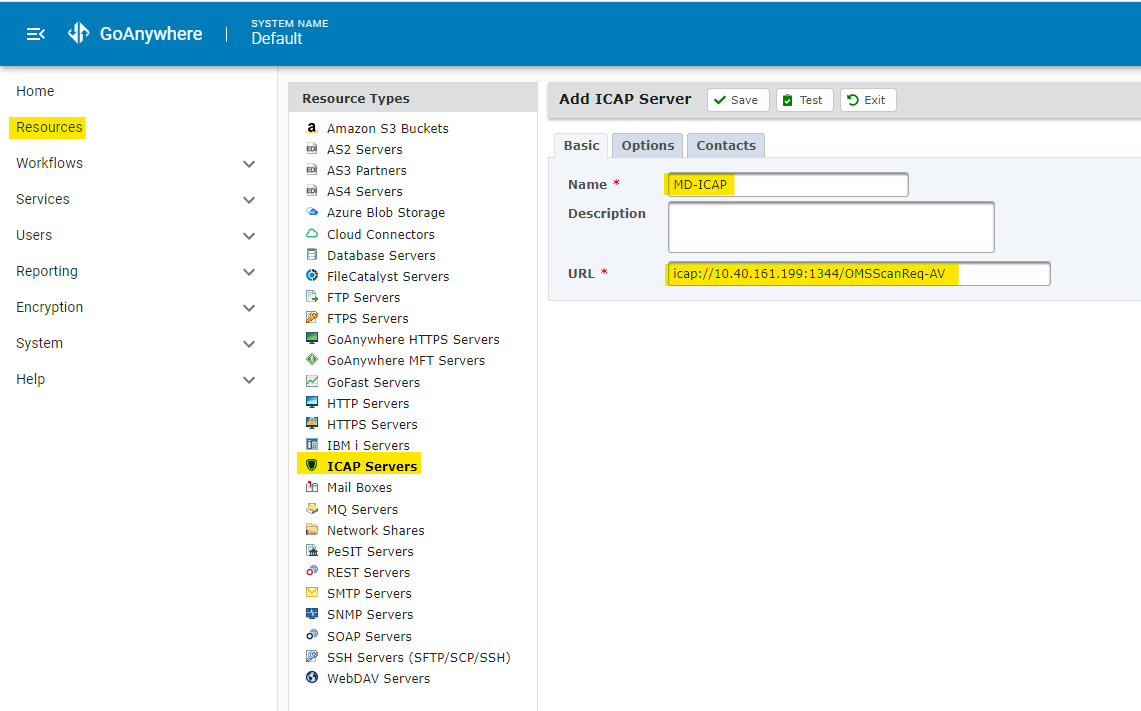
Create resource ICAP server
Go to Resource → ICAP Servers → Add ICAP Server
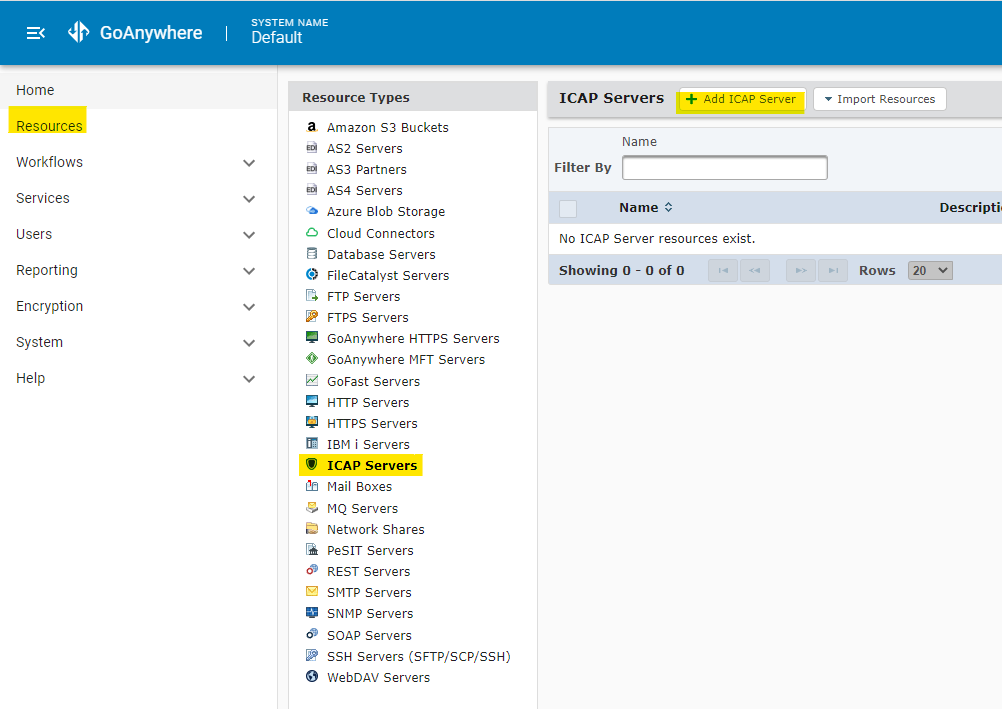
Fill Out:
Name: Name of resource
- E.g: MD-ICAP
URL: icap://<HOST>:1344/OMSScanReq-AV
- E.g: icap://10.40.161.199:1344/OMSScanReq-AV
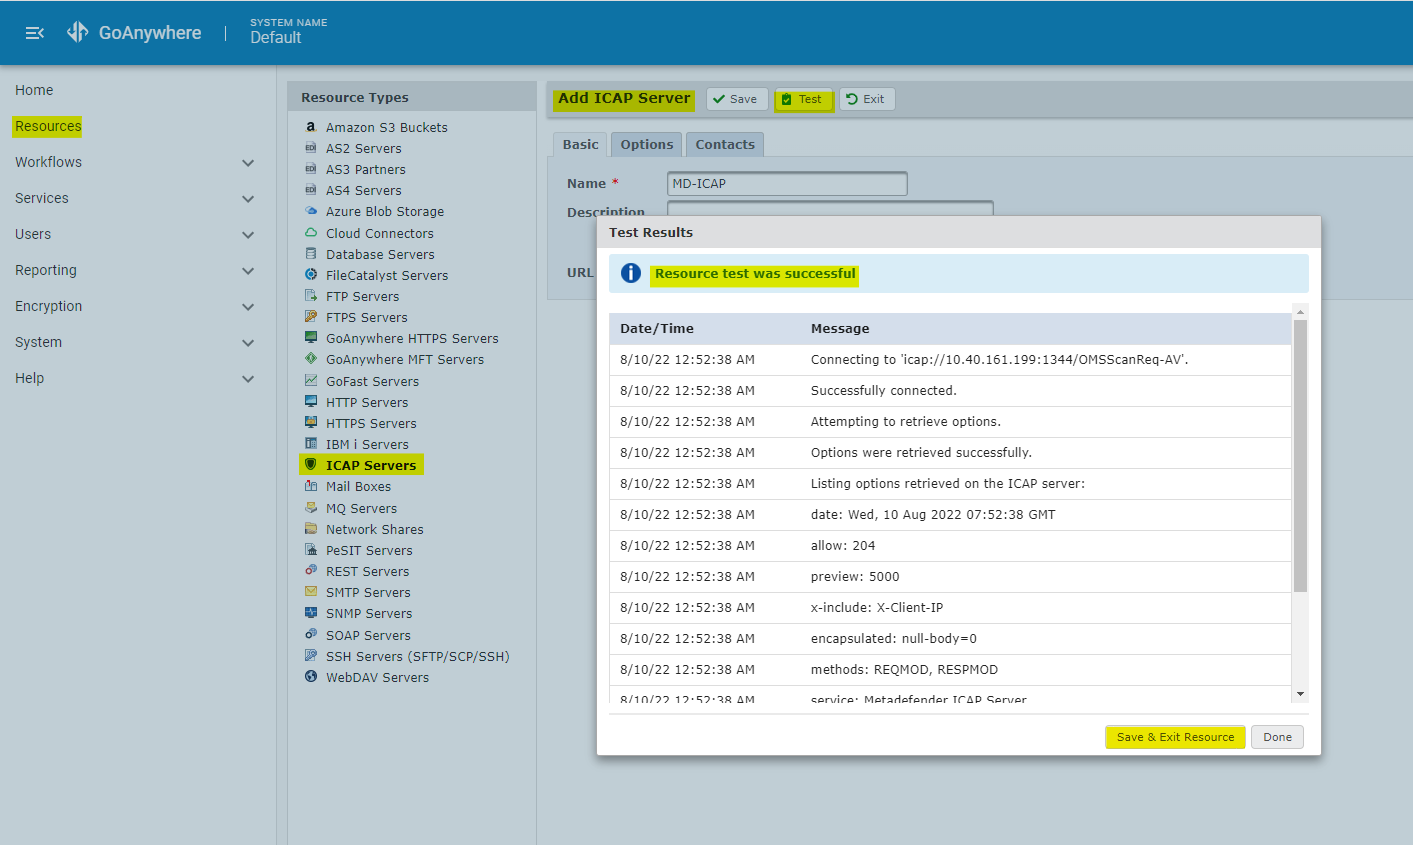
Then click Test → Save & Exit Resource
Create workflow
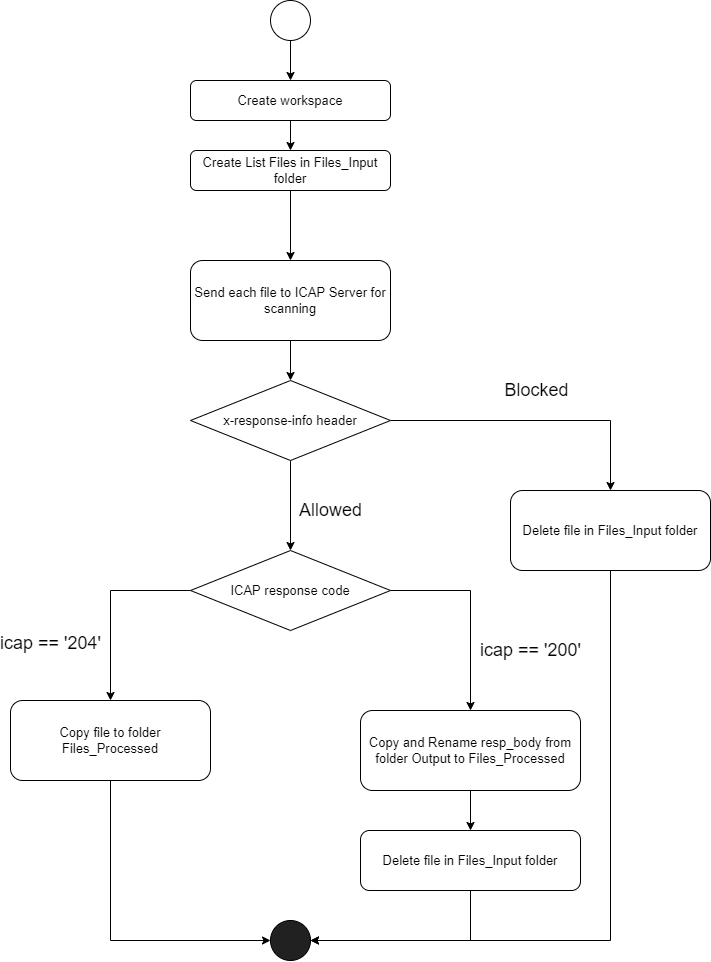
Workflow will be created differently depend on purpose. This is an example of custom workflow which will use MD ICAP Server for scanning files in a folder.
Example: Every 15 seconds, the system will check the Files_Input folder If there is any file created and modified in Files_Input folder then:
- Send all file in Files_Input folder to MD ICAP Server for scanning
- if file is blocked (x-response-info = Blocked) then delete the file
- if the file is allowed (x-response-info = Allowed) then check the icap respond code
- if the icap response code is 204 (mean file is clean) then move file to Files_Processed
- if the icap response code is 200 (mean file was sanitized) then: get file which was sanitized from MD ICAP Server and move to Files_Processed, after that delete the file in Files_Input
- Send all file in Files_Input folder to MD ICAP Server for scanning
- Setup custom workflow
- Setup custom workflow with MD ICAP Server
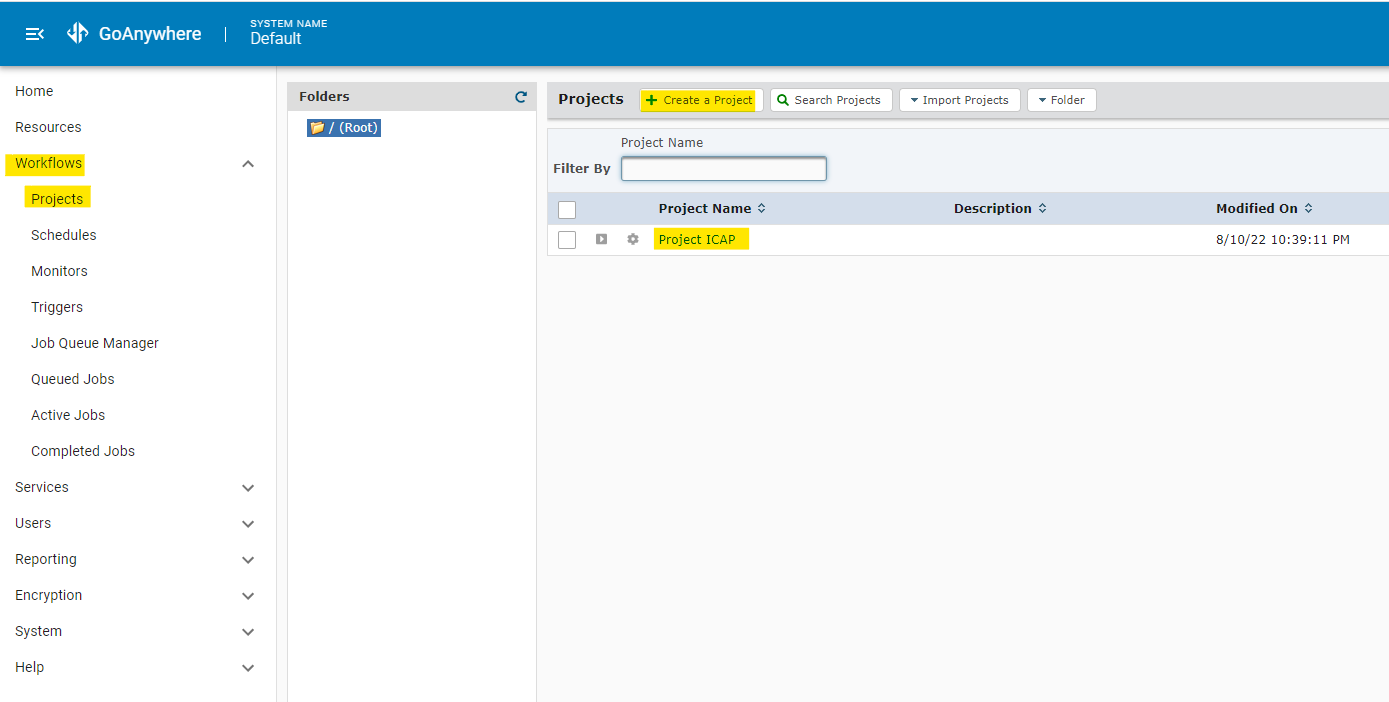
- Go to Workflows → Projects → Create a Project, In Create Project, fill out:
- Name: The Project Name must start with a letter (a-z or A-Z), and may only contain letters, digits (0-9), underscores (_), periods(.), and white spaces. Maximum length is 50 characters. E.g: Project ICAP
- Go to Workflows → Projects → Create a Project, In Create Project, fill out:
- Setup custom workflow with MD ICAP Server
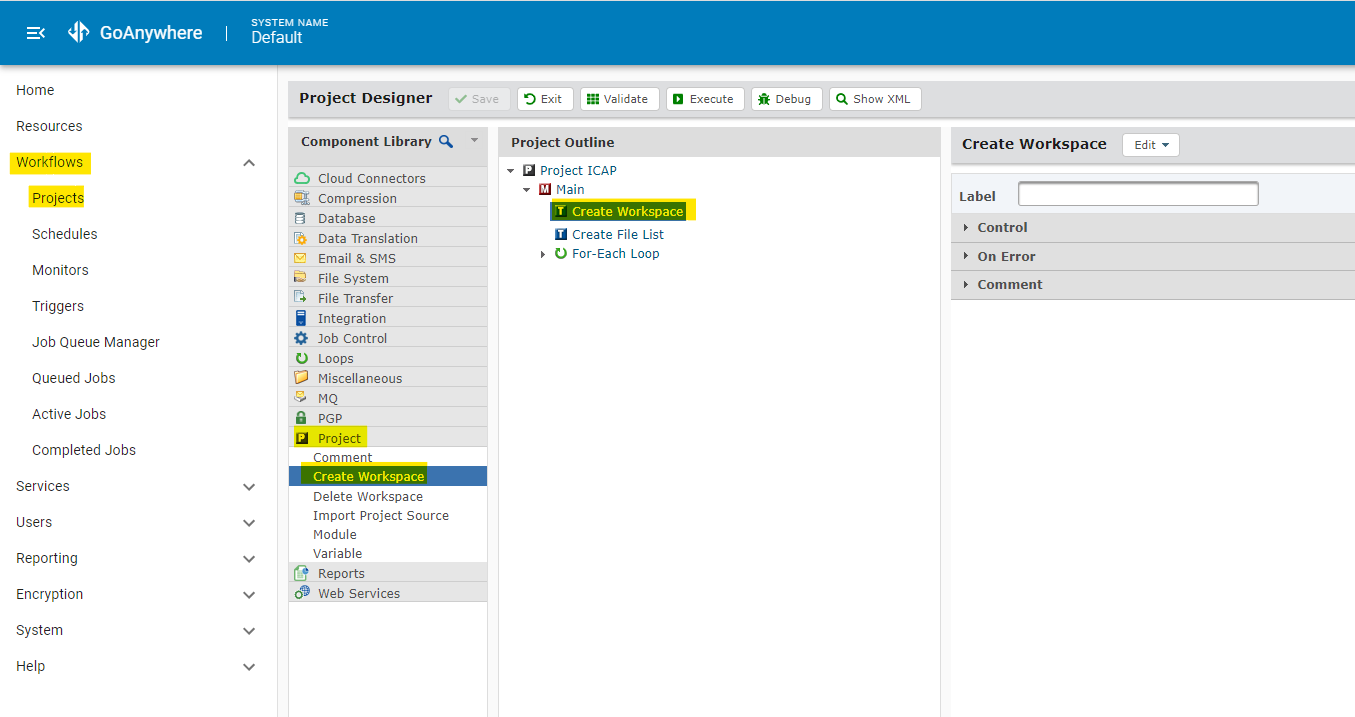
- First Workspace need to be created for temporarily storing files while executing a Project. Add Project → Create Workspace
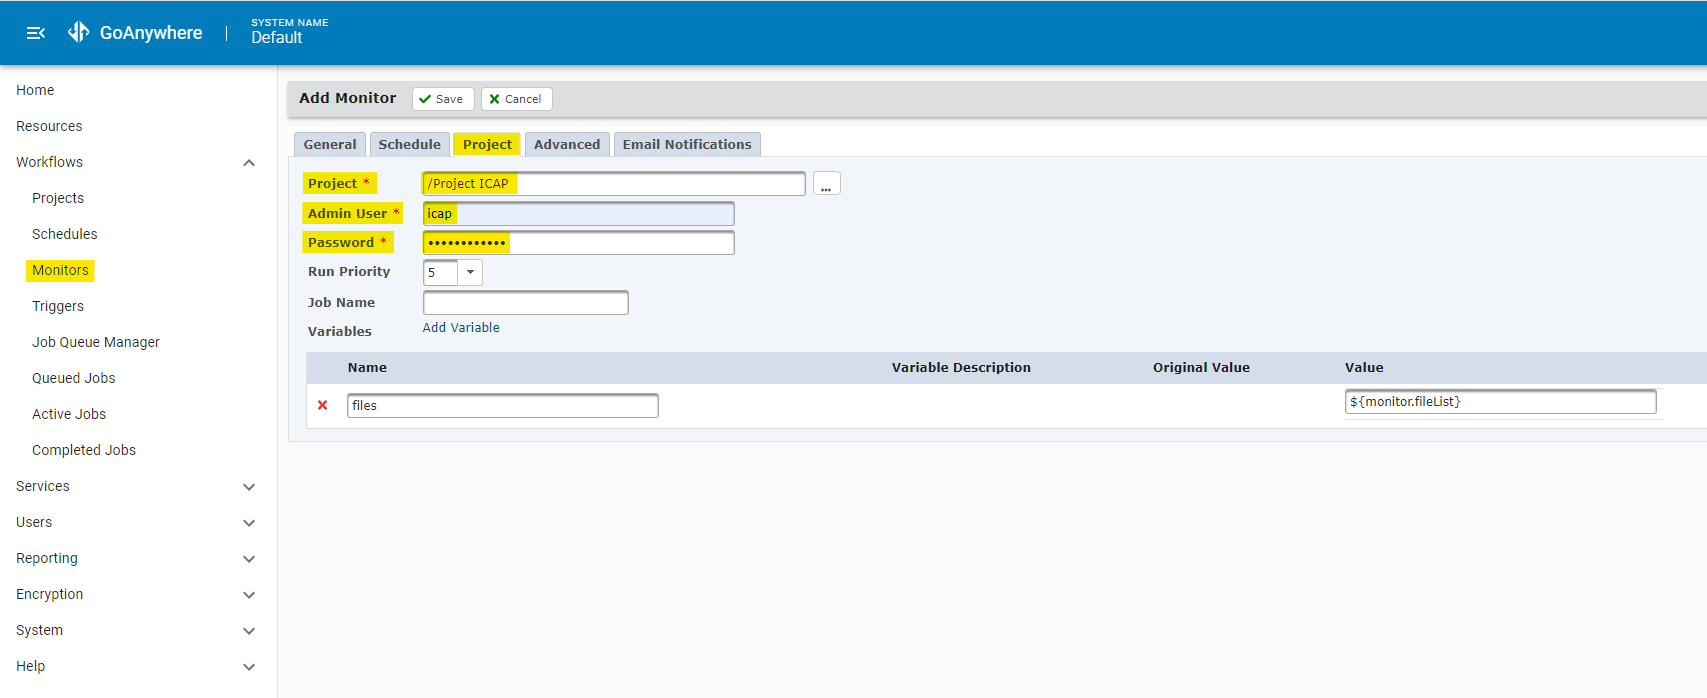
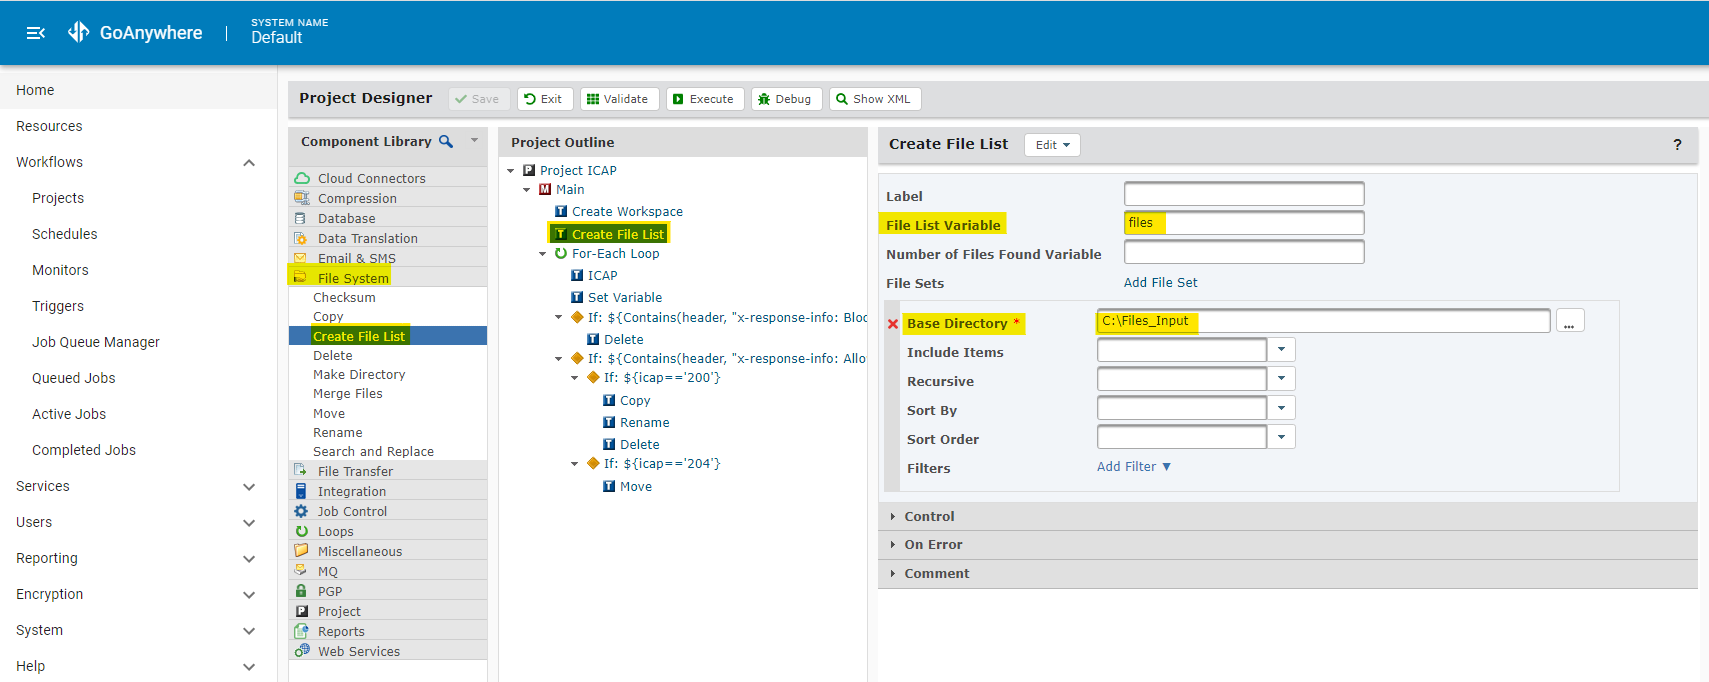
- Create file list, File System → Create File List → Enter File List Variable → Add File Set. This specifies the location of the files to be scanned.
- File List Variable: Enter name of variable file list
- E.g: File List Variable: files
- Base Directory: Location folder want to scan
- E.g: C:\File_Input
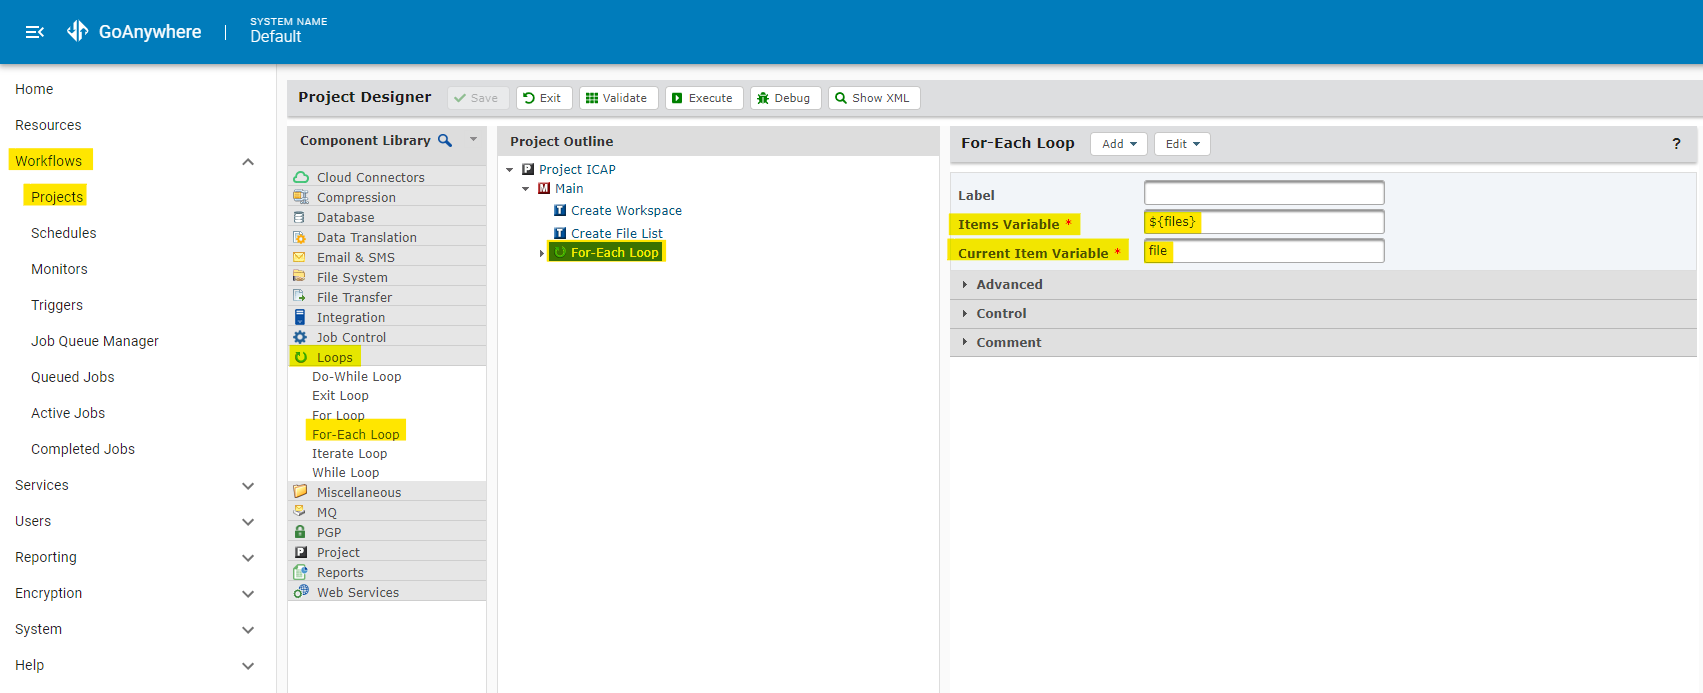
- Add loop to get each file in file list
- Items variable: Name of variable File List created in Create File List
- E.g: ${files}
- Current Item Variable: Enter name of current item variable
- E.g: file
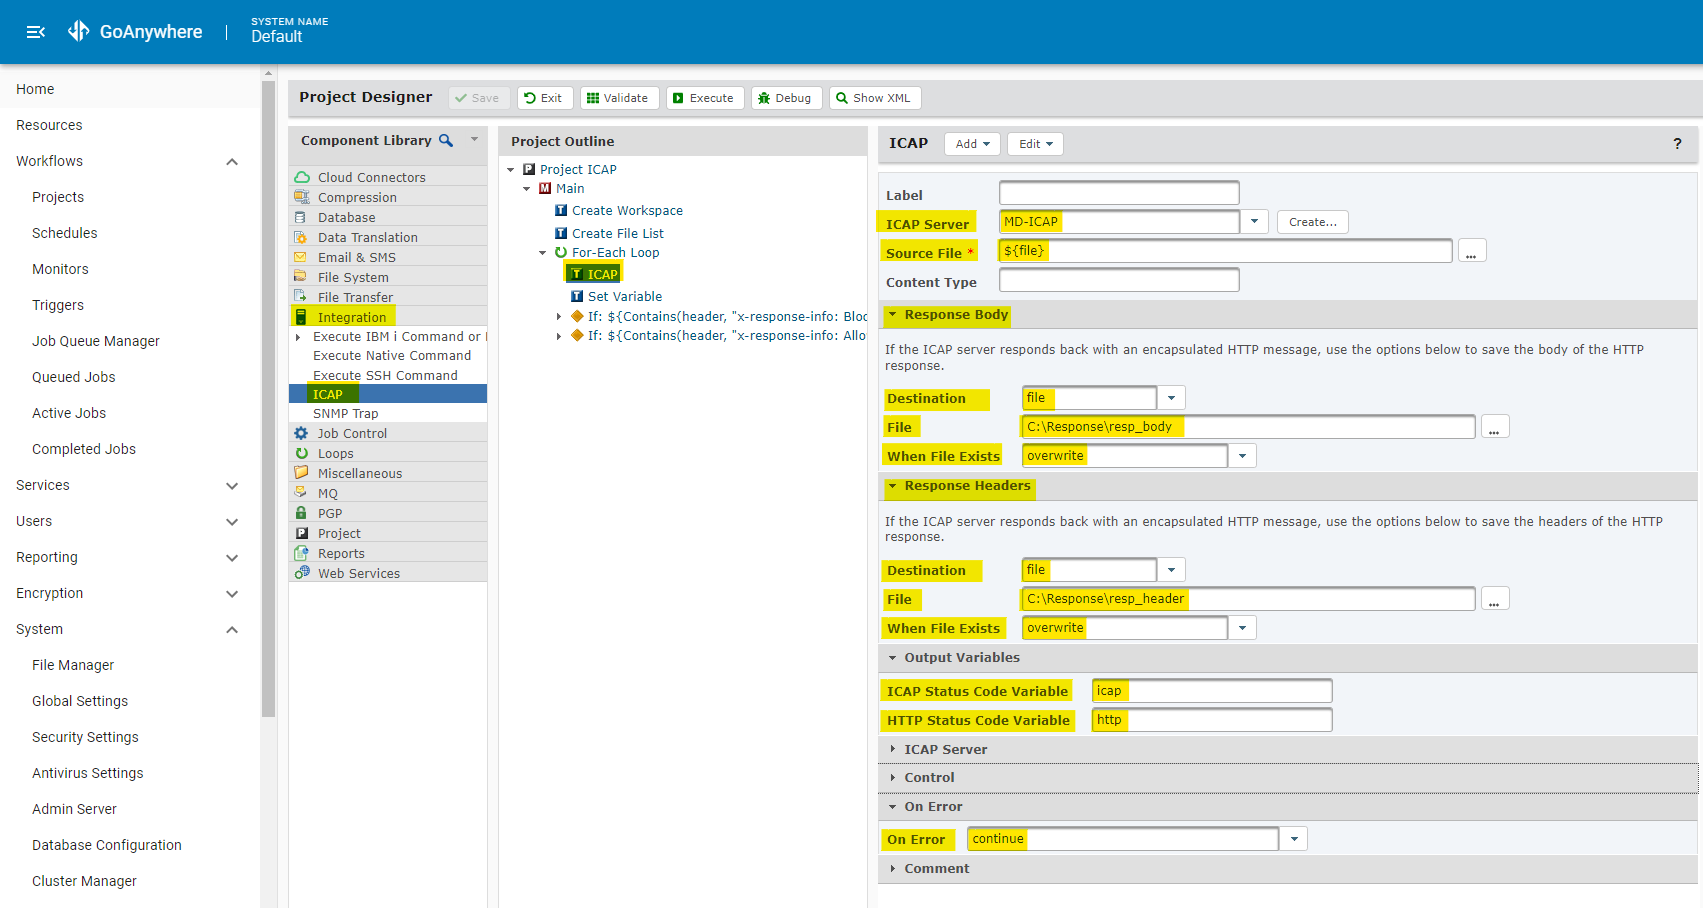
Each file in list will be sent to ICAP Server to scan by add Integration → ICAP
ICAP Server : ICAP Server Resource created in above
- fd
Source File: file want to be scanned by ICAP Server
- E.g: Variable ${file} in file list
Response Body: Body of ICAP response
Destination: Specify if and where the response body, if any, should be saved. By default, the response body will be saved to the job log.
- E.g: In this workflow, Destination is set to file
File: Specify the location of the file to which the response body, if any, should be saved. This is required if the 'Response Body Destination' is set to 'file'.
- E.g: In this workflow, File is set to folder “C:\Response\resp_body”
When File Exists: Specify the action to take when the response file already exists. Default Value: rename.
- E.g: In this workflow, “When File Exists” is set to overwrite
Response Header: Header of ICAP response
Destination: Specify if and where the response headers should be saved. By default, the response headers will be discarded.
- E.g: In this workflow, Destination is set to file
File: Specify the location of the file to which the response headers should be saved. This is required if the 'Response Headers Destination' attribute is set to 'file'.
- E.g: In this workflow, File is set to folder “C:\Response\resp_header”
When File Exists: Specify the action to take when the response file already exists. Default Value: rename.
- E.g: In this workflow, “When File Exists” is set to overwrite
Output Variable: Response codes of ICAP and HTTP returned from ICAP Server.
ICAP Status Code Variable:
- E.g: In this workflow, ICAP Status Code Variable is set to “icap”
HTTP Status Code Variable:
- E.g: In this workflow, HTTP Status Code Variable is set to “http”
On error: Specify the action to take when this task errors out. Default Value: Inherited from parent Module
- E.g: In this workflow, “On error” is set to “continue”
Create a variable contains ICAP Headers by add Miscellaneous → Set Variable
Variable name: Name of variable
- E.g: header
Input file: File contains header of ICAP Response
- E.g: C:\Response\resp_header

- Within the ICAP Integration task entry in the project workflow, add an If in Job Control task. Enter field Condition. This will instruct the MFT server how to handle infected files once it receives a scan response from the MetaDefender ICAP Server.
- E.g: Condition : ${Contains(header, "x-response-info: Blocked")}
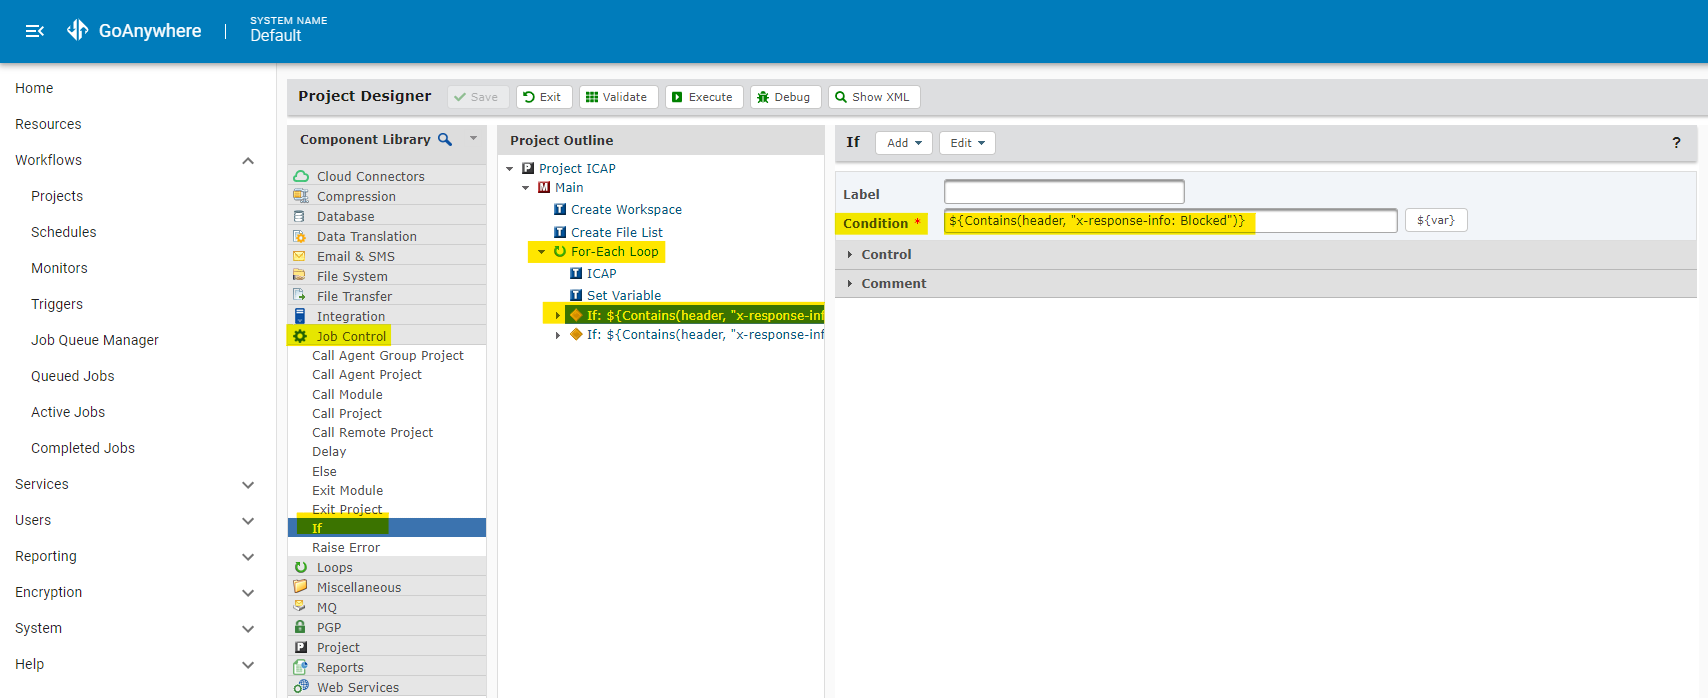
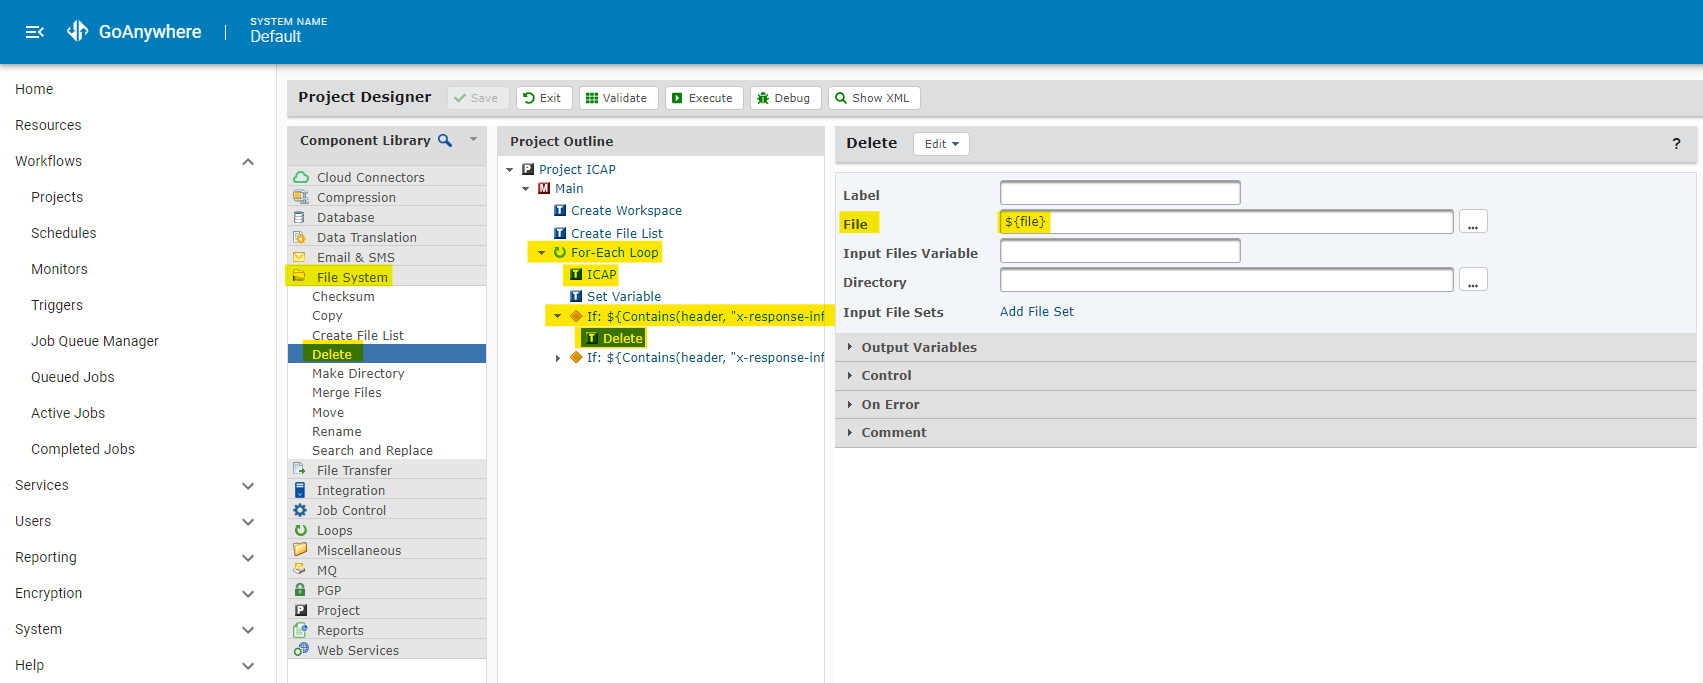
- When “x-response-info” is Blocked, add a Delete action for infected files under the If Job Control Task.
- File: The file will be deleted
- E.g: File is ${file} in file list
- File: The file will be deleted
- Under the ICAP Integration task, add an If Job Control Task for condition “x-response-info” is Allowed
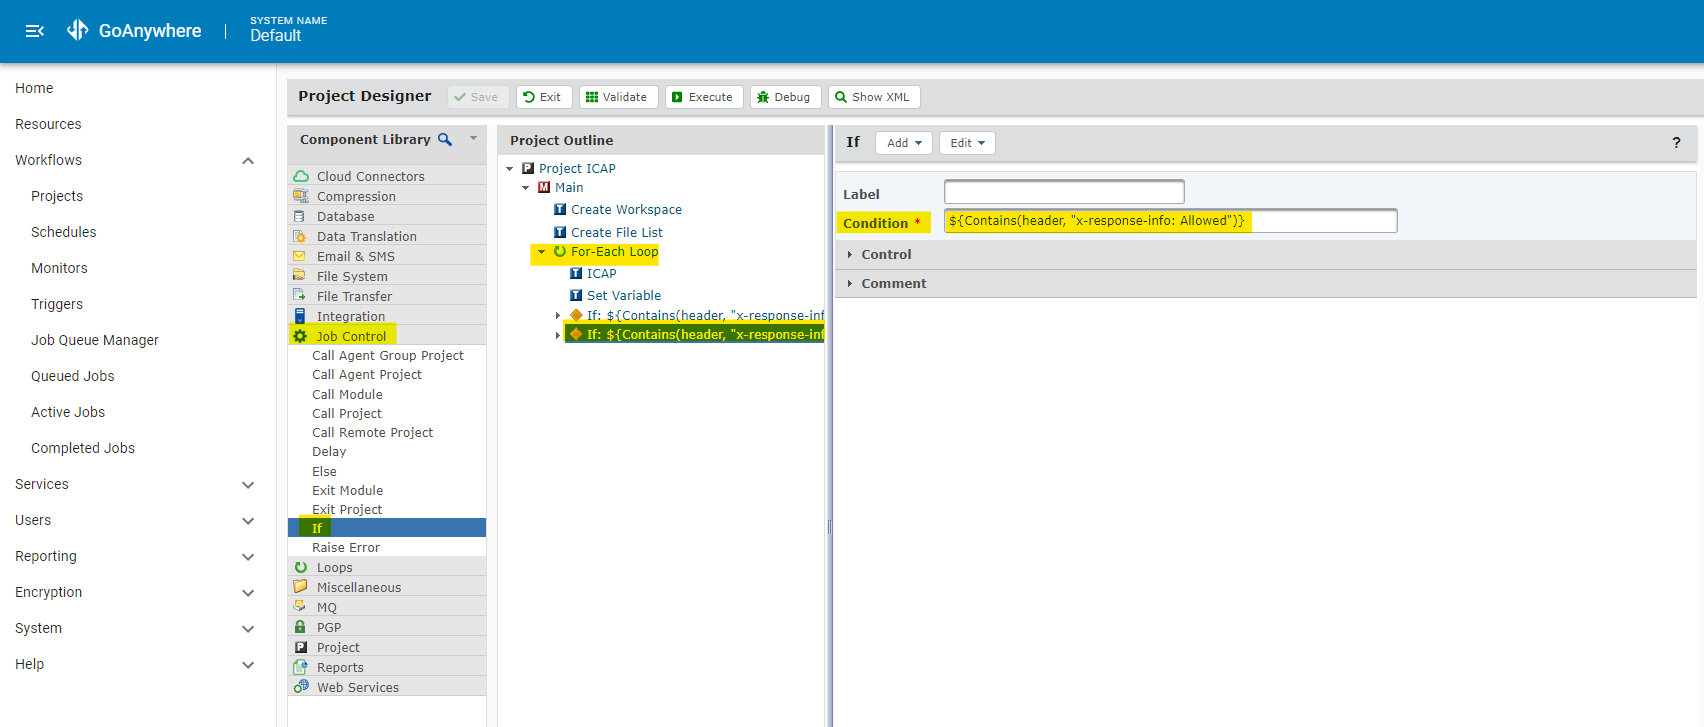
Add an If Job Control task under the If “x-response-info” == Allowed task just created. In the Condition field, enter ${icaps==’200'}. This will instruct the MFT server how to handle modified (e.g. processed by Deep CDR or Proactive DLP) files once it receives a scan response from MD ICAP Server
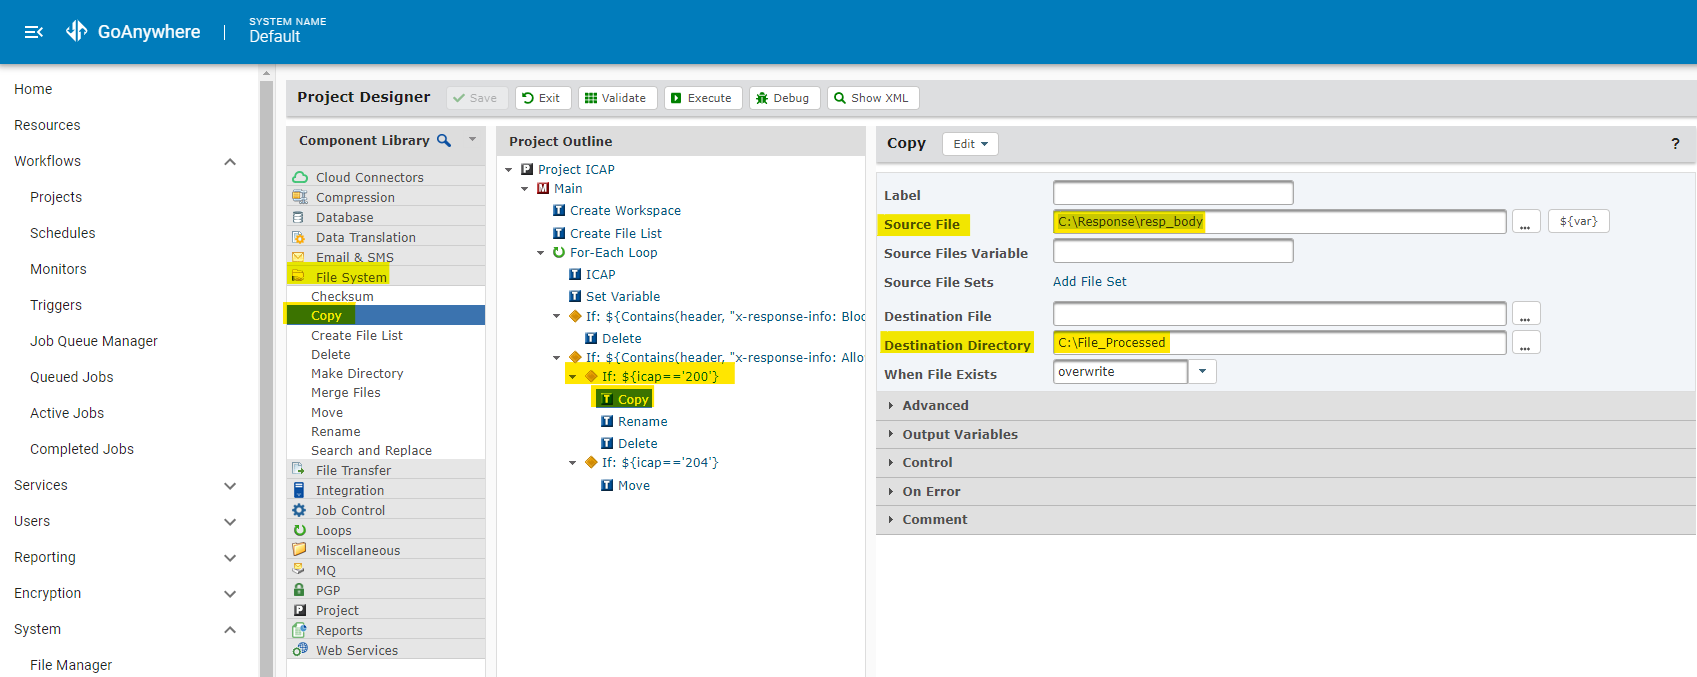
Add a Copy task to the If job condition. This job will copy resp_body turned from MD ICAP Server (modified file by DeepCDR or ProDLP) to File_Sanitized folder
Source file: File want to be copied
- E.g: File is ${file} in file list
Destination Directory: Folder which file will be copied to
- E.g: C:\File_Processed
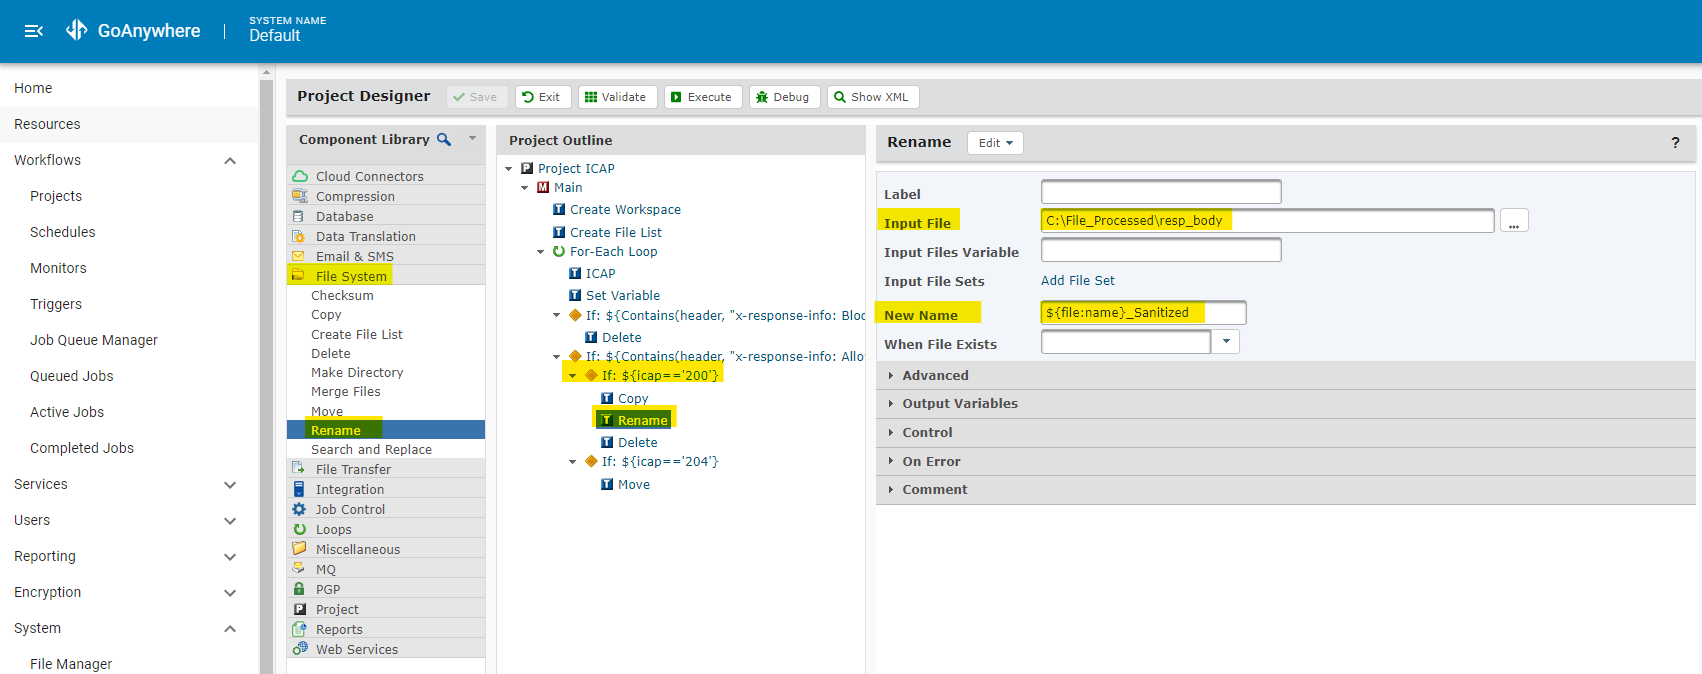
Add a Rename task for rename file resp_body just copied in folder File_Sanitized
Input file: File want to change name
- E.g: C:\File_Sanitized\resp_body
New Name
- E.g: ${file:name}_Sanitized with variable ${file:name} is current name of file
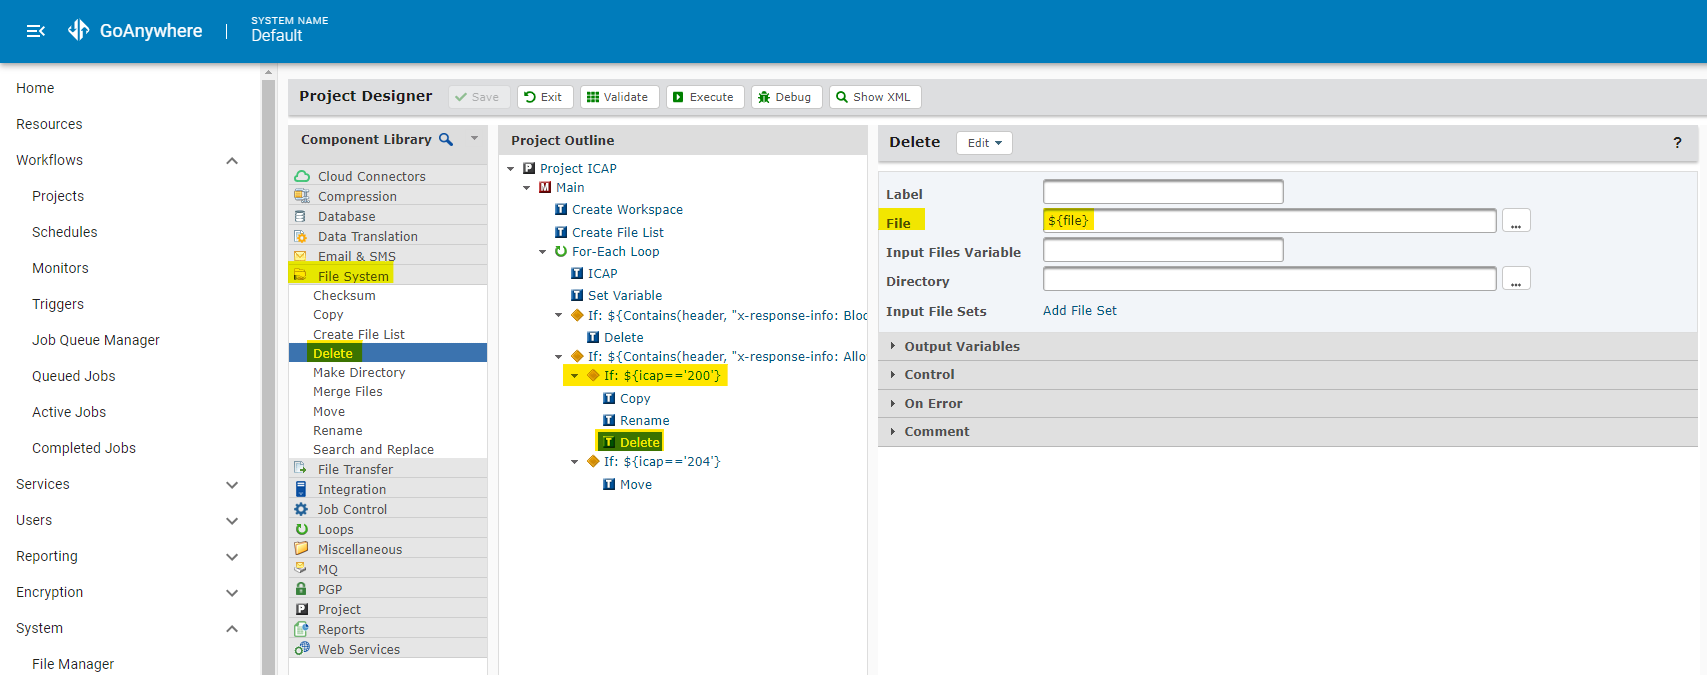
Delete File in Files_Input
Source file: File will be deleted
- E.g: Variable ${file} is current file in loop
- Add If task for condition ICAP code returned *204 *
- If MD ICAP Server return code 204, this file will be moved to folder Files_Clean by add Move task in File System
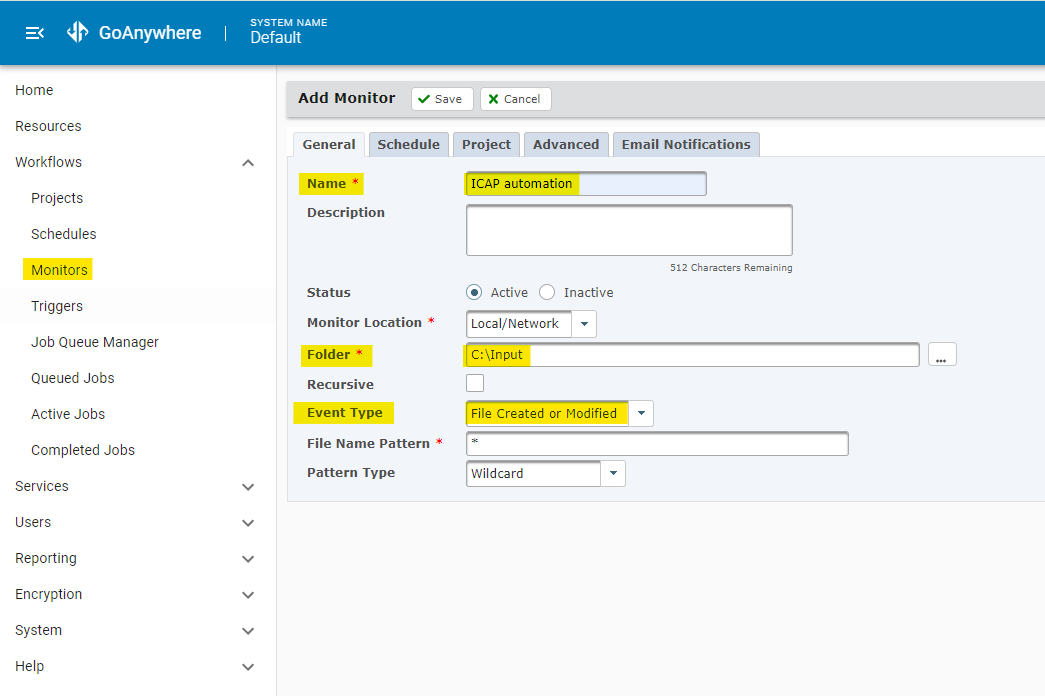
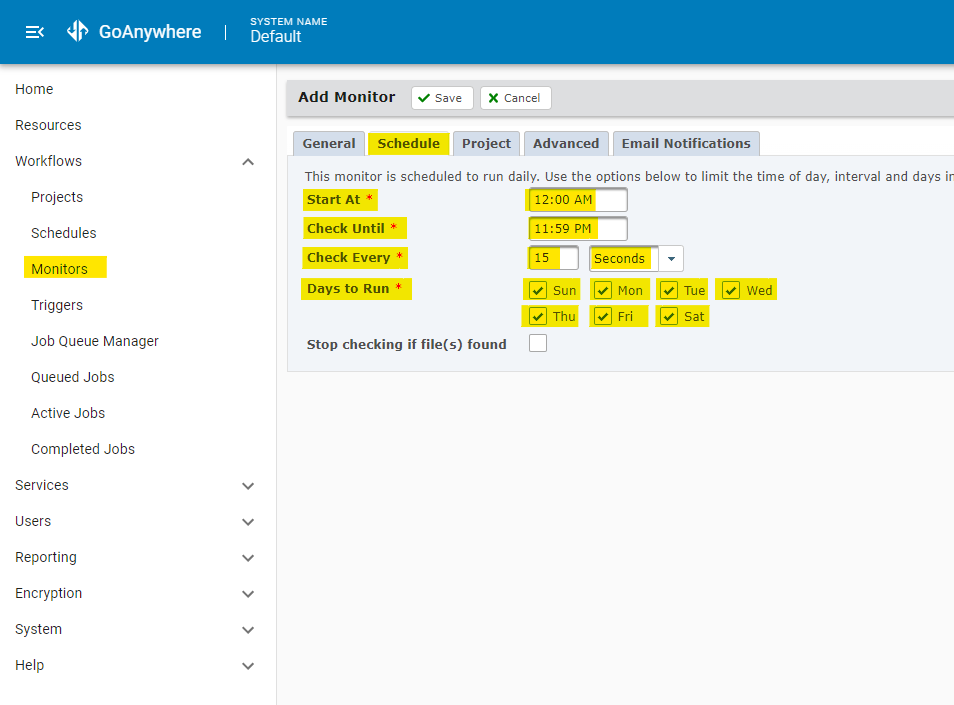
Setup monitor to monitor the Files_Input folder every 15 seconds
Monitors → Add Monitor → General
Name: Name of Monitor
- E.g: ICAP automation
Folder: Folder contains files input
- E.g: C:\Input
Event Type: Event trigger when Project will start
- E.g: File Created or Modified
Schelude tab allow to setup time will scan folder
Start at: The time of day when the Monitor will start monitoring for file events. Default 12:00 AM
Check Until: The time of day when the Monitor will start monitoring for file events. Default 11:59 PM
Check Every: The duration between each execution of the Monitor. (E.g: 15 Seconds)
Days to Run: The days of the week the Monitor should run. The default is Monday through Friday.
Project tab
Project: The name of the Project to execute when the Monitor conditions are satisfied
Admin User: The Admin User account that will be used to execute the project.
Password*: The password to use for authenticating the specified User