
1. Introduction
The OWCPatchingTool is a command-line utility designed to download and package system or third-party applications patches based on CSV filters. It supports flexible configuration, multi-threaded downloads, and optional packaging of all patches into a single archive.
Contact us to download the latest tool
2. Basic Usage
Run
-hto display tool information
2.1 Command Syntax
2.2 Required Parameters
--get-system-patchEnables the system patch downloading flag.
--get-app-patchEnables the 3rd app patch downloading flag
--input-file <csv_path>Specifies the CSV file containing patch filters.
--mode 0/1Select the CSV patch filter format:
0: Manual input (default)
1: Automatic (exported from Patch Management UI)
2.3 Optional Parameters
--output-path <dir>Specifies the directory where downloaded patches will be stored (Default: Current working directory).
--threads <num>Number of concurrent download threads (Default: 8).
--versionDisplays the current version of the tool.
--packagePackage downloaded patches into a ZIP archive and generate a manifest (YML) for upload.
--db-date <yyyymmdd>Select the date to download the database resource. This setting allows users to download the latest app version at the specified time.
--timeout <seconds>Download timeout in seconds. (Default: no timeout)
3. Examples
3.1 Download system patches using manual CSV filters
OWCPatchingTool.exe --get-system-patch --input-file system_missing_patches.csv
3.2 Save output to a specific directory
OWCPatchingTool.exe --get-system-patch --input-file system_missing_patches.csv --output-path C:\Patches
3.3 Using multiple threads for faster download
OWCPatchingTool.exe --get-system-patch --input-file system_missing_patches.csv --threads 16
3.4 Download 3rd patches with manual CSV filters
OWCPatchingTool.exe --get-app-patch --input-file 3rd_missing_patches.csv
3.5 Download 3rd patches with exported CSV from Patch Management UI
OWCPatchingTool.exe --get-app-patch --mode 1 --input-file Data_3rd_missing_patches.csv
3.6 Download 3rd patches at the provided time
OWCPatchingTool.exe --get-app-patch --mode 1 --input-file Data_3rd_missing_patches.csv --db-date 20251020
3.7 Download system & 3rd app patches and pack them into a zip package
3.7.1 Generate and upload system patches packages
OWCPatchingTool.exe --get-system-patch --input-file system_missing_patches.csv --package
This command downloads patch installers and packs them into a zip file in the
packages/system/<timestamp>folder. This output is the same as the Windows folder using--output-path. The output appears as below: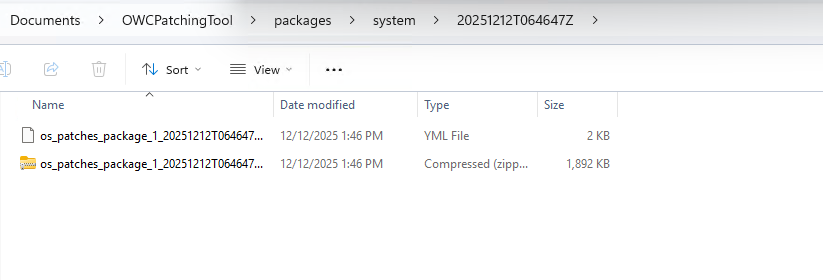
System patches packages
Upload
os_patches_package_<index>_<timestamp>.yml/zipin Settings → Upload Package → Patches Tab → Operating System → Select Manual source. You can upload multiple patches to My OPSWAT Central Management On-Premises.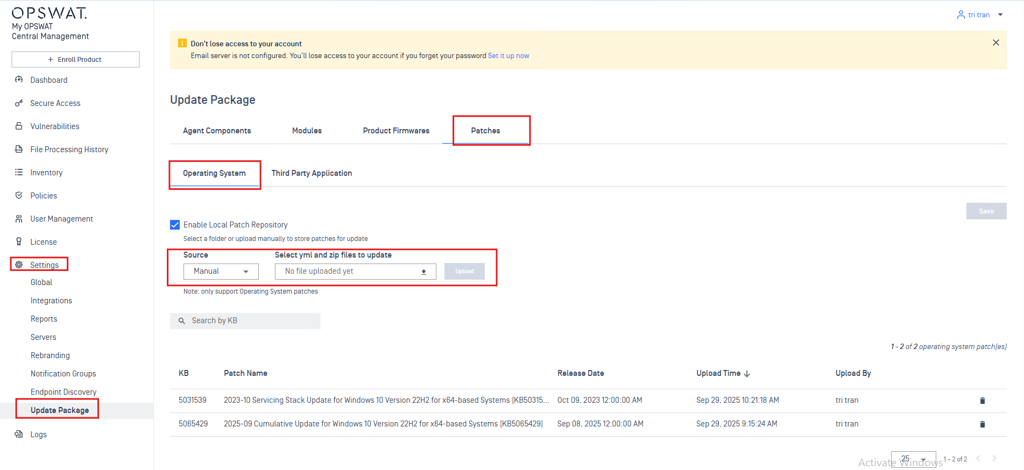
Upload system patches packages to My OPSWAT Central Management On-Premises
3.7.2 Generate and upload app patches packages
OWCPatchingTool.exe --get-app-patch --input-file app_missing_patches.csv --package
This command downloads patch installers and packs them into a zip file in the
packages/app/<timestamp>folder. This output is the same as the Windows folder using--output-path. The output appears below: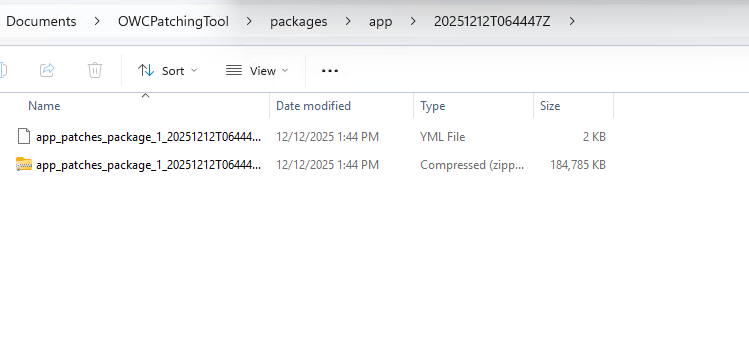
Application patches packages
Upload
app_patches_package_<index>_<timestamp>.yml/zipin Settings → Upload Package → Patches Tab → Operating System → Select Manual source. You can upload multiple patches to My OPSWAT Central Management On-Premises.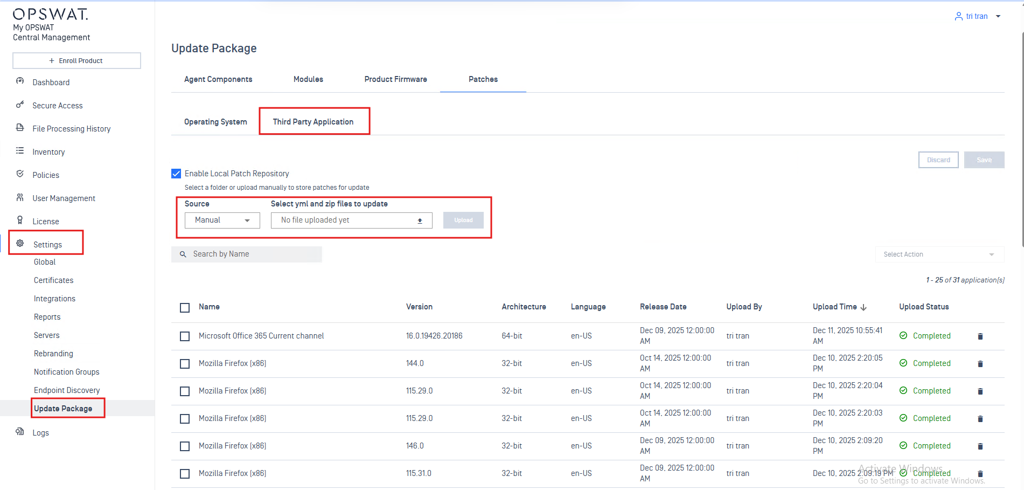
Upload app patches packages to My OPSWAT Central Management On-Premises
3.7.3 Upload vulnerability & patch databases
When selecting manual mode to upload patch packages to My OPSWAT Central Management On-Premises, you also need to upload the patch databases to ensure the database is always up to date.
The patch.zip/yml and vulnerability.zip/yml files are database packages used by the agent. They can be uploaded in Settings → Upload Package → Agent Components tab
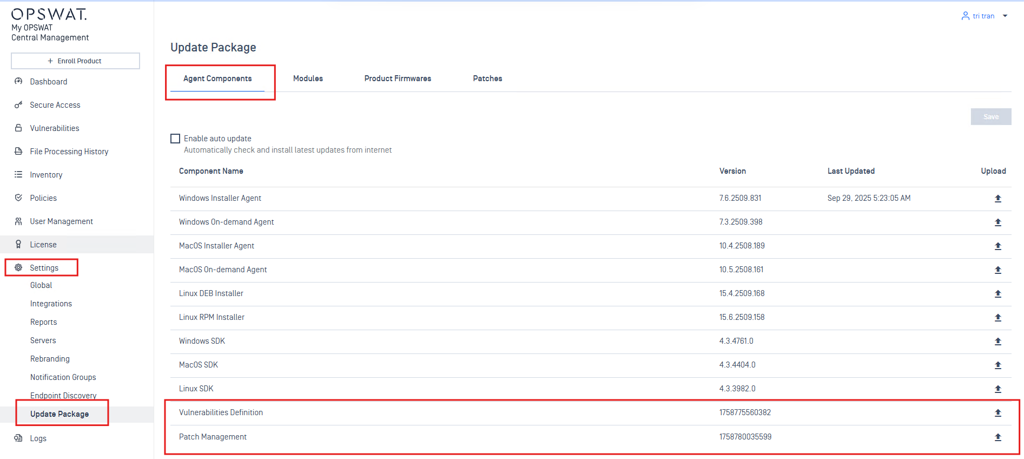
Database Packages Upload
4. Appendices
4.1 CSV File Format Specification
4.1.1 Manual CSV Format (--mode 0)
OS patches
kb_id | os_id | architecture |
|---|---|---|
5001330 | 59 | x86_64 |
5012599 | 59 | x86_64 |
kb_id: Knowledge Base article ID (required)
os_id: Operating system ID (optional). See Supported Operating Systems in Section 4.2
architecture: Target architecture:
x86_32,x86_64, orarm64(required)
Tips:
For OS-related KBs, fill in
os_id.For application KBs,
os_idcan be blank.If a KB is not found, try leaving
os_idblank to broaden the search.
Third-party application patches
Name | Architecture | Language | Product_release_id | Channel | Exclude_apps |
|---|---|---|---|---|---|
Microsoft Edge | 32-bit | en-US |
|
|
|
Microsoft Office 365 | 64-bit | en-US | O365ProPlusRetail | Current | groove,infopath,lync,excel |
Microsoft Office 365 | 64-bit | en-US | O365ProPlusRetail | SemiAnnual | groove |
Microsoft Office 365 | 64-bit | en-US | O365ProPlusRetail | MonthlyEnterprise | groove |
Microsoft Office 2019 | 64-bit | en-US | Professional2019Retail | Current | groove |
Microsoft Office 2016 | 32-bit | en-US | ProfessionalRetail | Current | groove |
The columns include name, architecture, language, product_release_id, channel, and exclude_apps. The values are described below
name: Product name (required)
architecture: Product architecture (
x86_32,x86_64, orarm64) (required)language: Product language (
en-US,fr-FR, …) (required)
The columns product_release_id, channel, and exclude_apps are only required for Microsoft Office products. For other 3rd-party applications, these columns can be left blank.
How to collect these informations? (see Collect Office Configuration at Section 4.3)
4.1.2 Exported CSV Format (--mode 1)
OS Patches
id | kb_id |
|---|---|
93e6fdce-b5ae-4e98-9cca-b2a331023981 | 5001330 |
22053fe8-307c-47b5-a555-8da7504fba6a | 5001330 |
id: Unique patch identifier (required)
kb_id: Knowledge Base article ID (optional)
Third-party app patches (Not Supported)
4.2 Operating System ID Supported
OS Family Name | ID |
|---|---|
Windows 10 | 59 |
Windows 11 | 76 |
Windows 7 | 30 |
Windows 8 | 43 |
Windows 8.1 | 51 |
Windows Server 2003 | 6 |
Windows Server 2003 R2 | 11 |
Windows Server 2008 | 24 |
Windows Server 2008 R2 | 37 |
Windows Server 2012 | 48 |
Windows Server 2012 R2 | 56 |
Windows Server 2016 | 63 |
Windows Server 2019 | 83 |
Windows Server 2022 | 80 |
Windows Server 2025 | 85 |
Windows Vista | 16 |
Windows XP | 1 |
4.3 Collect office configuration
To collect product_release_id, channel, and exclude_apps for Microsoft Office installations, use the provided PowerShell script GetOfficeConfiguration.ps1.
Open a PowerShell console as administrator and set the execution policy:
Set-ExecutionPolicy Bypass -Scope Process -Force
Run the script to collect Office configuration data
Run this script on devices that need Office patching to collect the correct Office configuration
.\scripts\GetOfficeConfiguration.ps1
The script will output the required Office configuration details, which you can use to populate the corresponding columns in your CSV file. Running it in PowerShell will return output like this:
ProductReleaseIds : O365ProPlusRetail
ExcludedApps      : groove,infopath,lync,sharepointdesigner
Language          : en-us
Channel           : Current
Architecture      : x64
Version           : 16.0.19127.20222