Microsoft Entra ID only accepts HTTPS protocol, please follow steps described in Enabling HTTPS to enable HTTPS first on MetaDefender Core.
Entra ID - Using SAML 2.0
Register a new application on Azure
- Access Azure portal and login.
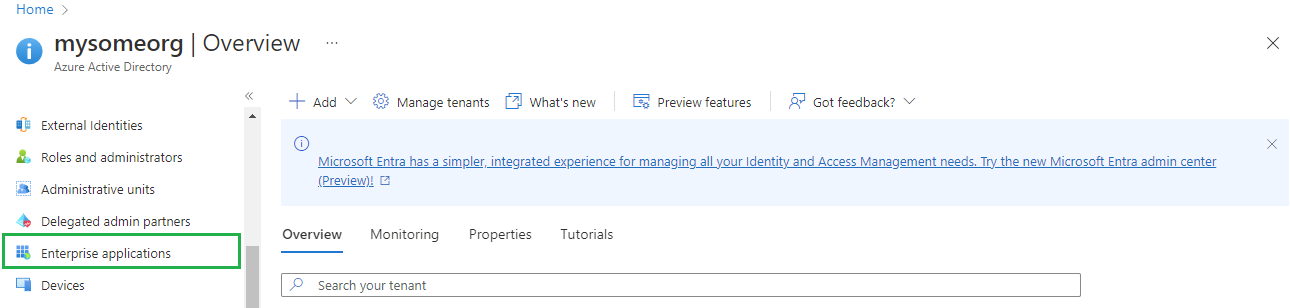
- In
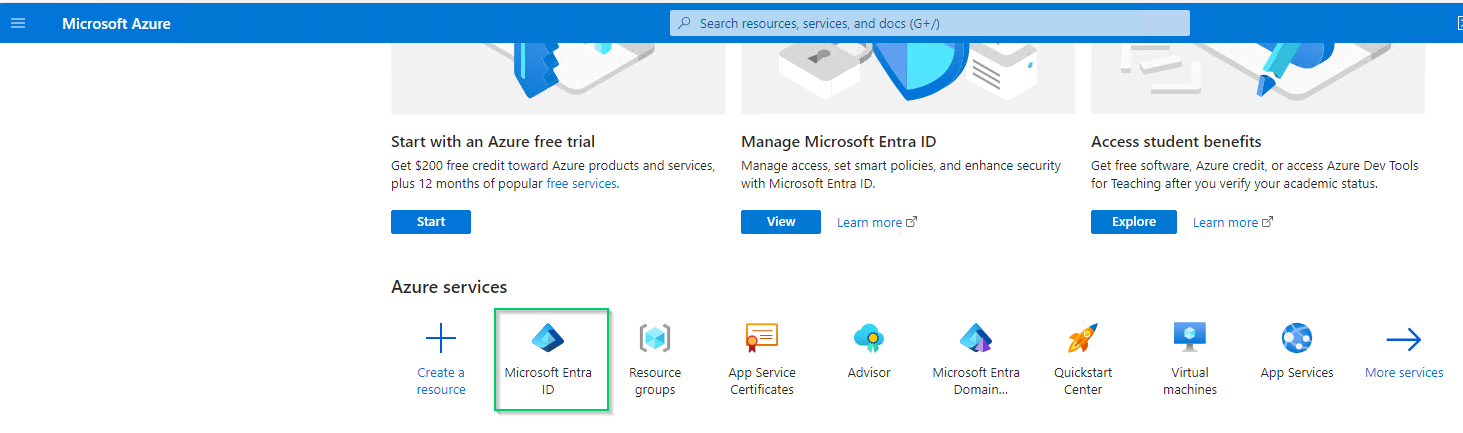
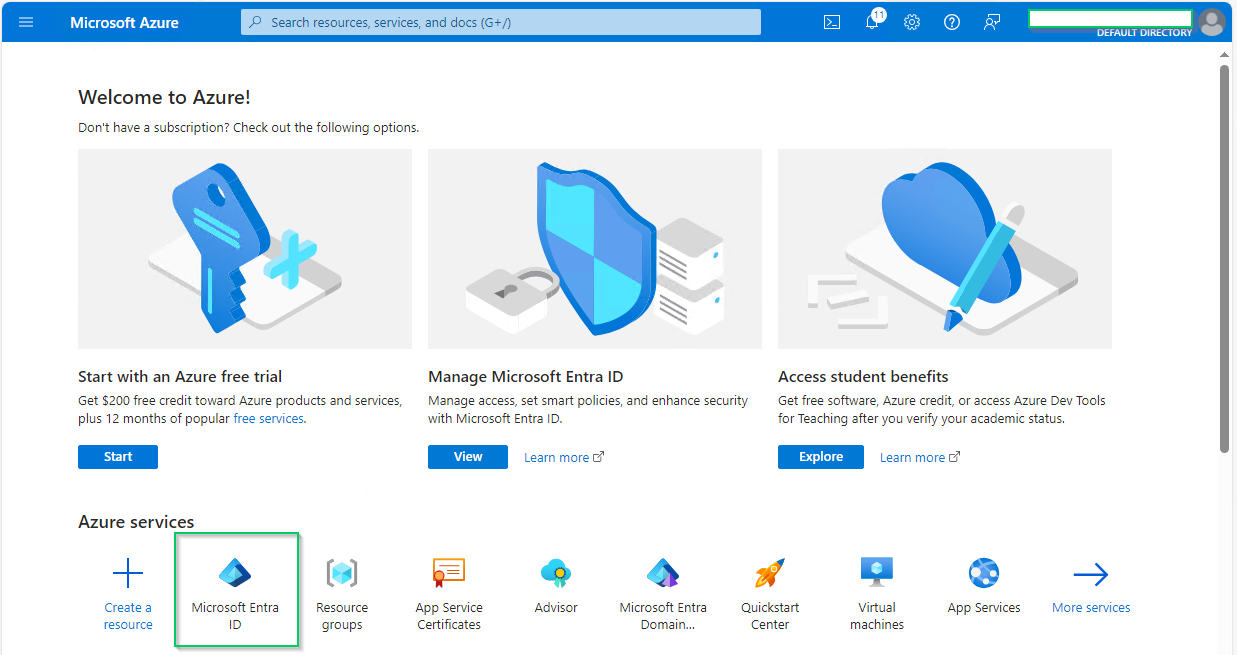
Homepage, selectMicrosoft Entra IDunderAzure services.

- Select
Enterprise applicationson the left sidebar
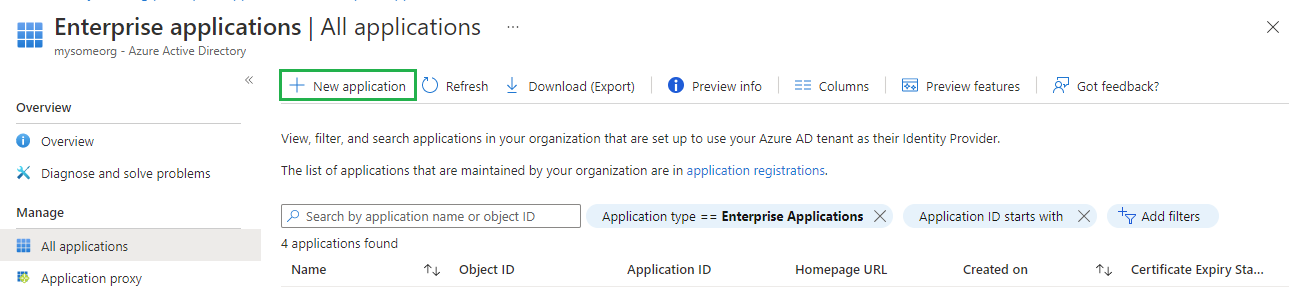
- In
All applicationspage, hitNew application
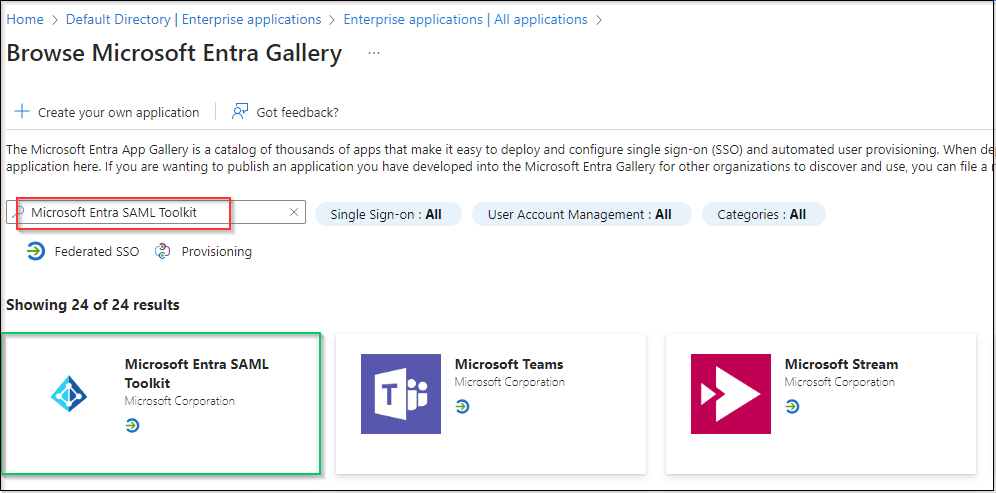
- In
Browse Azure AD Gallerypage, search for "Microsoft Entra SAML Toolkit" then hit onMicrosoft Entra SAML Toolkitin result panel.
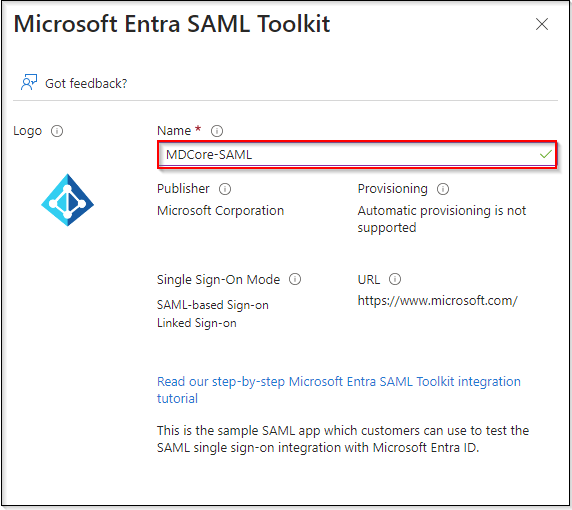
- Fill
Name, MDCore-SAML for example, and hitCreateon right sidebar.
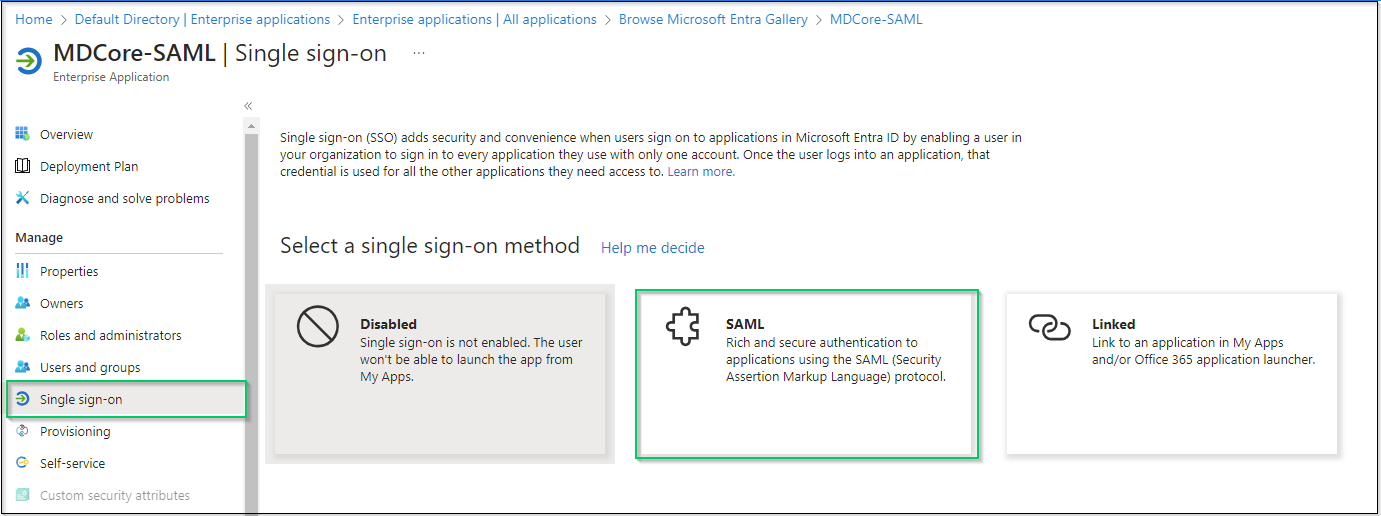
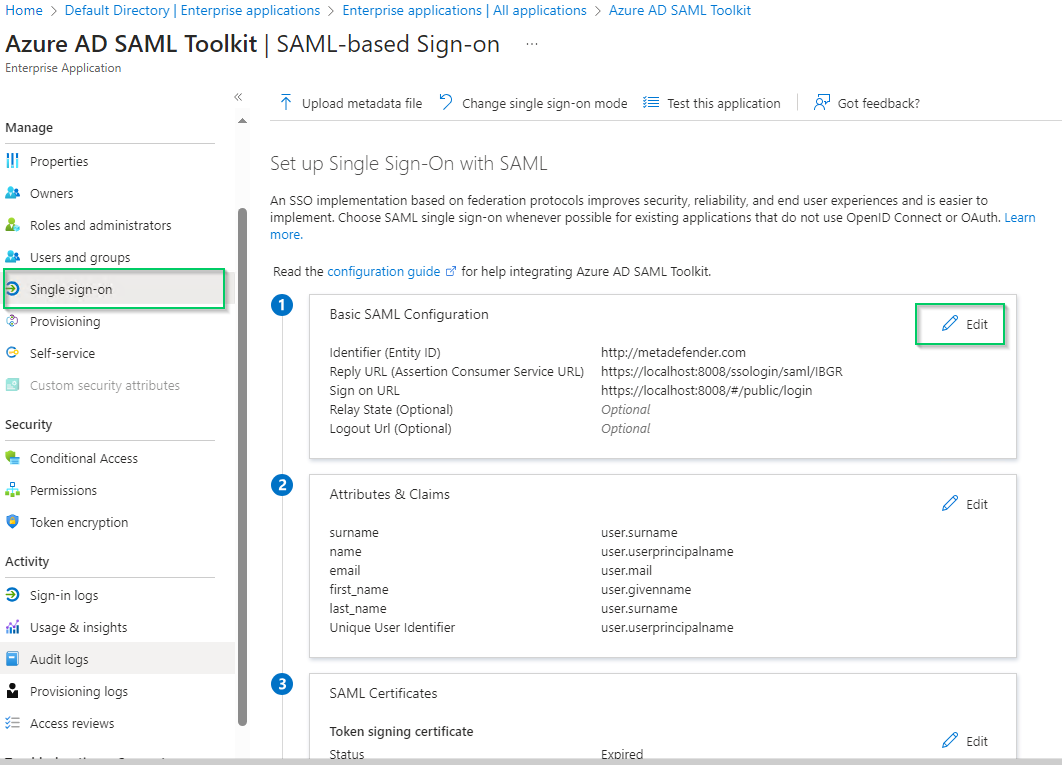
- Navigate
Single sign-onon left sidebar and hitSAML.
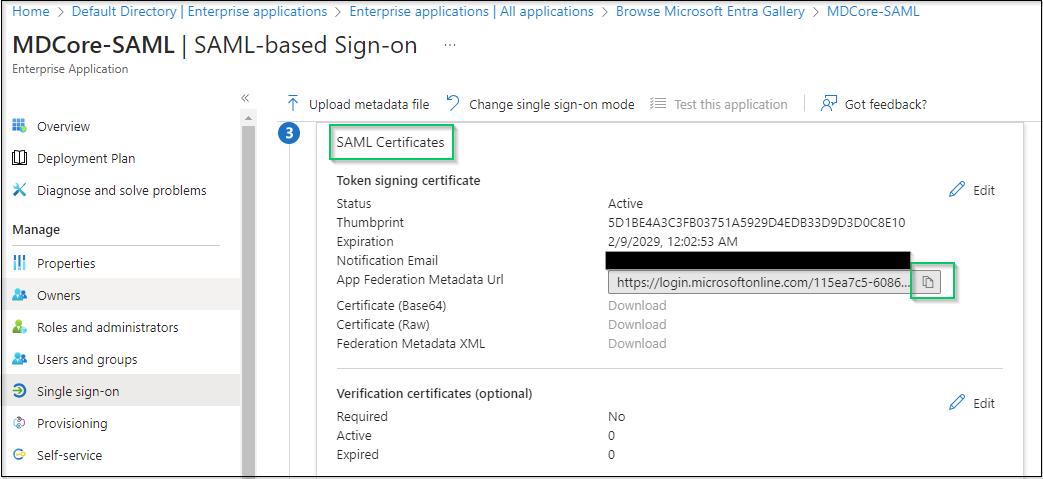
- Navigate to the item of
SAML Certificates, hit the copy button at the right most ofApp Federation Metadata Urland store as metadata_uri.
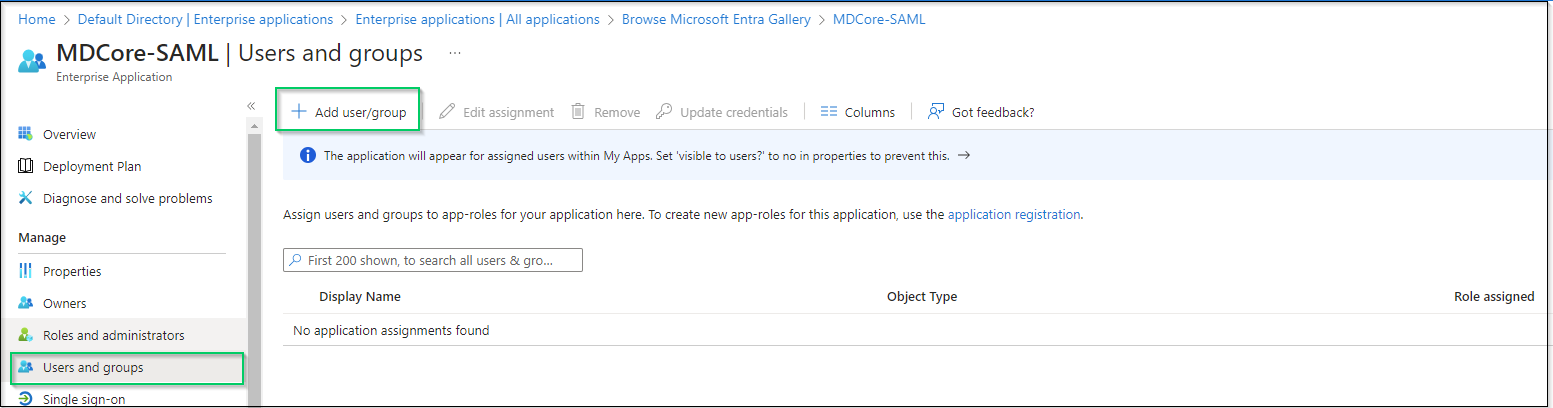
- Navigate to
Users and groupson left sidebar, hitAdd user/group.
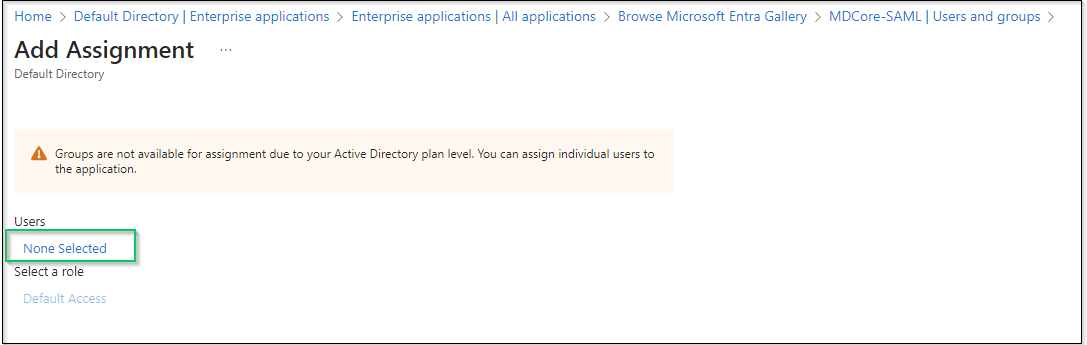
- On
Add Assignmentscreen, hitNon Selectedand add users who are allowed to login to the app, then hitSelecton the right panel.
- Finally, hit
Assignto complete.
Create SAML directory on MetaDefender Core
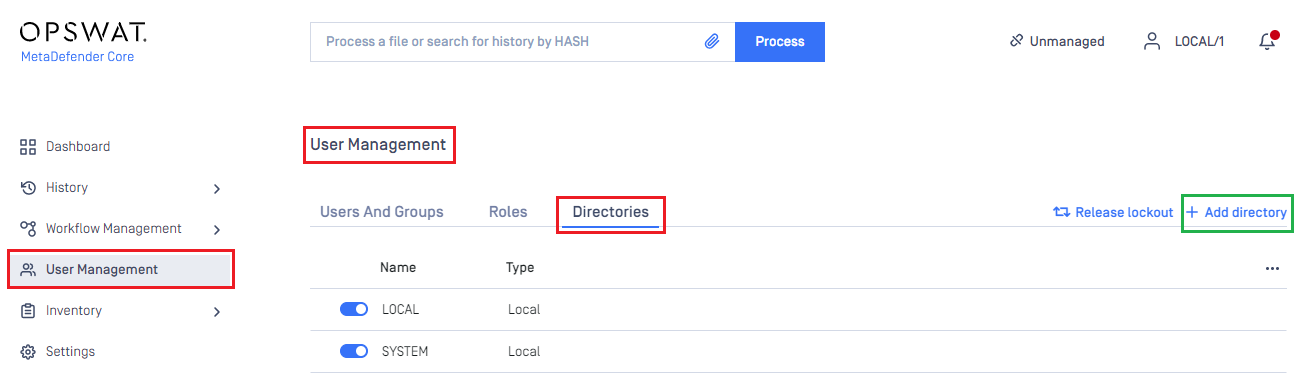
- Login to MetaDefender Core management console.
- At dashboard, hit
User Managementin sidebar. - Under
User Managementpage, chooseDirectoriestab and hitAdd directoryon the top right.
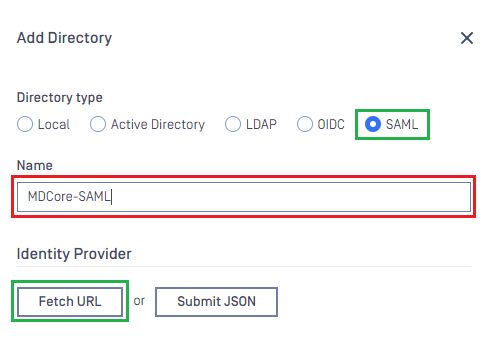
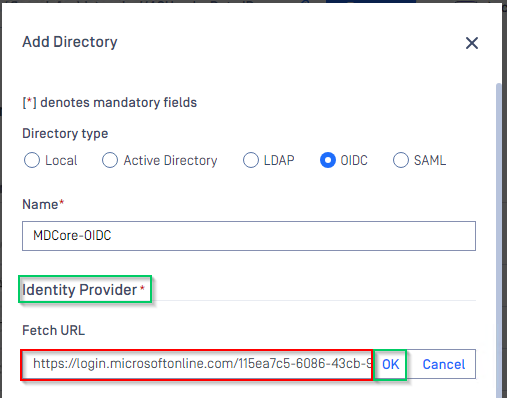
- In
Add Directorypage, choose SAML inDirectory Type, fillNamefor the new directory, MDCore-SAML for example and hitFetch URL
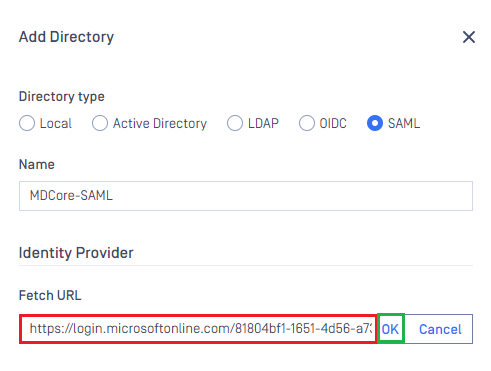
- Paste the uri stored in metadata_uri to the box under
Fetch URL, then hitOKfor MetaDefender Core to set Microsoft Entra ID as its IDP.
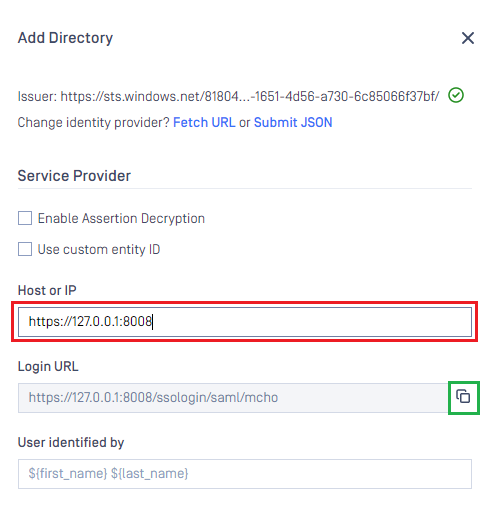
- Under section
Service Provider, fillHost or IPwhere MetaDefender Core is hosted, https://127.0.0.1:8008 in this example. - Copy the
Login URLand store in reply_uri in the later steps below.
Complete configuration on Entra ID
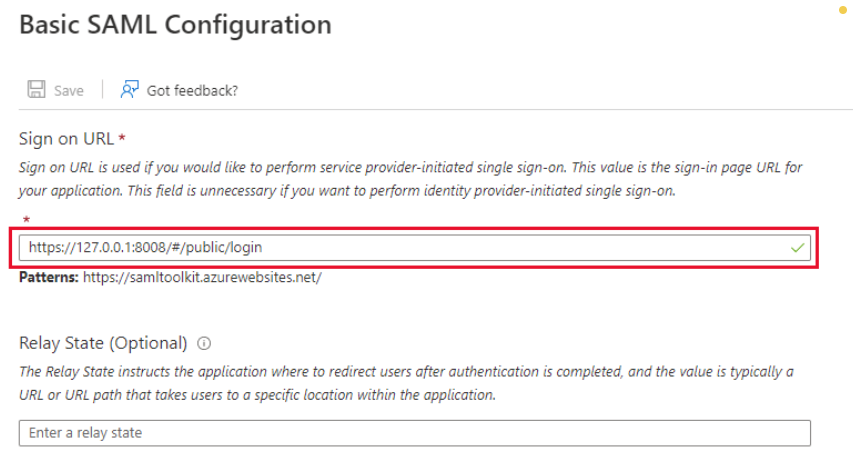
- Switch back to Microsoft Entra ID, on
SAML-based Sign-onpage, navigate toBasic SAML Configurationand hitEditon the top right.
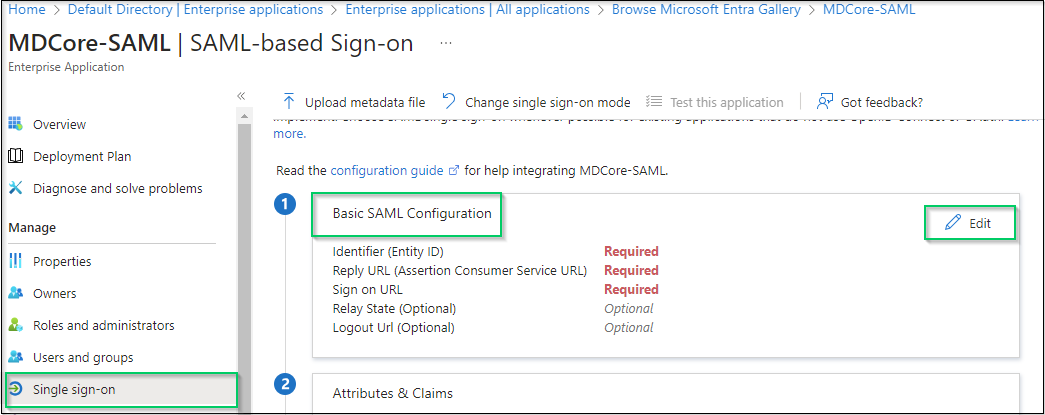
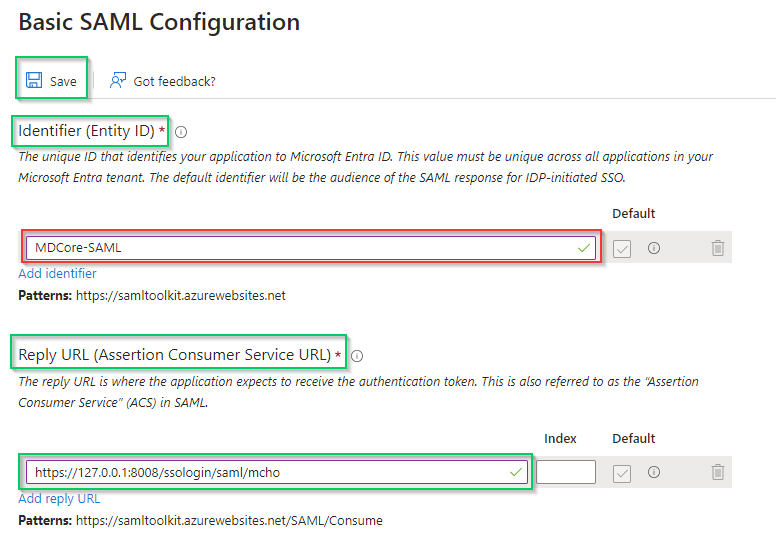
- Navigate to
Identifier (Entity ID)on the right sidebar, hitAdd identifier, then fill an unique ID to identify MDCore, MDCore-SAML for an example. Store the identifier to identifier. - Navigate to
Reply URL (Assertion Consumer Service URL), hitAdd reply URLand fill the URI stored in reply_uri to the new created box, then hitSave
- Navigate to
Attributes & Claims, then hitEdit
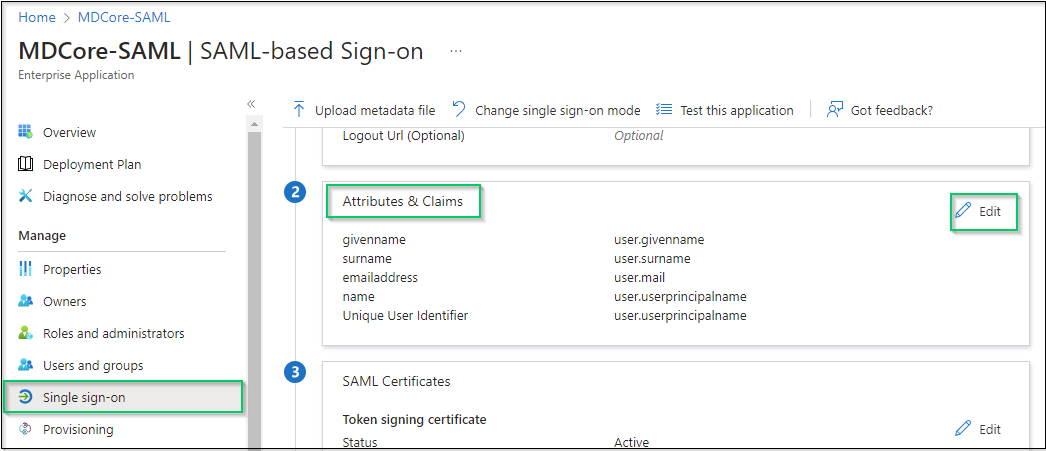
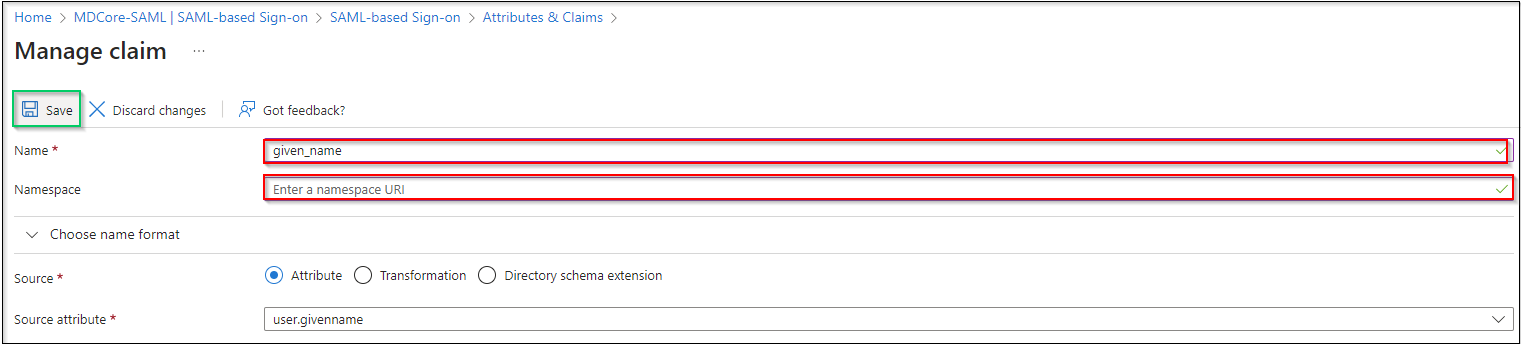
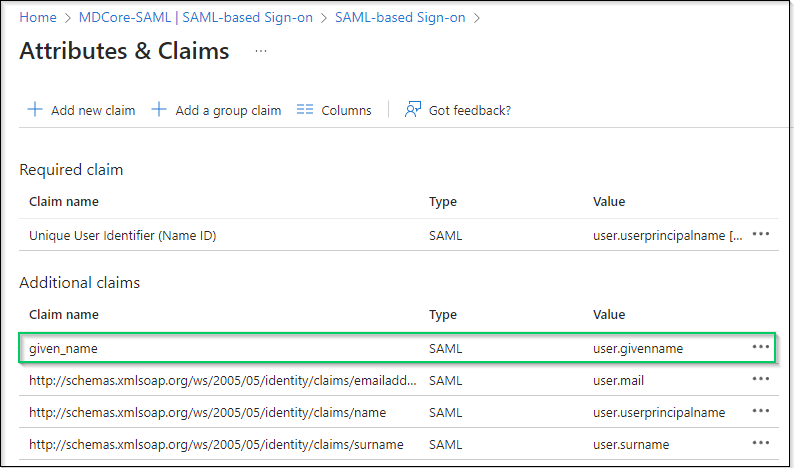
- In
Attributes & Claimspage, navigate toAdditional claims, click on any item underClaim nameto change its name.
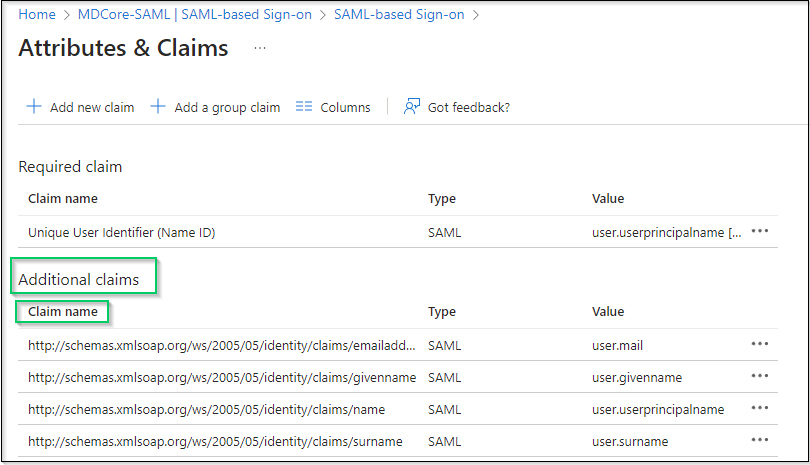
- Change claim
Name, setNamespaceempty and hitSaveto complete. In this example, claim name is changed to given_name which will be used later to identify logged-in user on MetaDefender Core.
If the names of attributes and claims provided by Azure are good enough, recommended to be used directly to identify logged-in user in MetaDefender Core.
Complete configuration on MetaDefender Core
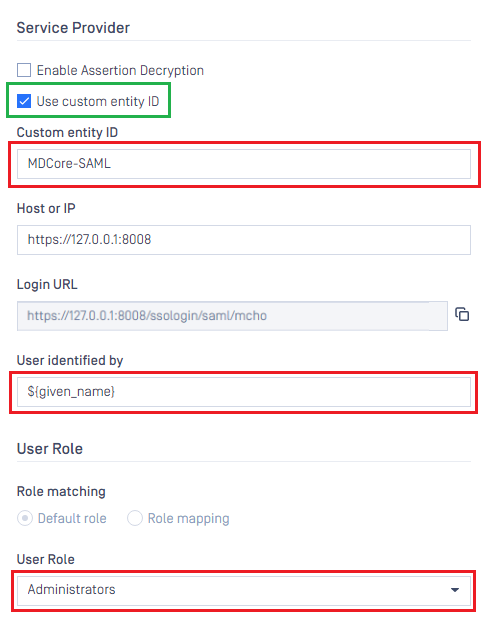
- Switch back to MDCore, under
Service Provider, selectUse custom entity IDand paste value in identifier into, MDCore-SAML in this example. - Fill user identity under
User identified by, ${given_name} is used in this example.
If the namespace is not removed from claim name in step 6 of previous section, the full claim name with namespace included must be used here to build identification for user.
For example, if the claim of http://schemas.xmlsoap.org/ws/2005/05/identitity/clams/given_name is added to Entra ID, then ${http://schemas.xmlsoap.org/ws/2005/05/identitity/clams/given_name} is used by MetaDefender Core to build up user identification.
- Select correct role for the user under
User Role - Hit
Addto complete settings.
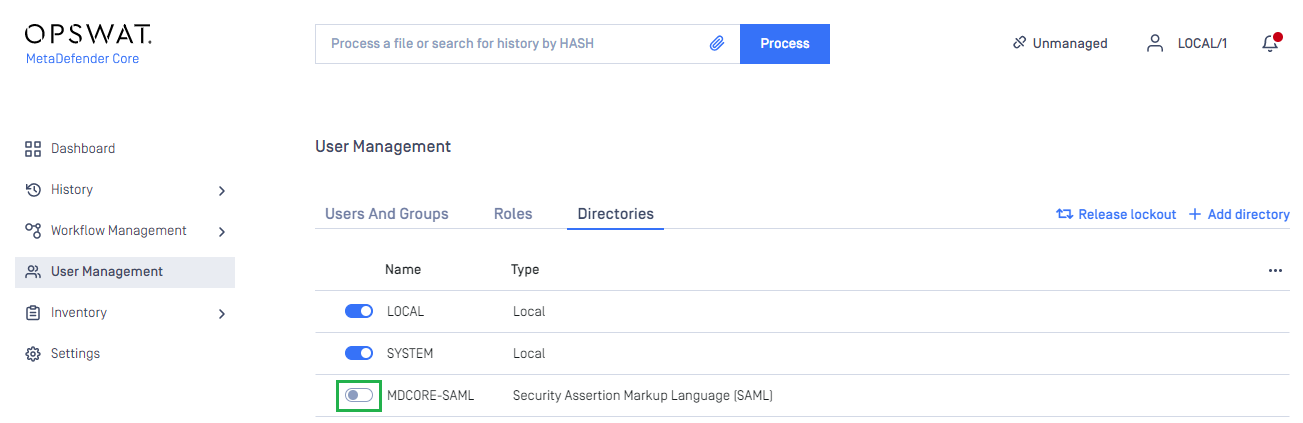
- In
User Managementscreen of MDCore, toggle the new directory, MDCORE-SAML in this example. A dialog box is shown to confirm the action. OnceEnableis hit, all sessions are expired immediately.
Test the integration
- At the home screen on MetaDefender Core, hit
Login, the user is redirected to login page from Microsoft Entra ID.
Login by the account registered to Entra ID.
If everything goes right, MetaDefender Core dashboard is displayed with user identity at the top right corner.
Otherwise, access back login page at
<mdcore-host>#/public/backuploginfor trouble shooting.
Setup pseudo IdP-initiated SSO
Microsoft Entra ID does not support Idp-initiated SSO in the same way as other Identity Providers. It actually accesses the login page of its SP and do initiating SSO login from there, so basically, it is SP-initiated.
- Login to Azure management page.
- Navigate section
Azure services, hitMicrosoft Entra ID.
- On the left sidebar, click
Enterprise applications

- Pick
Azure AD SAML Toolkiton the list of enterprise applications.

- Select
Single sign-onon the left sidebar, navigate toBasic SAML Configurationsection and hitEditon the top right of the section.
- In
Basic SAML Configurationright sidebar, insert Core login URL into the field underSign on URL.
- Hit
Saveto complete.
Test IdP-initiated SSO
Login to Azure management page.
Navigate section
Azure services, hitMicrosoft Entra ID.On the left sidebar, click
Enterprise applications.Pick
Azure AD SAML Toolkiton the list of enterprise applications.Navigate to tab
Properties.
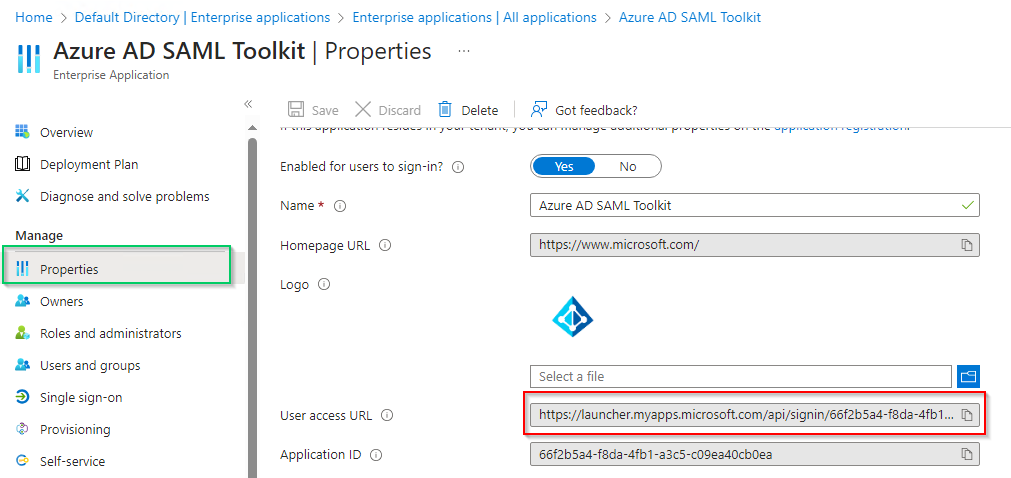
- Copy the URL next to
User access URL. - Paste the copied URL to browser and do login.
- If everything goes right, MDCore dashboard is shown with user identity set at the top right corner.

- Otherwise, access back login page at
<mdcore-host>#/public/backuploginfor trouble shooting.
Entra ID - Using OpenID Connect
Register a new application on Azure
- Access Azure portal and login.
- In
Homepage, selectMicrosoft Entra IDunderAzure services.
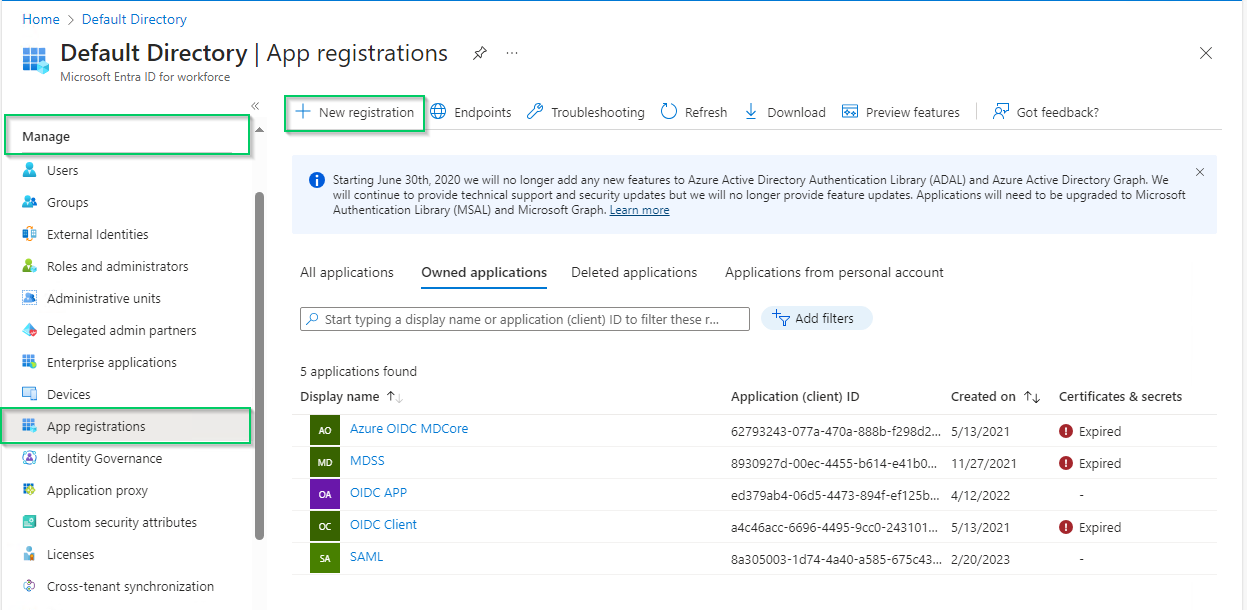
- Select
App registrationsunderManagesection on the left sidebar, then click onNew registrationon the top menu bar.
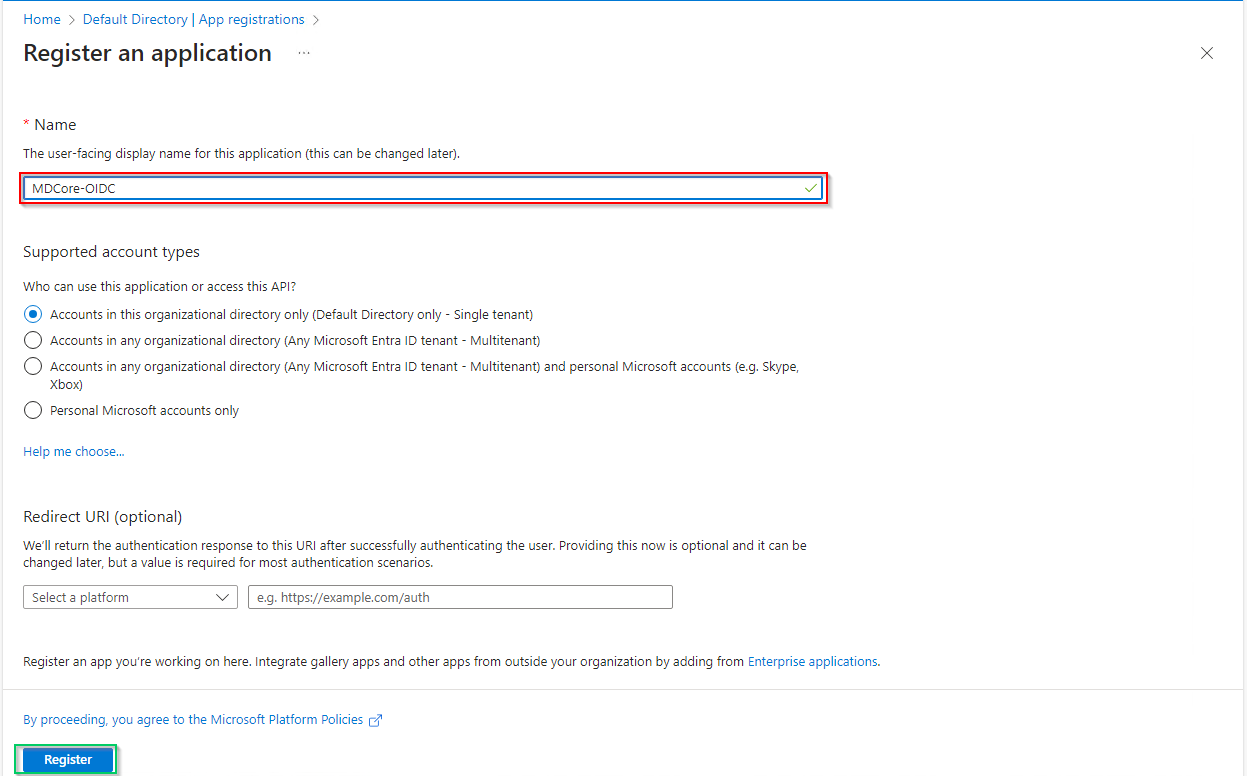
- In
Register an applicationpage, fill inNamefor new application, "MDCore-OIDC" in this example, and hitRegisterto complete.
- Select
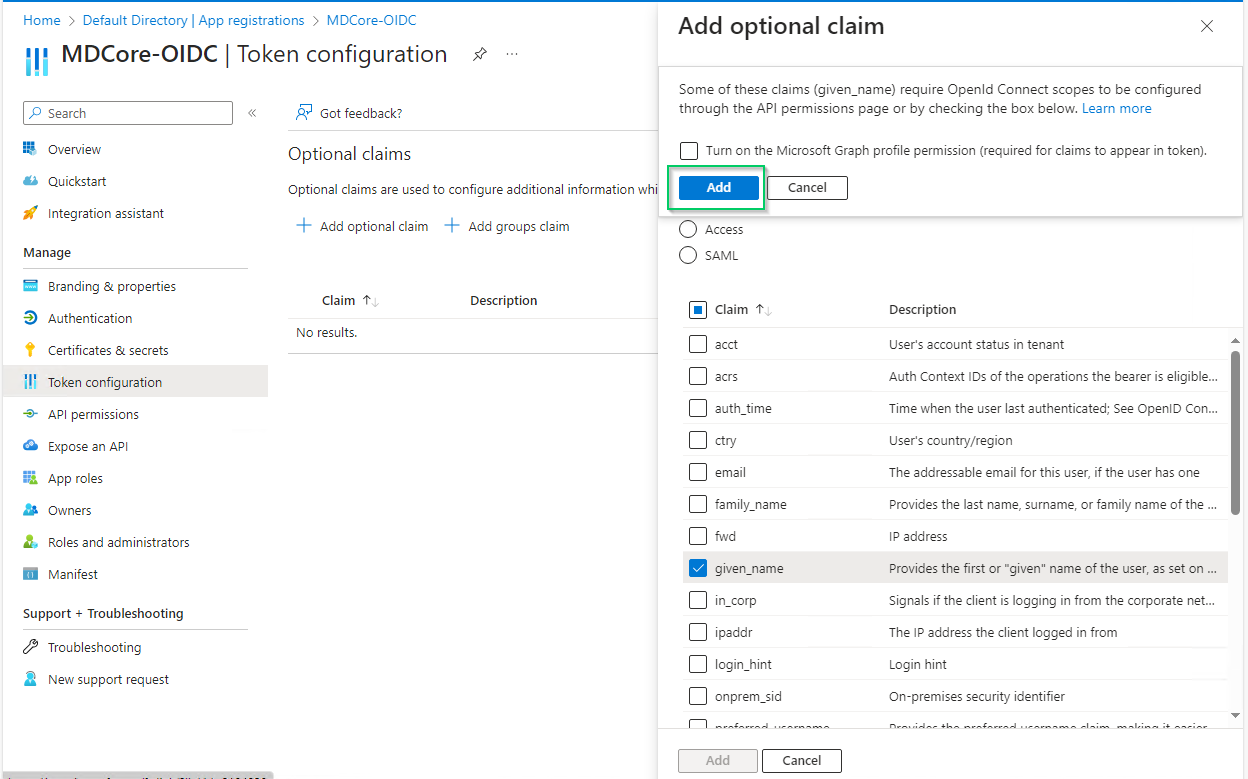
Token configurationon left sidebar, hitAdd optional claim, chooseIDon the right sidebar, enable essential claims (given_name in this example) and hitAddat the bottom.
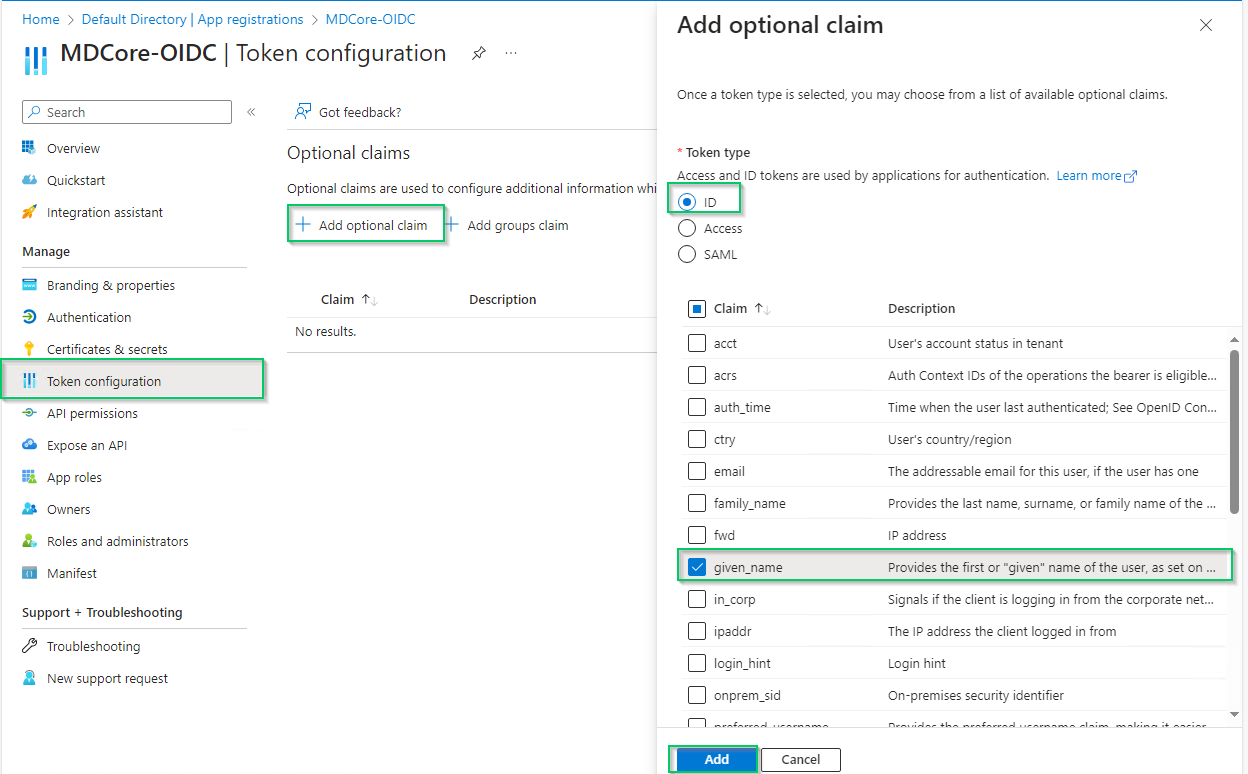
- Click
Addon the popup to complete.
Enabled claims will be used later by MetaDefender Core to identify logged-in user.
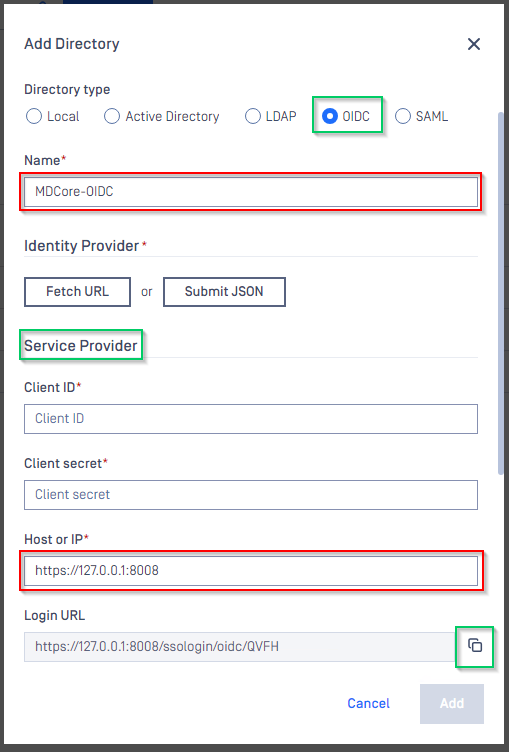
Create OIDC directory on MetaDefender Core
Login to MetaDefender Core.
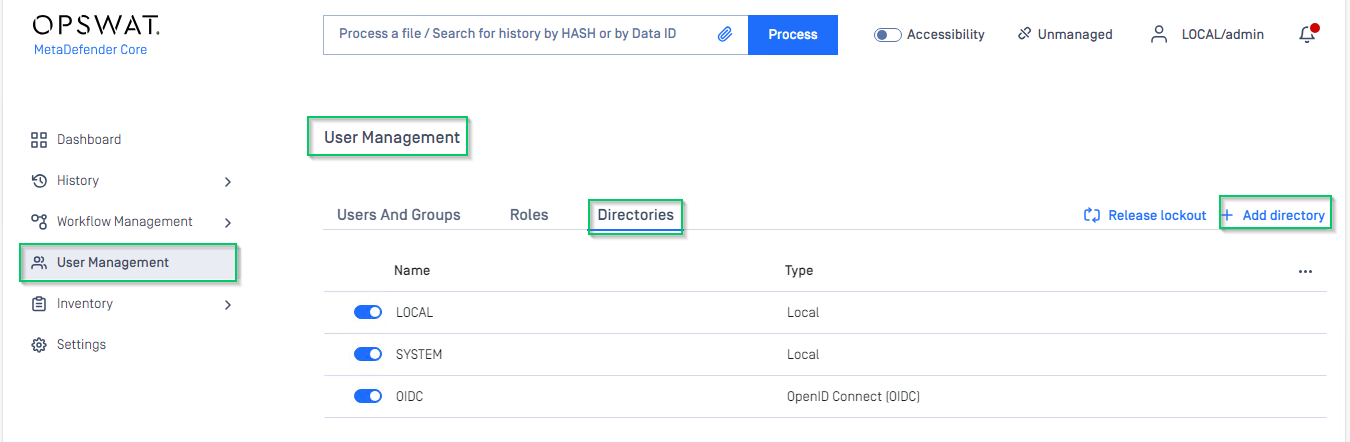
At dashboard, hit
User Managementin sidebar.Under
User Managementpage, chooseDirectoriestab and hitAdd directoryon the top right.
In
Add Directorypage, choose OIDC inDirectory TypeFill
Nameof the new directory, MDCore-OIDC for example.Under section
Service Provider, fillHost or IPwhere MDCore is hosted, https://127.0.0.1:8008 for this example.Copy the
Login URLand store somewhere for later use.
Complete configuration on Entra ID
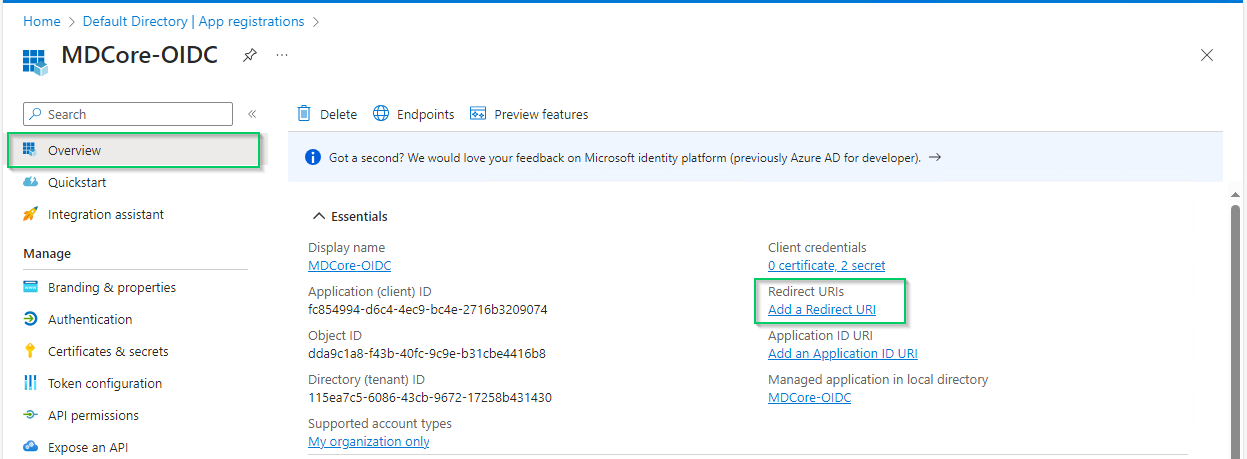
- Back to Entra ID, on
MDCore-OIDCpage, pickOverviewsection on left sidebar and hit onAdd a Redirect URIlink to switch toAuthenticationpage.
- In
Authenticationpage, hitAdd a platformand chooseWeboption on right sidebar.
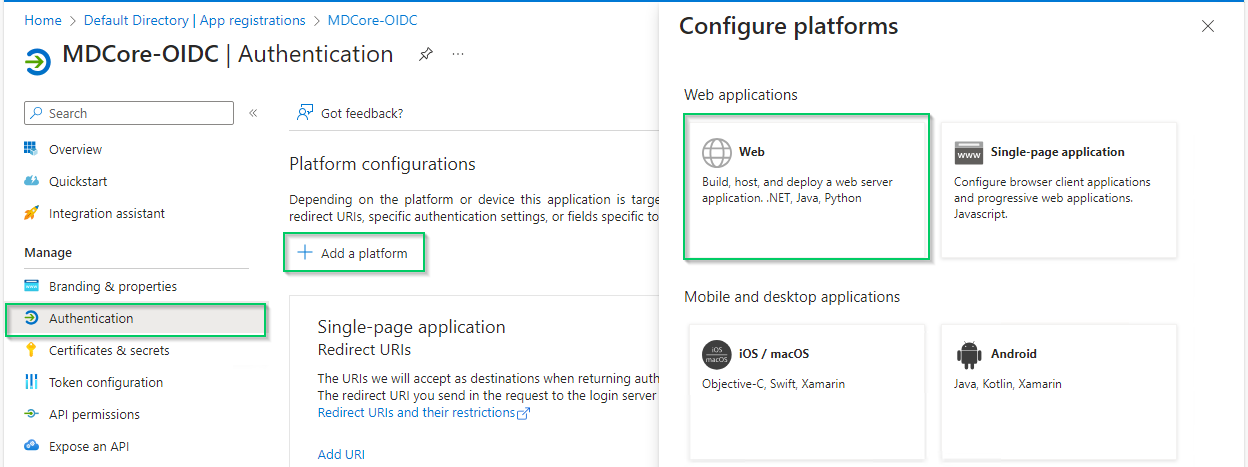
- ill
Redirect URIswith theLogin URLcopied from MDCore, enableAccess tokensoption and hitConfigure

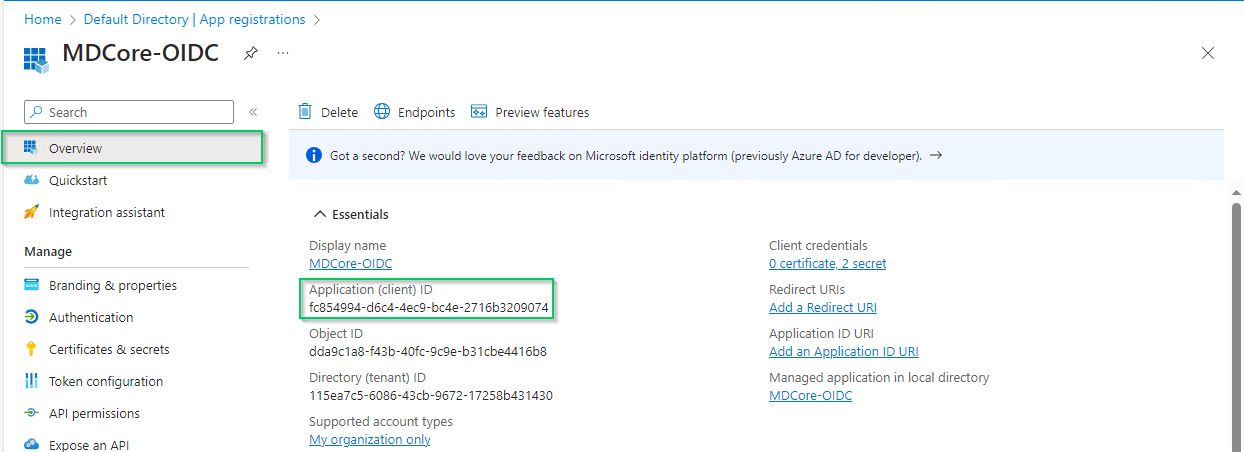
- Pick
Overviewon left sidebar again, copy the string next toApplication (client) IDand store as client_id
- Hit
Endpointson the top bar, copy the uri underOpenID Connect metadata documenton the right sidebar and store as metadata_uri

- Pick
Certificates & secretson left sidebar, inClient secrets (0)tab, hitNew client secret, fill secretDescriptionand setExpiresand, then hitAddto complete.
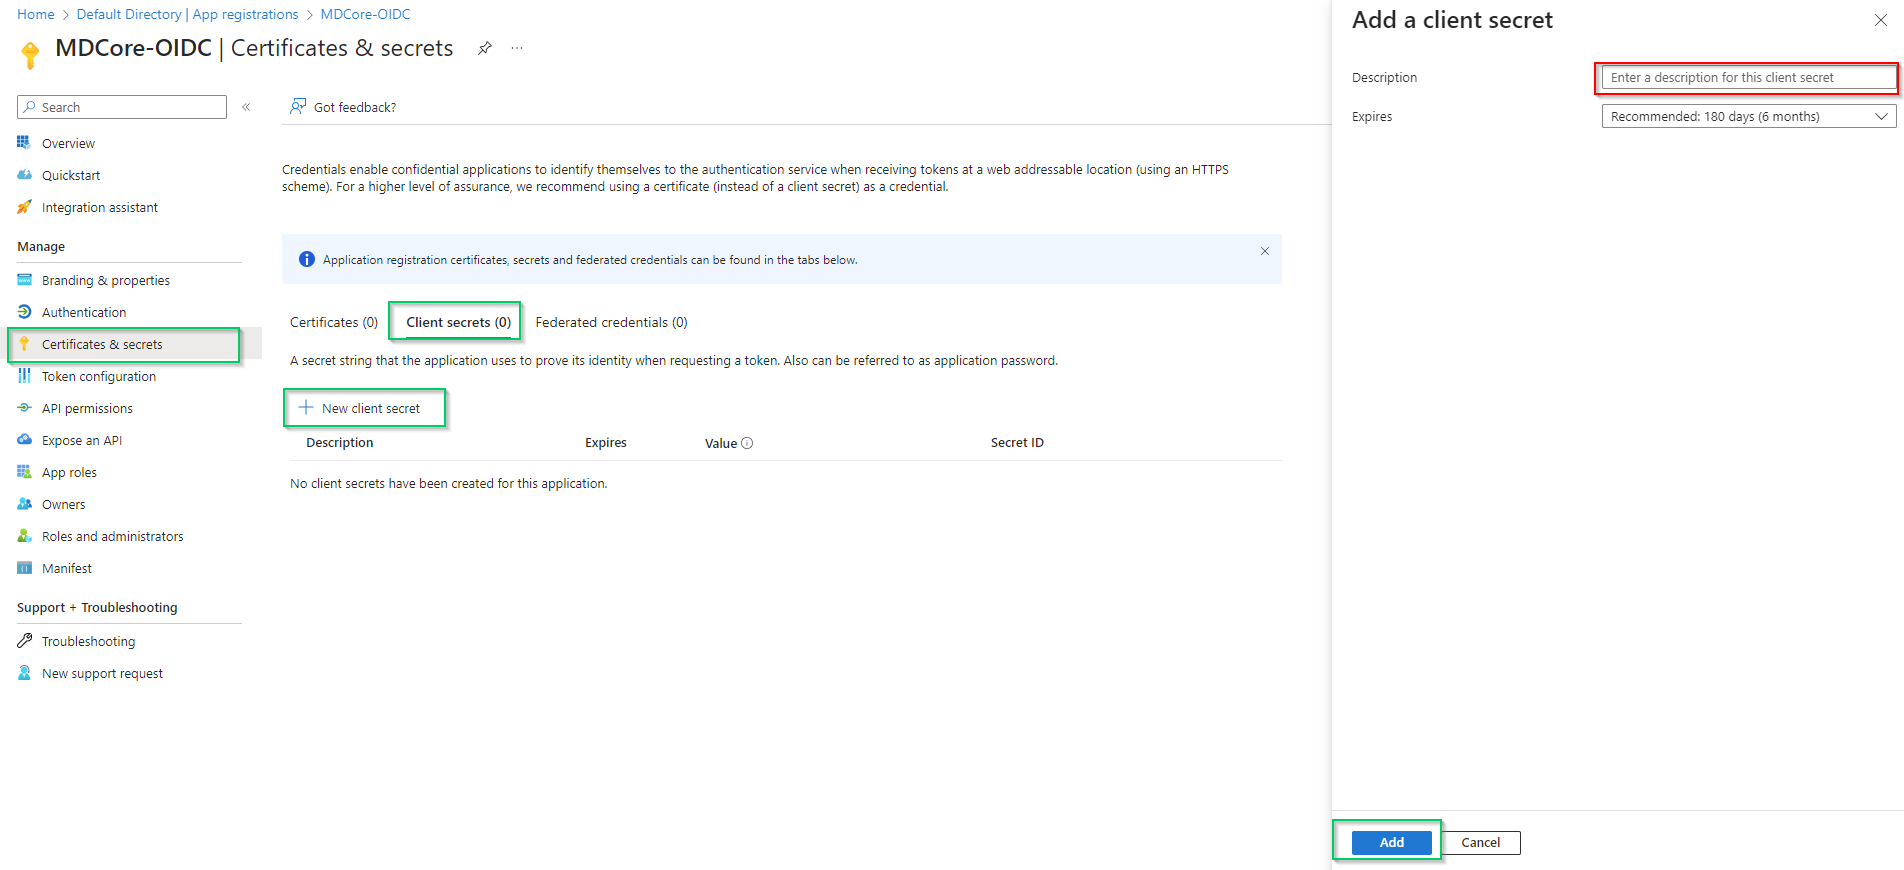
- A new client secret is created under
Client secret (1)tab, copy the string underValuecolumn and store it as client_secret
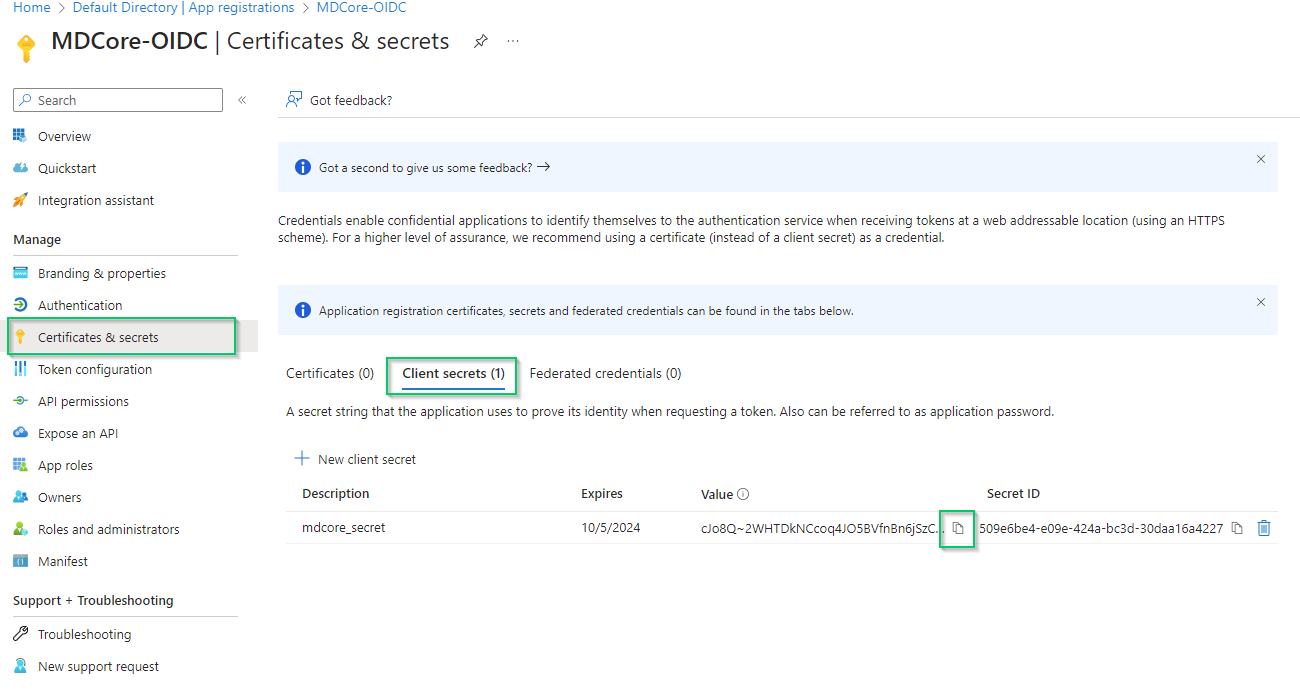
Entra ID will hide the client secret completely when page Certificate & secrets is left. Administrator is recommended to store the client secret in a safe place, otherwise they have to create a new one.
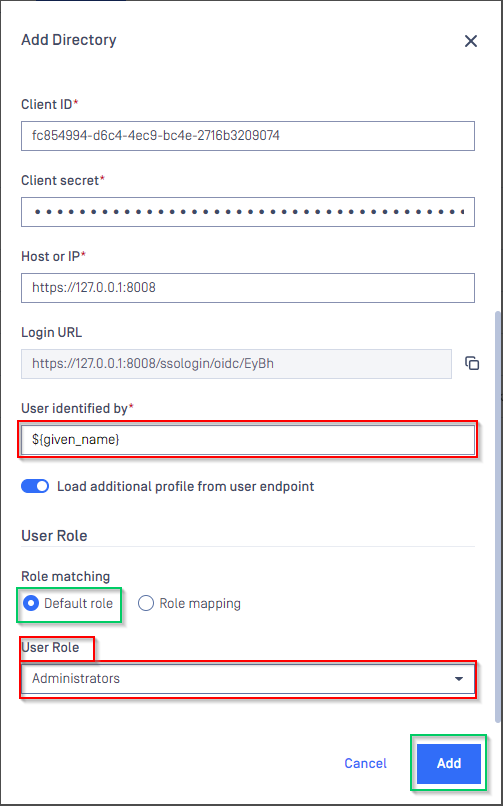
Complete configuration on MetaDefender Core
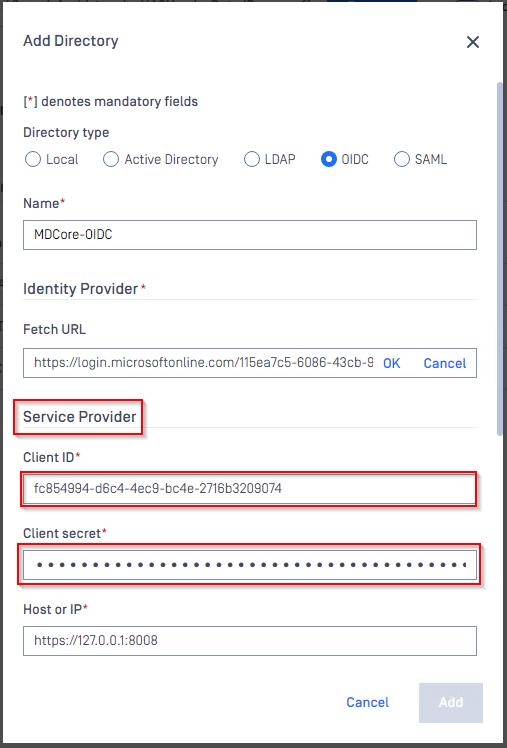
- Switch to MDCore, under section
Identity Provider, hit onFetch URLand paste metadata_uri gathered in Configure Azure stage to the box underFetch URLand hitOKto ensure MetaDefender Core can set Microsoft Entra ID as its IdP.
- Under section
Service Provider, paste client_id and client_secret gathered in Configure Azure stage toClient IDandClient secretrespectively.
- Fill user identity under
User identified by, ${given_name} is used in this example. - Pick
Default roleoption and select correct role for the user underUser Role - Hit
Addto complete settings
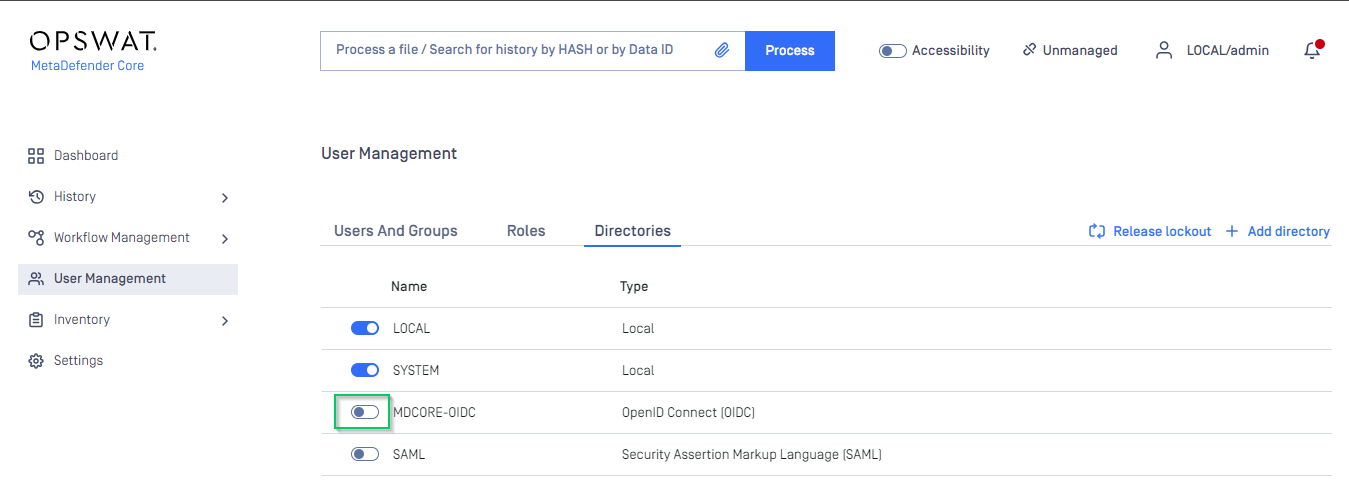
- In
User Managementscreen of MDCore, toggle the new directory, MDCORE-OIDC in this example. A dialog box is shown to confirm the action. OnceEnableis hit, all sessions are expired immediately.
Test the integration
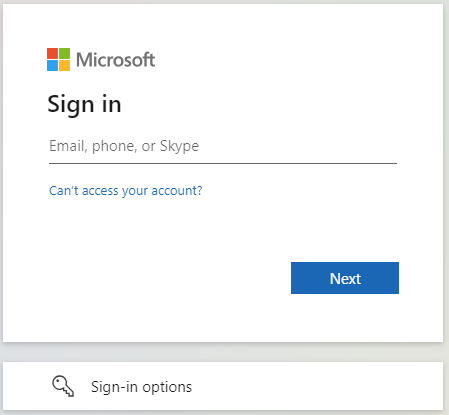
- In home screen on MetaDefender Core, hit
Login, the user is redirected to login page from Microsoft.
- Login by the registered account.
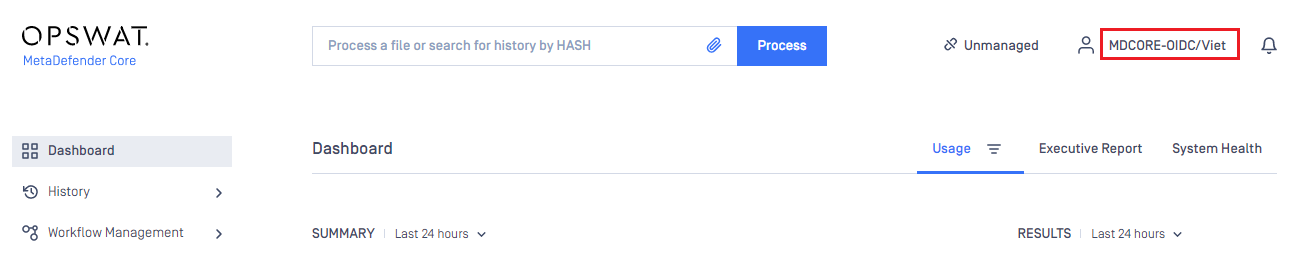
- If everything goes right, MDCore dashboard is shown with user identity set at the top right corner.
- Otherwise, access back login page at
<mdcore-host>#/public/backuploginfor troubleshooting.