Temporary access allows an end user to gain access to remediation resources when they are not able to immediately meet policy requirements. There are situations, such as installing anti-virus software, where an end user will need network access to meet policy requirements. Prior to access requests, a user would have to call the help desk, where they would then be placed in Open Access by a help desk representative. With temporary access requests, this process can be automated, therefore reducing help desk calls. The purpose of this guide is to introduce you to the configuration and operation of the temporary access feature in SafeConnect. This guide provides all the information needed to fully configure temporary access, and details how an end user will request access and receive subsequent notifications. Let's get started!
Step-by-step guide
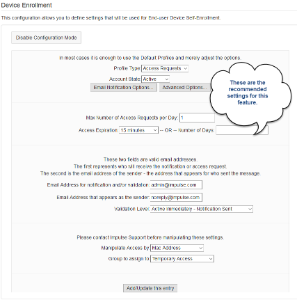
Configuring and Enabling Temporary Access:
- Connect to the management portal. /manage
- Navigate to "Configuration" > "Device Enrollment" then Click on "Enable Configuration Mode" and then edit Access Request
- Expand the configurable controls by clicking on "Email Notification" and "Advanced" options buttons
Administrators have the ability to configure temporary access in a variety of ways:
Max Number of Access Requests:
- This setting controls how many times an end user may request temporary access per day. It is recommended to keep this settings default of 1 time per day.
Access Expiration:
- This setting allows you to specify the exact time restrictions of the temporary access the end user will receive. It is recommended to set this time to no more than 30 minutes. The default of 15 minutes should be more than enough time to access remediation resources.
Email Notifications:
- Email address for notification/validation settings will send an email to the configured admin address when an end user requests temporary access.
- Email address sender settings will send an email to the end user as the configured address when an end user requests temporary access.
Validation Level:
- This setting controls how access is granted and whether or not to send notifications. It is recommended to set this to Active Immediately - Notification Sent. This will grant access to the end user immediately and inform the administrator (configured email address) that the end user has requested this access.
Manipulate Access by:
- This setting controls how the temporary access will be applied to the client record. It is highly recommended to use MAC Address or Authenticated Name. IP address can have undesirable results if the IP of the requesting end user changes. MAC Address would be best since the temporary access will be tied to the device the request originated from.
Group Assignment:
- This setting controls what group the end user will be moved to. It is recommended to leave this defaulted to Temporary Access.
Adding this feature to a remediation page:
- Connect to the management portal. /manage
- Navigate to "Policy Manager" > "Web UI Menu" then Click on "Web Messages"
- Search for 'not installed' and select "Anti-Virus - not installed" from the Web Messages list
- Select "Quarantine" radio button from the Preview Options and then click "Download Web Message" and save file
- Open the downloaded file using a text editor and add the following lines to the bottom off the <! – Quarantine Section – > of the file. For ease of use, the modified file had been attached to this document.
The following is the full section for reference:
- Save changes to the file and do not change the file name. The name must be Anti-Virus - not installed.jsp
- From the Policy Manager - click on "Browse" and select the modified file
- Select "Upload and Preview" to see what your modifications will look like to the end user
- Select "Upload and Save Web Message" when you are happy with the results
Saving will overwrite the existing, selected web message.
If you want to use the attached anti-virus file, simply download it, navigate to Policy Manager > Web UI > Web Messages. Search for 'not installed' and select "Anti-Virus - not installed". Click on browse and upload and save the web message.
##
Related articles
For environments using the classic web-messages, see the attached document.