Introduction
This document describes how to set up Windows Group Policy to allow domain machines to automatically perform 802.1x EAP-TLS authentication against NAC. For more details about how EAP-TLS authentication works, checkout Cisco's excellent document here.
Configuration
Install and Configure the Certificate Authority
In order for clients to perform EAP-TLS authentication, each client will need to be provisioned with a certificate signed by a central Certificate Authority, whose signature the NAC with verify during authentication. To generate these certificates, we will use Active Directory Certificate Services.
Certificate Services automatically integrates with Active Directory, meaning that client certificates will be automatically deploy to domain-joined machines via GPO. This can be verified on the workstation using the certificate utility after ADCS is installed.
Install Active Directory Certificate Services
We use PowerShell for install and config ADCS. (Make sure the run the following commands as Administrator from a Domain Controller in your domain)
Once the installation is complete, you can go to Server Manager –> Tools –> Certification Authority to view the Certificate Authority ("certsrv") management tool.
Auto Enroll Certificates with Group Policy
Prepare Certificate Template For Computer and User
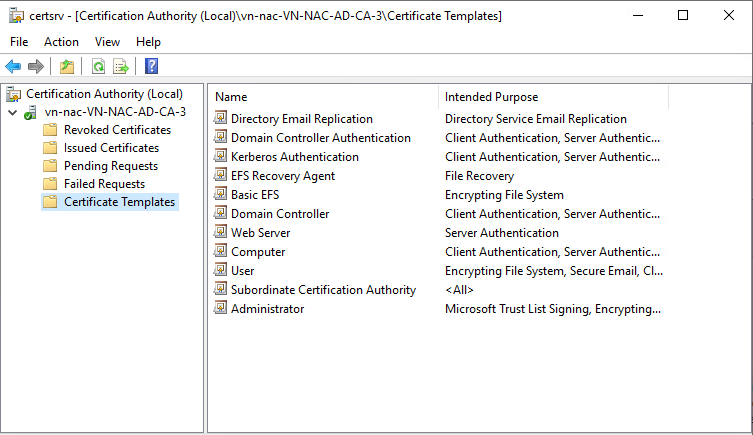
Open Certification Authority tool.
Right click on Certificate Templates and then click Manage.
Right-click the Computer template, select Duplicate Template and specify the following:
Under Compatibility Settings, specify Certification Authority=Windows Server 2003 and Certificate recipient=Windows XP/Server 2003.
Click the General tab, and change the Template display name to Computer_Auto_Enrollment.
Click the Security tab, and give "Domain Computers" permissions to Read, Enroll and Autoenroll.
Additionally, give 'Domain Controllers' permissions to Read, Enroll and Autoenroll. This is required as the DC computer account will request the policy server for validation rather than the logged-in user.
Select the Subject Name tab, and change the Subject name format to DNS Name.
Select DNS Name in the subject alternative name.
Under the Request Handling tab, clear Allow private key to be exported. If the requirement is to be able to export private key, leave this checked.
Click OK to go back to the template list.
Right-click the User template and select Duplicate Template and specify the following:
Under Compatibility Settings, specify Certification Authority**=Windows Server 2003** and Certificate recipient=Windows XP/Server 2003.
Click the General tab, and change the Template display name to User_Auto_Enrollment. If the requirement is to Publish the User certificate in Active Directory and Credential Roaming is enabled, ensure to select both Publish certificate in Active Directory and Do not automatically re-enroll if a duplicate certificate exists in Active Directory.
Select the Security tab, and give "Domain Users" permissions to Enroll and Autoenroll.
Select the Subject Name tab, and change the Subject name format to Common name.
Clear Include email name in subject name and clear Email name in the subject alternative name.
Select User principal name (UPN).
Under the Request Handling tab, clear Allow private key to be exported. If the requirement is to be able to export private key, leave this checked.
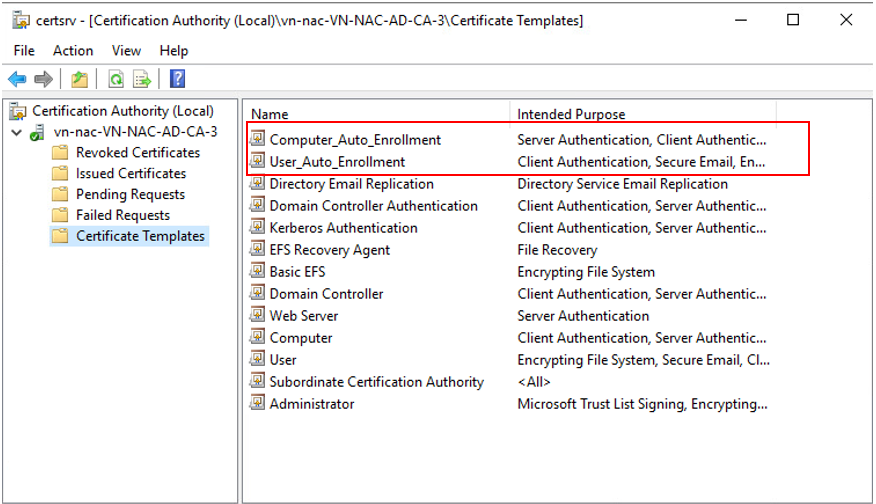
Click OK to go back to the template list and then close the Certificate Templates Console window.
Issue Certificate Template
Right click on Certificate Template-New-Certificate Template to Issue, and select both Computer_Auto_Enrollment & User_Auto_Enrollment
Configuration Of Group Policy
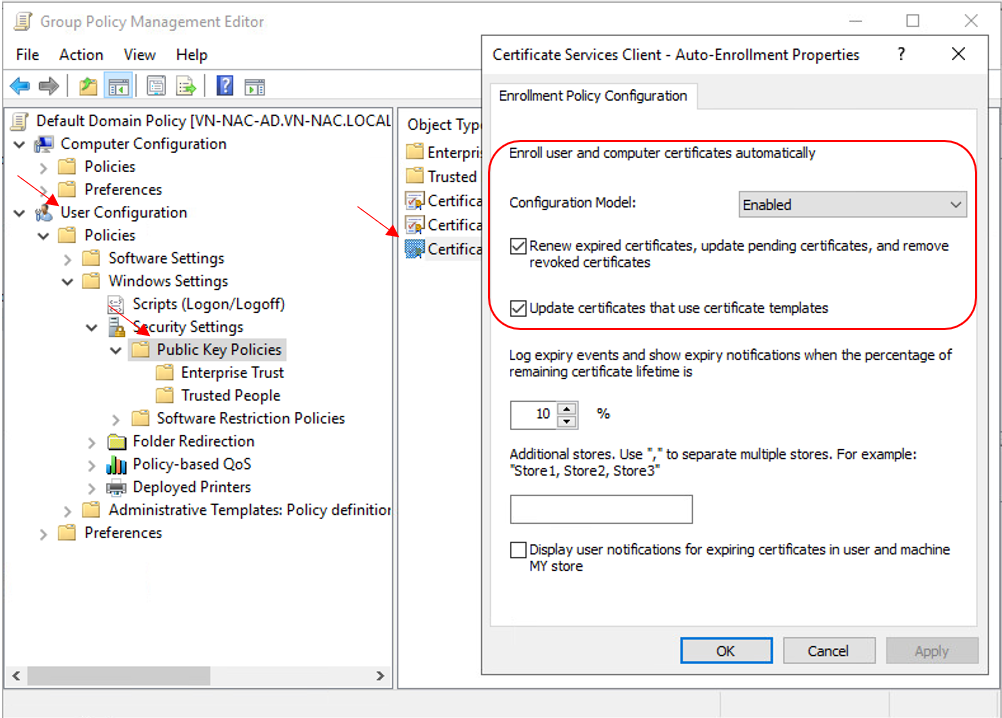
Set the Configuration Model = Enabled in Computer Configuration – Windows Settings – Security Settings – Public Key Policies – Certificate Services Client – Auto Enrollment in Default Domain Policy to enable Certificate Auto Enroll for all domain computers

Set the Configuration Model = Enabled in User Configuration – Windows Settings – Security Settings – Public Key Policies – Certificate Services Client – Auto Enrollment in Default Domain Policy to enable Certificate Auto Enroll for all domain users
Auto Enroll Certificates With Group Policy For Windows 10
Computer & User Certificate will be generated automatically when Group Policy is updated in the background every 90 Minutes
Deploy Group Policy for Wireless and Wired Networks
Group Policy for EAP-TLS authentication to a Wireless Network
Under Computer Configuration – Windows Settings – Security Settings – Wireless Network (IEEE 802.11) Policies
Enter Policy Name, Description and click Add – Infrastructure
Enter the SSID Name and click Add
Select the following
Authentication = WPA2-Enterprise
Encryption = AES-CCMP
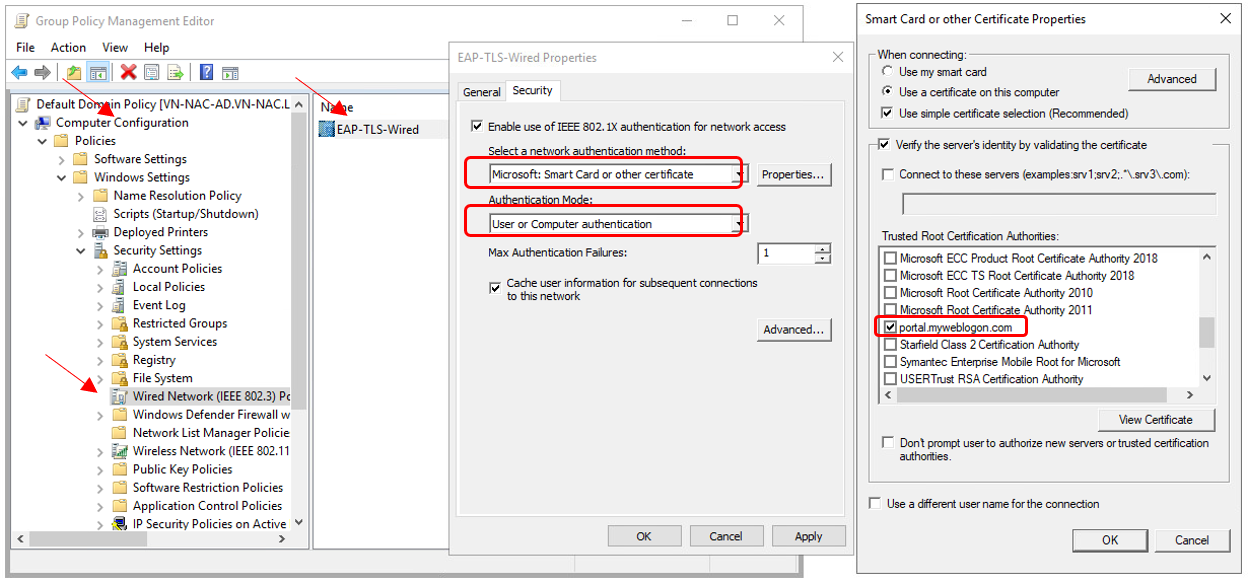
Network Authentication Method = Microsoft: Smart Card or Other Certificate
Authentication Mode = User or Computer Authentication
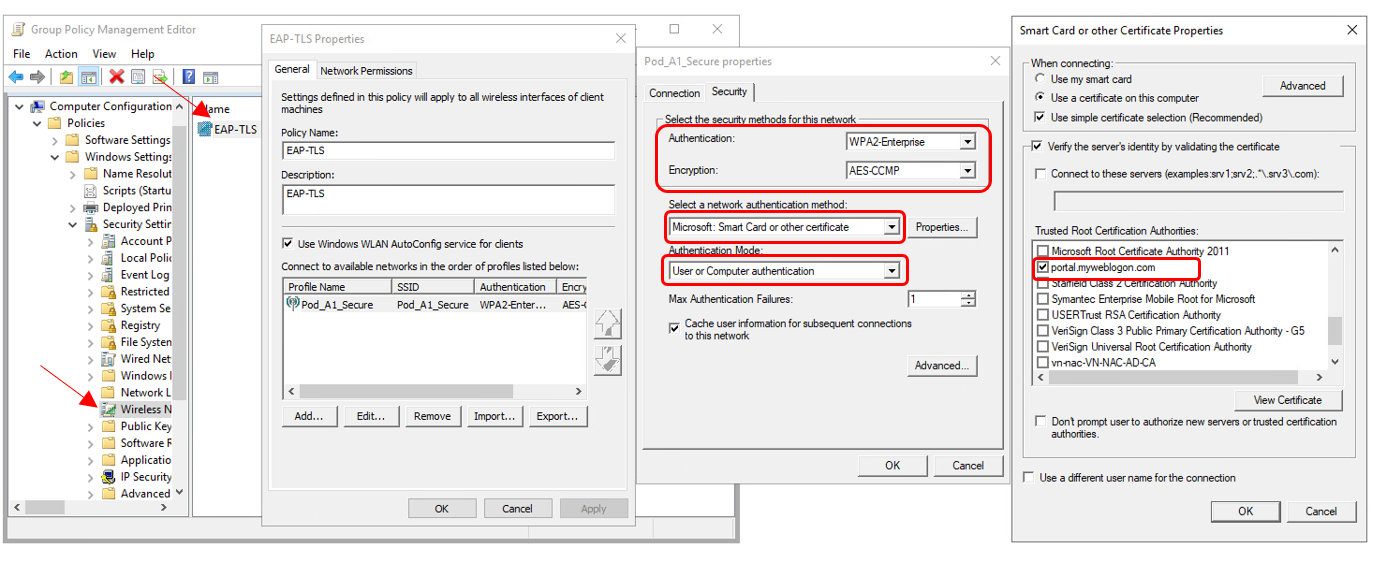
NOTE: If you are using a self-signed RADIUS certificate instead of the default "portal.myweblogon.com" certificate, you should click the "Properties..." button next to the "Select a network authentication method" drop-down on the right-most screen, and choose your self-signed certificate from the list in the window that appears.
Group Policy for EAP-TLS authentication to a Wireed Network
Please follow the same steps as on previous part, but select "Wired Network (IEEE 802.3) Policies" under "Security Settings".
Export Certificate from CA and Import to NAC
Export Certificate from CA
Go to Start > Run. Enter cmd, press Enter, then enter the command below at the prompt:
Import Certificate to NAC
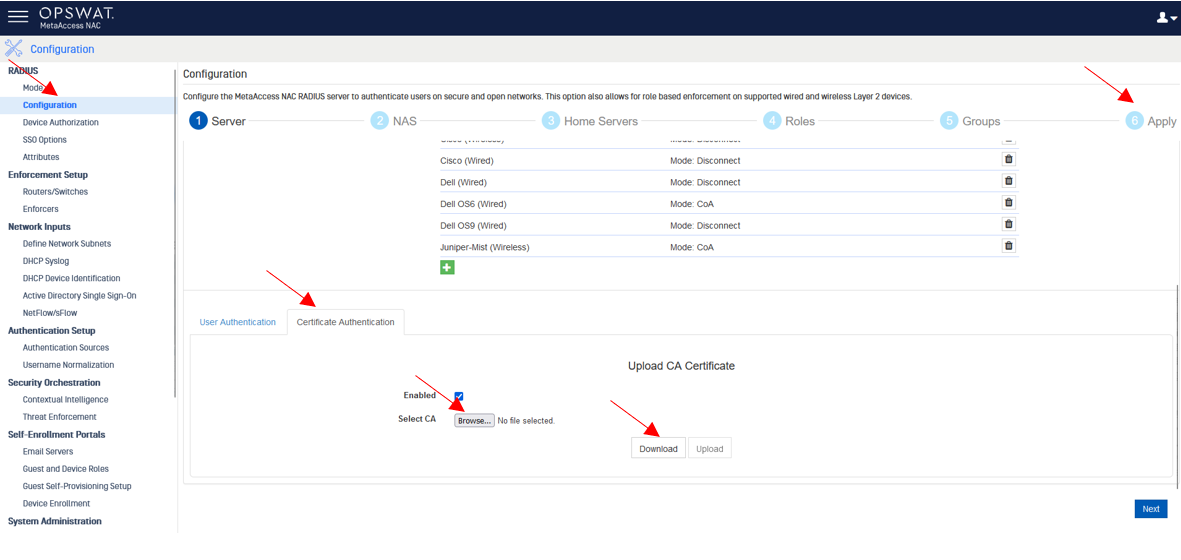
Access NAC UI
From Configuration -> choose Server -> click Certificate Authentication -> choose Enable -> Browse to the cerificate file exported above -> Click Upload -> choose Apply -> Apply and Use
Computer is connected to WIFI automatically when GPO applied
