
The Certificate Management feature in My OPSWAT Central Management enables administrators to manage digital certificates across their environment. This includes importing, managing, and deleting certificates, as well as assigning them to product instances or policies.
Supported Products
MetaDefender Core
MetaDefender Kiosk K-Series
On This Page
Certificate List Page
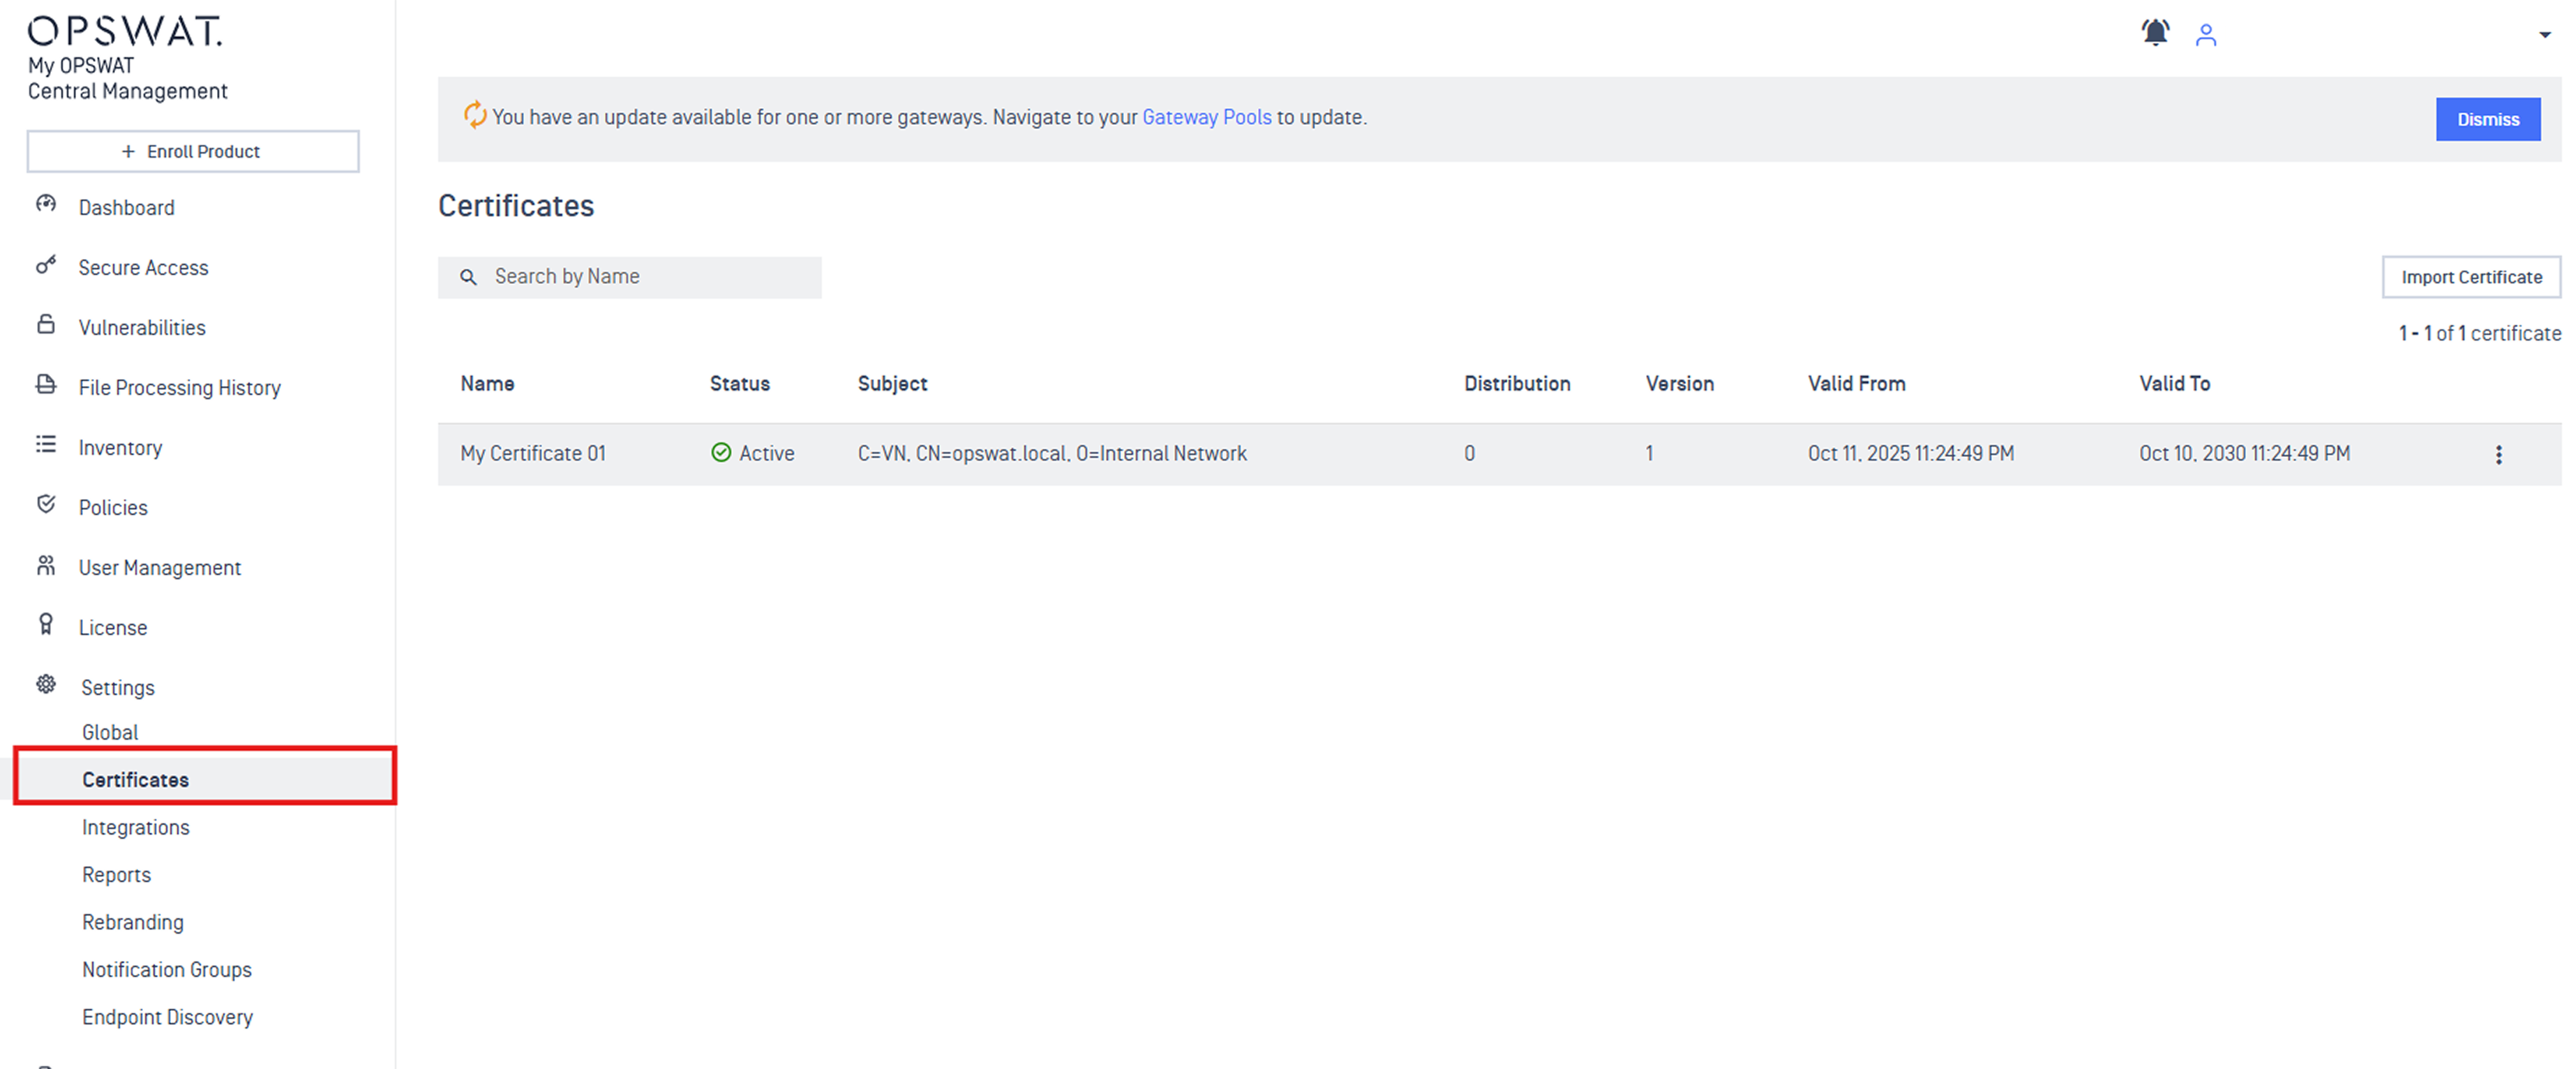
The Certificate List page displays all certificates imported into My OPSWAT Central Management.
To access the page, navigate to Settings → Certificates.
Each certificate includes the following details: Name, Status, Subject, Distribution, Version, Valid From, Valid To.
Importing a Certificate
From the Certificate List page, click Import Certificate.

In the popup dialog:
Enter a Certificate Name
Upload the certificate file and private key (e.g.,
.pem,.crt,.pfx).If the private key is encrypted, enter the passphrase
Click Add to complete the import. Once imported, the certificate will appear in the Certificate List.
Certificate Details Page
To view certificate details, select a certificate from the list.
Information tab
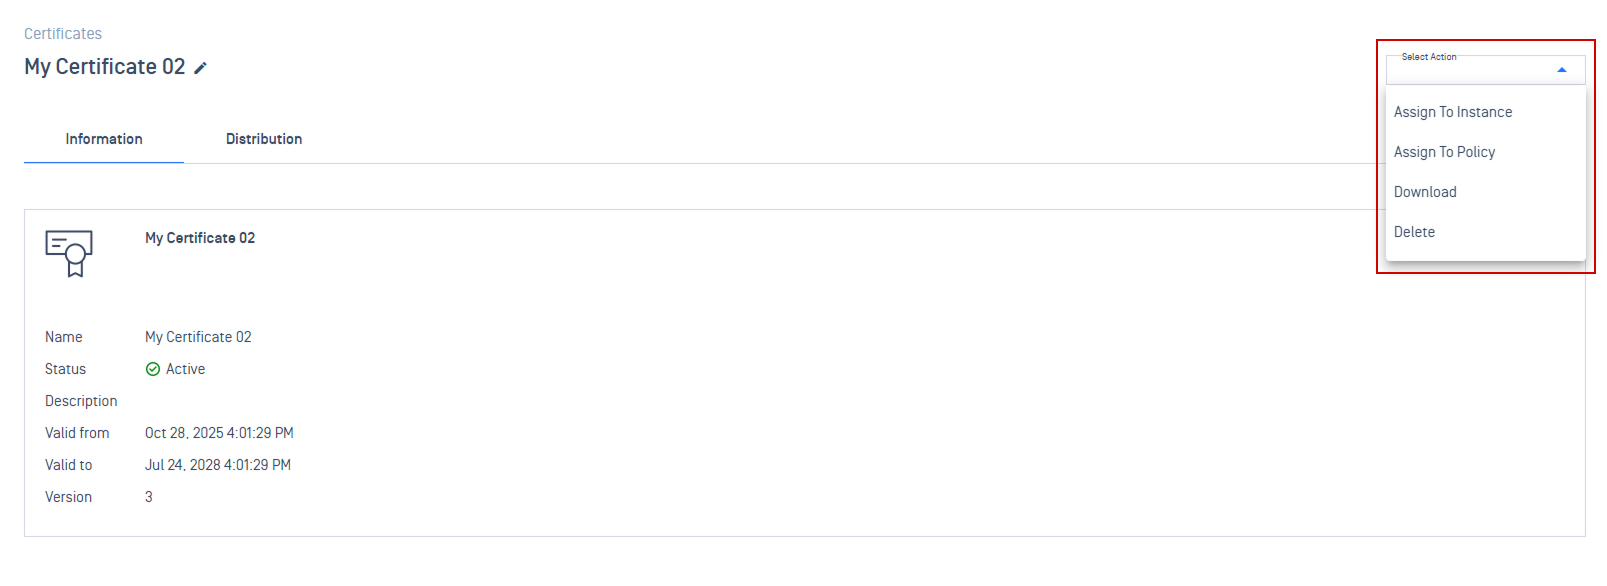
Displays key certificate information.
Supported actions: From the Select Action dropdown, you can:
Assign to Instance: Assign the certificate to a specific instance.
Assign to Policy: Assign the certificate to a policy, which can then be applied to one or more groups.
Download: Download the certificate for local use or backup.
Delete: Remove the certificate permanently.
Distribution Tab
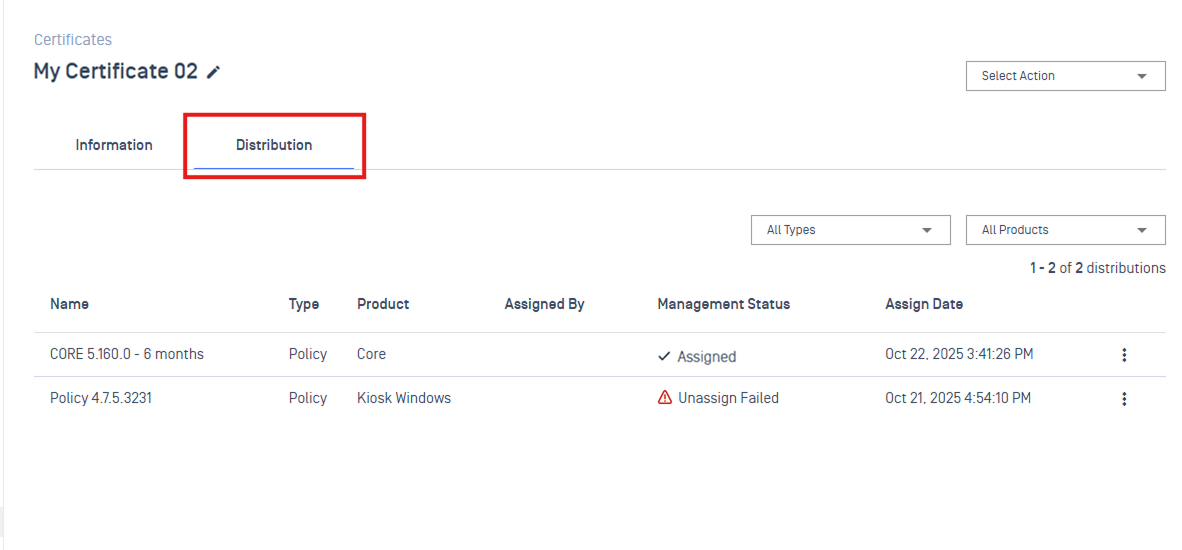
Shows where the certificate is currently assigned. Each entry includes:
Name: The name of the instance or policy.
Type: Indicate the distribution type: the certificate can be assigned to a policy, device, or service.
Product: Specify the OPSWAT product associated with the certificate.
Assigned By: The user assigned the certificate.
Management Status: Shows the current distribution status, which can be:
Assigned: The certificate is successfully assigned.
Unassigning: User has unassigned the certificate. My OPSWAT Central Management will request the device or instance to fully remove the certificate.
Unassign Failed: The unassign process failed; hover to the status to see the failure reason and view details.
Assign Date: The date the certificate was assigned.

Assigning a Certificate
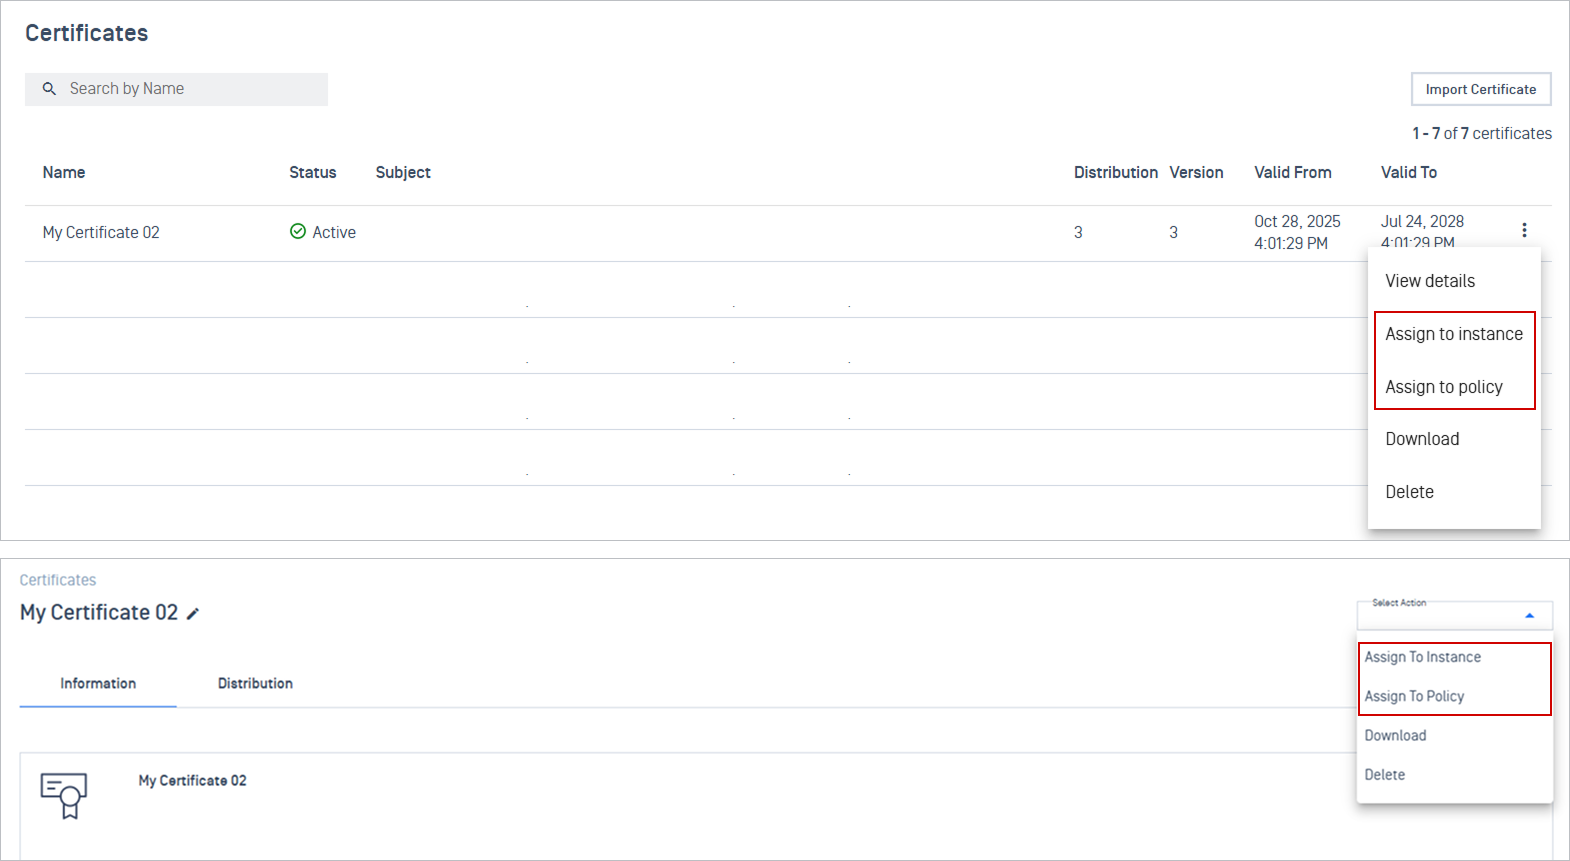
You can assign certificates from two places:
Certificate List Page: Click the 3-dot menu → Select Assign to Instance or Assign to Policy.
Certificate Details Page: Use the Select Action dropdown → Select Assign to Instance or Assign to Policy.
Assign to Instance
Use this method when each individual instance requires a unique, distinct digital certificate.
Assigning a certificate to an instance is a two-step process:
Assign the certificate to the target instance.
Enable HTTPS on the instance to activate the certificate.
MetaDefender Core
Step 1: Assign the certificate to the target instance
Select Assign to Instance → choose MetaDefender Core
Choose your target Core instance from the list, and click Assign.
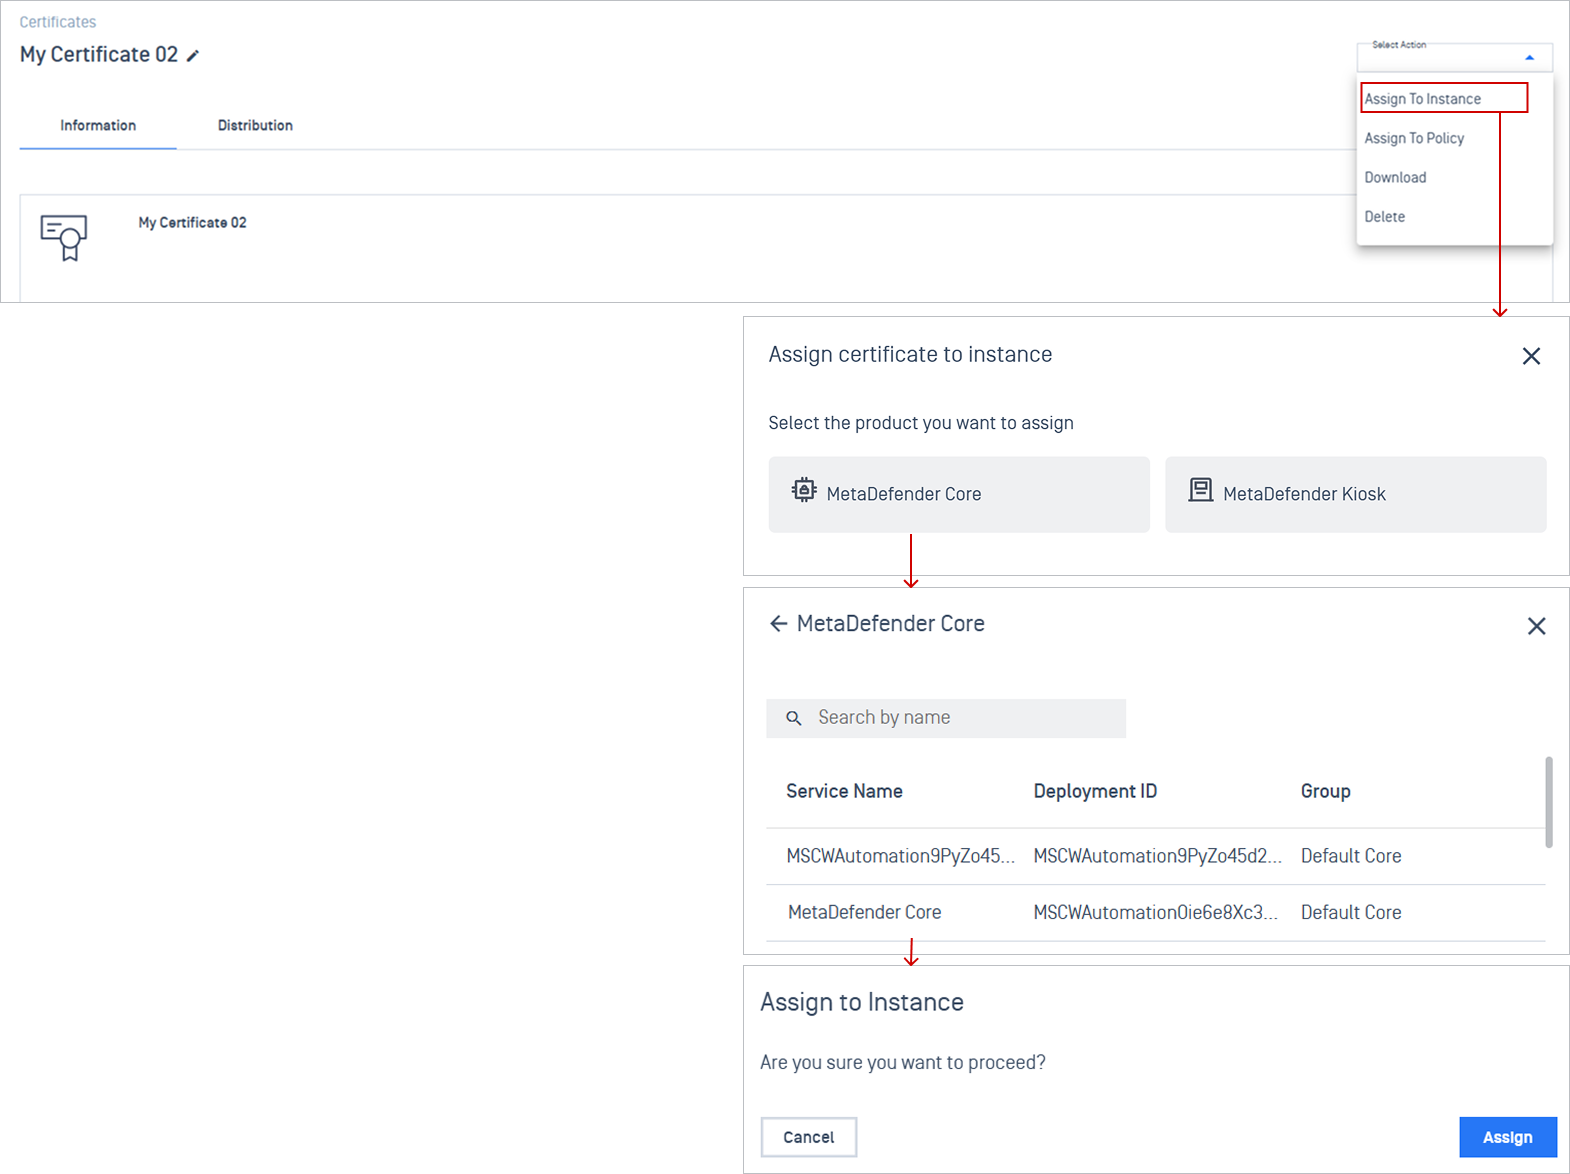
Step 2: Enable HTTPS on the instance configuration
Navigate to Inventory > Services and open the target Core instance details.
Go to the Configuration tab, under the General section, select Security.
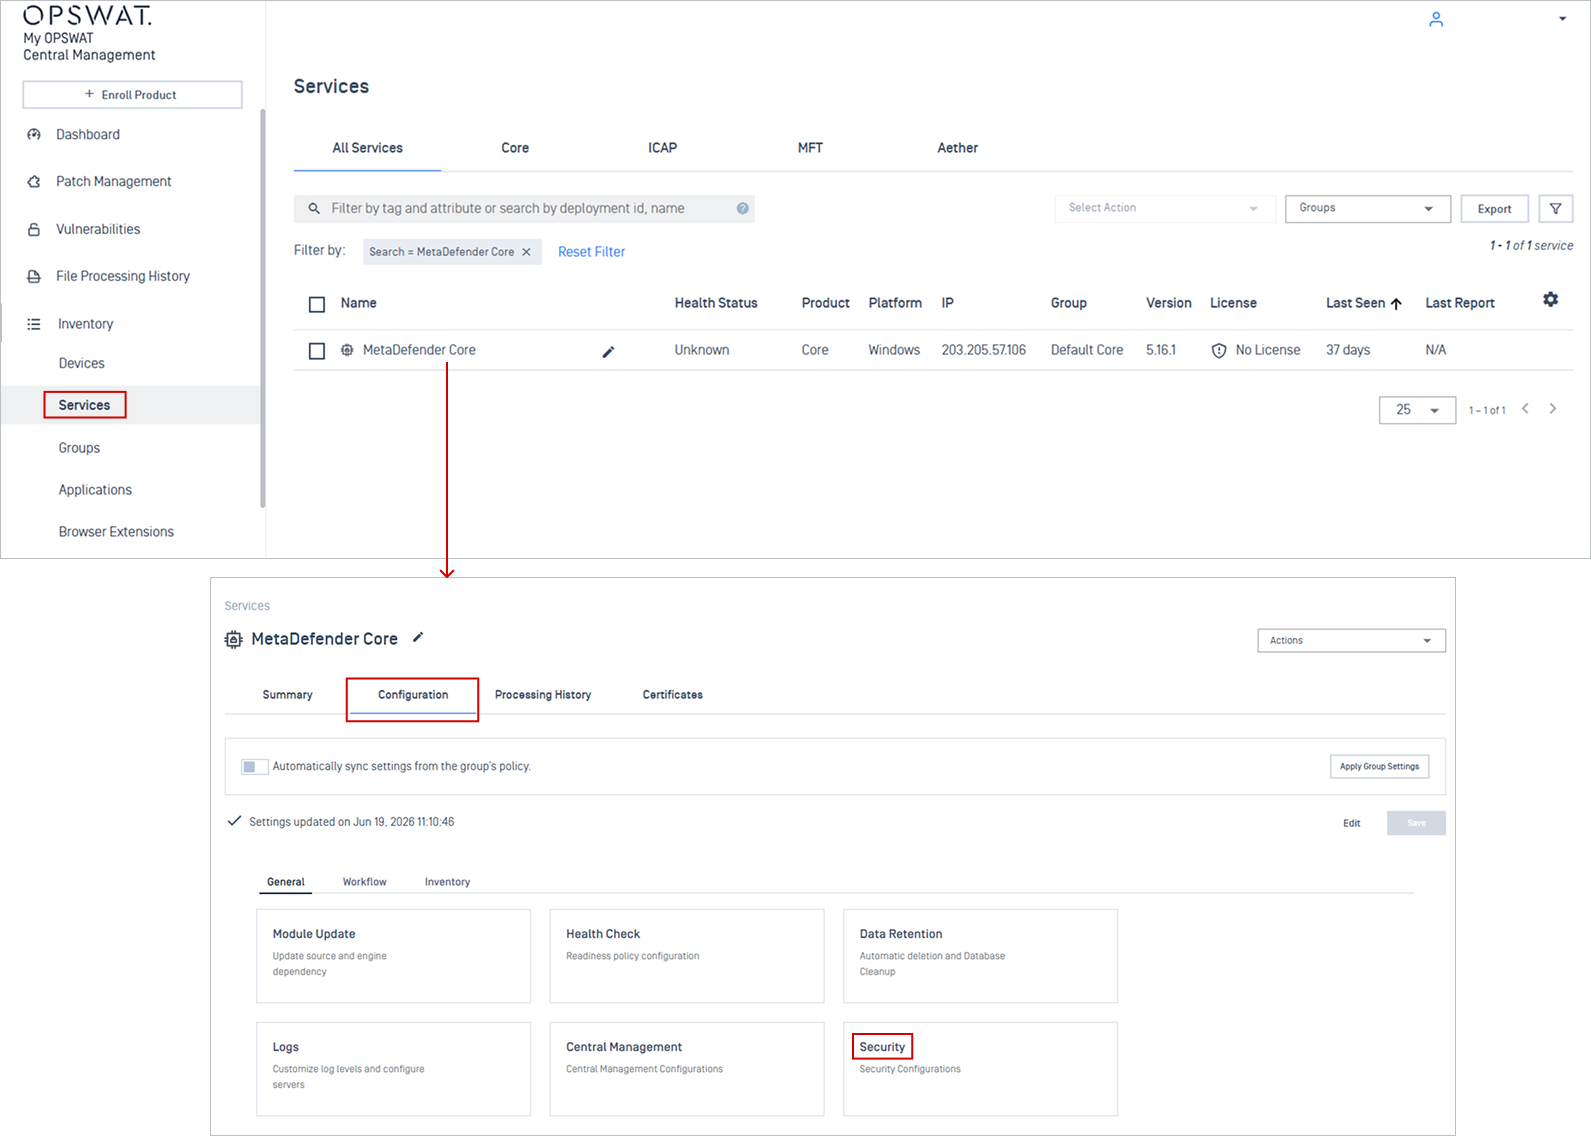
Click Edit, then select Details, toggle Enable certificate, select the target certificate from the dropdown selection, and click Save changes.
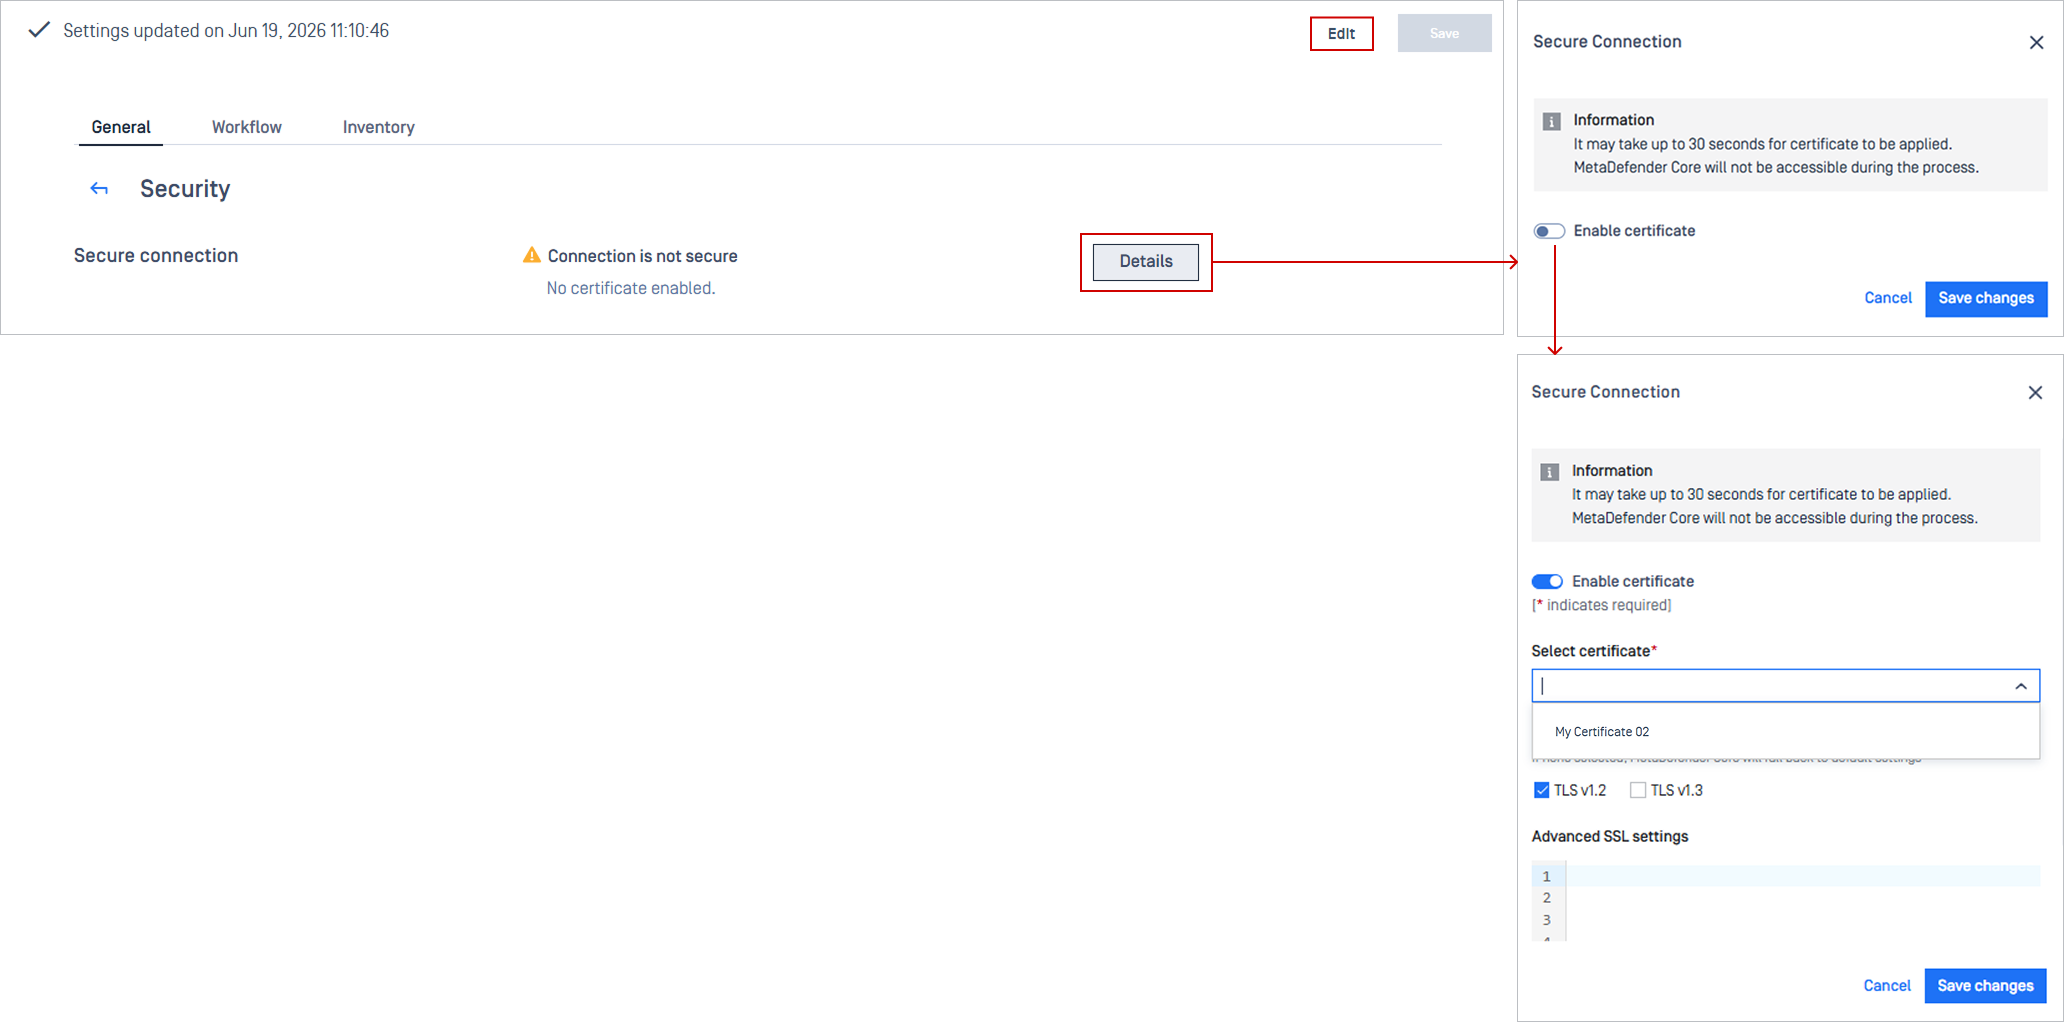
Note Only certificates listed in the instance’s Certificates tab are available for selection.
MetaDefender Kiosk K-Series
Step 1: Assign the certificate to the target instance
Select Assign to Instance → choose MetaDefender Kiosk
Choose your target Kiosk instance from the list, and click Assign.
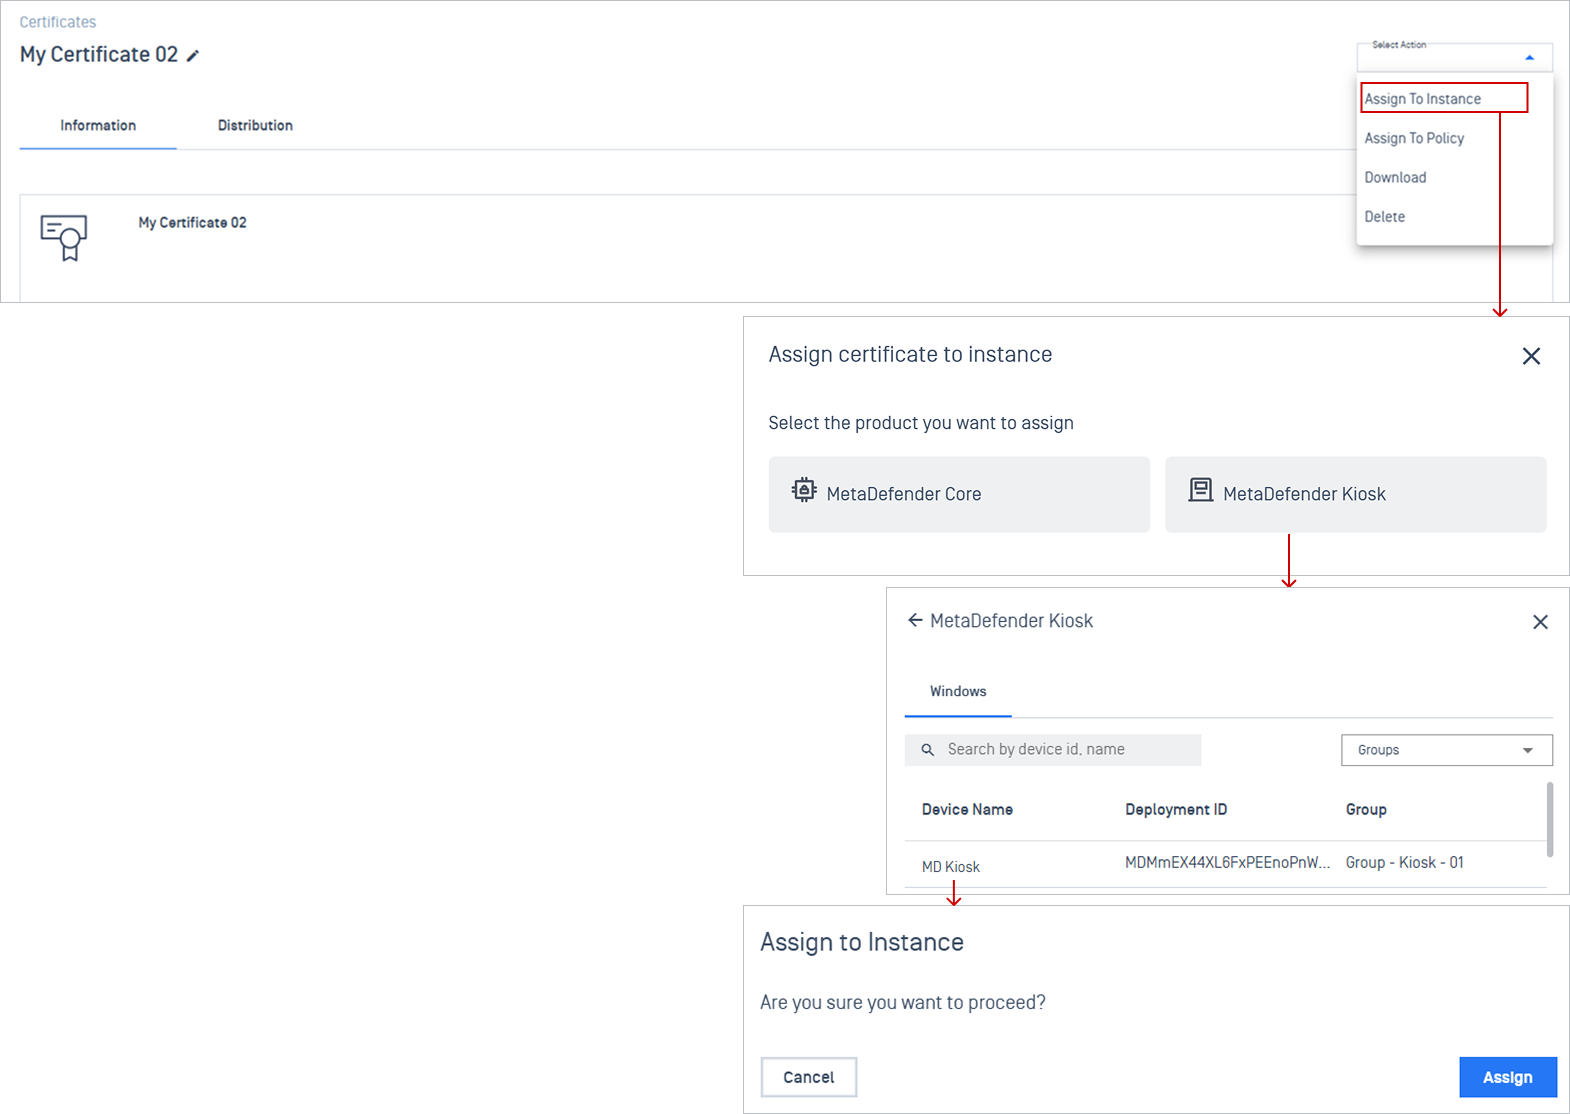
Step 2: Enable HTTPS on the instance settings
Navigate to Inventory > Devices and open the target Kiosk instance details.
Go to the Settings tab, and select Security from the dropdown menu.
Click Edit, toggle Enable HTTPS, choose your target certificate from the dropdown selection, and click Save.
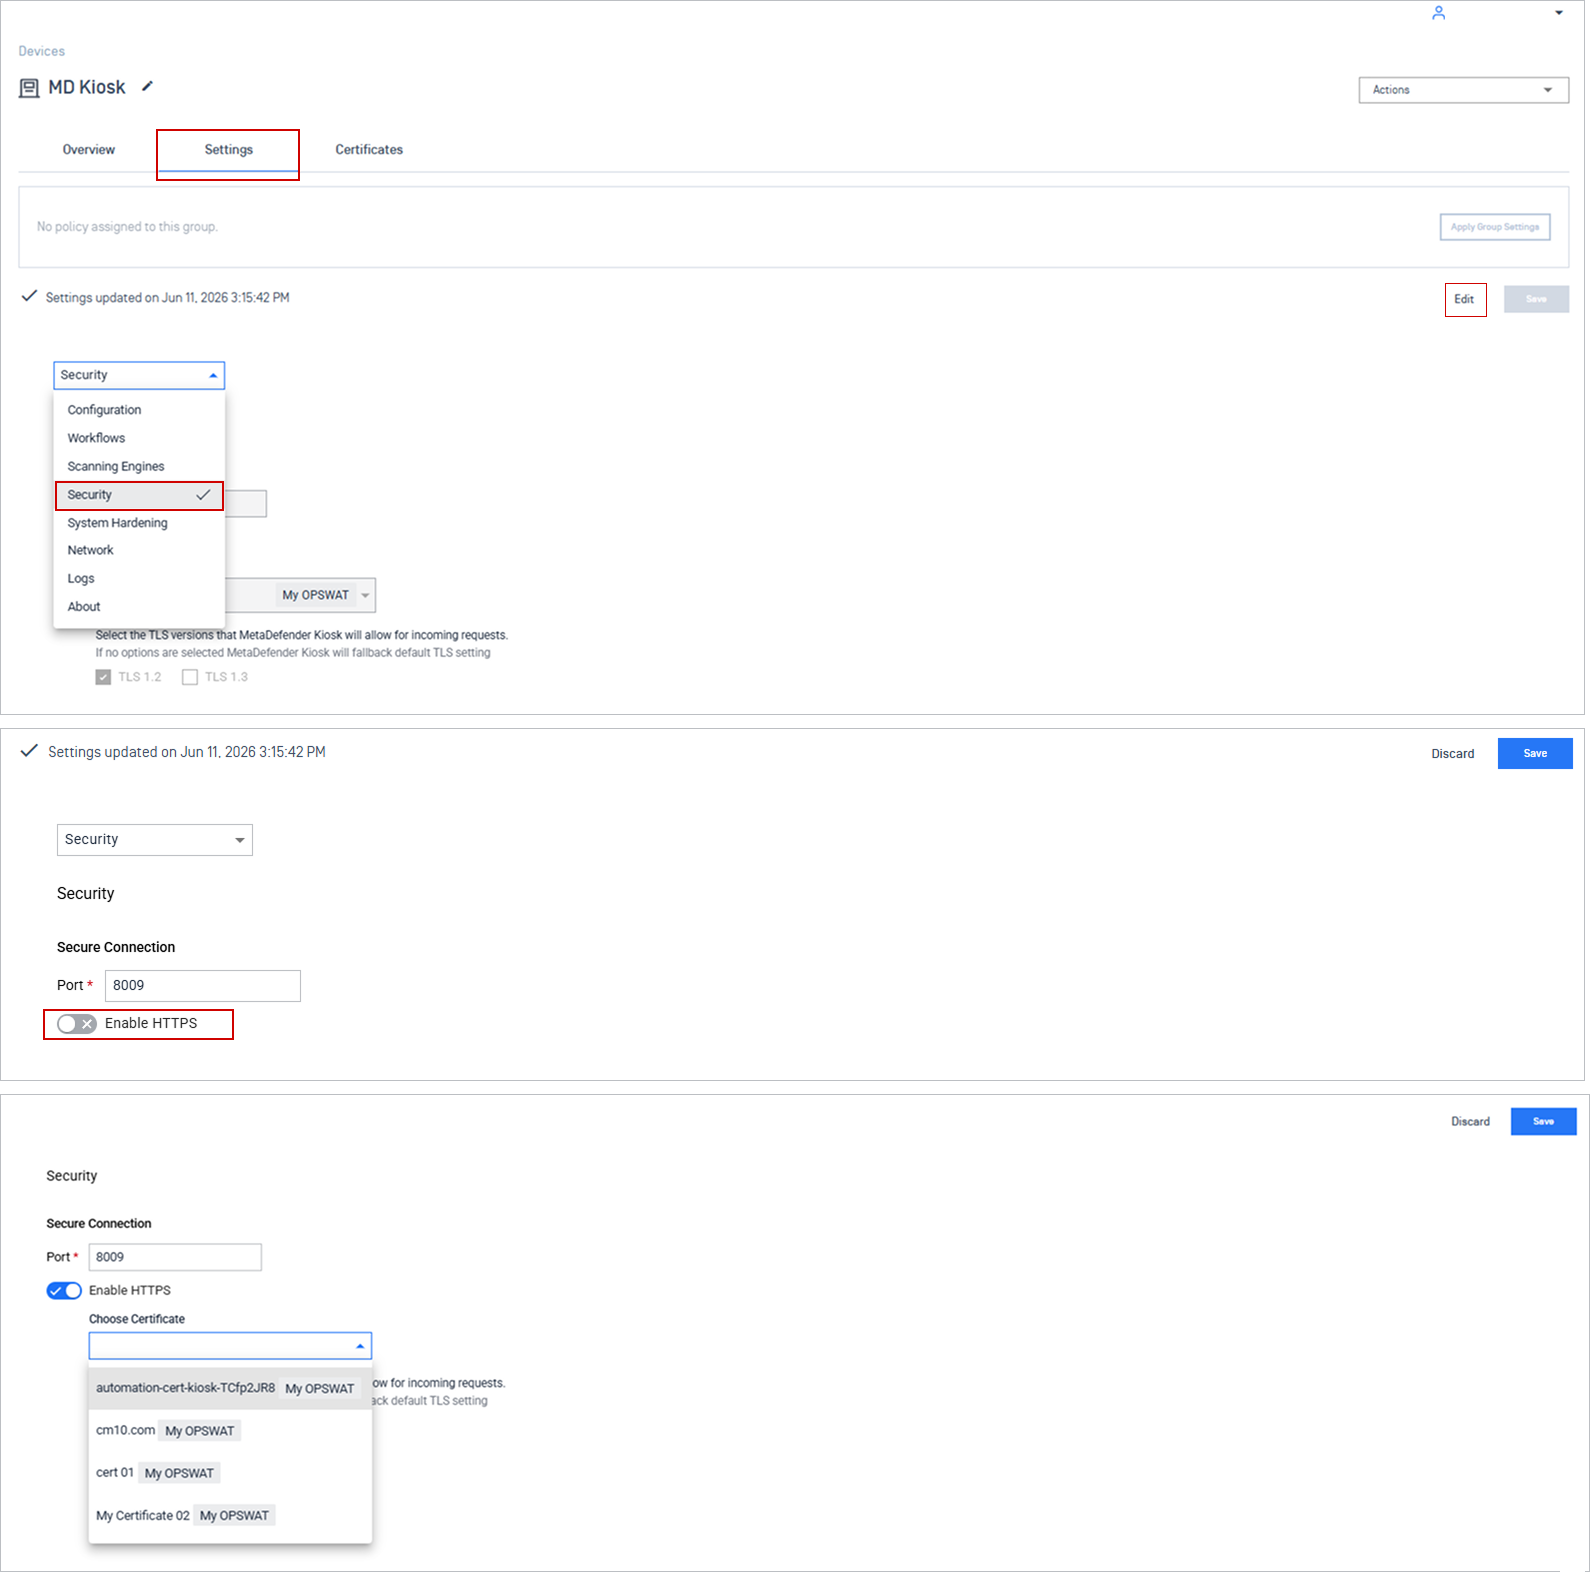
Note Only certificates listed in the instance’s Certificates tab are available for selection.
Assign to Policy
Assigning a certificate to a policy allows you to distribute it across multiple groups of instances.
To ensure certificate is consistently applied, you need to follow three-step process:
Assign the certificate to a policy.
Enable HTTPS on the group settings.
Enable group auto-sync to ensure instances stay aligned with the group policy.
MetaDefender Core
Assigning certificates to policies for MetaDefender Core may not function as expected in some cases. If you encounter any issues, please contact OPSWAT Support for assistance.
Step 1: Assign the certificate to policy
Select a certificate → Assign to Policy → choose File Security → choose your target policy name → click Assign.
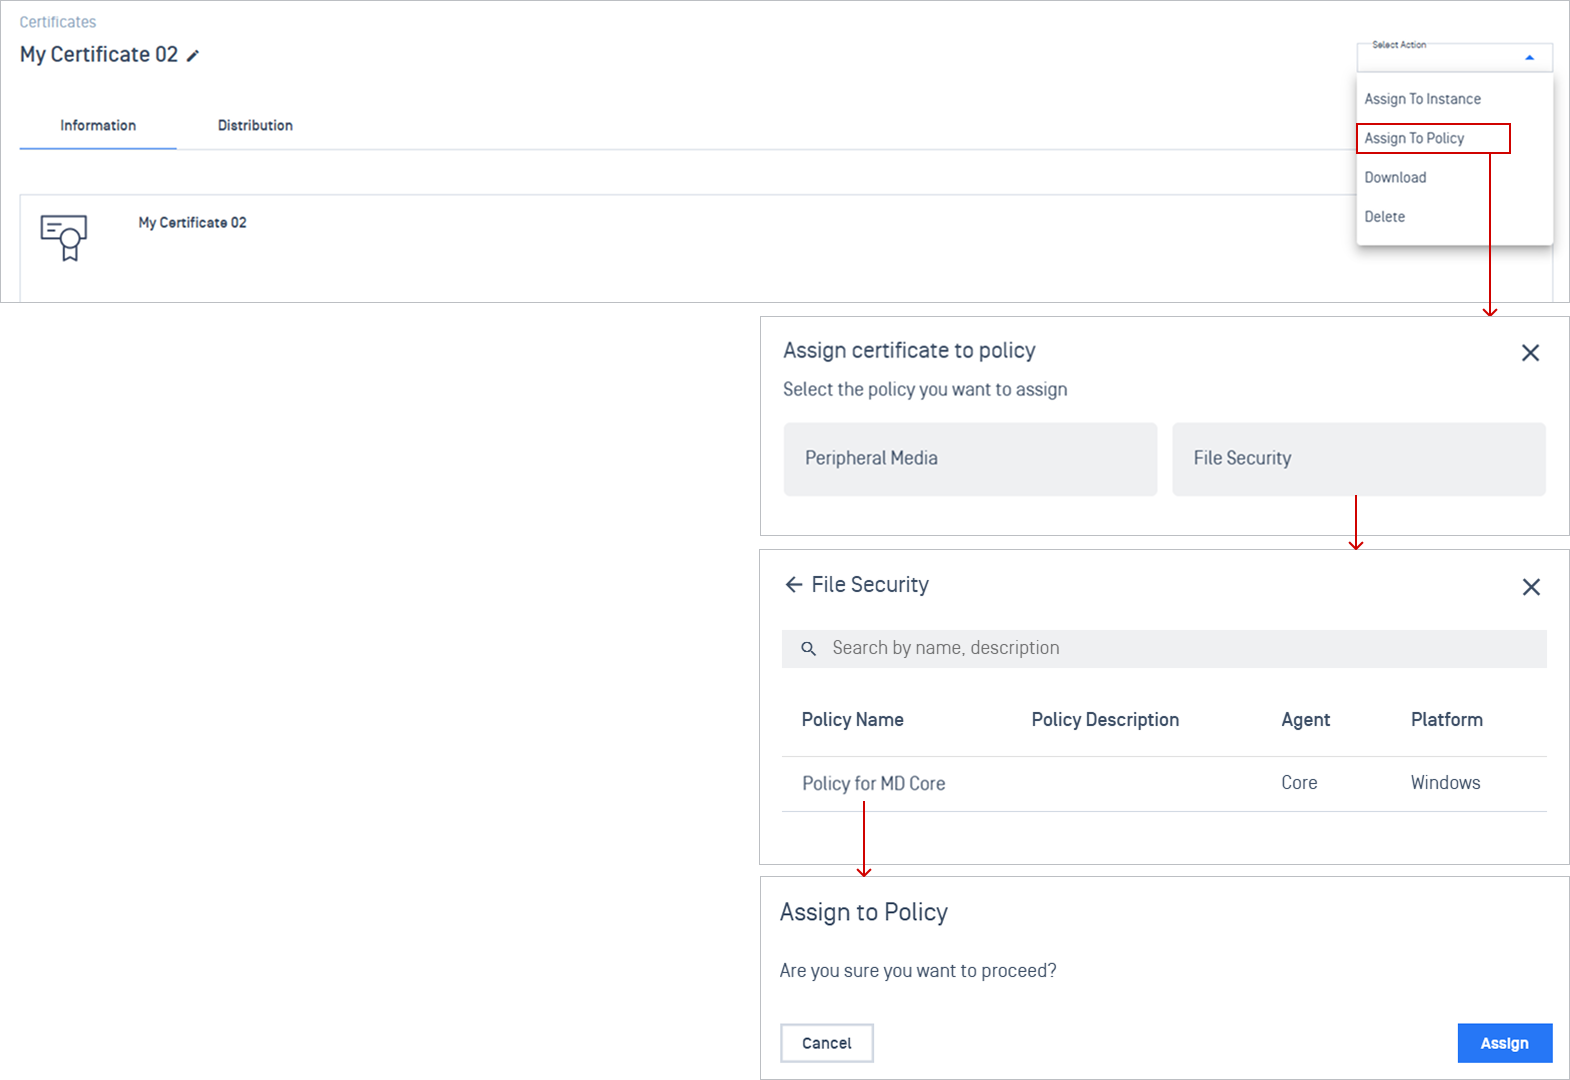
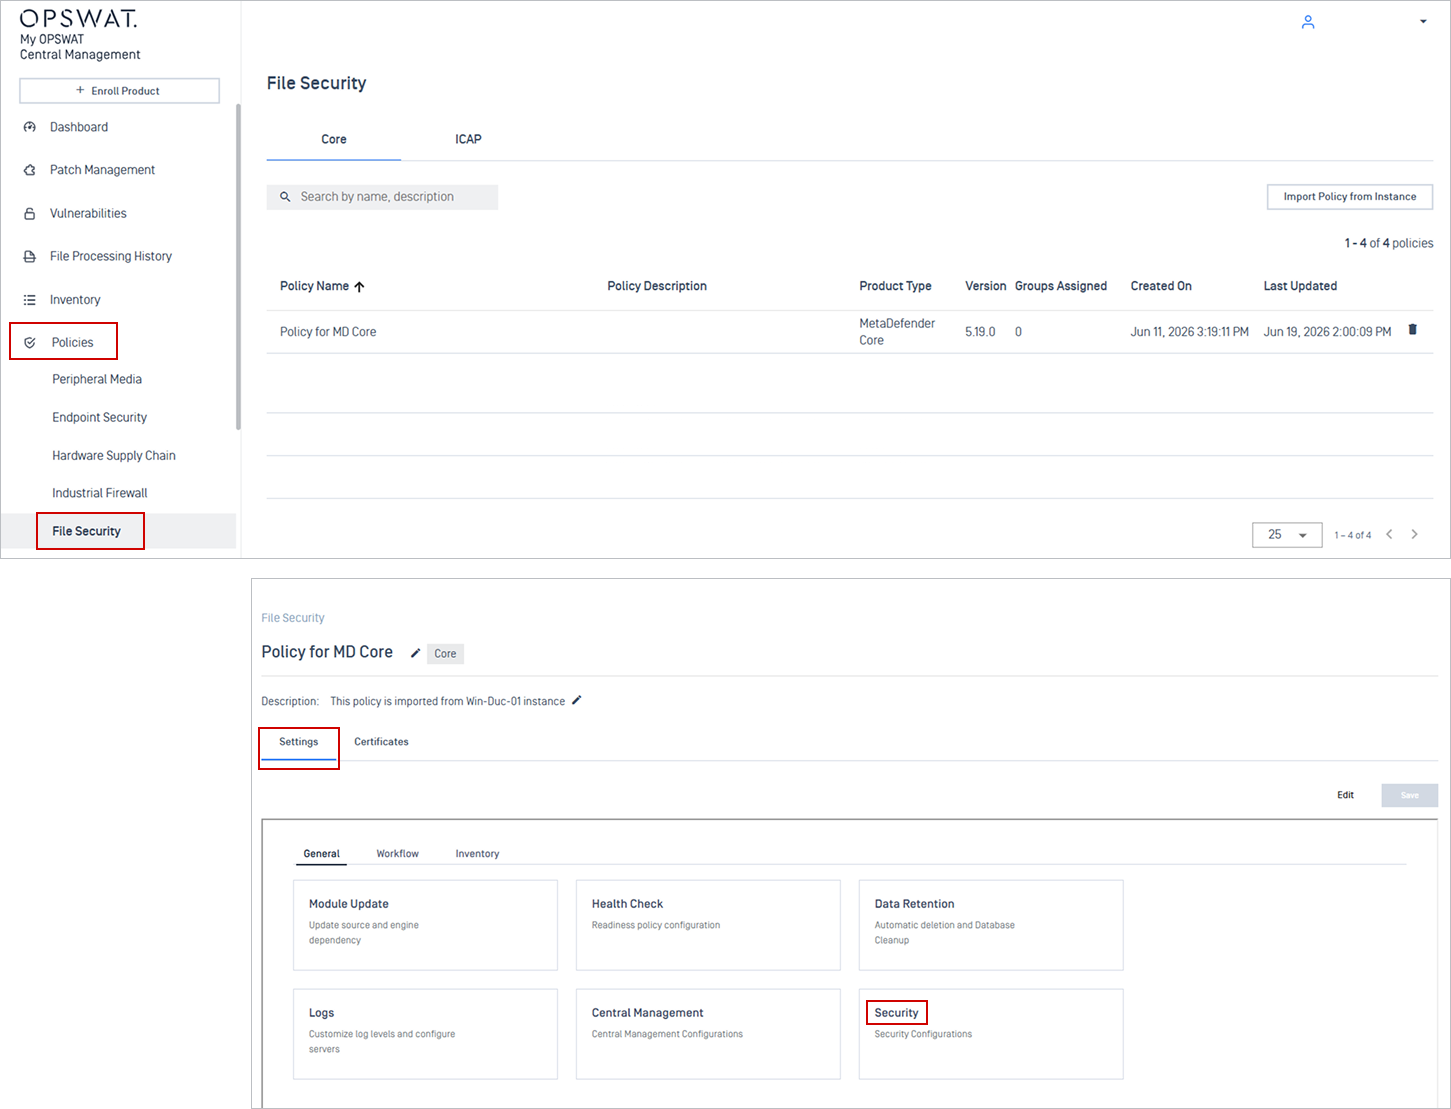
Step 2: Enable HTTPS on the policy settings
Navigate to Policies > File Security, and open the target policy you choose in the previous step.
In the Settings tab, under the General section, select Security.
Click Edit, then select Details, toggle Enable certificate, select the certificate from the dropdown selection, and click Save changes.
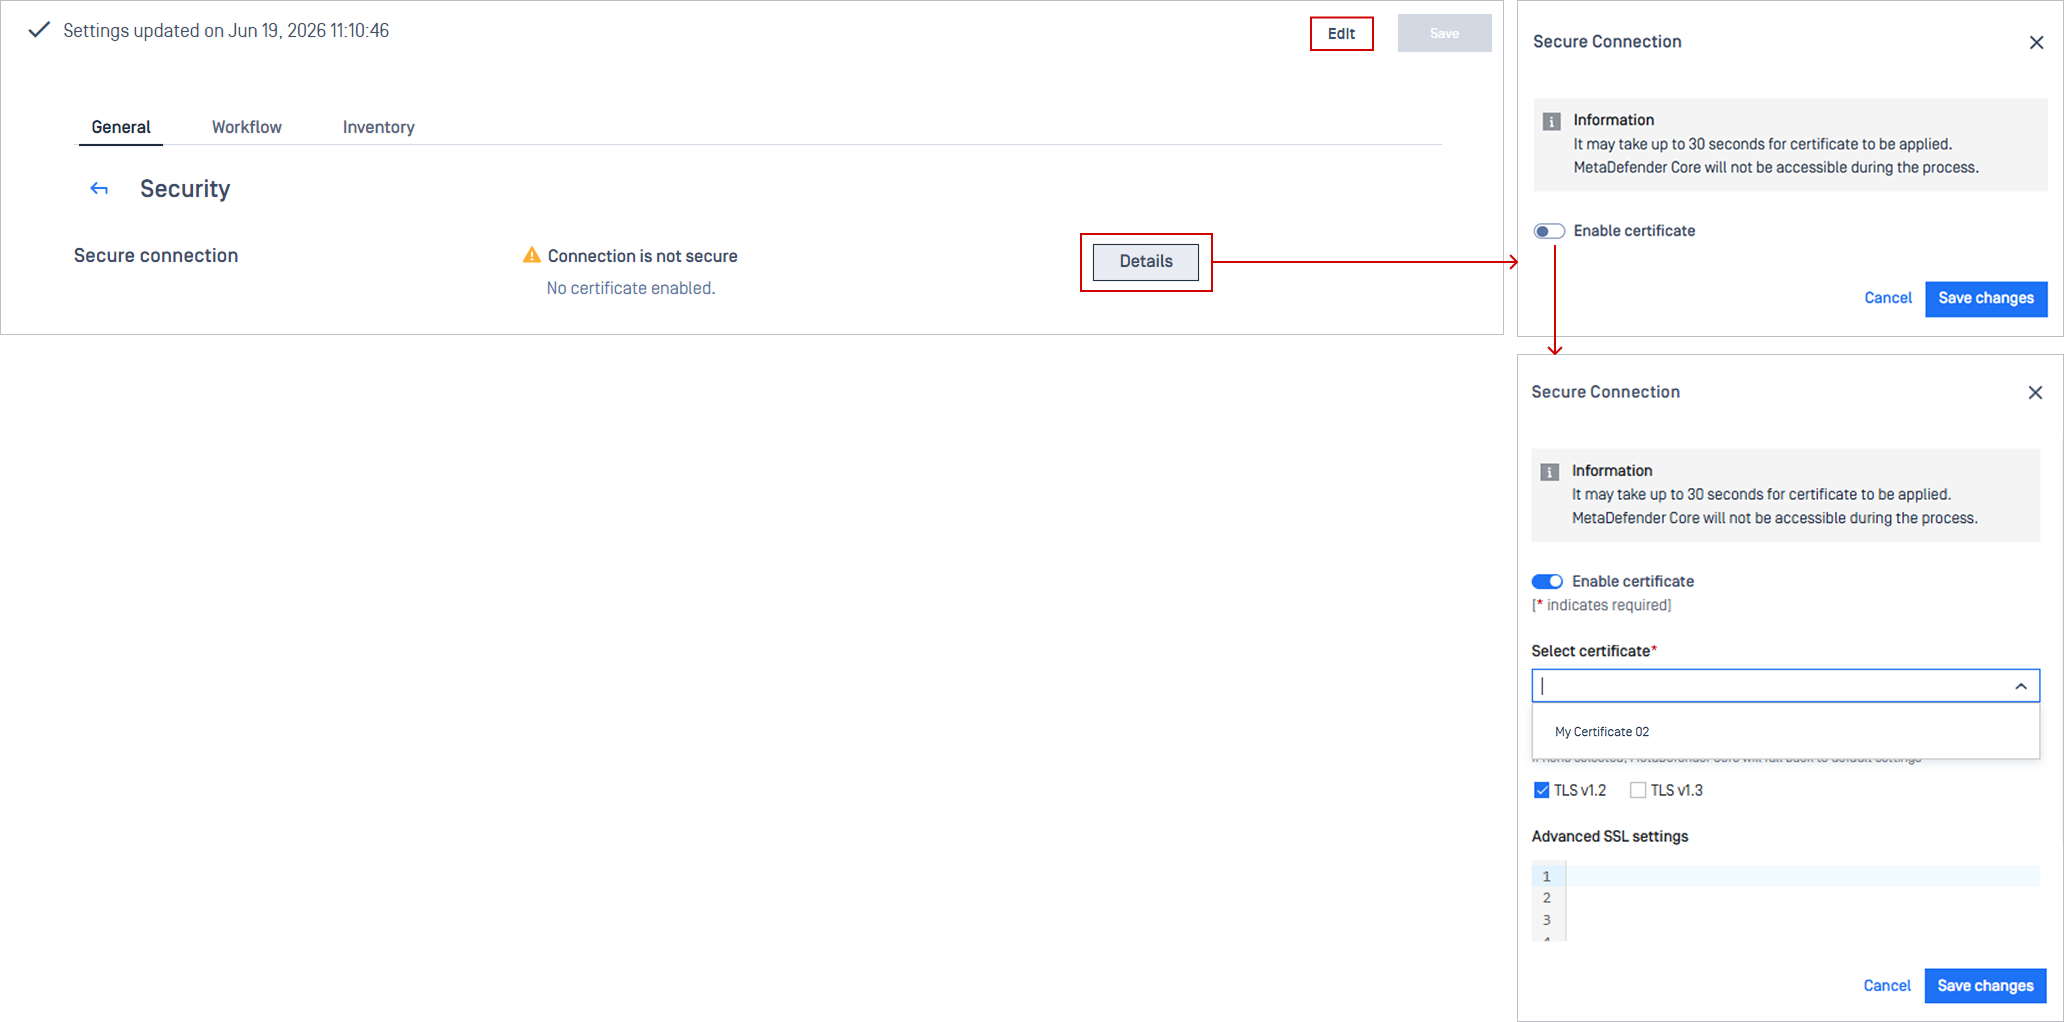
Note Only certificates listed in the policy's Certificates tab are available for selection.
Step 3: Enable group auto-sync to ensure instances stay aligned with the group policy
Go to Inventory → Groups, click on the group using the target policy.
In the Settings tab, enable Automatically sync group policy for new instance, then click Save. New instances added to this group inherit the certificate automatically.
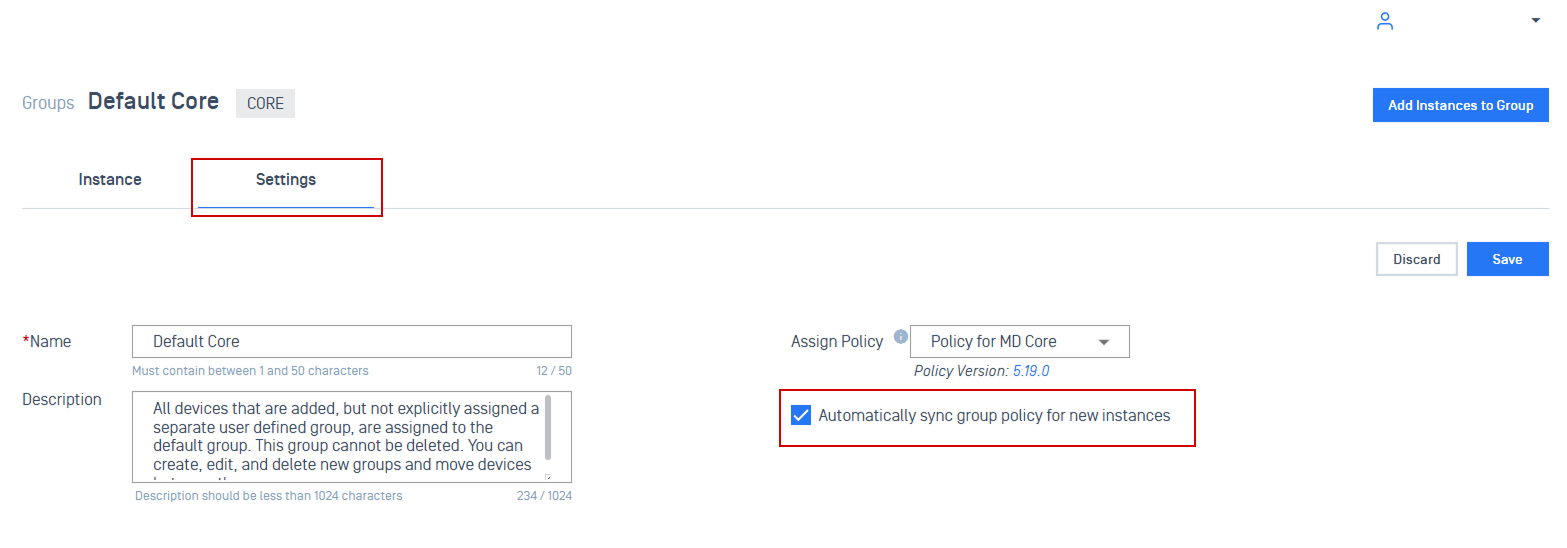
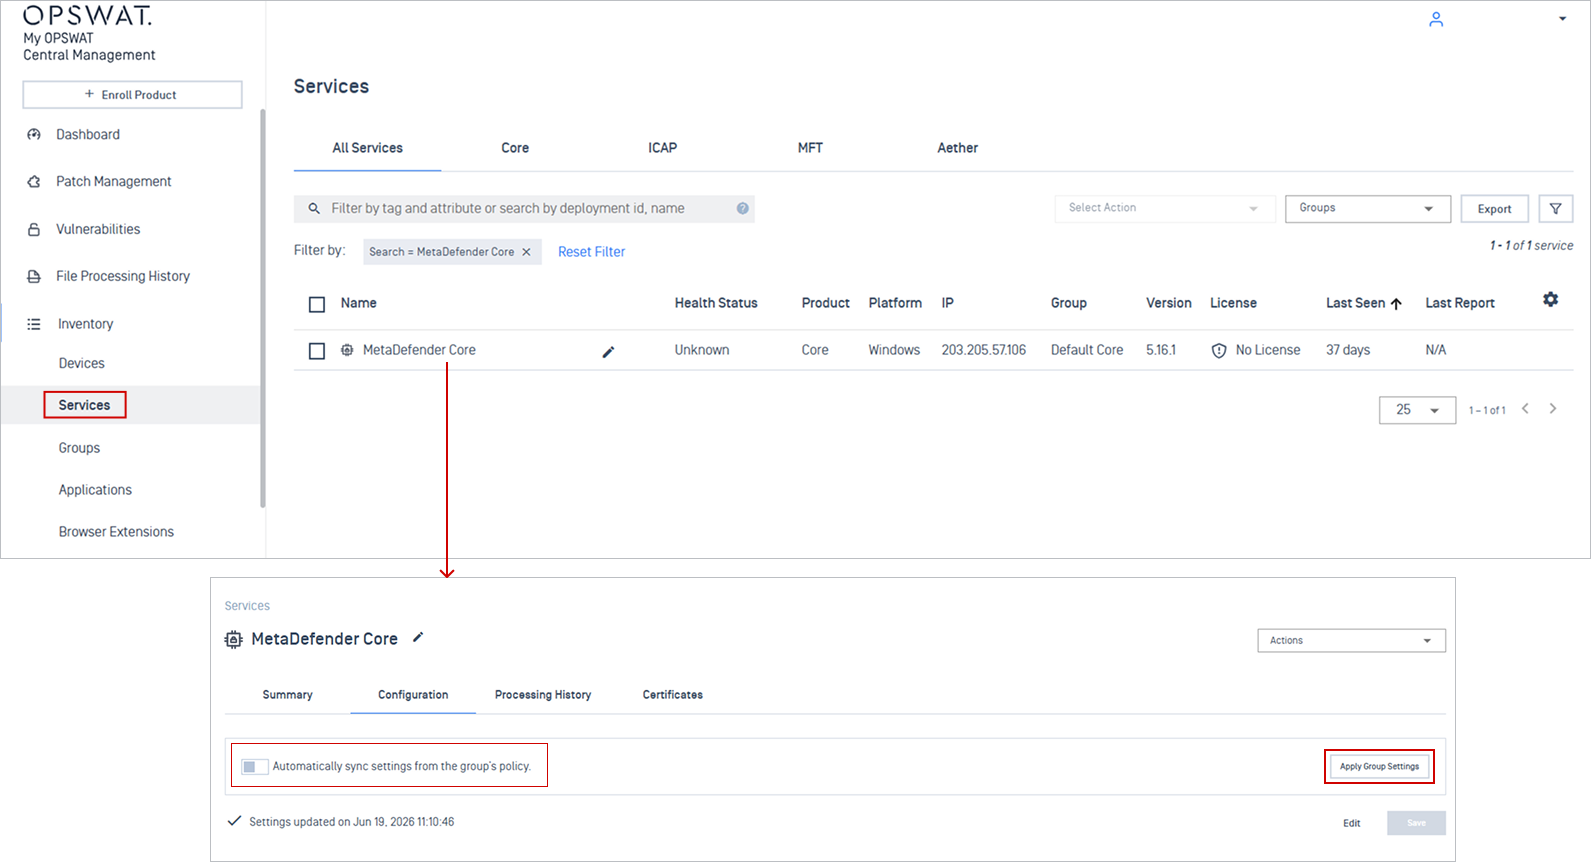
For existing Core instances in the group that do not have auto-sync enabled, you need to turn on auto-sync and apply group settings to ensure they inherit the policy and receive future updates automatically.
Navigate to Inventory > Services and click on the target Core instance.
In the Configuration tab, click Apply Group Settings to pull the policy.
Select Automatically sync settings from the group's policy to pass future policy updates to this instance automatically.
MetaDefender Kiosk K-Series
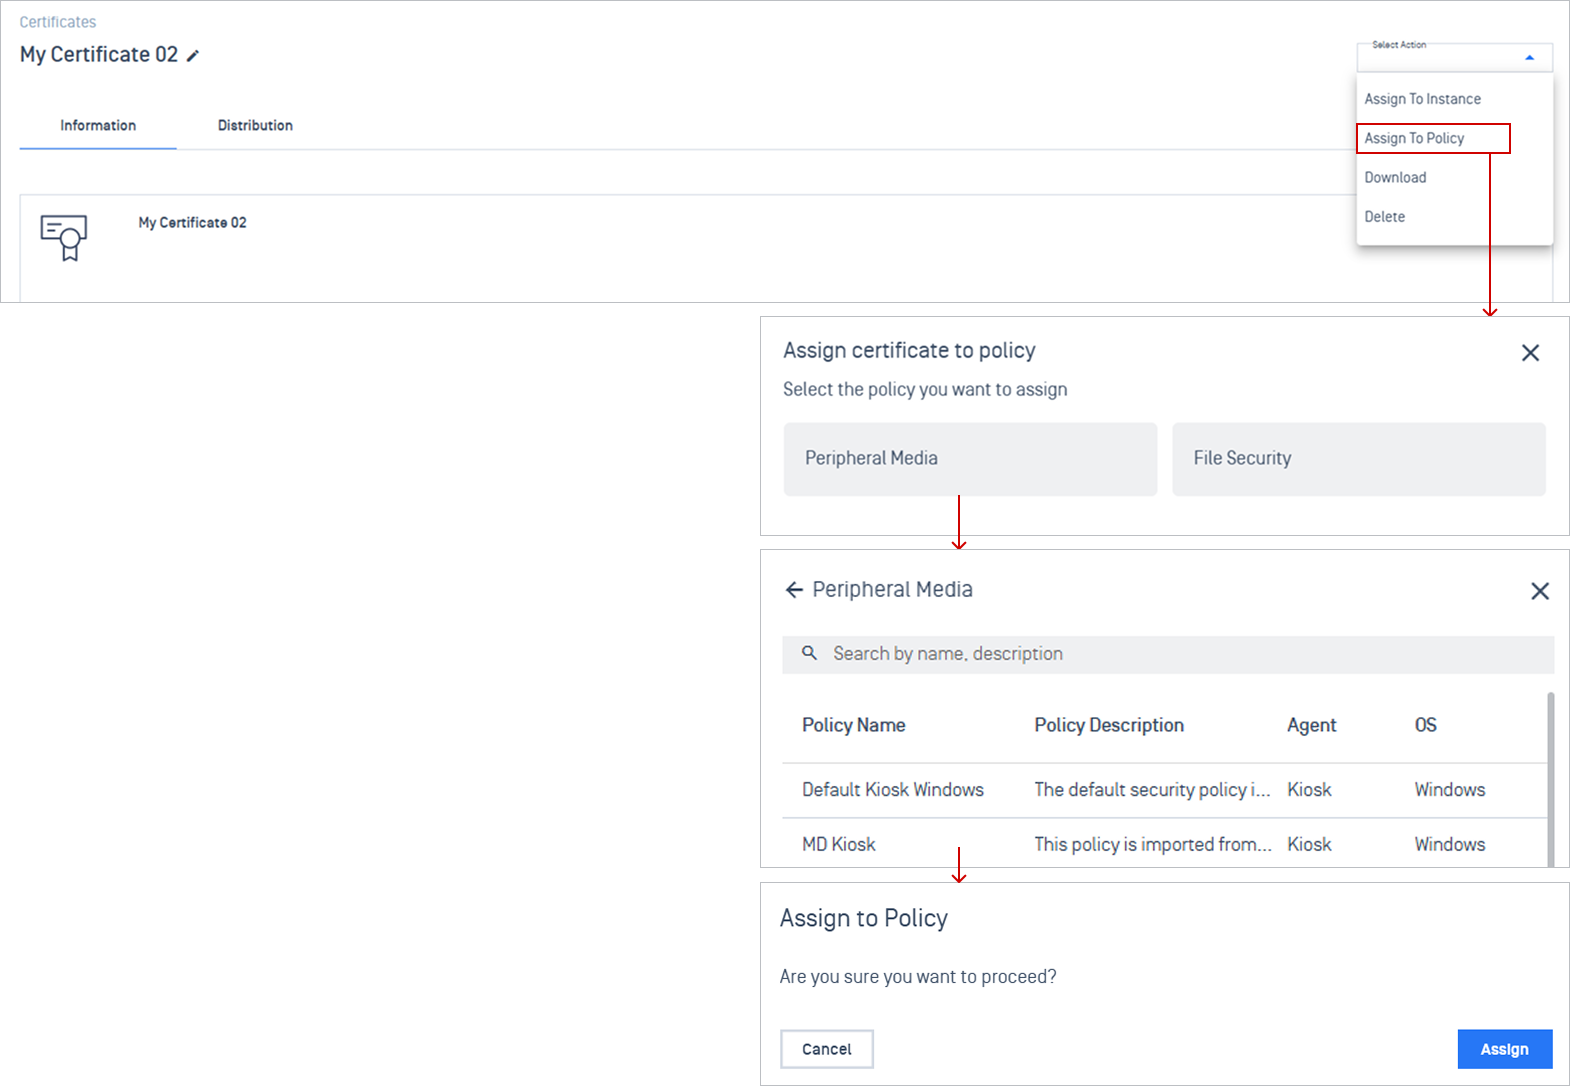
Step 1: Assign the certificate to policy
Select a certificate → Assign to Policy → choose Peripheral Media → choose your target policy name → click Assign.
Step 2: Enable HTTPS on the policy settings
Navigate to Policies > Peripheral Media, and open the policy selected in the previous step.
In the Settings tab, select Security from the dropdown menu.
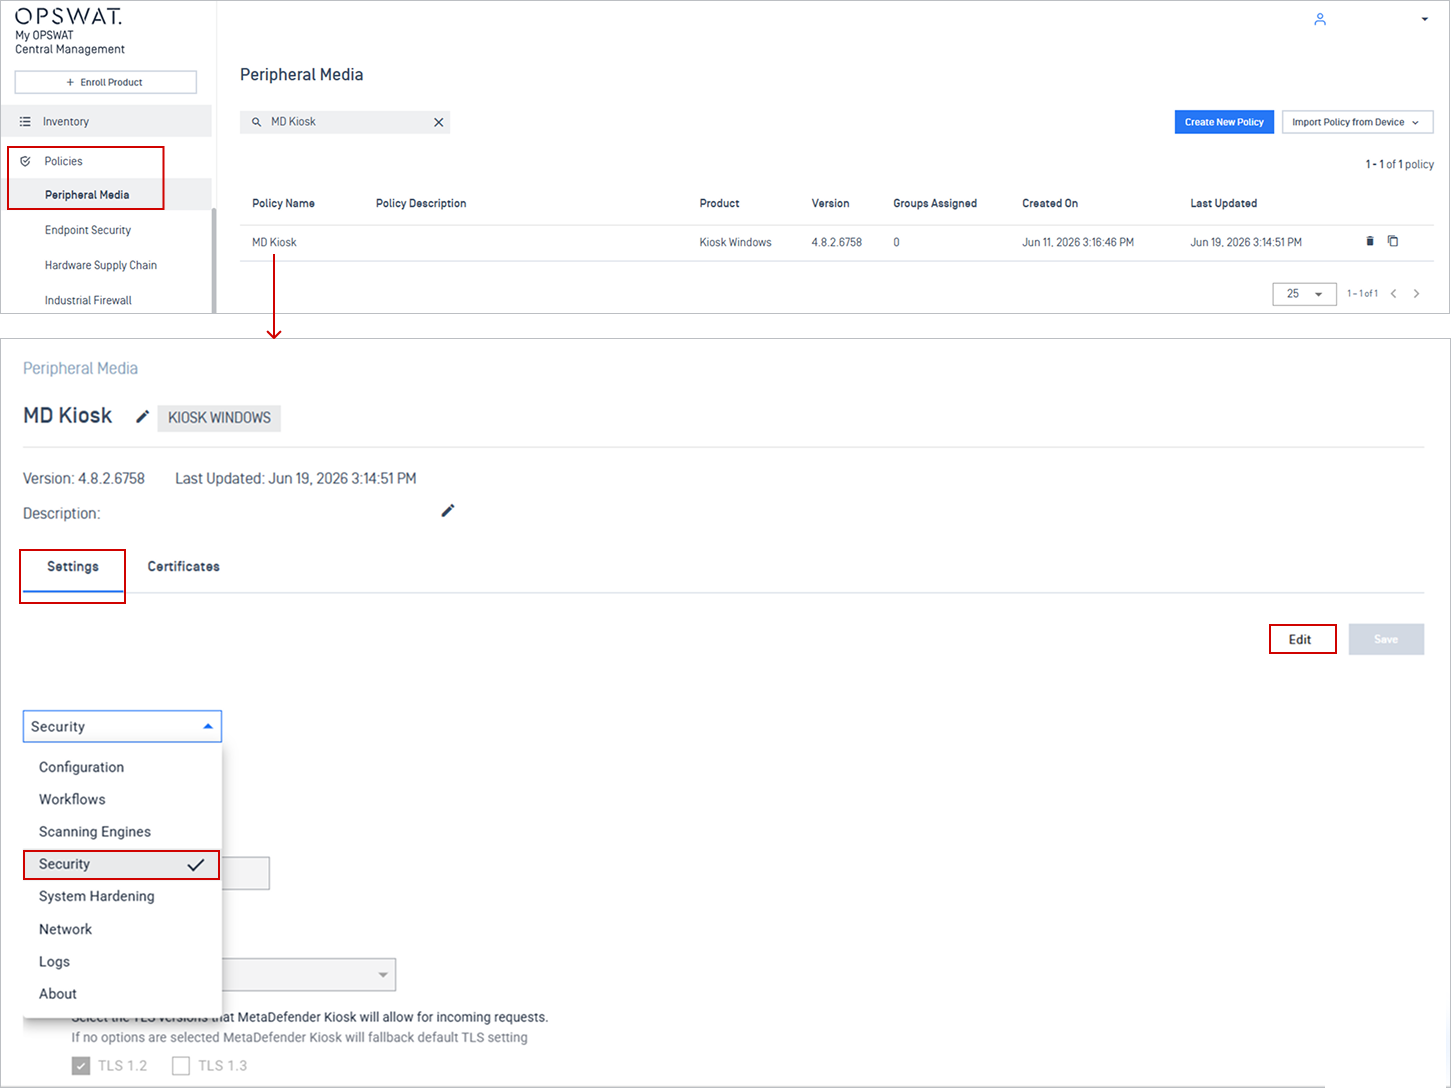
Click Edit, toggle Enable HTTPS, select your target certificate, and click Save.
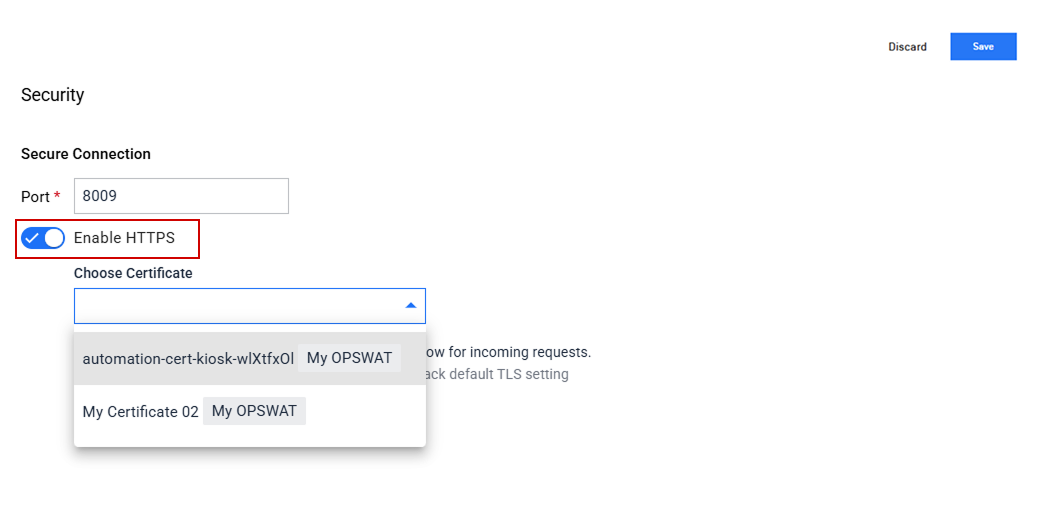
Note Only certificates listed in the policy's Certificates tab are available for selection.
Step 3: Enable group auto-sync to ensure instances stay aligned with the group policy
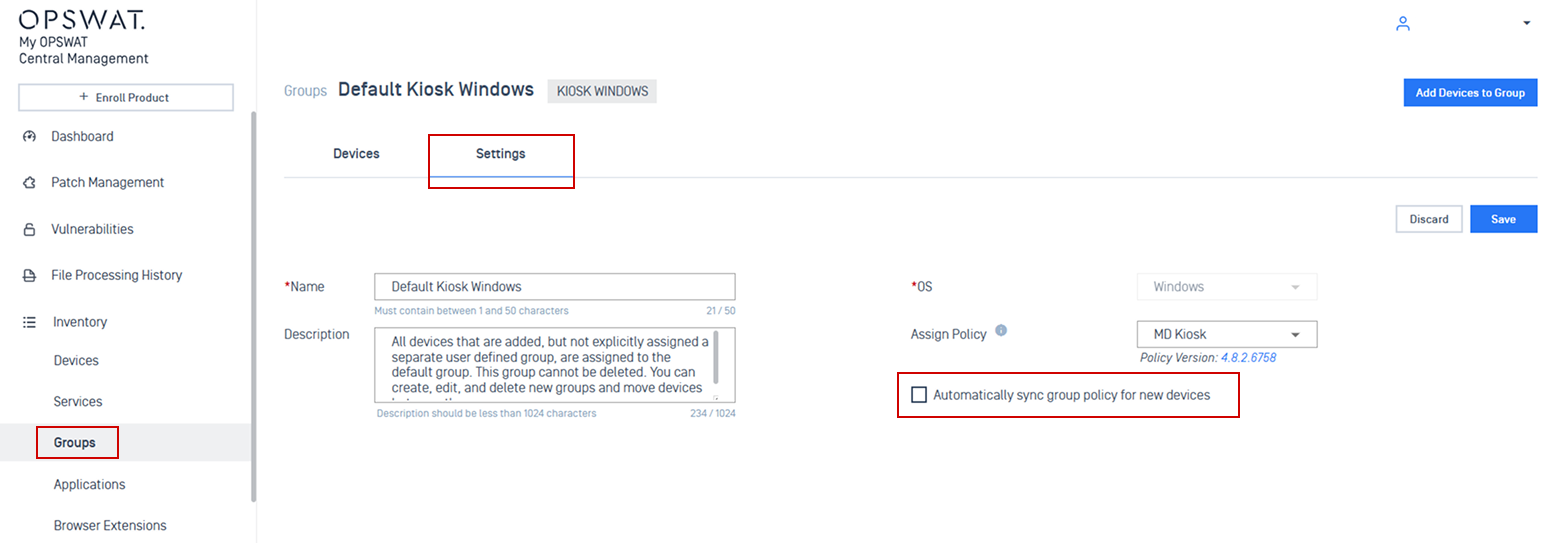
Go to Inventory → Groups, click on the group using the target policy.
In the Settings tab, enable Automatically sync group policy for new instance, then click Save. New instances added to this group inherit the certificate automatically.
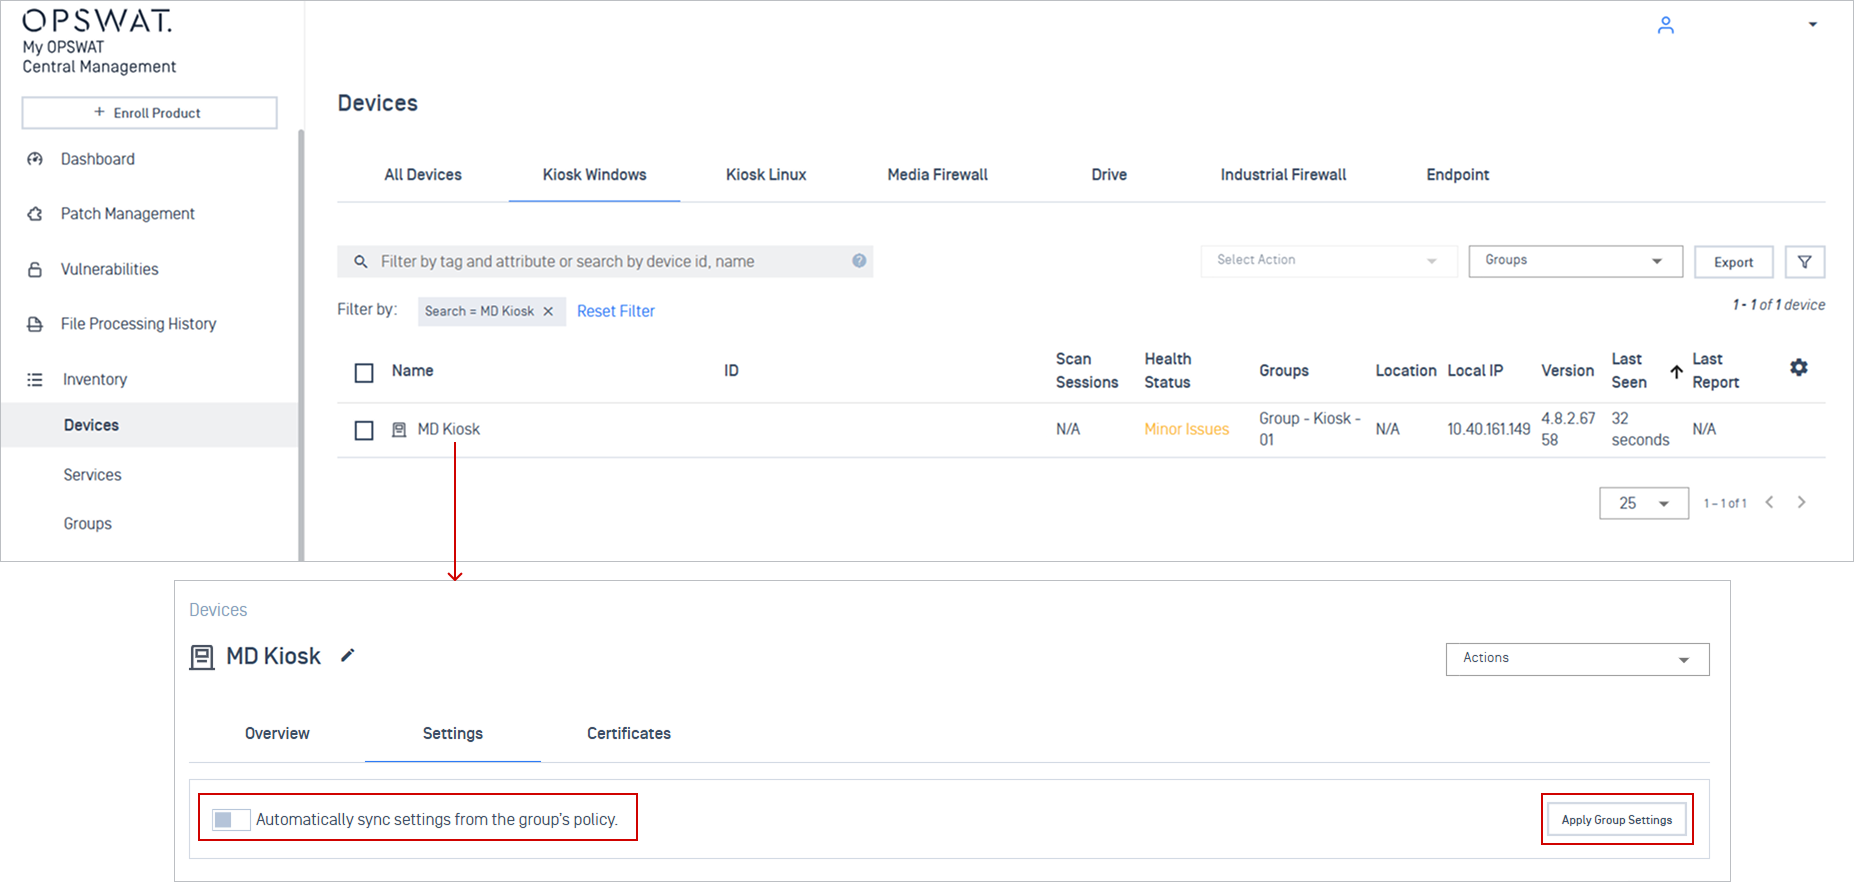
For existing Kiosk instances in the group that do not have auto-sync enabled, you need to turn on auto-sync and apply group settings to ensure they inherit the policy and receive future updates automatically.
Navigate to Inventory > Devices and click on the target Kiosk instance.
In the Settings tab, click Apply Group Settings to pull the policy.
Select Automatically sync settings from the group's policy to pass future policy changes to this instance automatically.
Unassign and Force Unassign a Certificate
When removing a certificate from an instance or policy, you have two options: Unassign and Force Unassign. Each option behaves differently and serves a different purpose.
Unassign
When choosing Unassign, My OPSWAT Central Management sends a request to the instance to remove the certificate. The status changes to Unassigning while in progress.
Once the instance confirms removal, the certificate is fully unassigned and removed from the list.
How to unassign a certificate
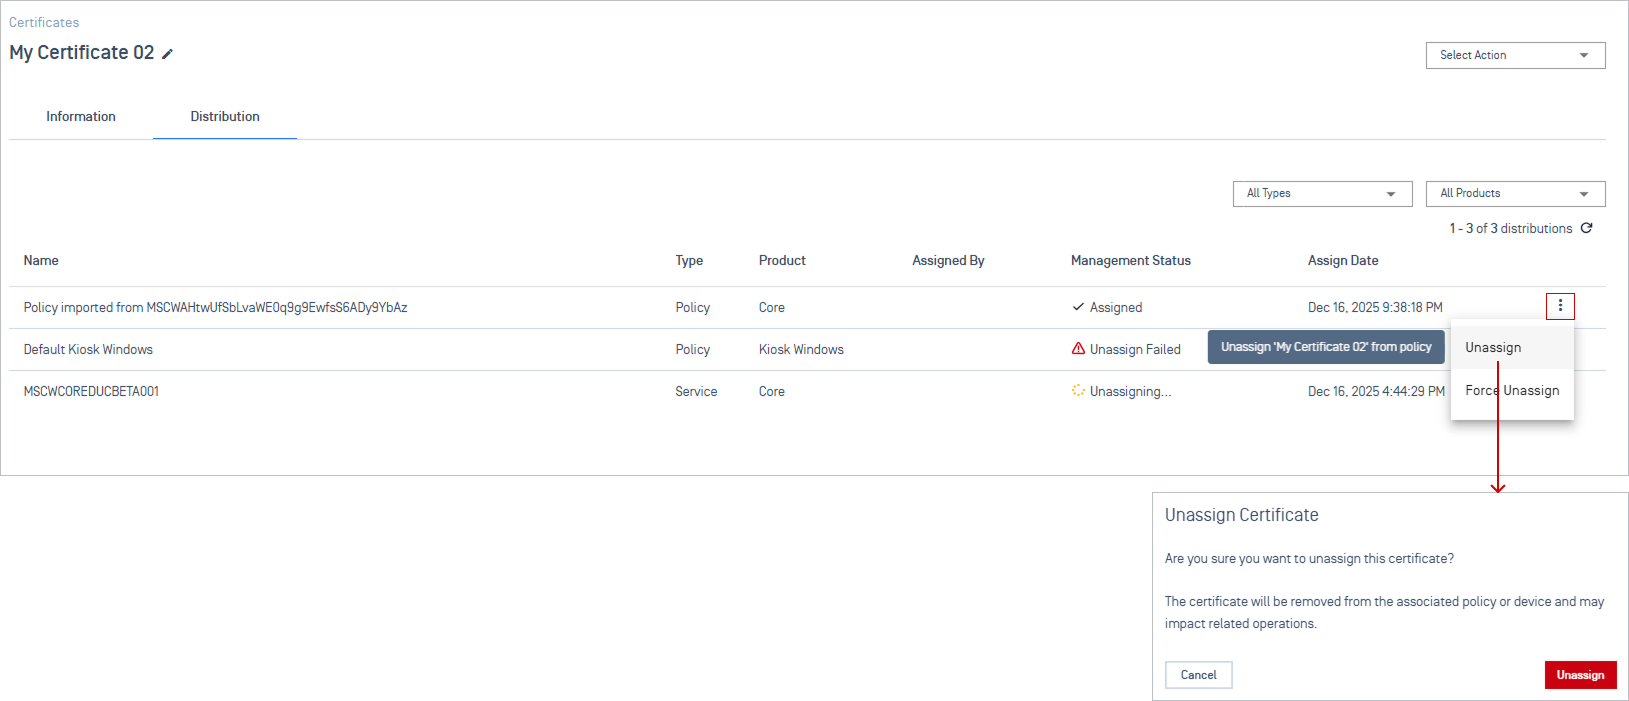
Navigate to the Certificate Details Page and select the Distribution tab.
Click the 3-dot menu and click Unassign.
Confirm the action in the prompt box.
Force Unassign
Force Unassign a certificate will immediately removes it from My OPSWAT Central Management without waiting for confirmation from the instance.
After a force unassign:
The certificate may still remain on the instance.
It is converted from a centrally managed certificate to a locally managed certificate, and will be managed directly on the product console.
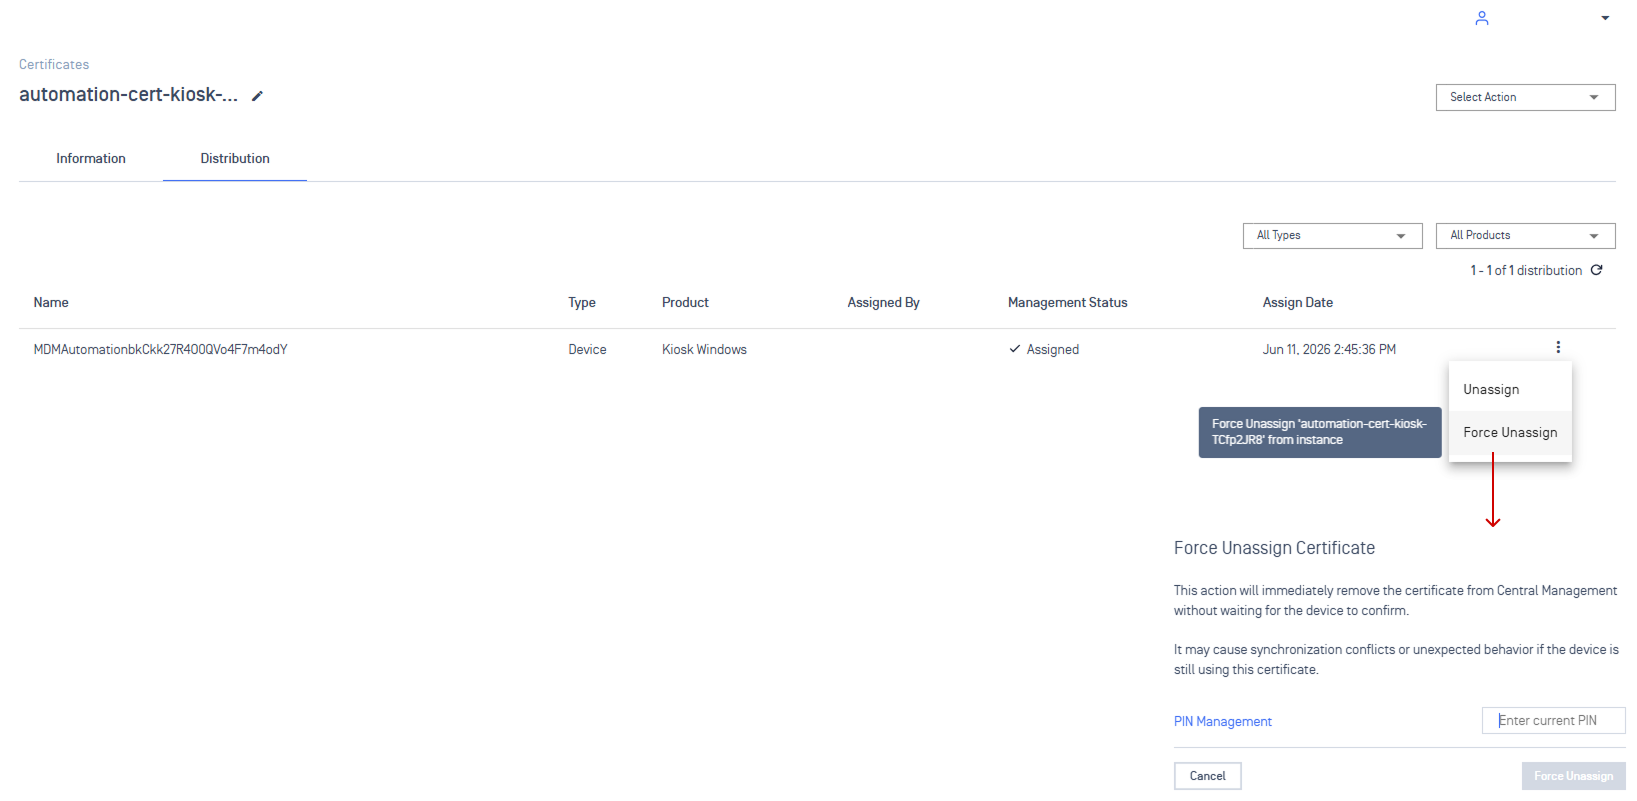
Use this option when:
The instance is unreachable or unresponsive.
The unassign process is stuck or failed.
Immediate removal is required.
Deleting a Certificate
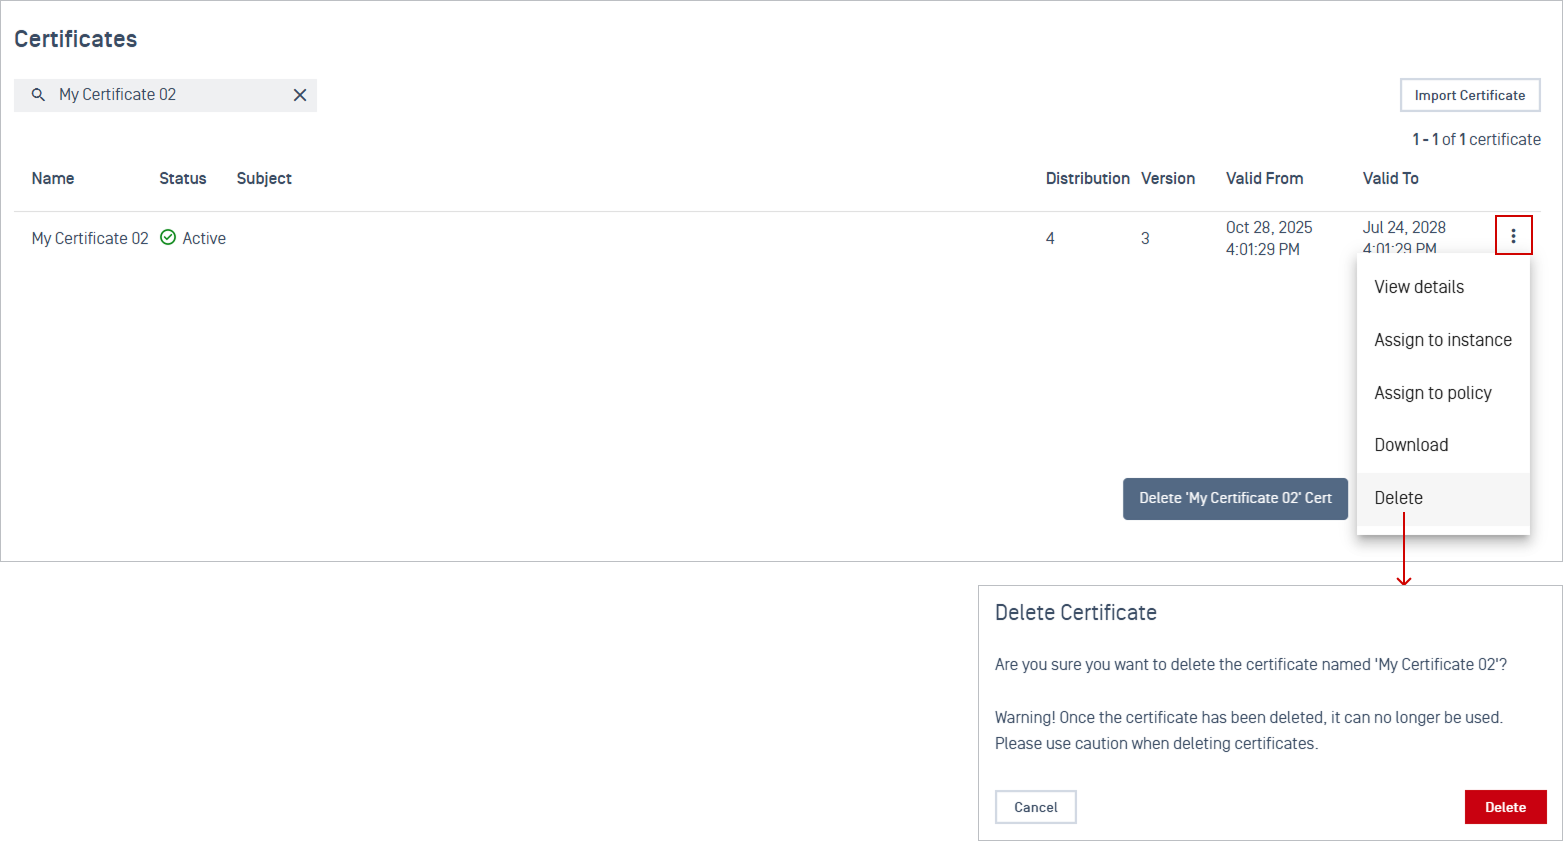
Certificates must be unassigned before deletion. If still assigned, perform Force Unassign first.
Locate the certificate you want to delete.
Click the 3-dot menu next to the certificate. Select Delete.
Confirm the deletion.
Local Certificate
Local certificates are certificates that are imported directly on the product instance, not through My OPSWAT Central Management.
These certificates can still be viewed in the instance details, but cannot be managed from central management console.
Note This function currently applies only to MetaDefender Kiosk (K-Series) and is not supported for MetaDefender Core.
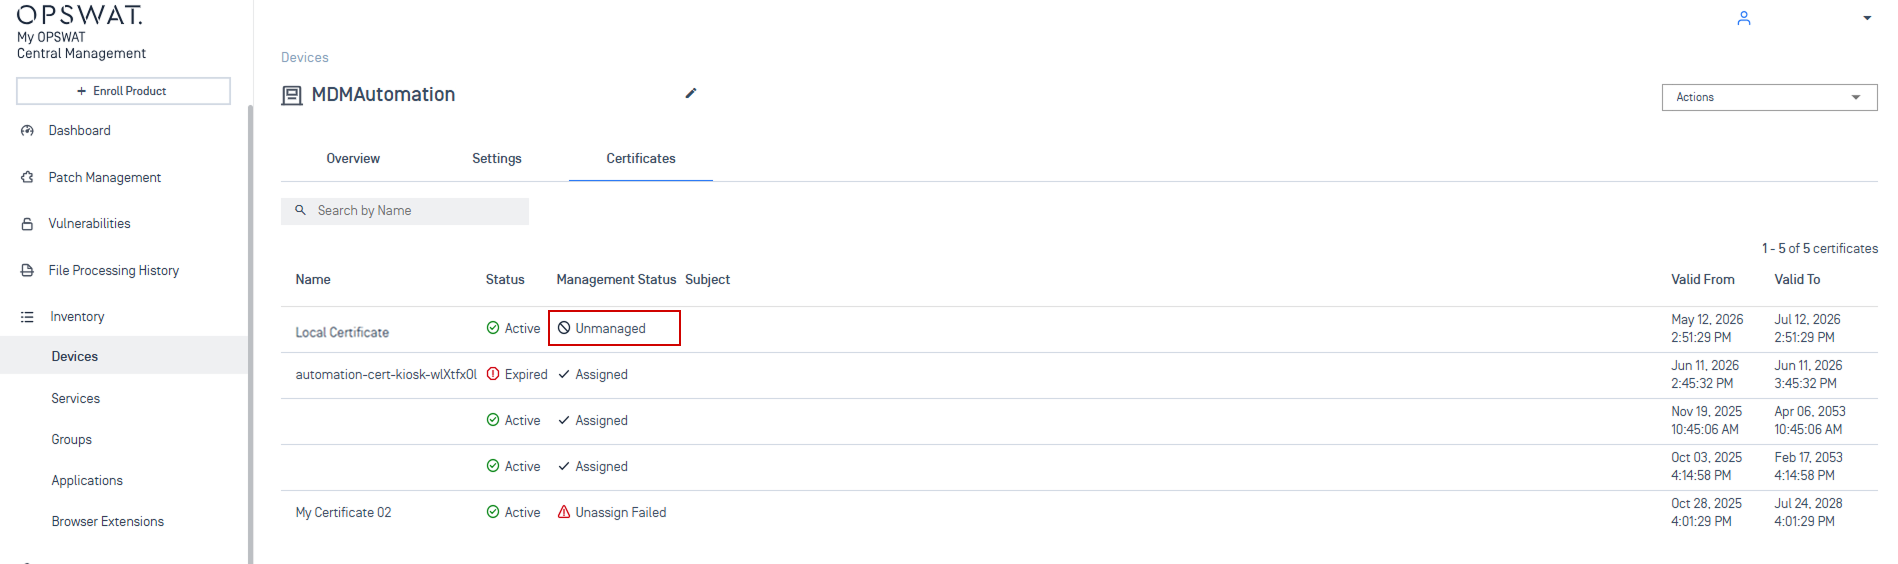
How to view local certificates
Go to Inventory → Devices.
Select the target instance to open its details.
Navigate to the Certificates tab.
Local certificates are marked with an Unmanaged status, actions such as assign, unassign, or delete are not available from the central management console.
