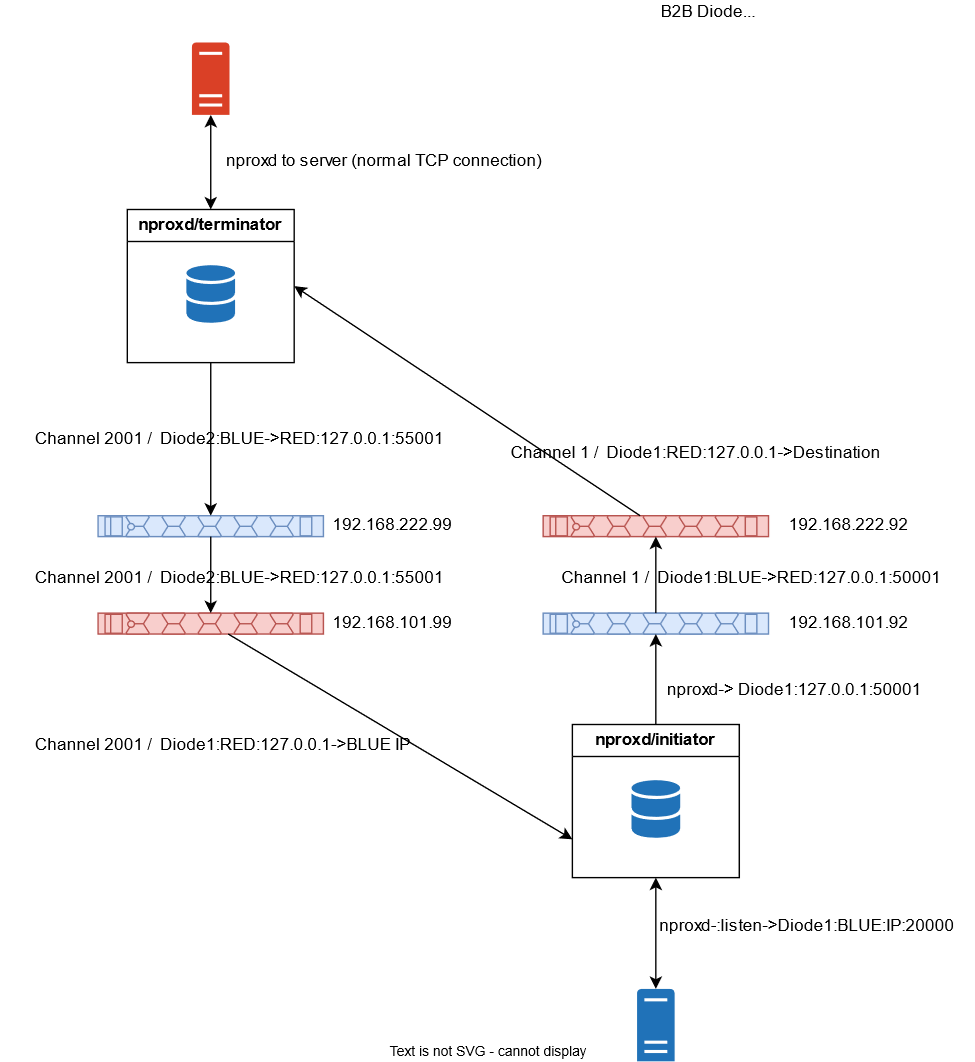
Back-to-Back MetaDefender Optical Diode requires two MetaDefender Optical Diode appliances that point in different directions. One Optical Diode is used to send data South-North and the other Optical Diode is used to send data North-South.
Two MetaDefender Optical Diodes are required to configure the Back-to-Back Mode.
The purpose of this feature is to utilize unidirectional existing TCP streams and allow any existing TCP connection to be split into ingress flow and egress flow. These flows are then routed via the appropriate MetaDefender Optical Diode in the Back-to-Back Diode set – in order to achieve normal TCP functionality.
Streams can work in two modes:
Initiator
Terminator
When in Initiator mode, it listens for incoming connections then forwards the ingress of the TCP stream to Diode 1’s BLUE configured unidirectional TCP Stream. The unidirectional TCP stream is “terminated” on the north instance of the Back-to-back Optica Diode.
Back-to-Back Diode Configuration
Go to the Advanced menu and click on Back to Back Mode. Click on the Edit button.
You will need to configure Back to Back Mode on both, BLUE and RED Servers and in both MetaDefender Optical Diodes
Fill in the following fields:
Enabled: Check box to enable Back to Back Mode.
Neighbor IP Address: Management IP Address of the diode device setting in the same network as this appliance. In our example, if we are configuring 192.168.101.92, the neighbor would be 192.168.101.99.
Allow Initiating Back to Back Connections from this Netwall: Allow MetaDefender Optical Diode users to create TCP/UDP Back to Back Streams that initiate the connection (called Initiator) from the MetaDefender Optical Diode. Both BLUE and RED sides need to have this enabled.
Network: Select the network of the current MetaDefender Optical Diode and the defined neighbor.
Click on Submit button and repeat the same steps in the rest of MetaDefender Optical Diode appliances.
Configuring Initiator
Once Back to Back Mode has been enabled and Neighbor IP Address is defined, the Initiator and Terminator Stream will be configured correctly.
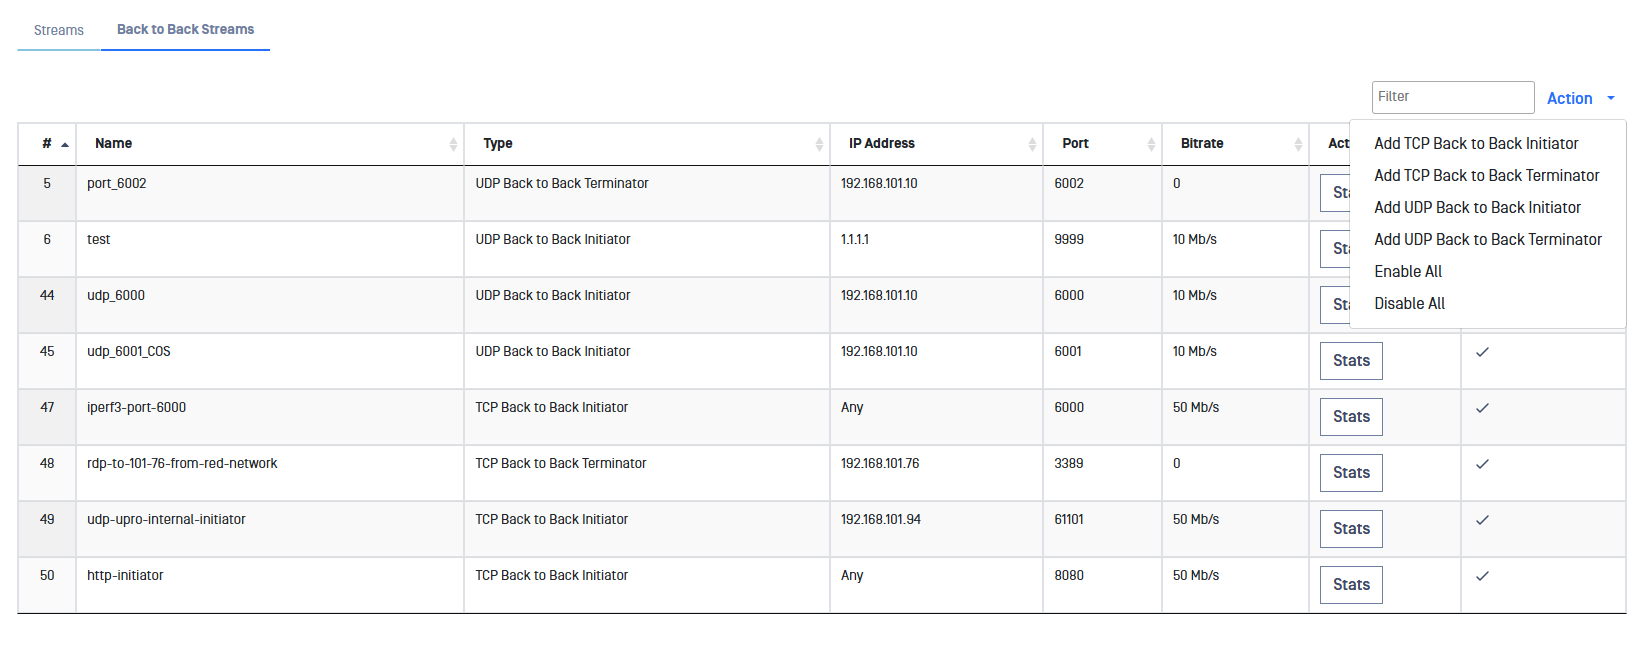
When enabling Back to Back Mode, a new tab appears in the Streams section.
When a user defines an Initiator Stream, it will listen for incoming connections and split the single inbound connection into two streams, both bound to/from different MetaDefender Optical Diode instances.
A Terminator Stream will listen for incoming connection on the internal MetaDefender Optical Diode port and join the two streams between the correlated Back-to-Back MetaDefender Optical Diode instances – then send the normal TCP flow upstream to the designated server.
When an Initiator Stream is created, it needs to be configured on both BLUE and RED.
When a Terminator Stream is created, it needs to be configured on both BLUE and RED.
To configure an Initiator, go to Streams and click on the Back to Back Streams tab, click on Action and select Add TCP Back to Back Initiator or Add UDP Back to Back Initiator, then configure the Stream parameters.
MetaDefender Optical Diode BLUE Configuration
Complete the following:
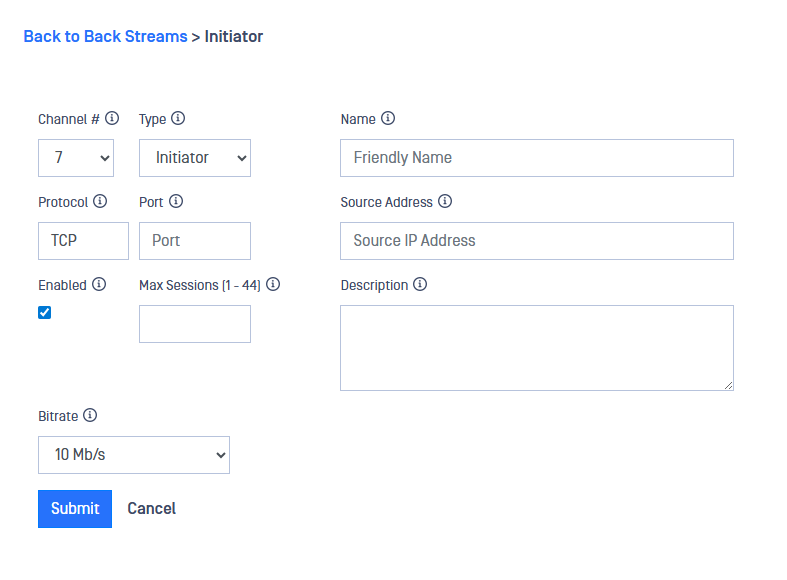
Channel: Choose a channel number.
The channel number needs to be the same on both Optical Diodes as well as the BLUE and RED sides.
Type: Type of stream being tracked. For adding an Initiator, this value will be preselected.
Name: Name of the stream
Protocol: select TCP or UDP depending on the stream you want to create. The value will be preselected depending on user's selection.
Source port: Port number of the source IP.
Source addresses: IP address(es) in the BLUE zone where the stream will originate. If you are entering more than one address, separate the addresses with a semicolon.
Enabled: checkbox to enable/disable the stream.
Max Sessions: Maximum number of sessions for the stream
Bitrate: Maximum bitrate that BLUE side will reach for this stream. Users would need to tune this bitrate to avoid overload in the RED side.
Description: user-friendly description.
MetaDefender Optical Diode RED Configuration
Complete the following:
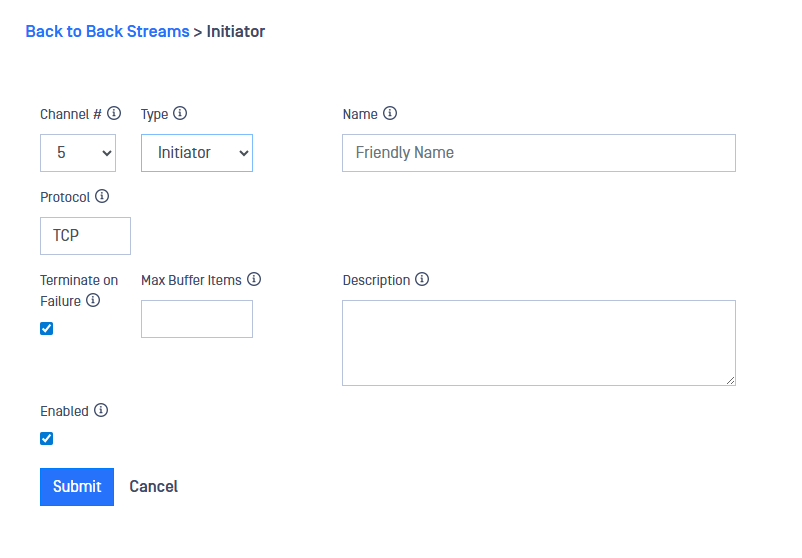
Channel: Choose a channel number.
The channel number needs to be the same on both Optical Diodes as well as the BLUE and RED sides.
Type: Type of stream being tracked. For adding an Initiator, this value will be preselected.
Name: Name of the stream
Protocol: select TCP or UDP depending on the stream you want to create. The value will be preselected depending on user's selection.
Enabled: checkbox to enable/disable the stream.
Max Buffer Items: select the size of the buffer items queued on RED. For high speed streams, a larger buffer is preferred in order to avoid data overruns. Please, note that buffering data consumes memory.
Terminate on Failure: This checkbox controls what happens in the event of data overrun. When the box is checked, the relevant connection on RED will be closed, all data buffers discarded and a new connection re-opened to allow for synchronization recovery. If left unchecked, the relevant connection remains intact and communication continues after the data buffers have been discarded.
Description: user-friendly description.
Configuring Terminator
To configure a Terminator go to Streams and click on the Back to Back Streams tab, click on Action and select Add TCP Back to Back Terminator or Add UDP Back to Back Terminator, then configure the Stream parameters.
MetaDefender Optical Diode BLUE Configuration
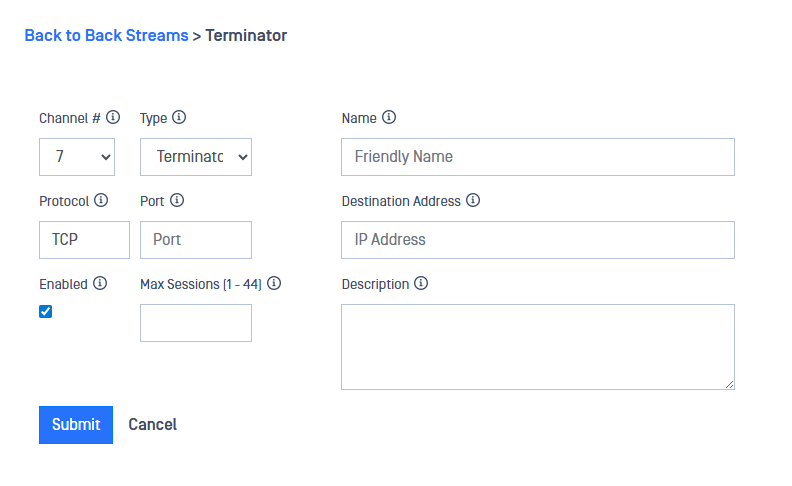
Complete the following:
Channel: Choose a channel number.
The channel number needs to be the same on both Optical Diodes as well as the BLUE and RED sides.
Type: Type of stream being tracked. For adding a Terminator, this value will be preselected.
Name: Name of the stream.
Protocol: select TCP or UDP depending on the stream you want to create. The value will be preselected depending on user's selection.
Source port: Port number of the source IP.
Source addresses: IP address(es) in the BLUE zone where the stream will originate. If you are entering more than one address, separate the addresses with a semicolon.
Enabled: checkbox to enable/disable the stream.
Max Sessions: Maximum number of sessions for the stream.
Description: user-friendly description.
MetaDefender Optical Diode RED Configuration
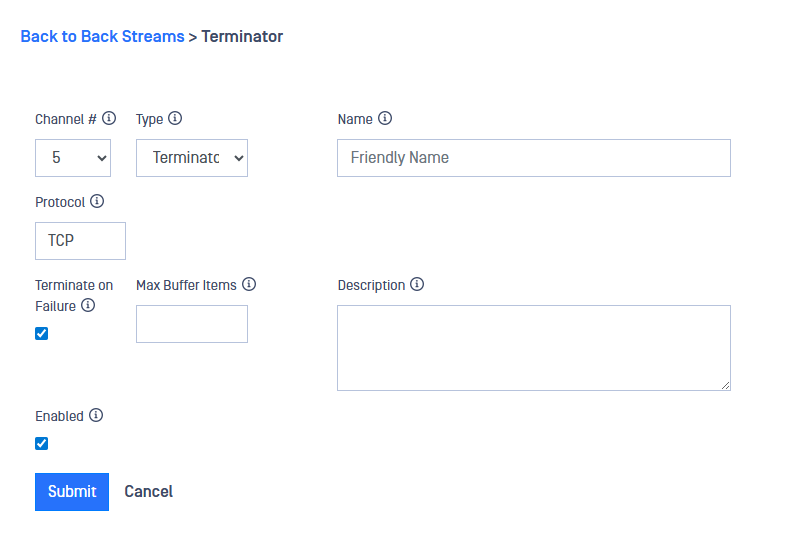
Complete the following:
Channel: Choose a channel number.
The channel number needs to be the same on both Optical Diodes as well as the BLUE and RED sides.
Type: Type of stream being tracked. For adding a Terminator, this value will be preselected.
Name: Name of the stream
Protocol: select TCP or UDP depending on the stream you want to create. The value will be preselected depending on user's selection.
Enabled: checkbox to enable/disable the stream.
Max Buffer Items: select the size of the buffer items queued on RED. For high speed streams, a larger buffer is preferred in order to avoid data overruns. Please, note that buffering data consumes memory.
Terminate on Failure: This checkbox controls what happens in the event of data overrun. When the box is checked, the relevant connection on RED will be closed, all data buffers discarded and a new connection re-opened to allow for synchronization recovery. If left unchecked, the relevant connection remains intact and communication continues after the data buffers have been discarded.
Description: user-friendly description.