The PI to PI (PI2PI) system extracts values from one or more PI systems in the source (BLUE) domain and stores those values on a designated PI system in the destination (RED) domain. It is designed to operate using the MetaDefender Security Gateway.
The PI2PI system also performs historical backfill. Historical backfill alleviates any gaps in archive data on the destination PI system.
Installation Prerequistes
It is recommended to install the OPSWAT NetWall AVEVA PI Service either on the PI server itself or on an API node that is on a network local to the PI server. This will eliminate any delays that could be caused by increased latency if the OPSWAT NetWall AVEVA PI Service were to be located on a remote network with limited bandwidth.
The OPSWAT NetWall AVEVA PI Service software has been tested on Windows 10, Windows 11, Windows Server 2012 R2, Windows Server 2019 and Windows Server 2022.
The OPSWAT NetWall AVEVA PI Service uses the PI Asset Framework SDK. The PI AF Client must be installed on the machine where the OPSWAT NetWall AVEVA PI Service is to be installed. The following versions of the AF SDK have been tested:
PI-AF-Cient_2023_.exe
PI-AF-Client_2018-SP3-Patch-5_.exe
PI-AF-Client_2018-SP3-Patch-3_.exe
Note that older versions of PI (3.4.390) can be read by the OPSWAT PI Software but cannot be written to. If an older version of PI is to be used as the source (BLUE) database, you must create a separate API node and install the AF SDK and the OPSWAT NetWall AVEVA PI Service. You can then either create a PI trust or create a PI mapping to access the data in the PI database from the API node.
Pi Collectives
OPSWAT NetWall PI Replication system supports Pi Collectives.
Two or more PI databases can be configured as a redundant set. This redundant set is called a Collective. The Collective is normally created in a specified domain, and each PI database is operating on a computer that is a member of that domain. Every collective has a Primary PI Database member, and one or more secondary PI Database members.
PI2PI
OPSWAT PI2PI-Blue Service
OPSWAT NetWall AVEVA PI Service (BLUE) needs to be installed on each PI server of interest on the BLUE network. It operates as a Windows Service, configuration for the PI2PI system is done using the OPSWAT Web interface on Blue and the OPSWAT Web interface on Red. There is no user interface on the Windows machines. OPSWAT NetWall AVEVA PI Service (BLUE) service can be loaded either on the PI server itself or on another Windows machine that has the PI SDK installed and has a trusted relationship with the PI Server. To correctly install it, follow the instructions:
Double click on the msi file that OPSWAT will provide OPSWAT NetWall AVEVA PI Service (BLUE) and click Next.
Fill in the IP address and port for listening for the configuration and click Next. Tipically, this IP will be the IP of MetaDefender Security Gateway BLUE.
Click finish button to exit the Setup.
MetaDefender Security Gateway BLUE
To configure AVEVA PI Connector, a security dongle should be inserted in the BLUE server.
Login into MetaDefender Security Gateway BLUE.
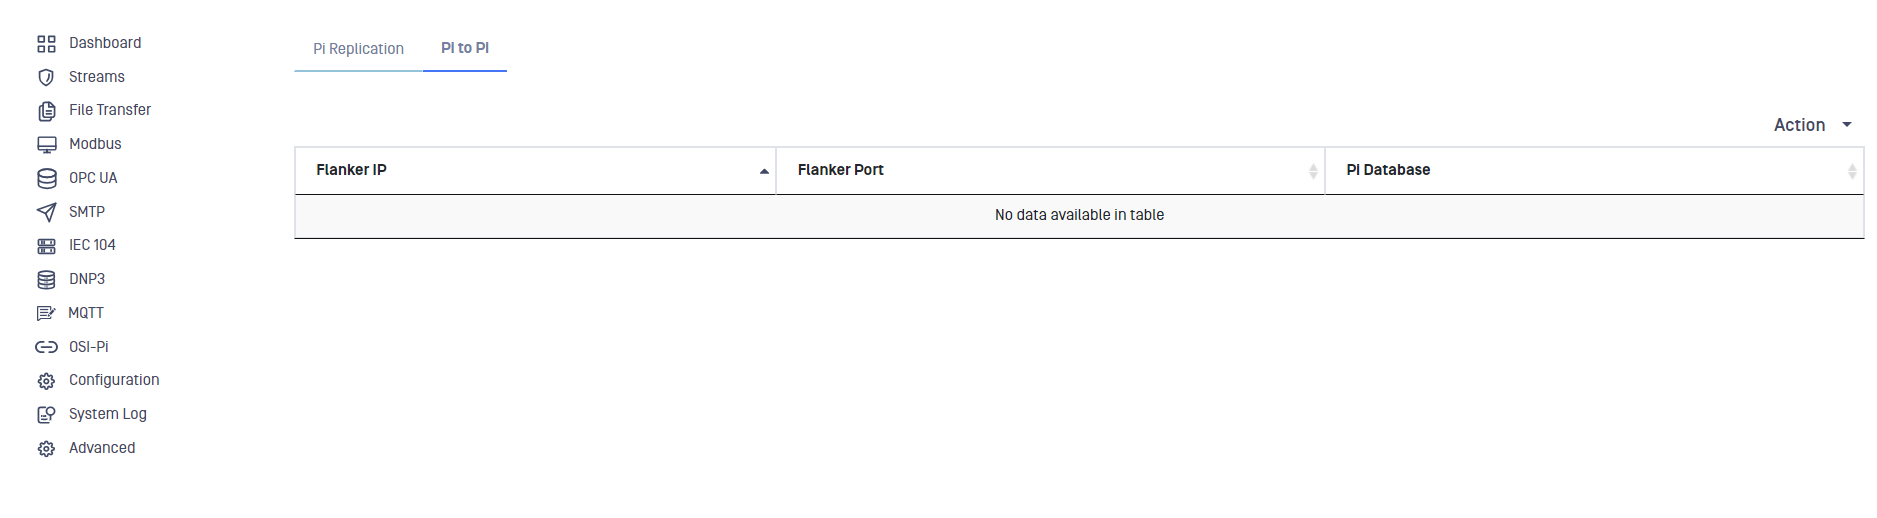
Go to AVEVA PI menu, select Pi to PI label, deploy Action button and select Add Client.
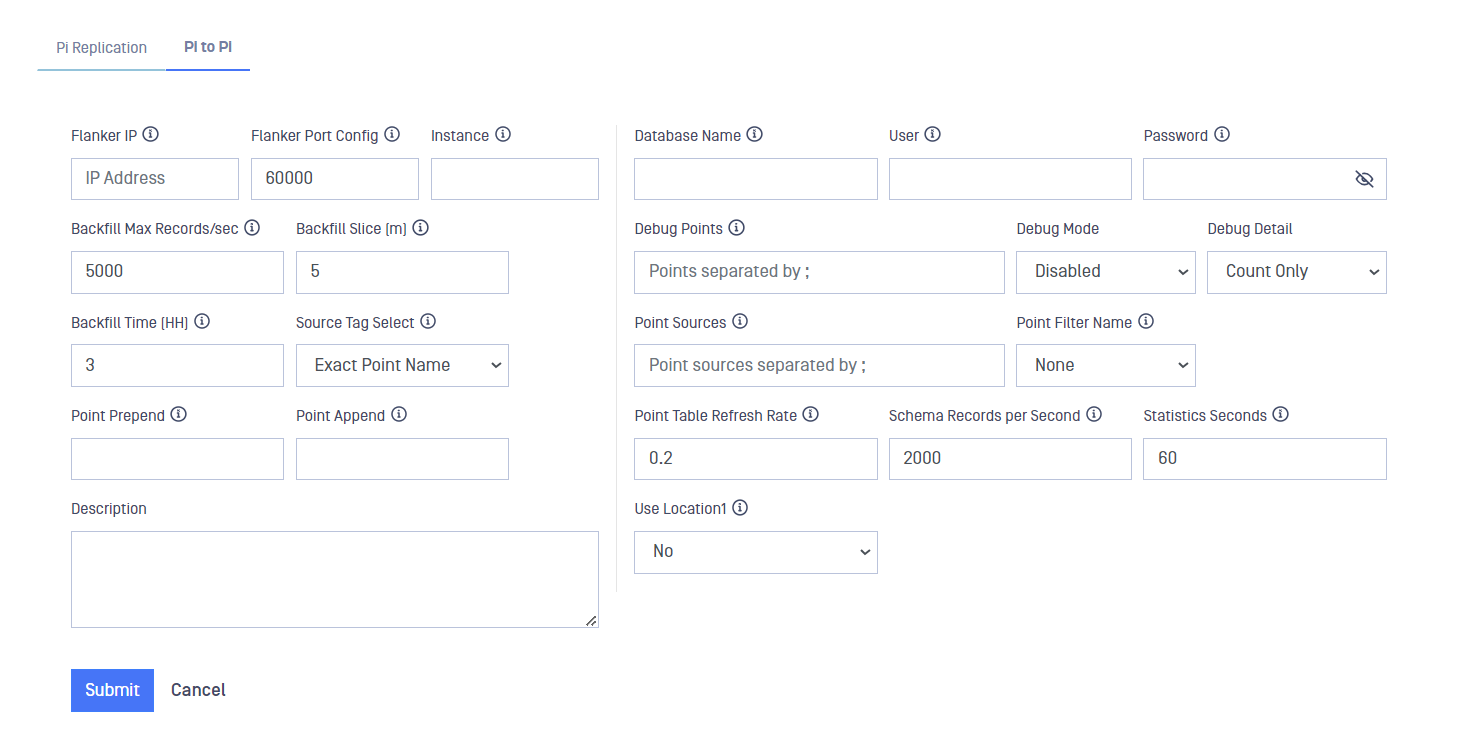
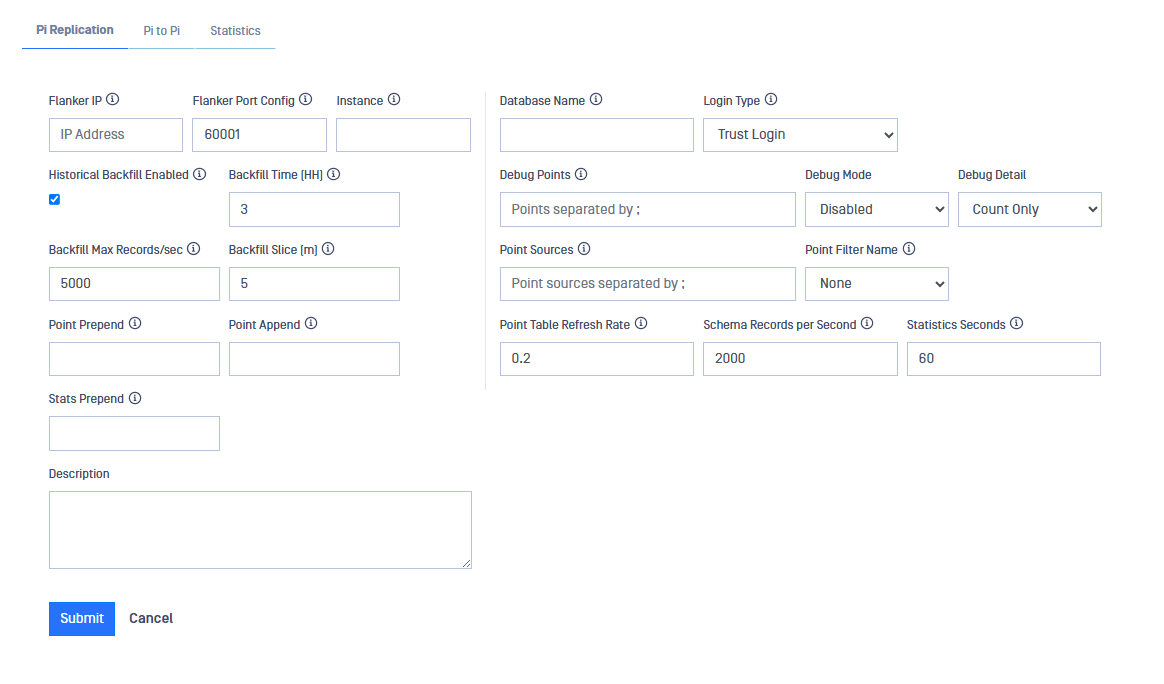
Type values in the following boxes:
Flanker IP: IP address of the Blue Windows Machine.
Flanker Port Config: Port number the Blue Windows Machine is listening on for Config.
Instance: The Interface Instance number to be used at red. Must be a positive integer.
Backfill Max Records/sec: Max values per second to extract during backfill (range: 1000-20000).
Backfill Slice (m): The number of minutes to read for each History Backfill retrieval (range: 1-60).
Point Prepend: Prepend the string indicated here to each Pi point. The maximum length for the string is 20 chars (lowercase, uppercase, numbers, dash and undescore are allowed characters).
Stats Prepend: If this field is not empty, then the structure of the PI tags used to publish the statistics will be: opswat_blue_{stats prepend value}_{PI tag name}. If this field is empty, then the interface instance is used instead of stats prepend value.
Source Tag Select: Dropdown list where the user can select between Exact Tag Name, Instrument Tag, ExDesc and UserInt1.
Backfill Time (HH): How far back in time to go for historical backfill (range: 0.5-168, values with more than two decimals will be rounded).
Database Name : Windows Network Name of the PI server.
User: PI Username (blank: use trusted connection).
Password: PI Password (blank: use trusted connection).
Debug Points: Points for debugging, separated by semicolon ';'. Maximum 10 points.
Debug Mode: User can select the debug mode using this dropdown list. User can select between Disabled, All, Snapshot only and History only.
Debug Detail: User can select the debug detail using this dropdown list. User can select between Count only and List History values.
Point Sources: One or more PI point sources, separated with semicolon ';'.
Point Filter Name: User can assign a Pi field to use for additional point filtering in BLUE. "None" means no filter.
Point Table Refresh Rate: Rate in hours for transmitting the PI Point Table. Range is from 0.2 to 2.
Schema Records per Second: Maximun number of Schema records to transmit per second (default value is 2000, range is from 1000 to 5000).
Statistics Seconds: Statistics frequency in seconds. If the value is 0, no statistics are printed (range: 5-3600).
Use Location1: If 'Yes' is selected, Location1 on Red must match Instance.
Description: user-friendly description for the defined Client.
Click on Submit button to save the changes.
OPSWAT PI2PI-Red Service
OPSWAT NetWall AVEVA PI service (RED) needs to be installed on the PI server on the RED network. It operates as a Windows Service, configuration for the Pi2PI system is done using the OPSWAT Web interface on Blue and the OPSWAT Web interface on Red. There is no user interface on the Windows machines. OPSWAT NetWall AVEVA PI service (RED) service can be loaded either on the PI server itself or on another Windows machine that has the PI SDK installed and has a trusted relationship with the PI Server. To correctly install it, follow the instructions:
double click on the msi file that OPSWAT will provide OPSWAT NetWall AVEVA PI Service (RED) and click Next.
Fill in the IP address and port for listening for the configuration and click Next. Tipically, this IP will be the IP of MetaDefender Security Gateway RED.
Click finish button to exit the Setup.
MetaDefender Security Gateway RED
To configure AVEVA PI Connector, a security dongle should be inserted in the RED server
Login into MetaDefender Security Gateway RED.
Go to AVEVA PI menu and click on Edit button. Notice that only one AVEVA PI Client can be configured in MetaDefender Security Gateway RED.
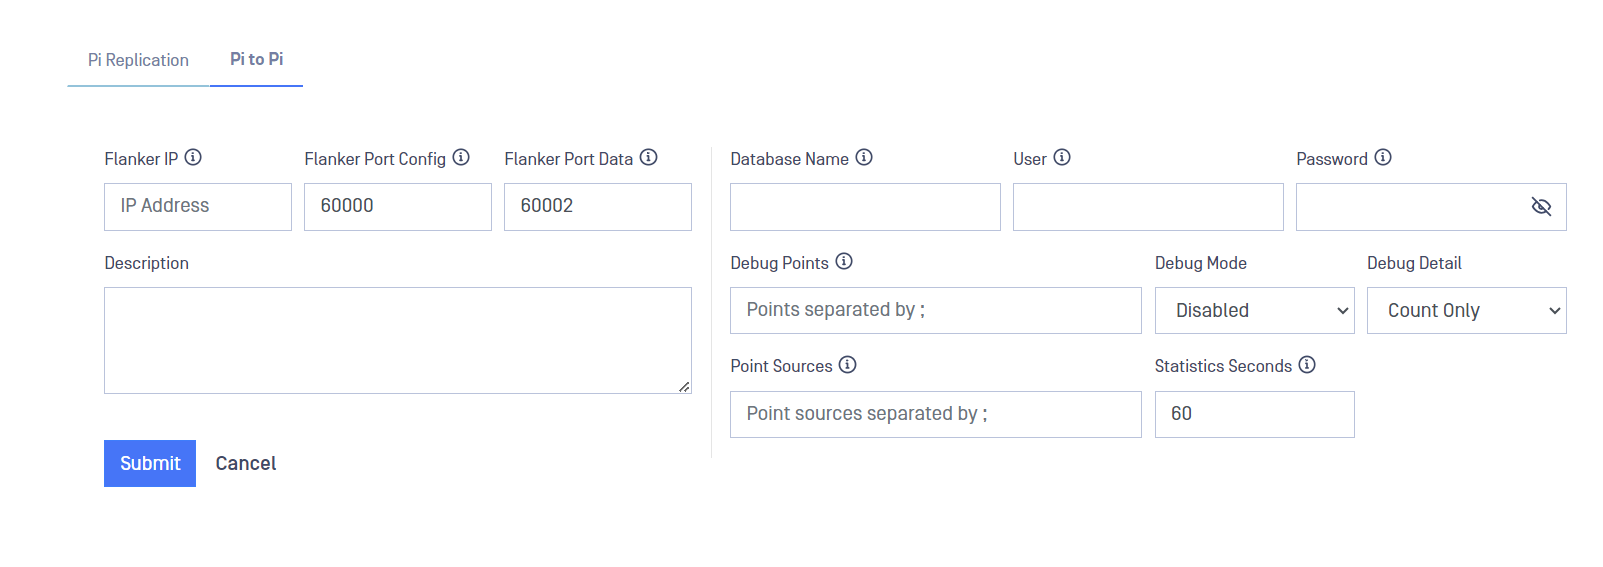
Type values in the following boxes:
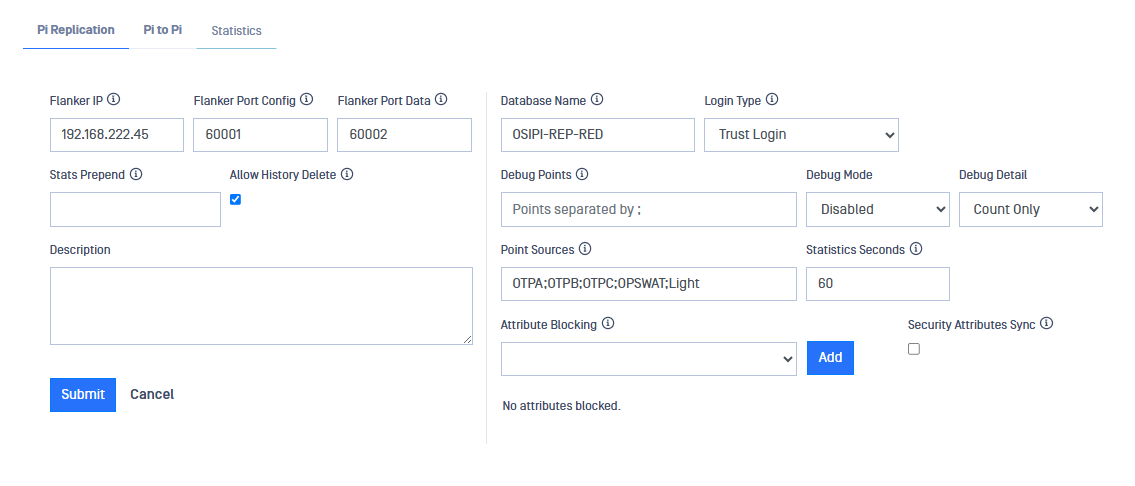
Flanker IP: IP address of the Windows Machine in the BLUE network acting as flanker.
Flanker Port Config: Port number where the flanker defined will listen on for configuration.
Flanker Port Data: Port number where the defined flanker will listen on for data transmission.
Stats Prepend: If this field is not empty, then the structure of the PI tags used to publish the statistics will be: opswat_blue_{stats prepend value}_{PI tag name}. If this field is empty, then the interface instance is used instead of stats prepend value.
Database Name: PI Server name within the Windows Network.
User: PI username (leave it blank for using a trusted connection).
Password: PI password (leave it blank for using a trusted connection).
Point Sources: User can include here one or more Pi point souces seperated with semicolon.
Debug Points: A maximum number of 10 debugging points can be configured including them in this field separated by semicolon ';'.
Debug Mode: User can select the debug mode using this dropdown list. User can select between Disabled, All, Snapshot only and History only.
Debug details: User can select the debug detail using this dropdown list. User can select between Count only and List History values.
Statistics Seconds: Statistics frequency in seconds. If the value is 0, no statistics are displayed.
Description: User-friendly description field for the created client.
Click on Submit button to save the changes.
PI Database Replication
OPSWAT NetWall AVEVA PI DB replication Service (BLUE)
OPSWAT NetWall AVEVA PI DB replication service (BLUE) needs to be installed on each PI server of interest on the BLUE network. It operates as a Windows Service, configuration for the DB Replication system is done using the OPSWAT Web interface on Blue and the OPSWAT Web interface on Red. There is no user interface on the Windows machines. OPSWAT NetWall AVEVA PI DB replication service (BLUE) service can be loaded either on the PI server itself or on another Windows machine that has the PI SDK installed and has a trusted relationship with the PI Server. To correctly install it, follow the instructions:
Double click on the msi file that OPSWAT will provide OPSWAT NetWall AVEVA PI replication Service (BLUE) and click Next.
Fill in the IP address and port for listening for the configuration and click Next. Tipically, this IP will be the IP of MetaDefender Security Gateway BLUE.
MetaDefender Security Gateway BLUE
To configure AVEVA PI Connector, a security dongle should be inserted in the BLUE server.
Login into MetaDefender Security Gateway BLUE.
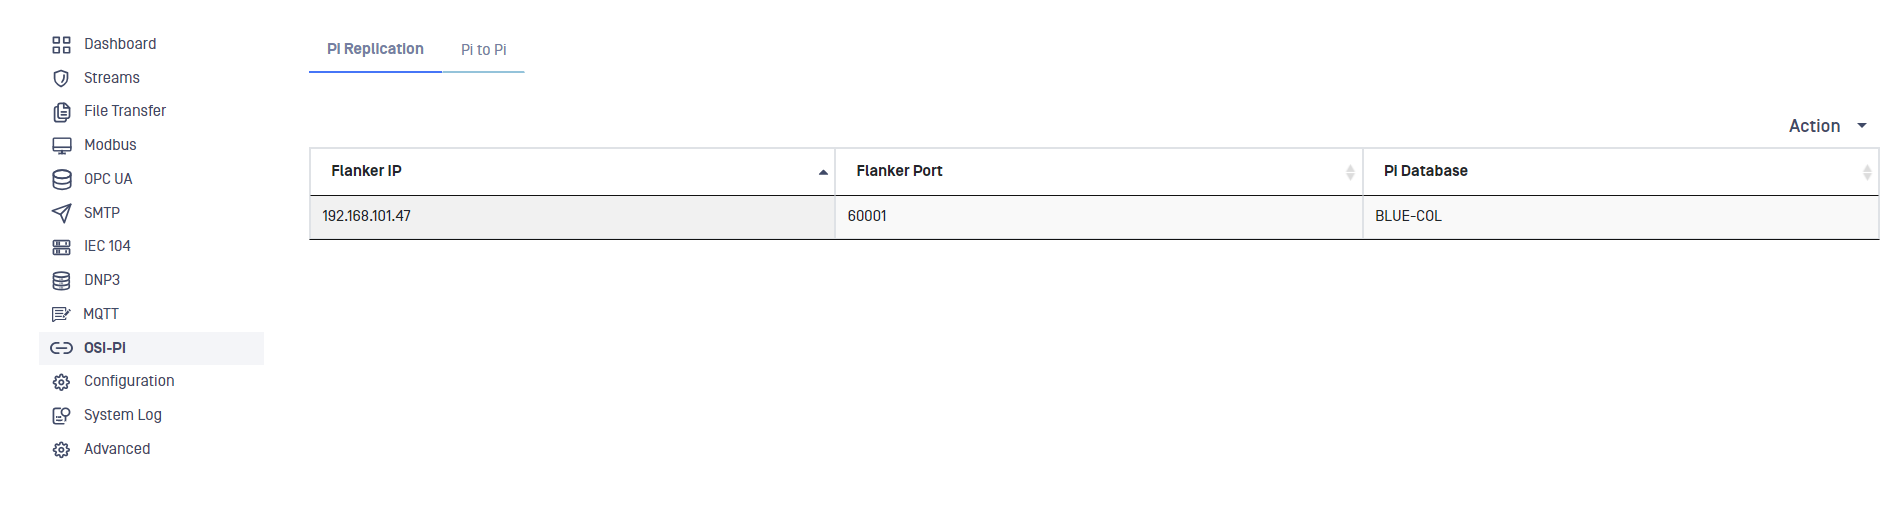
Go to AVEVA PI menu, select Pi Replication label, deploy Action button and select Add Client.
Type values in the following boxes:
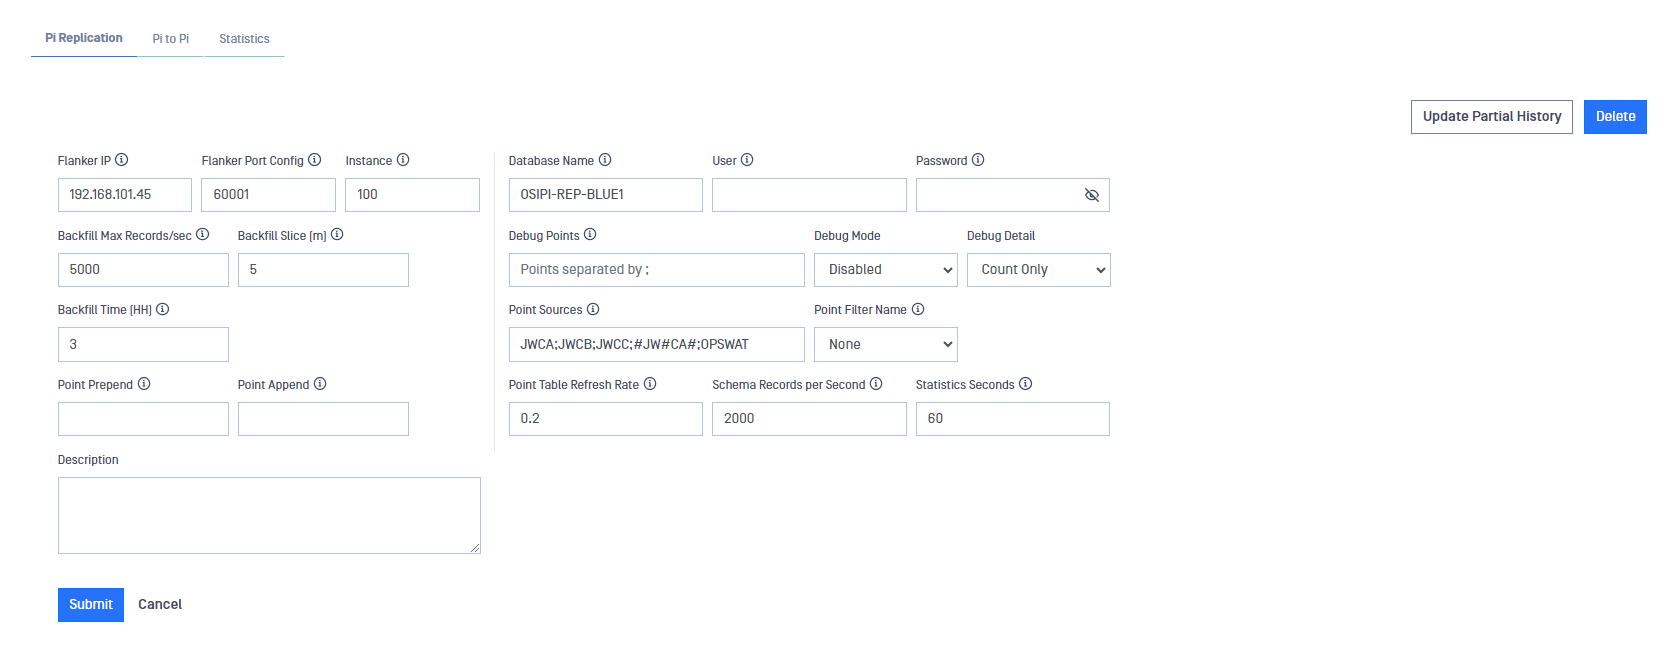
Flanker IP: IP address of the Blue Windows Machine.
Flanker Port Config: Port number the Blue Windows Machine is listening on for Config.
Instance: The Interface Instance number to be used at red. Must be a positive integer.
Backfill Max Records/sec: Max values per second to extract during backfill (range: 1000-20000).
Backfill Slice (m): The number of minutes to read for each History Backfill retrieval (range: 1-60).
Point Prepend: Prepend the string indicated here to each Pi point. The maximum length for the string is 20 chars (lowercase, uppercase, numbers, dash and undescore are allowed characters).
Point Append: Append the string indicated here to each PI point. Maximum lenght is 20 characters. (lowercase, uppercase, numbers, dash and undescore are allowed characters).
Stats Prepend: If this field is not empty, then the structure of the PI tags used to publish the statistics will be: opswat_blue_{stats prepend value}_{PI tag name}. If this field is empty, then the interface instance is used instead of stats prepend value.
Backfill Time (HH): How far back in time to go for historical backfill (range: 0.5-168, values with more than two decimals will be rounded).
Database Name : Windows Network Name of the PI server.
User: PI Username (blank: use trusted connection).
Password: PI Password (blank: use trusted connection).
Debug Points: Points for debugging, separated by semicolon ';'. Maximum 10 points.
Debug Mode: User can select the debug mode using this dropdown list. User can select between Disabled, All, Snapshot only and History only.
Debug Detail: User can select the debug detail using this dropdown list. User can select between Count only and List History values.
Point Sources: One or more PI point sources, separated with semicolon ';'.
Point Filter Name: Allows filtering on attributes in addition to Point Sources.
Point Table Refresh Rate: Rate in hours for transmitting the PI Point Table. Valid values are 0.2-2.
Schema Records per Second: Maximum number of Schema records to transmitper second. Valid values are 1000-5000.
Statistics Seconds: Statistics frequency in seconds. If the value is 0 no statistics are printed. Valid values are 5-3600, default value is 60 seconds.
Enabled: This checkbox should be marked to enable AVEVA PI connector.
Click on Submit button to save the changes.
OPSWAT NetWall AVEVA PI PI DB replication Service (RED)
OPSWAT NetWall AVEVA PI DB replication service (RED) needs to be installed on the PI server on the RED network. It operates as a Windows Service, configuration for the DB Replication system is done using the OPSWAT Web interface on Blue and the OPSWAT Web interface on Red. There is no user interface on the Windows machines. OPSWAT NetWall AVEVA PI DB replication service (RED) service can be loaded either on the PI server itself or on another Windows machine that has the PI SDK installed and has a trusted relationship with the PI Server. To correctly install it, follow the instructions:
double click on the msi file that OPSWAT will provide OPSWAT NetWall AVEVA PI replication Service (RED) and click Next.
Fill in the IP address and port for listening for the configuration and click Next. Tipically, this IP will be the IP of MetaDefender Security Gateway RED.
Click finish button to exit the Setup.
MetaDefender Security Gateway RED
To configure AVEVA PI Connector, a security dongle should be inserted in the RED server
Login into MetaDefender Security Gateway RED.
Go to AVEVA PI menu and click on Edit button. Notice that only one AVEVA PI Client can be configured in MetaDefender Security Gateway RED.
Type values in the following boxes:
Flanker IP: IP address of the Windows Machine in the BLUE network acting as flanker.
Flanker Port Config: Port number where the flanker defined will listen on for configuration.
Flanker Port Data: Port number where the defined flanker will listen on for data transmission.
Stats Prepend: If this field is not empty, then the structure of the PI tags used to publish the statistics will be: opswat_blue_{stats prepend value}_{PI tag name}. If this field is empty, then the interface instance is used instead of stats prepend value.
Database Name: PI Server name within the Windows Network.
User: PI username (leave it blank for using a trusted connection).
Password: PI password (leave it blank for using a trusted connection).
Point Sources: User can include here one or more Pi point souces seperated with semicolon.
Debug Points: A maximum number of 10 debugging points can be configured including them in this field separated by semicolon ';'.
Debug Mode: User can select the debug mode using this dropdown list. User can select between Disabled, All, Snapshot only and History only.
Debug details: User can select the debug detail using this dropdown list. User can select between Count only and List History values.
Statistics Seconds: Statistics frequency in seconds. If the value is 0, no statistics are displayed.
Description: User-friendly description field for the created client.
Attribute Blocking: Identify one or more attributes that are not to be replicated on Red. This applies to all points.
Security Attributes Sync: If the checkbox is checked, the security attributes will be synchronized and new options will be selectable in "Attibute Blocking" list. Please, notice that the groups/users should be identical on BLUE and RED PI servers.
Click on Submit button to save the changes.
Update Partial History
Users can do a partial historical backfill for a specified time and for a selected number of Pi points. That can be done for both, Pi2Pi and Pi Database Replication.
To perform a partial historical backfill go to Connector -> AVEVA Pi and select a Pi Replication or Pi2Pi. Then select one entry on the table and the Edit view will be displayed. Click on Update Partial History button.
A pop up will appear to indicate the date and the Pi points to perform the backfill.
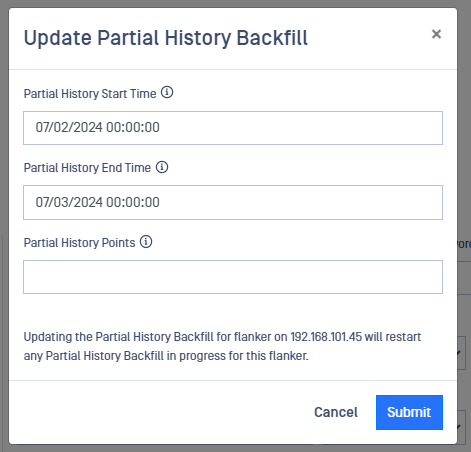
Updating the Partial History Backfill for a flanker will restart any Partial Backfill already in progress for that flanker.
Once the user have selected Start time, End Time and Points, Submit button have to be pressed.
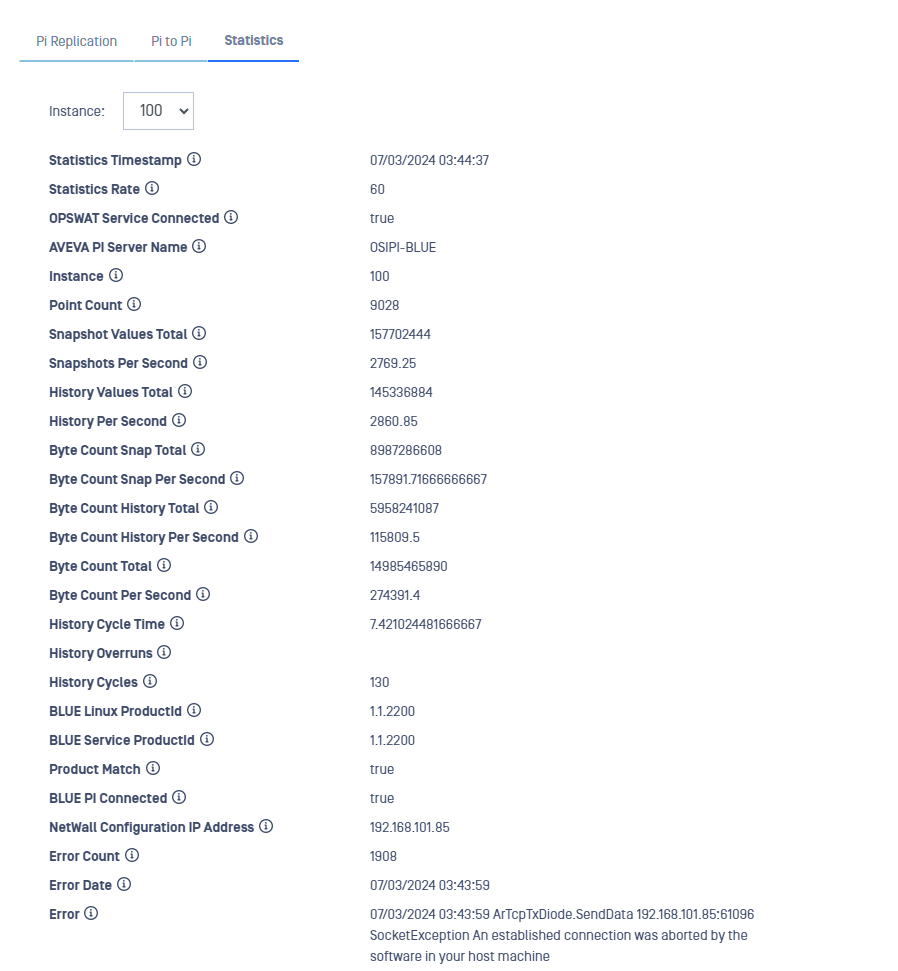
Statistics
Users can check AVEVA PI Statistics by clicking on the Statistics tab in AVEVA PI Connector section of the menu.