Introduction
This document is a guide for the implementation of MSSQL (Microsoft SQL) replication using the NetWall Security Gateway.
It is derived from 2 Microsoft documents:
Please note the following:
The Microsoft Sql Server Express (free) edition does not support Transactional Replication.
Replication is not supported on SQL Server instances that are more than two versions apart. Microsoft supplies a Transactional Replication compatibility matrix here: https://docs.microsoft.com/en-us/sql/relational-databases/replication/replication-backward-compatibility?view=sql-server-ver15
Replication is only supported on Netwall Bilateral. The Unilateral version of Netwall cannot support Transactional Replication.
The replication example in this document uses the “AdventureWorks” sample database from Microsoft. You would, of course, use your own database as you work through the implementation shown below. If you wish to try the AdventureWorks database first, please refer to the Microsoft documents shown above for instructions on downloading and installing the AdventureWorks database.
Configuring your SQL Source and Destination Databases
The Source and Destination Database computers should have a unique, dedicated IP address. The Netwall Security Gateway TCP Streaming configuration requires an IP address, and the IP address must be fixed.
Communications for each Database should be configured so that TCP is enabled and named pipes are disabled. Use the Sql Server Configuration Manager for this. On the OPSWAT system, the Sql Server Configuration Manager on BLUE appears as shown below. Note there are two Database instances: the default instance (MSSQLSERVER) and a named instance (BAYSHOREBLUE).
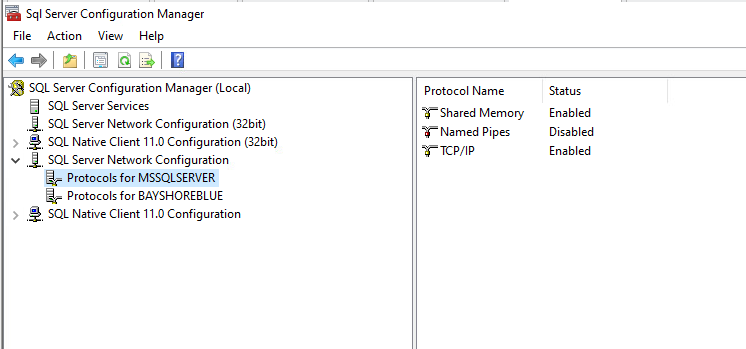
The Default SQL Instance
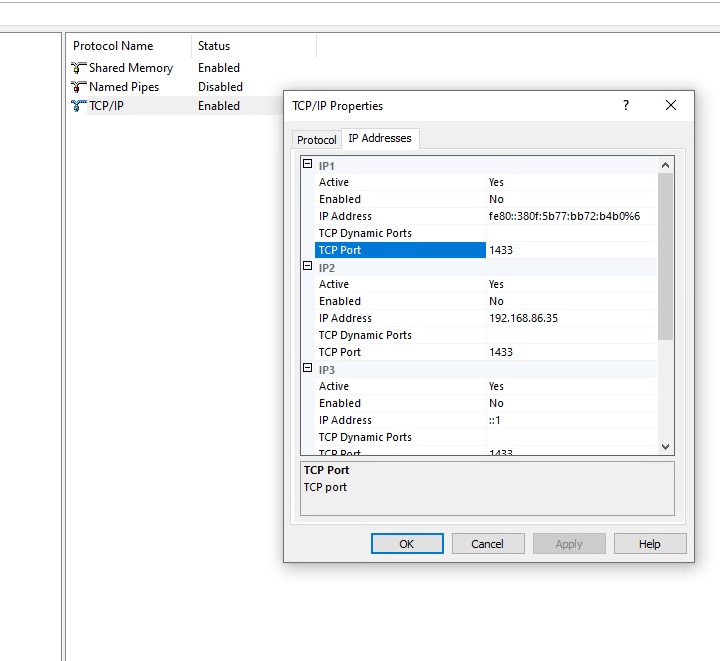
MSSQLSERVER is the default instance that is created when SQL is installed. BAYSHOREBLUE is an additional named instance that was created on our machine. Note that MSSQLSERVER is highlighted and note the Protocol status. Right-Click on TCP/IP, select Properties, and then select the IP Addresses tab. Note the default port number is 1433.
The Named SQL Instance
An additional SQL database Instance, called BAYSHOREBLUE, was also created on this machine. It is important to do the Network Configuration for this and every other Named instance that will be used as a source for replication. Note that BAYSHOREBLUE is highlighted and note the Protocol status. Right-Click on TCP/IP, select Properties, and then select the IP Addresses tab. Note the default port number is blank.
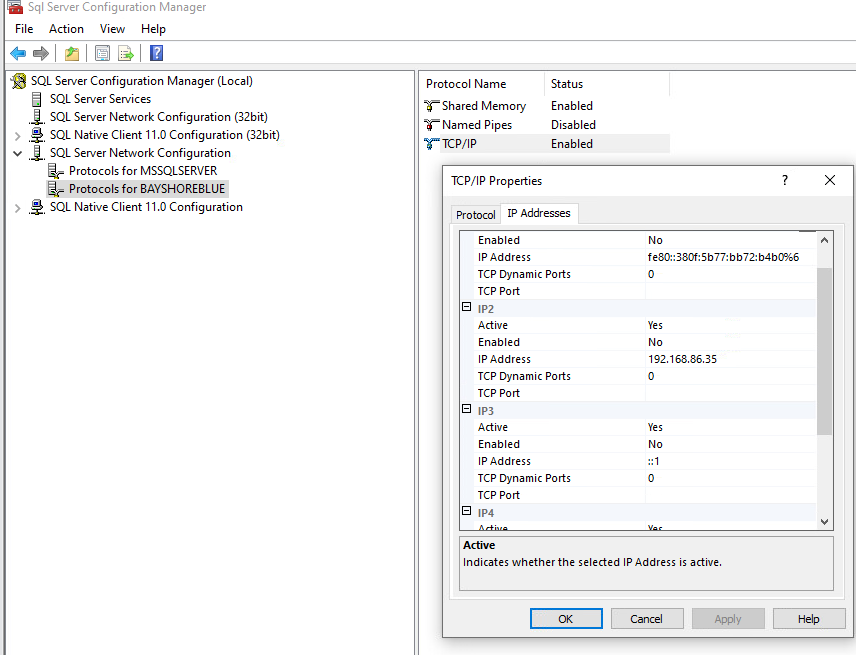
You will need to assign a port number (i.e.,1433) and fill in each of the TCP Port locations with this port number. It is this port number that you will need to supply when configuring Netwall.
Configuring Netwall
Bilateral TCP streaming must be configured at Netwall. TCP streaming consists of :
Identifying the BLUE Source IP (MSSQL Publisher)
Identifying the RED Destination IP (MSSQL Subscriber)
Identifying the TCP Port Number
For the default SQL dbs, the port number is 1433
For Named dbs Instances, the port number is assigned by you , as shown in the previous section.
The representative Streaming Point Parameters screens are shown below, for configuration in BLUE and RED side.


We have created two entries for SQL, SSMS Default Instance and SSMS OPSWAT Instance. The Source IP is the address of the BLUE (publisher) SQL Server, and the Destination IP is the address of the RED (Subscriber) SQL Server. The Port is the TCP port number for the SQL instance, as described in the previous section.
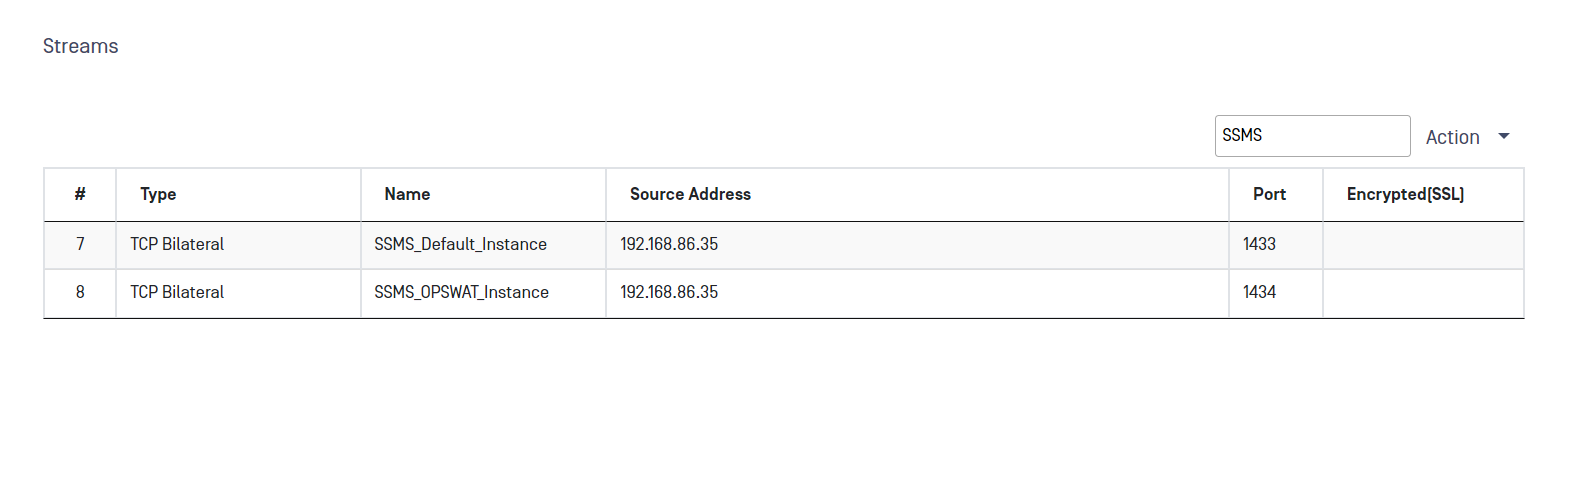
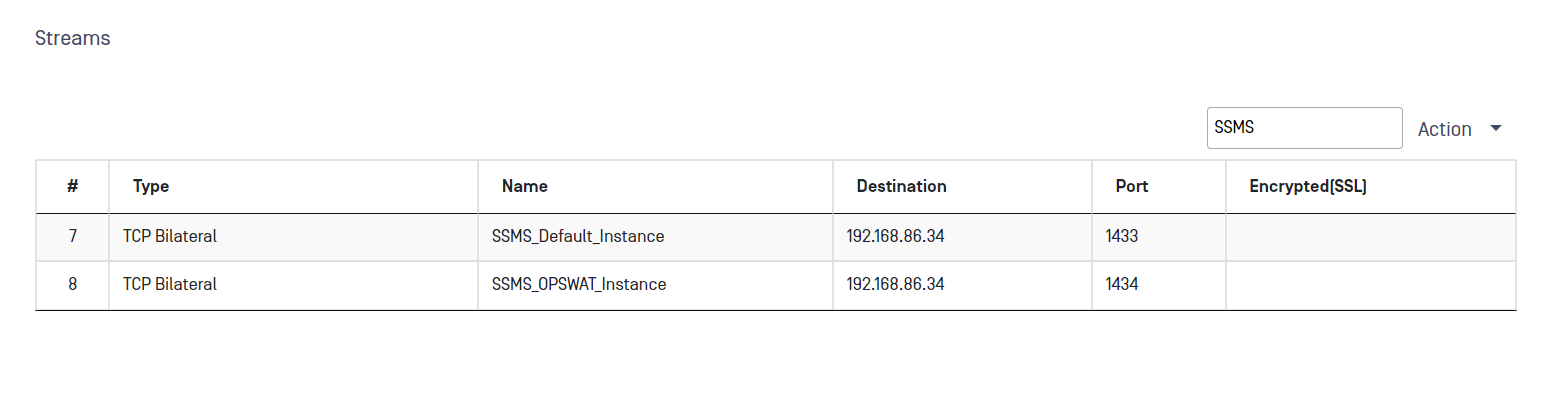
Make sure to set the Max Sessions to 10. SQL Server replication uses multiple instances of the same connection to perform its tasks.
Create local Windows accounts for replication agents at the publisher
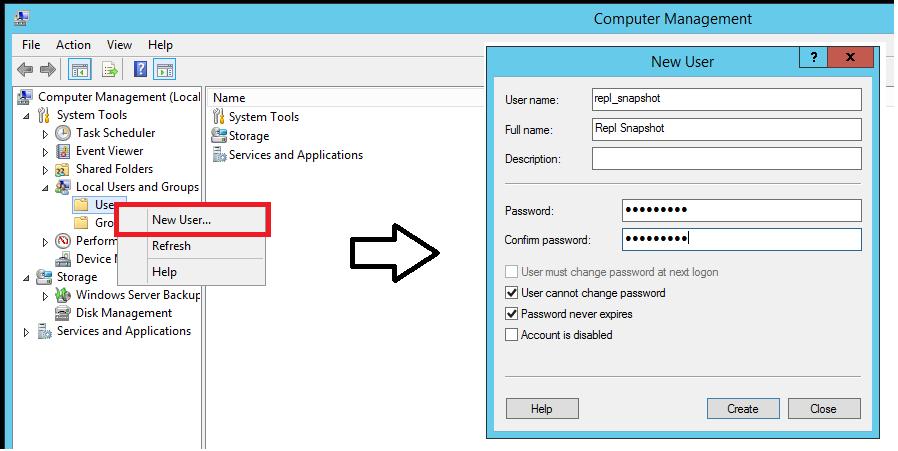
At the publisher, open Computer Management from Administrative Tools in Control Panel.
In System Tools, expand Local Users and Groups.
Right-click Users and then select New User.
Enter repl_snapshot in the User name box, provide the password and other relevant information, and then select Create to create the repl_snapshot account:
Repeat the previous step to create the repl_logreader_,_ repl_distribution, and repl_merge accounts:
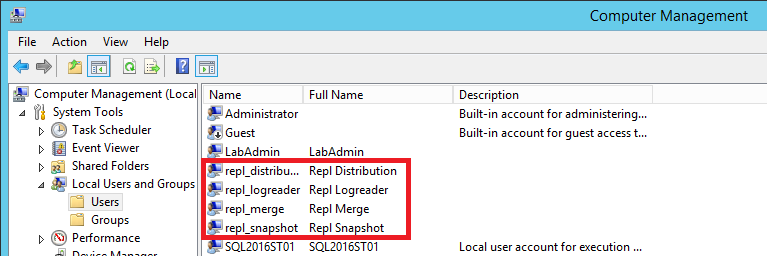
Select Close.
Create local Windows accounts for replication agents at the subscriber
At the subscriber, open Computer Management from Administrative Tools in Control Panel.
In System Tools, expand Local Users and Groups.
Right-click Users and then select New User.
Enter repl_distribution in the User name box, provide the password and other relevant information, and then select Create to create the repl_distribution account.
Repeat the previous step to create the repl_merge account.
Select Close.
For more information, see Replication agents overview.
Prepare the snapshot folder
In this section, you configure the snapshot folder that's used to create and store the publication snapshot.
Create a share for the snapshot folder and assign permissions
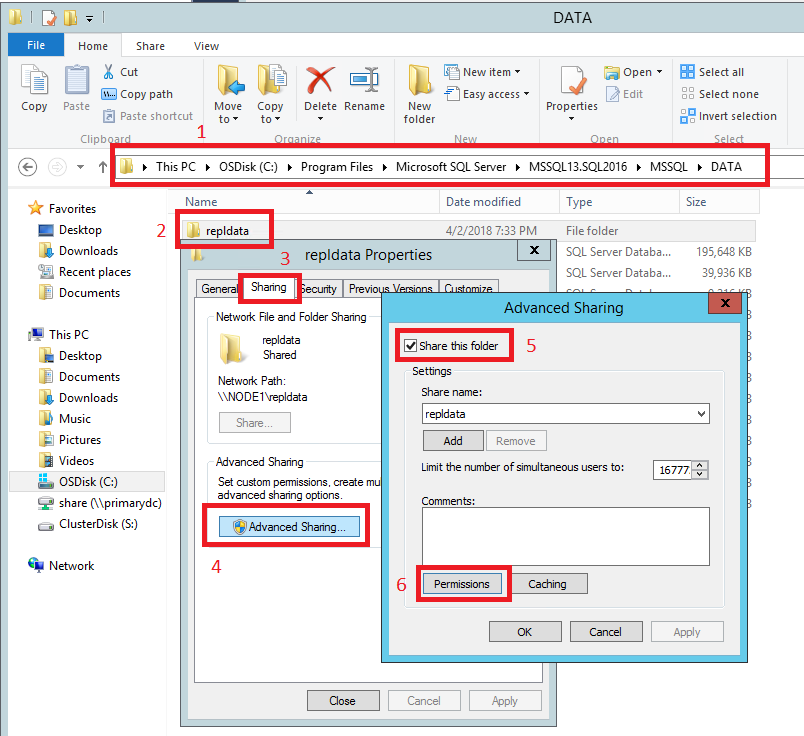
In File Explorer, browse to the SQL Server data folder. The default location is C:\Program Files\Microsoft SQL Server\MSSQL.X\MSSQL\Data.
Create a new folder named repldata.
Right-click this folder and select Properties.
a. On the Sharing tab in the repldata Properties dialog box, select Advanced Sharing.
b. In the Advanced Sharing dialog box, select Share this Folder, and then select Permissions.
In the Permissions for repldata dialog box, select Add. In the Select User, Computers, Service Account, or Groups box, type the name of the Snapshot Agent account that you created previously, as <Publisher_Machine_ Name>\repl_snapshot. Select Check Names, and then select OK.
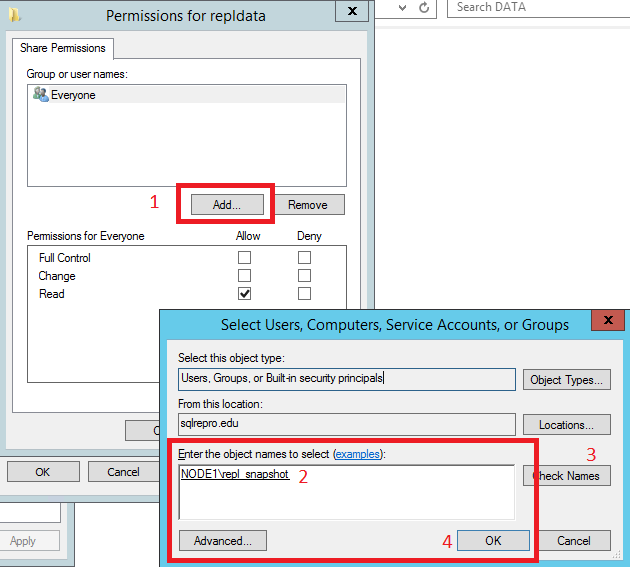
Repeat step 6 to add the other two accounts that you created previously: <Publisher_Machine_Name>\repl_merge and <Publisher_Machine_Name>\repl_distribution.
After you add the three accounts, assign the following permissions:
repl_distribution: Read
repl_merge: Read
repl_snapshot: Full Control
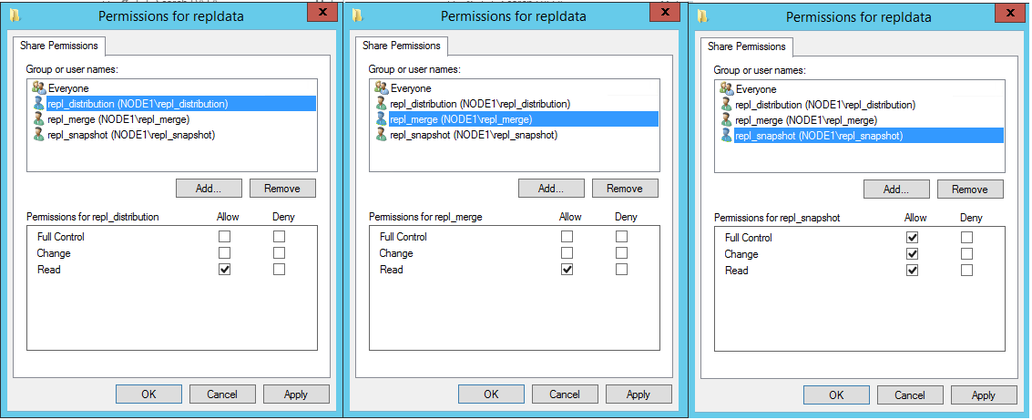
After your share permissions are configured correctly, select OK to close the Permissions for repldata dialog box. Select OK to close the Advanced Sharing dialog box.
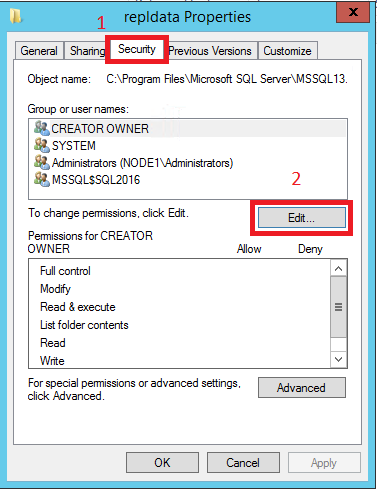
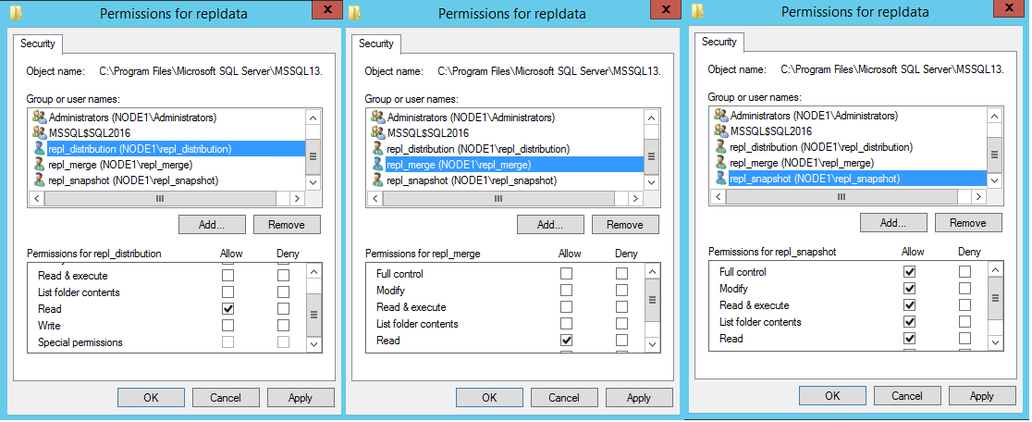
In the repldata Properties dialog box, select the Security tab and select Edit:
In the Permissions for repldata dialog box, select Add. In the Select Users, Computers, Service Accounts, or Groups box, type the name of the Snapshot Agent account that you created previously, as <Publisher_Machine_Name>\repl_snapshot. Select Check Names, and then select OK.
In the Permissions for repldata dialog box, select Add. In the Select Users, Computers, Service Accounts, or Groups box, type the name of the Snapshot Agent account that you created previously, as <Publisher_Machine_Name>\repl_snapshot. Select Check Names, and then select OK.
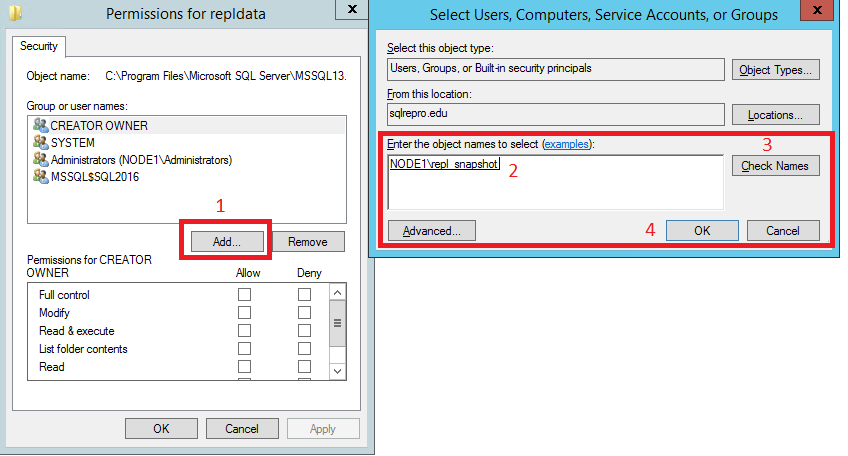
Repeat the previous step to add permissions for the Distribution Agent as <Publisher_Machine_Name>\repl_distribution, and for the Merge Agent as <Publisher_Machine_Name>\repl_merge.
Verify that the following permissions are allowed:
repl_distribution: Read
repl_merge: Read
repl_snapshot: Full Control
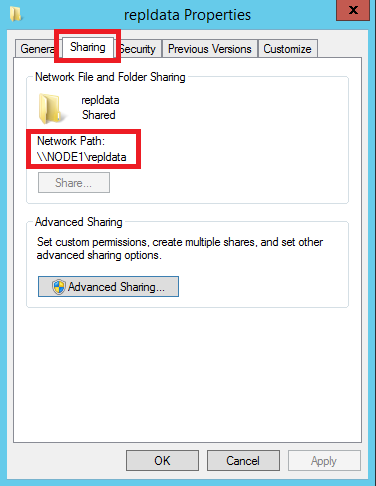
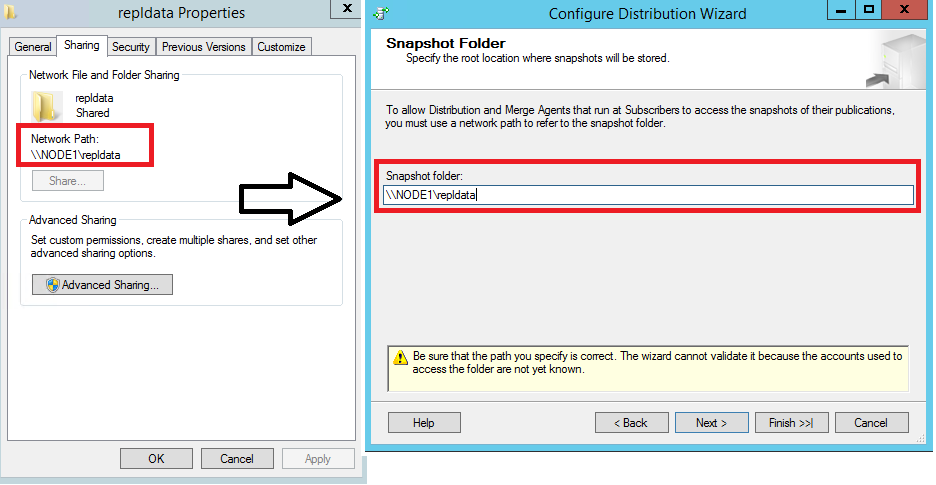
Select the Sharing tab again and note the Network Path for the share. You'll need this path later when you're configuring your snapshot folder.
Select OK to close the repldata Properties dialog box.
For more information, see Secure the snapshot folder.
Configure distribution
In this section, you configure distribution at the publisher and set the required permissions on the publication and distribution databases. If you have already configured the distributor, you must disable publishing and distribution before you begin this section. Do not do this if you must keep an existing replication topology, especially in production.
Configuring a publisher with a remote distributor is outside the scope of this tutorial.
Configure distribution at the publisher
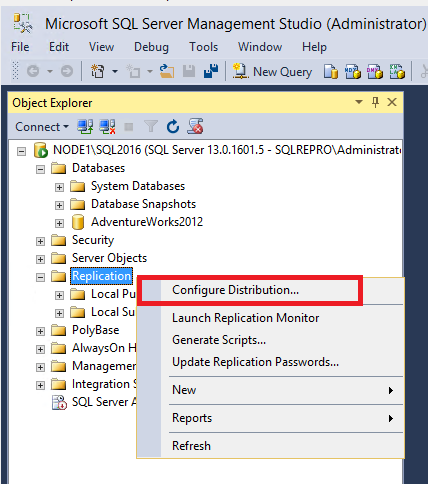
Connect to the publisher in SQL Server Management Studio, and then expand the server node.
Right-click the Replication folder and select Configure Distribution:
If you connected to SQL Server by using localhost rather than the actual server name, you'll be prompted with a warning that SQL Server cannot connect to localhost or IP Address. Select OK in the warning.
There is currently a known issue with SQL Server Management Studio (SSMS) 18.0 (and later) where a warning message is not displayed when connecting to the Distributor with the IP address, but this is still invalid. The actual server name should be used when connecting to the Distributor.
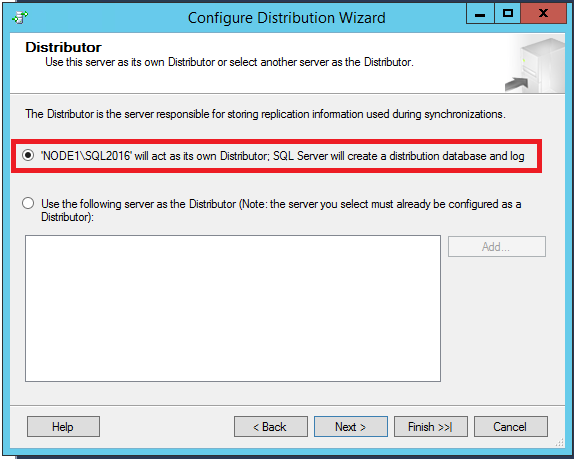
On the Distributor page, select <'ServerName'> will act as its own Distributor; SQL Server will create a distribution database and log. Then select Next.
If the SQL Server Agent is not running, on the SQL Server Agent Start page, select Yes, configure the SQL Server Agent service to start automatically. Select Next.
Enter the path <Publisher_Machine_Name>\repldata in the Snapshot folder box, and then select Next. This path should match what you saw previously under Network Path for your repldata properties folder after configuring your share properties.
Accept the default values on the remaining pages of the wizard.
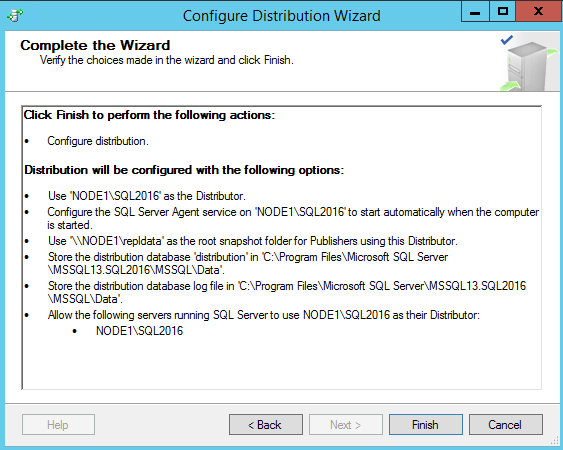
Select Finish to enable distribution.
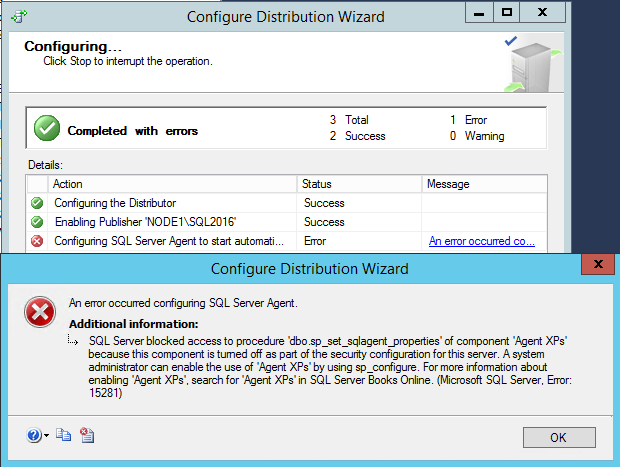
You might see the following error when configuring the distributor. It's an indication that the account that was used to start the SQL Server Agent account is not an administrator on the system. You'll either need to start the SQL Server Agent manually, grant those permissions to the existing account, or modify which account the SQL Server Agent is using.
If your SQL Server Management Studio instance is running with administrative rights, you can start the SQL Agent manually from within SSMS:
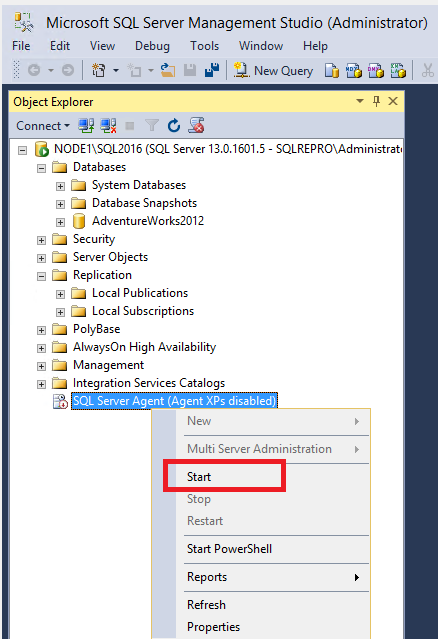
If the SQL Agent doesn't visibly start, right-click the SQL Server Agent in SSMS and select Refresh. If it's still in the stopped state, start it manually from SQL Server Configuration Manager.
Set Database permissions
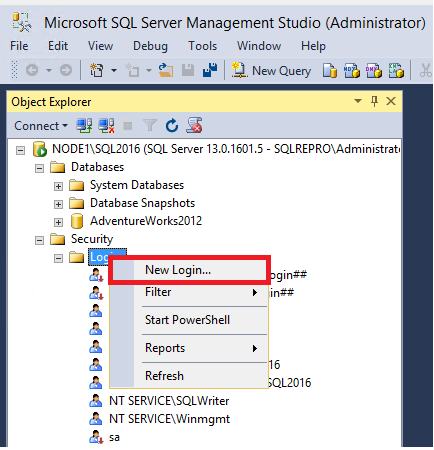
In SQL Server Management Studio, expand Security, right-click Logins, and then select New Login:
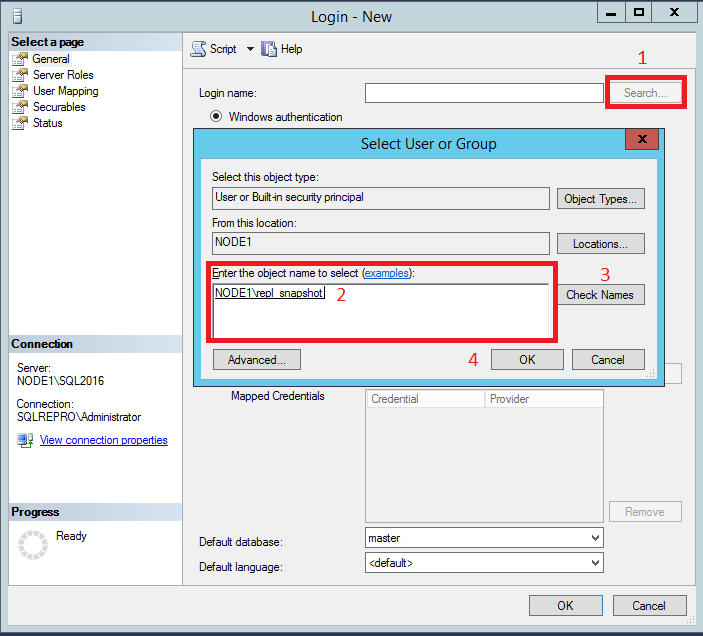
On the General page, select Search. Enter <Publisher_Machine_Name>\repl_snapshot in the Enter the object name to select box, select Check Names, and then select OK.
On the User Mapping page, in the Users mapped to this login list, select both the distribution and AdventureWorks2012 databases.
In the database role membership list, select the db_owner role for the login for both databases.
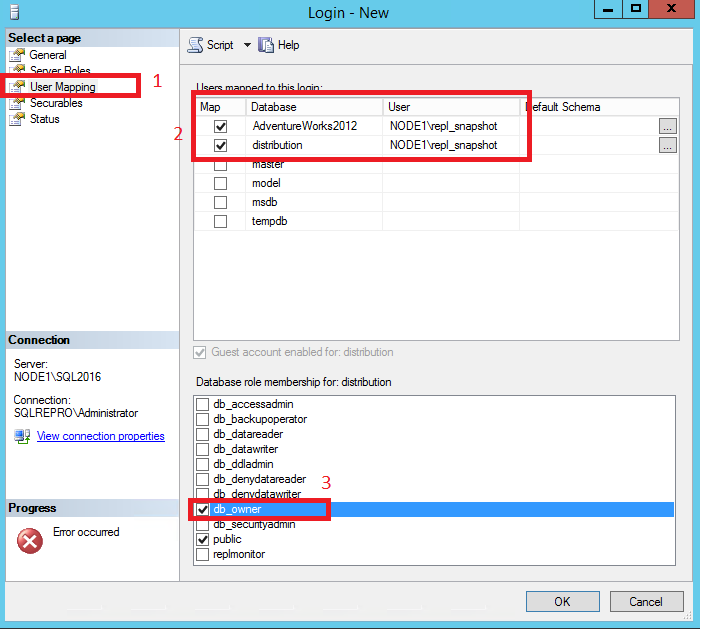
Select OK to create the login.
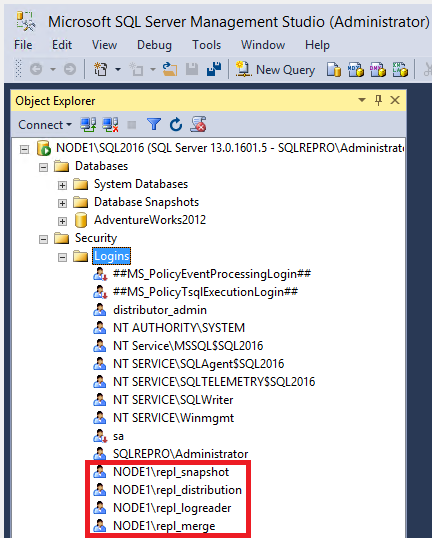
Repeat steps 1-4 to create a login for the other local accounts (repl_distribution, repl_logreader, and repl_merge). These logins must also be mapped to users who are members of the db_owner fixed database role in the distribution and AdventureWorks databases.
For more information, see:
Configure the publisher for transactional replication
In this section, you create a transactional publication by using SQL Server Management Studio to publish a filtered subset of the Product table in the AdventureWorks2012 sample database. You also add the SQL Server login used by the Distribution Agent to the publication access list (PAL).
Create a publication and define articles
Connect to the publisher in SQL Server Management Studio, and then expand the server node.
Right-click SQL Server Agent and select Start. The SQL Server Agent should be running before you create the publication. If this step does not start your agent, you'll need to do so manually from SQL Server Configuration Manager.
Expand the Replication folder, right-click the Local Publications folder, and select New Publication. This step starts the New Publication Wizard:
On the Publication Database page, select AdventureWorks2012, and then select Next.
On the Publication Type page, select Transactional publication, and then select Next:
On the Articles page, expand the Tables node and select the Product check box. Then expand Product and clear the check boxes next to ListPrice and StandardCost. Select Next.
On the Filter Table Rows page, select Add.
In the Add Filter dialog box, select the SafetyStockLevel column. Select the right arrow to add the column to the filter statement WHERE clause of the filter query. Then manually type in the WHERE clause modifier as follows:
Select OK, and then select Next.
Select the Create a snapshot immediately and keep the snapshot available to initialize subscriptions check box, and select Next:
On the Agent Security page, clear the Use the security settings from the Snapshot Agent check box.
Select Security Settings for the Snapshot Agent. Enter <Publisher_Machine_Name>\repl_snapshot in the Process account box, supply the password for this account, and then select OK.
Repeat the previous step to set <Publisher_Machine_Name>\repl_logreader as the process account for the Log Reader Agent. Then select OK.
On the Complete the Wizard page, type AdvWorksProductTrans in the Publication name box, and select Finish:
After the publication is created, select Close to complete the wizard.
You might encounter the following error if your SQL Server Agent is not running when you try to create the publication. This error indicates that your publication was created successfully but your Snapshot Agent was unable to start. If this happens, you'll need to start the SQL Server Agent, and then manually start the Snapshot Agent. The next section gives instructions.
View the status of snapshot generation
Connect to the publisher in SQL Server Management Studio, expand the server node, and then expand the Replication folder.
In the Local Publications folder, right-click AdvWorksProductTrans, and then select View Snapshot Agent Status:
The current status of the Snapshot Agent job for the publication appears. Verify that the snapshot job has succeeded before you continue to the next section.
If your SQL Server Agent was not running when you created the publication, you'll see that the Snapshot Agent was never run when you check the Snapshot Agent status for your publication. If that's the case, select Start to start your Snapshot Agent:
If you see an error here, see Troubleshooting Snapshot Agent error.
Add the Distribution Agent login to the PAL
Connect to the publisher in SQL Server Management Studio, expand the server node, and then expand the Replication folder.
In the Local Publications folder, right-click AdvWorksProductTrans, and then select Properties. The Publication Properties dialog box appears.
Select the Publication Access List page, and select Add. b. In the Add Publication Access dialog box, select <Publisher_Machine_ Name>\repl_distribution, and select OK.
For more information, see Replication programming concepts.
Create a subscription to the transactional publication
In this section, you add a subscriber to the publication that you previously created. This tutorial uses a remote subscriber (NODE2\SQL2016), but you can also add a subscription locally to the publisher.
Create the subscription
Connect to the publisher in SQL Server Management Studio, expand the server node, and then expand the Replication folder.
In the Local Publications folder, right-click the AdvWorksProductTrans publication, and then select New Subscriptions. The New Subscription Wizard starts:
On the Publication page, select AdvWorksProductTrans, and then select Next:
On the Distribution Agent Location page, select Run all agents at the Distributor, and then select Next. For more information on pull and push subscriptions, see Subscribe to publications.
On the Subscribers page, if the name of the subscriber instance is not displayed, select Add Subscriber, and then select Add SQL Server Subscriber from the drop-down list. This step opens the Connect to Server dialog box. Enter the subscriber instance name and then select Connect.
After the subscriber has been added, select the check box next to the instance name of your subscriber. Then select New Database under Subscription Database.
The New Database dialog box appears. Enter ProductReplica in the Database name box, select OK, and then select Next:
On the Distribution Agent Security page, select the ellipsis (...) button. Enter <Publisher_Machine_Name>\repl_distribution in the Process account box, enter the password for this account, select OK, and then select Next.
Select Finish to accept the default values on the remaining pages and complete the wizard.
Set database permissions at the subscriber
Connect to the subscriber in SQL Server Management Studio. Expand Security, right-click Logins, and then select New Login.
a. On the General page, under Login Name, select Search and add the login for <Subscriber_Machine_Name>\repl_distribution.
b. On the User Mappings page, grant the login db_owner membership for the ProductReplica database.
Select OK to close the New Login dialog box.
View the synchronization status of the subscription
Connect to the publisher in SQL Server Management Studio. Expand the server node, and then expand the Replication folder.
In the Local Publications folder, expand the AdvWorksProductTrans publication, right-click the subscription in the ProductReplica database, and then select View Synchronization Status. The current synchronization status of the subscription appears:
If the subscription is not visible under AdvWorksProductTrans, select the F5 key to refresh the list.
For more information, see:
Measure replication latency
In this section, you use tracer tokens to verify that changes are being replicated to the subscriber and to determine latency. Latency is the time it takes for a change made at the publisher to appear to the subscriber.
Connect to the publisher in SQL Server Management Studio. Expand the server node, right-click the Replication folder, and then select Launch Replication Monitor:
Expand a publisher group in the left pane, expand the publisher instance, and then select the AdvWorksProductTrans publication.
a. Select the Tracer Tokens tab. b. Select Insert Tracer. c. View elapsed time for the tracer token in the following columns: Publisher to Distributor, Distributor to Subscriber, Total Latency. A value of Pending indicates that the token has not reached a specified point.
For more information, see: