Introduction
This document shows how to properly configure Aspentech Connect and MetaDefender Bilateral Security Gateway to perform Aspentech IP.21 replication. Note that Aspentech Connect uses gRPC as its transport on TCP port 50051, so MetaDefender Bilateral Security Gateway needs to be configured to transfer TCP data on that port.
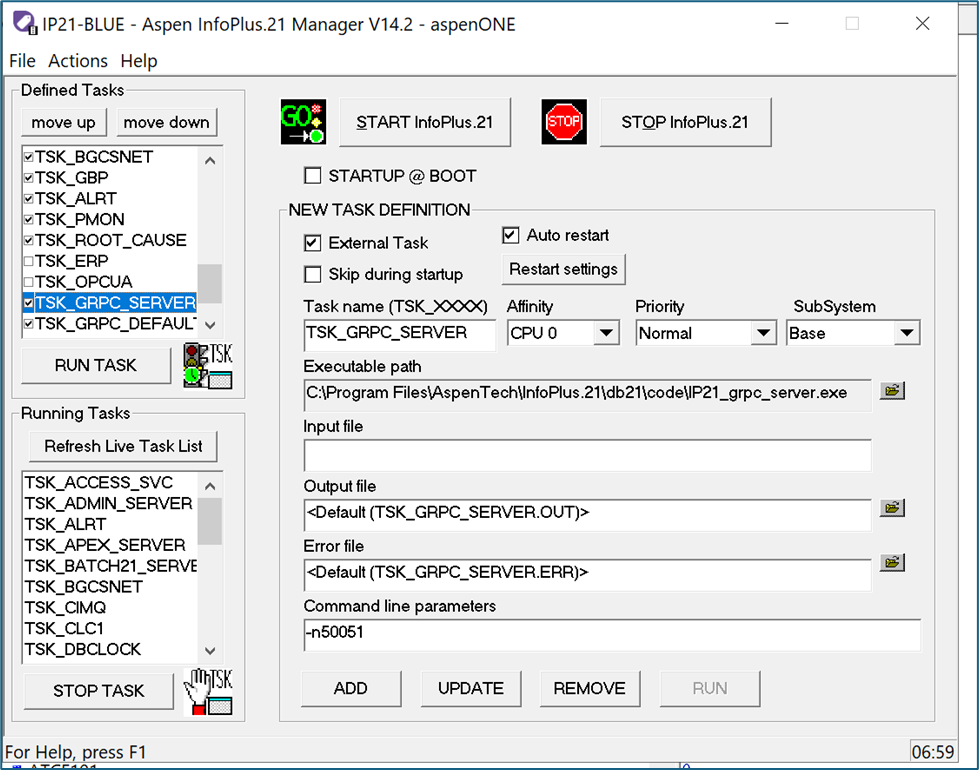
This port number can be changed by modifying the _TSK_GRPC SERVER command line parameters using the Aspen InfoPlus.21 Manager, as shown below. However, in this document we will consider the use of port 50051 to perform the configuration.
MetaDefender Bilateral Security Gateway Configuration
We implemented two bilateral TCP channels:
Port 50051 (for gRPC).
Port 6584 (for Aspen Connect configuration).
MetaDefender Bilateral Security Gateway BLUE Configuration
For the Blue side of MetaDefender Bilateral Security Gateway, the following streams need to be configured:
Bilateral Stream for gRPC:
Channel: 23
Protocol: TCP
Port: 50051
Concurrent Count: 10
Bilateral Stream for Aspen Connect:
Channel: 24
Protocol: TCP
Port: 6584
Concurrent Count: 10
Please, check auto$ to check how to create these Streams
MetaDefender Bilateral Security Gateway RED Configuration
For the Red side of MetaDefender Bilateral Security Gateway, the following streams need to be configured:
Bilateral Stream for gRPC:
Channel: 23
Protocol: TCP
Port: 50051
Destination IP: 192.168.75.115 (IP for IP21-RED)
Bilateral Stream for Aspen Connect:
Channel: 24
Protocol: TCP
Port: 6584
Destination IP: 192.168.75.115 (IP for IP21-RED)
Please, check auto$ to check how to create these Streams
Aspentech Server Configuration
Prerequisites IP21-BLUE
Software installed on IP21-BLUE is as follows:
Aspentech IP.21, Version 14.2.
Windows Server 2019.
Aspen Cloud Connect (Aspen-AIoT-CC-V14.3-May-2024.iso).
Prerequisites IP21-RED
Software installed on IP21-RED is as follows:
Aspentech IP.21, Version 14.2.
Windows Server 2019.
Aspen Cloud Connect (Aspen-AIoT-CC-V14.3-May-2024.iso).
IP21-BLUE (Publisher) Configuration
IP21-BLUE will be the publisher. Note that all of the configuration for Aspen Cloud Connect takes place on IP21-BLUE: there is no Aspen Cloud Connect configuration on IP21-RED.
Digital certificates are used to verify the identity of sender and receiver in digital communication as well as to encrypt and decrypt data that is transferred between these two parties. Aspen Connect will generate certificates automatically based on the network names of the computer. However, the Blue IP-21 machine does not have direct access to the Red IP-21 machine, so there are two choices when managing the Digital certificates for Aspen Connect and MetaDefender Bilateral Security Gateway:
Create a custom self-signed certificate yourself:
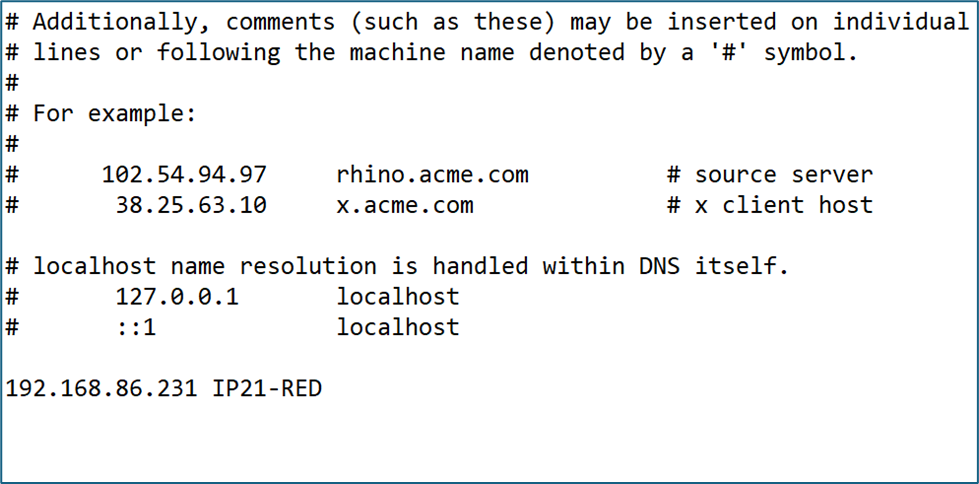
Modify the IP address associated with the RED IP-21 Server:
C:\Windows\System32\drivers\etc\hosts
For this scenario, we chose to modify the hosts table. Our entry in the hosts table appears as shown below. The IP21-RED server was assigned the IP address of MetaDefender Bilateral Security Gateway Blue, which is 192.168.86.231 in this example.
Configuring Aspen Connect on IP21-BLUE
Aspen Connect is accessed from the browser. For IP-21, the access is as follows:
The default user/password is admin/admin.
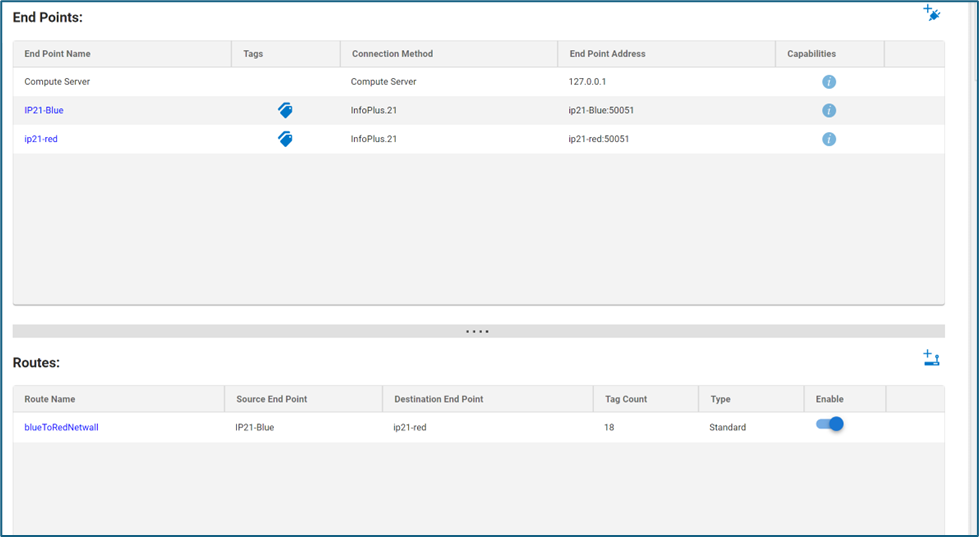
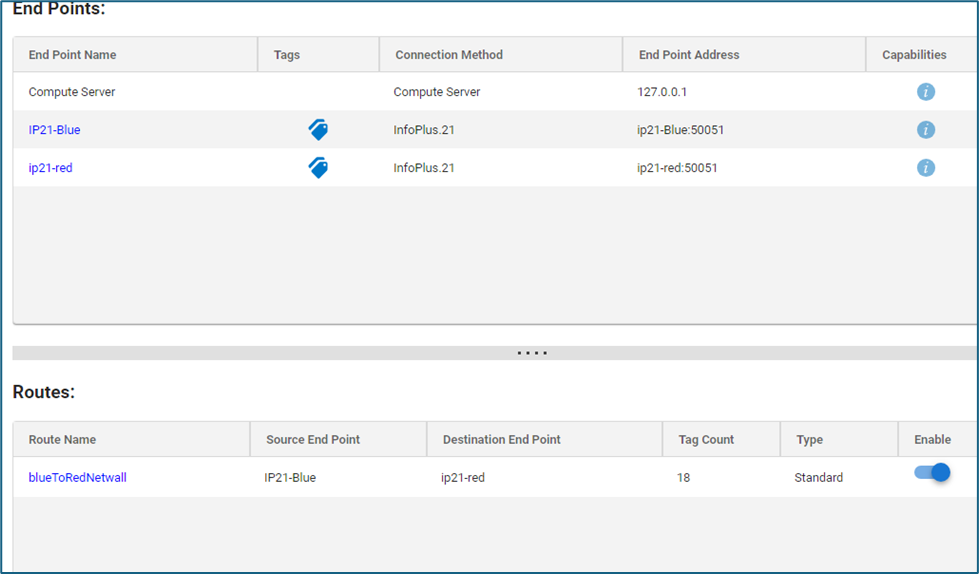
We have to construct an End Point for IP21-Blue, and an End Point for IP21-Red.
IP21-Blue End Point
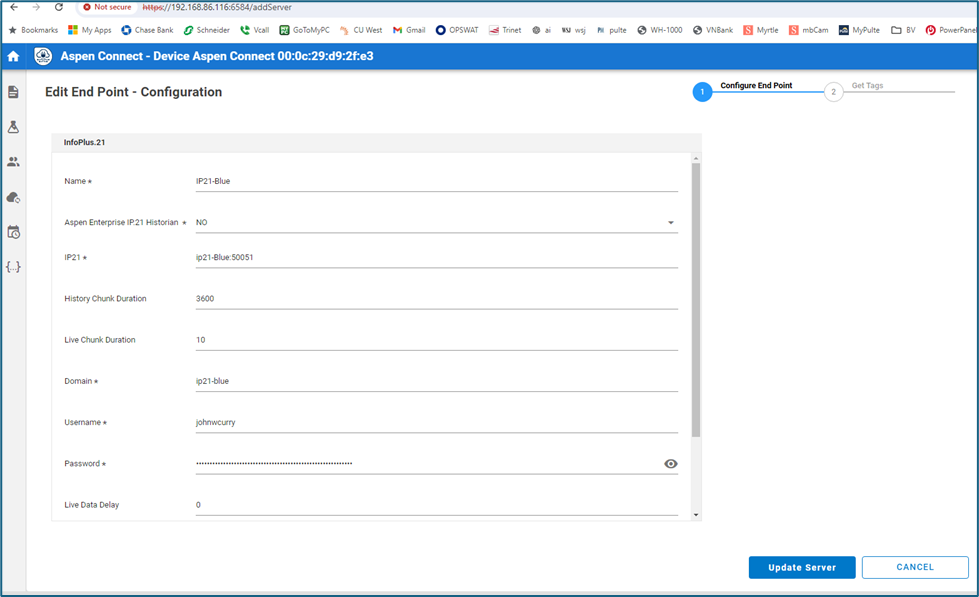
The ‘Name ‘field can be anything of your choice.
The ‘IP21’ field must be the Network Name of your Blue machine, and the Port Number assigned in TSK_GRPC_SERVER. The default assignment is 50051.
‘Domain’ in our case is just the Network Name of the IP21-BLUE machine. If you are using a domain, refer to the Help file for Aspen Connect for further information.
Scrolling down will reveal these additional fields:
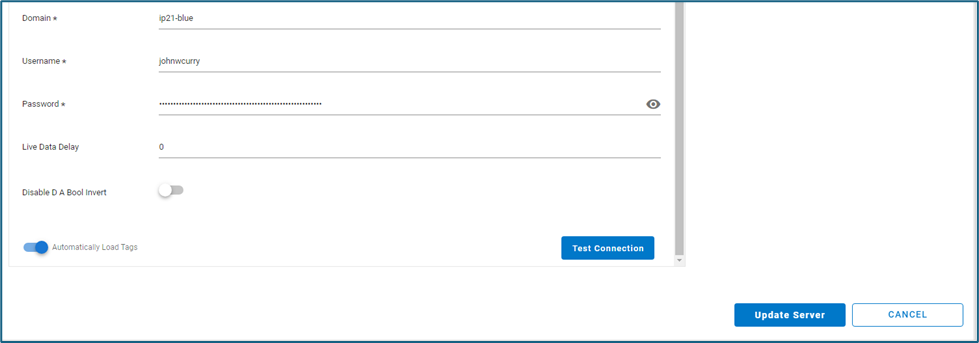
When ‘Test Connection’ is pressed, the following Connection Successful must appear:
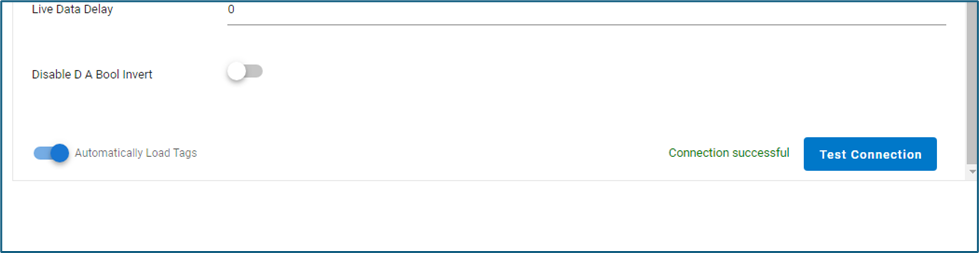
Click ‘Update Server’ when done.
IP21-RED End Point
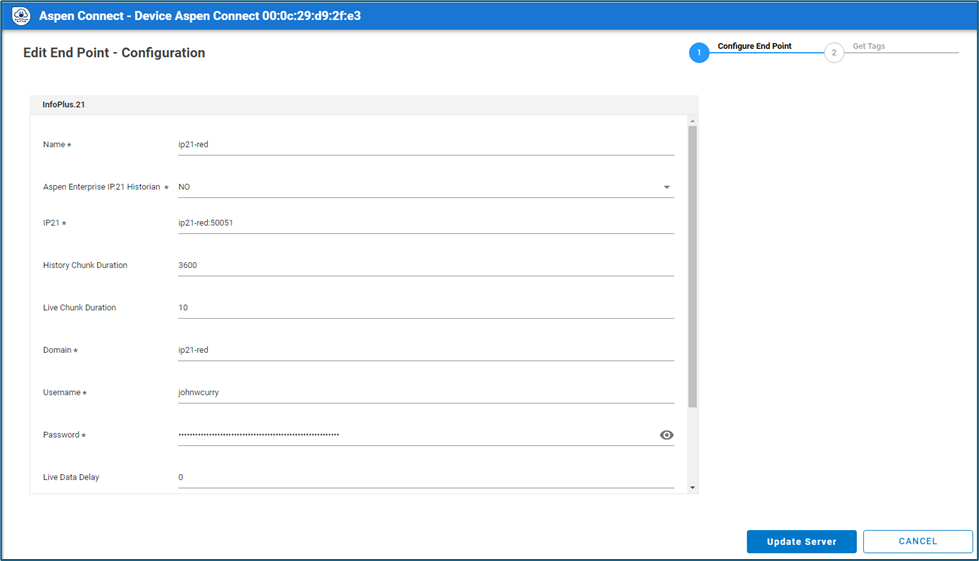
The ‘Name ‘field can be anything of your choice.
The ‘IP21’ field must be the Network Name of your Blue machine, and the Port Number assigned in TSK_GRPC_SERVER. The default assignment is 50051.
‘Domain’ in our case is just the Network Name of the IP21-RED machine. If you are using a domain, refer to the Help file for Aspen Connect for further information.
Scrolling down will reveal these additional fields:
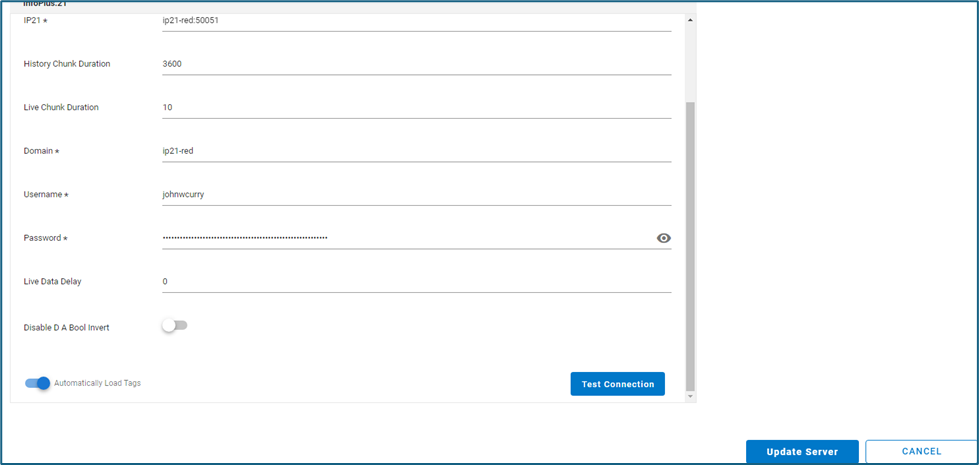
When ‘Test Connection’ is pressed, the following Connection Successful must appear:

Click ‘Update Server’ when done.
Configuring the Aspen Connect Route
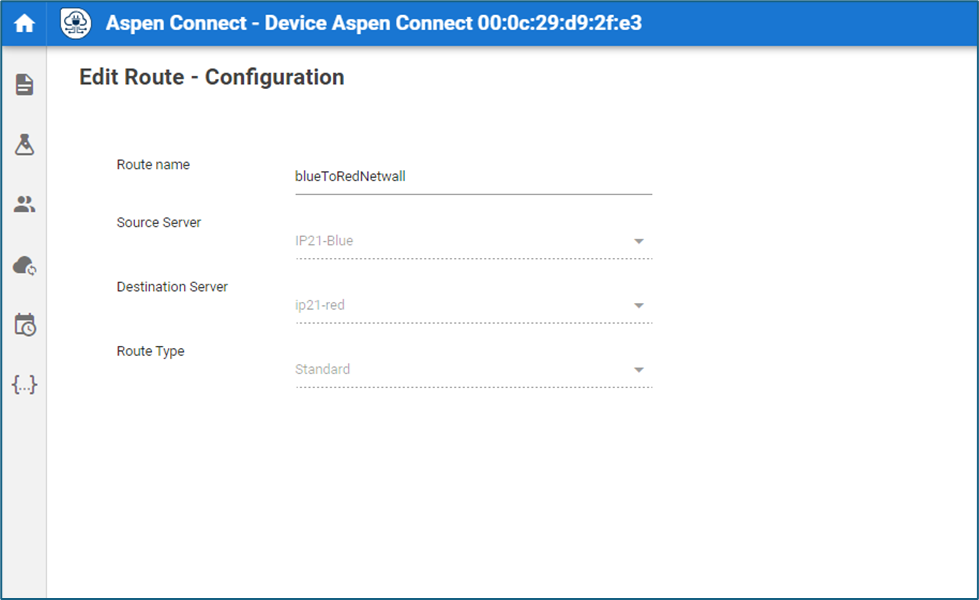
The Aspen Connect Route in our test system (blueToRedNetwall) is shown as follows:
The route configuration is as follows:
In the lower left portion of the screen is the ‘Map Tags’ button. When pressed on our system the following appears:
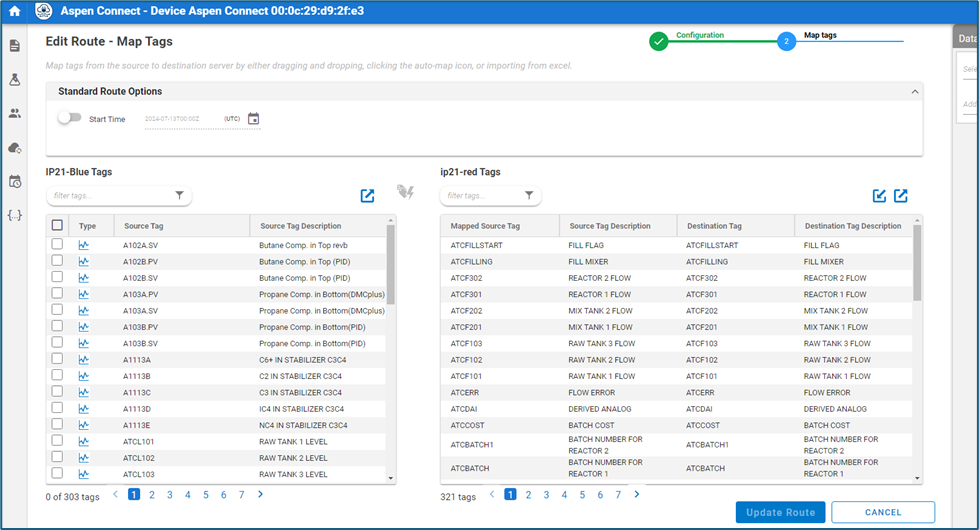
This is where you associate the source tags with the destination tags. Select the tags on the source (IP21-Blue) and then click the tag/lightning bolt to automatically associate the source tags with the destination tags.
Click on Update Route when done.
Note that more complex arrangements are available between the source tags and the destination tags. Please refer to the help files for additional information on this.
Verifying Connectivity
In our case, we just have the Aspentech sample database connected on both Red and Blue. This sample database has simulated values.
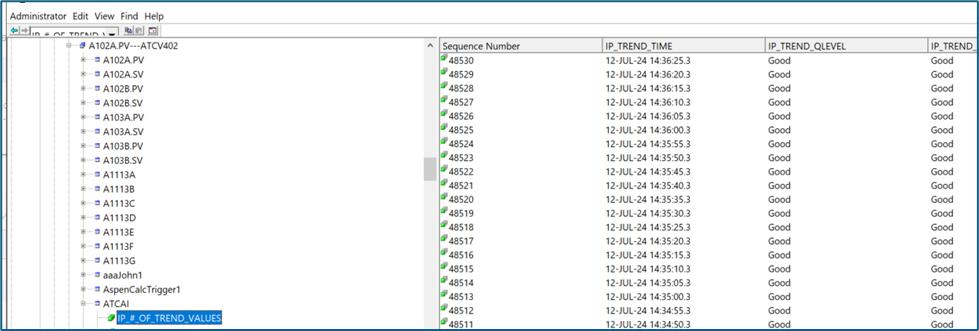
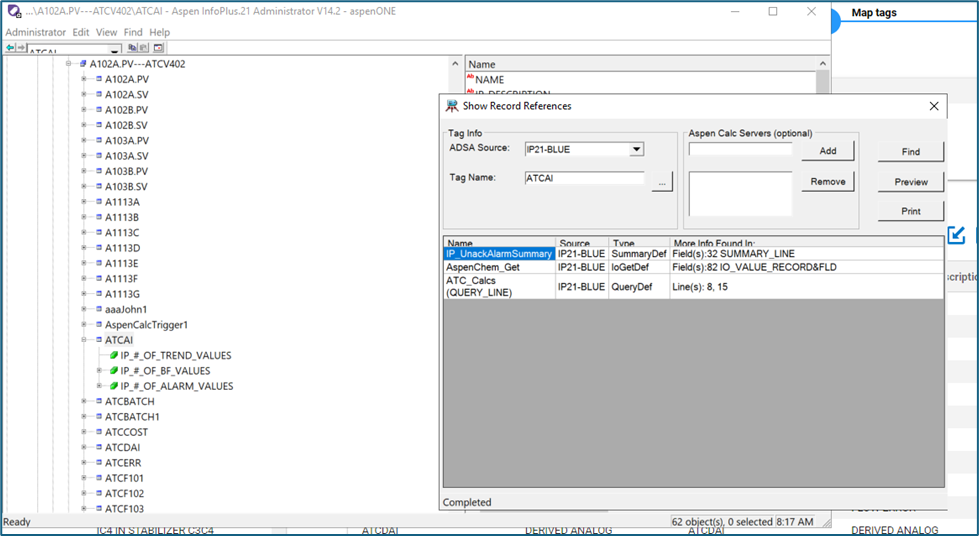
We turned off ATC_Calcs for the ATC tags on Red, as shown in the Record References for tag ATCAI:
Once turned off, values are no longer generated via simulation for the ATC tags on Red. We could then observe the values being passed from Blue to Red by looking at the Trend Values for ATCAI on Red: