Vscan support is available only for MetaDefender Storage Security on Windows.
If you are running MetaDefender Storage Security on Linux, this page is not applicable to you.
Step 1: Understanding Vscan
What is Vscan?
Vscan is an antivirus scanning solution developed by NetApp that allows customers to protect their data from being compromised by viruses or other malicious code. It combines partner-provided antivirus software with ONTAP features to give customers the flexibility they need to manage file scanning.
Major components
Vscanner or Vscan Server) - This is a Microsoft Windows server used for antivirus (AV) scanning.
Vscan engine - This is the partner-supplied antivirus (AV) software that runs on Vscanner(s).
ONTAP Antivirus Connector - This is NetApp-provided software that runs on Vscan Server
LIF (logical interface) - This is the IP address used to access a cluster
- To send files for virus scanning, you must configure ONTAP Antivirus Connector to connect to one or more SVMs by entering the Data ONTAP management LIF, the poll information, and the account credentials.
- The management LIF is polled to retrieve the list of data LIFs
Storage Virtual Machine (SVM) or virtual storage server (Vserver) - this is the logical storage object in NetApp ONTAP software
- Vscan configuration is defined at the SVM level. The scope of the configuration is the SVM, and it only operates on SVM resources.
Vscan configurable components
Scanner pool - This component defines the Vscanners and privileged users that can connect to SVMs. It also defines a scan request timeout period, after which the scan request is sent to an alternative Vscanner, if one is available.
Privileged user - This component is a domain user account that a Vscanner uses to connect to the SVM. The account must exist in the list of privileged users in the scanner pool
Scanner policy - This component determines whether a scanner pool is active. Scanner policies are system-defined, so you cannot create custom scanner policies. Only these three policies are available
- Primary specifies that the scanner pool is active
- Secondary specifies that the scanner pool is active, only when none of the Vscanners in the primary scanner pool are connected
- Idle specifies that the scanner pool is inactive
On-Access Policy - This component defines the scope of an on-access scan
You can specify the maximum file size to scan, file extensions and paths to scan, and file extensions and paths to exclude from the scan
By default, only read-write volumes are scanned. You can specify filters that enable scanning of read-only volumes or that restrict scanning to files opened with execute access:
scan-ro-volumeenables scanning of read-only volumesscan-execute-accessrestricts scanning to files opened with execute access. Note: “Execute access” is different from “execute permission.” A given client will have “execute access” on an executable file only if the file was opened with “execute intent.”
Within on-access mode you can choose from these two mutually-exclusive options
- Mandatory: With this option, Vscan tries to deliver the scan request to the server until the timeout period expires. If the scan request is not accepted by the server, then the client access request is denied
- Non-Mandatory: With this option, Vscan always allows client access, whether or not a Vscanner was available for virus scanning
On-demand task - This component defines the scope of an on-demand scan
- You can specify the maximum file size to scan, file extensions and paths to scan, and file extensions and paths to exclude from the scan. Files in subdirectories are scanned by default.
- You use a cron schedule to specify when a task runs
Vscan file-operations profile (on-access scanning only) - The vscan-fileop-profile parameter for the
vserver cifs share createcommand defines which SMB file operations trigger virus scanning. By default, the parameter is set to standard. File operations are suspended until the external server reports the scan status of the file. If the file has already been scanned, ONTAP allows the file operation. Otherwise, it requests a scan from the server. You can adjust this parameter as necessary when you create or modify an SMB share:no-scan specifies that virus scans are never triggered for the share
standard specifies that virus scans are triggered by open, close, and rename operations
strict specifies that virus scans are triggered by open, read, close, and rename operations
- The strict profile provides enhanced security for situations in which multiple clients access a file simultaneously. If one client closes a file after writing a virus to it, and the same file remains open on a second client, strict ensures that a read operation on the second client triggers a scan before the file is closed
- You should be careful to restrict the strict profile to shares containing files that you anticipate will be accessed simultaneously. Since this profile generates more scan requests, it may impact performance
writes-only specifies that virus scans are triggered only when modified (or newly added) files are closed
- Because writes-only generates fewer scan requests, it typically improves performance.
- If you use this profile, the scanner must be configured to delete or quarantine unrepairable infected files, so they cannot be accessed. If, for example, a client closes a file after writing a virus to it, and the file is not repaired, deleted, or quarantined, any client that accesses the file without writing to it will be infected
On-access scanning is not supported for NFS
Currently, MetaDefender Storage Security supports only on-access scanning with profile type set to writes-only as a configuration from ONTAP. This means only the newly added or modified files will be sent by ONTAP to MetaDefender Storage Security for scanning. In the future, we will add support for standard and strict profile types too. For more details about file operations profile types please read this article provided by NetApp team.
For on-demand task (immediately or on a schedule), use this feature directly from MetaDefender Storage Security.
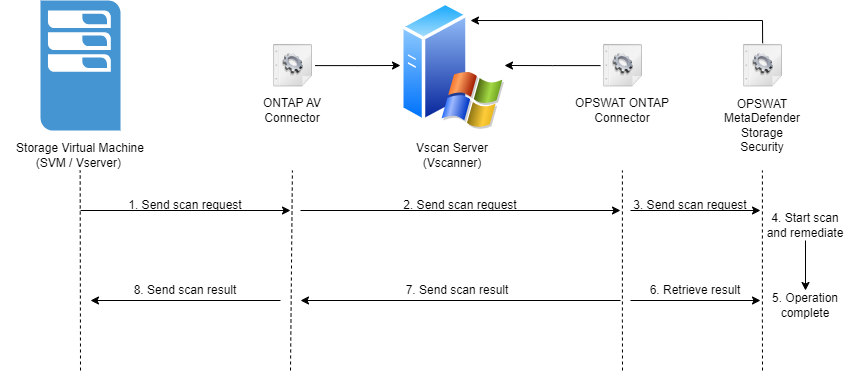
How virus scanning works
Storage systems offload scanning operations to external servers hosting antivirus software from third-party vendors.
Based on the active scanning mode (Vscan file-operations profile), ONTAP sends scan requests when clients access files over SMB (on-access).
The ONTAP Antivirus Connector, provided by NetApp and installed on the external server, handles communication between the storage system and the antivirus software.

Step 2: Prerequisites
Windows Server machine (minimum required version is 2019). This will be the Vscan Server where the following components will be installed:
- NetApp ONTAP Antivirus Connector
- OPSWAT ONTAP Antivirus Connector
- OPSWAT MetaDefender Storage Security
SMB share created from NetApp ONTAP
An AD user with admin privileges that will be logged in on the Vscan Server. This user will become the privileged user for your SMB share and will be used later to add the SMB share to MetaDefender Storage Security.
Read the best practices recommended by NetApp team here.
Step 3: Enable Vscan from ONTAP
Assuming you have already created an SMB share and a Vserver, please execute the below commands from ONTAP CLI.
Step 3.1: Create scanner pool
vserver vscan scanner-pool create -vserver {your-vserver} -scanner-pool {scanner-pool-name} -hostnames {IP-of-Vscan-Server} -privileged-users {AD-Privileged-User}For more details about creating a scanner pool, please read this article.
Step 3.2: Apply policy to your scanner pool
vserver vscan scanner-pool apply-policy -vserver {your-vserver} -scanner-pool {scanner-pool-name} -scanner-policy primaryFor more details about applying a policy to your scanner pool, please read this article.
Step 3.3: Create on-access policy to receive scan requests
vserver vscan on-access-policy create -vserver {vserver-name} -policy-name {policy-name} -protocol CIFSFor more details about creating an on-access-policy, please read this article.
Step 3.4: Modify file operations profile to writes_only(will trigger a file scanning, when the file will be Closed, only for newly created or modified files)
vserver cifs share modify -share-name {cifs-share-name} -vscan-fileop-profile writes-onlyFor more details about modifying a CIFS share, please read this article.
Step 3.5: Enable Vscan
vserver vscan enable -vserver {vserver-name}Step 4: Install NetApp ONTAP AV Connector on the Vscan Server machine
Please download the installer from here and follow the guidelines from NetApp team. The ONTAP AV Connector should be installed under the privileged user configured at step 3.1.
In our testing, we have added a management LIF having the IP of the cluster. User and password were the same from cluster admin.
Step 5: Add SMB share in MetaDefender Storage Security
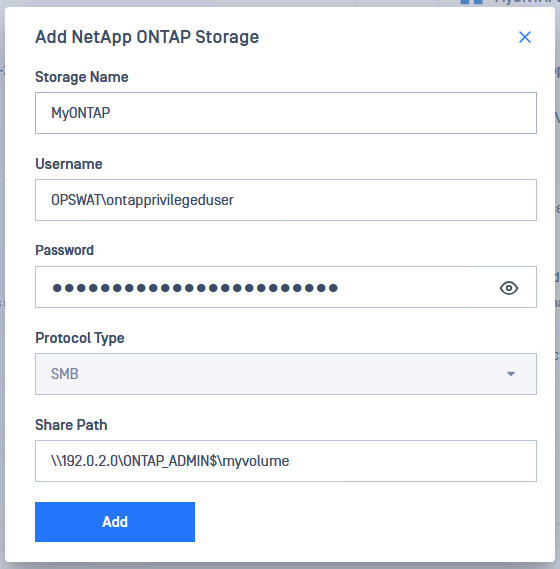
- From MetaDefender Storage Security UI, navigate to Storage Units -> Network-Attached Storage -> Add NetApp ONTAP Storage
- Give your storage a unique name so you can easily identify it later
- Enter the privileged user configured at step 3.1. The following format is required: DOMAIN\Username
- Enter the password of the privileged user.
- SharePath should have the following format:
\\{CIFS-SHARE-IP}\ONTAP_ADMIN$\{CIFS-VOLUME-NAME}. ONTAP_ADMIN$ is required in order to not trigger a new file scan when MetaDefender Storage Security is scanning or remediating the file. - Here is an example of how adding the storage should look

- Click Add in order to finish the process.
Step 6: Install OPSWAT ONTAP Connector on the Vscan Server machine
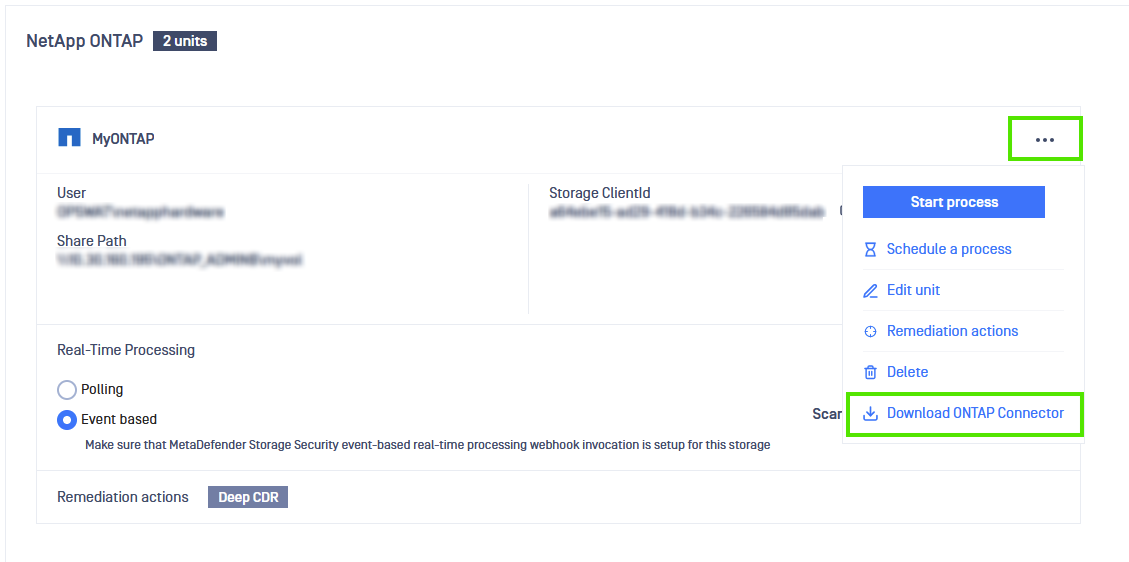
- From MetaDefender Storage Security, navigate to Storage Units -> Network-Attached Storage -> Click on the three dots from your NetApp ONTAP Storage -> Click Download ONTAP Connector

- Unzip the downloaded archive
- Open a console with admin privileges at the same path where the archive was unzipped
- Run the following command line instruction
.\OPSWAT-ONTAP-Connector.exe --install- You will be asked if you want to install the OPSWAT ONTAP Connector under the Local System Account. In our testing, we have used this user and everything worked as expected. However, NetApp team recommends to install it under the same privileged user configured at step 3.1. To do that, close the current installation and run again with following parameters:
.\OPSWAT-ONTAP-Connector.exe --install /user DOMAIN\privilegeduser /password your-password- A confirmation message should be received once the installation is complete.
Step 7: Test the integration
- From MetaDefender Storage Security UI, navigate to Storage Units -> Network-Attached Storage -> Your NetApp ONTAP Storage -> Enable Real Time Processing with Event Based

- Copy a new file to the CIFS/SMB share
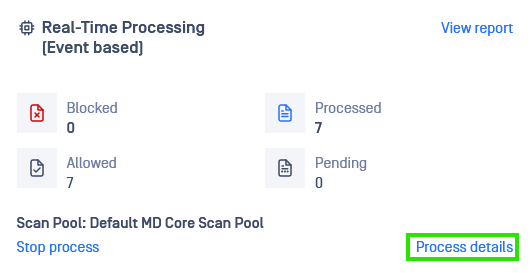
- From MetaDefender Storage Security UI, navigate to Dashboard -> NetApp ONTAP -> Choose your NetApp ONTAP Storage -> Click on Process details for your Real Time processing

- The newly uploaded file should be detected and scanned by MetaDefender Storage Security
- Open the file and modify its content, then save it.
- The modified file should be detected and scanned by MetaDefender Storage Security. If it's not the case, please see the below section named
Troubleshooting.
For different ways to enhance your scanning experience, please read this article
Troubleshooting
Step 1 - Check if the file is received by our ONTAP Connector
- Navigate to
C:\ProgramData\OPSWAT-ONTAP-Connector\logs - Open the log file from today and search for your file name. You should see a message like this if your file was sent by ONTAP AV Connector and received by OPSWAT ONTAP Connector:
[{Time}] [Information] VS_ScanRequest received. Id: {sca-id}. File path : \\?\UNC\{IP-of-smb-share}\ontap_admin$\{volume-name}\{file-name-and-extension} [2024-10-21 15:33:40] [Information] VS_ScanRequest received. Id: 3. File path : \\?\UNC\160.160.160.160\ontap_admin$\myvolume\test-file.txtIf file is not received by our ONTAP Connector, there is a misconfiguration somewhere. Please check:
- privileged user from ONTAP to be the same as NetApp ONTAP user from storage unit from MDSS UI
- ONTAP AV Connector connected to management LIF that has the cluster IP address
You can also enable logging for ONTAP AV Connector by following this guideline
Step 2 - Check if the file is sent by OPSWAT ONTAP Connector to MetaDefender Storage Security
- In the logs from step 1.2, search for your file name. You should see a log containing the following text:
File successfully sent for scanning - If file is not sent to MDSS for scanning, please check the following:
- Real Time Processing with Event-Based to be enabled for your NetApp ONTAP storage unit
ApikeyandStorageClientIdfrom config fileC:\ProgramData\OPSWAT-ONTAP-Connector\config.inito be the same as their values from MDSS UI.
Step 3 - Check if file is discovered by MetaDefender Storage Security
- In MDSS UI, navigate to
Dashboard -> NetApp ONTAP -> Choose your storage unit -> Real-Time Processing [Event Based] -> View Report - Check if the file appears in the table
- If not, something happened with our SMB service. You can check the logs from
C:\Program Files\OPSWAT\MetaDefender Storage Security\services\opswat.mdcs.smbservice\logs\600xto see if you spot anything. Please check in each of the 600x folders. If you need guidance from us, please generate a support package and send it to our support team.
Uninstall
To uninstall OPSWAT-ONTAP-Connector, run the following command line in an admin console
.\OPSWAT-ONTAP-Connector.exe --uninstallA confirmation message will be received.
If you run the command with the executable from C:\ProgramData\OPSWAT-ONTAP-Connector\OPSWAT-ONTAP-Connector.exe, the service will be uninstalled but the executable file will not be deleted because is in use. Finish the uninstallation process and then remove the folder manually.

