This feature allows secure and controlled file transfers between different networks. When enabled, all file and folder operations will be sent from the source MFT to the destination MFT server. Based on the various transfer policies, file operation rules can be specified as:
All files
Only allowed files
Only supervisor-approved files (supervisor approval must be enabled)
If the "All files" option is selected, all files will be mirrored to the secondary MFT, regardless of their state or whether they are blocked.
Supported Operations
MetaDefender Managed File Transfer™ versions must be identical on both source and destination servers.
File and folder actions performed before the integration of both MetaDefender Managed File Transfer™ systems will not be transferred to the destination MFT. To ensure redundancy for all file and folder actions, it is recommended to set up and integrate both MFT systems simultaneously.
Supported file and folder actions:
Operation | File | Folder |
|---|---|---|
Upload (Create) | ||
Share | ||
Move | ||
Rename | ||
Delete | ||
Archiving |
Supported account operations:
Operation |
|---|
Guest account creation |
Guest account update |
Guest account delete |
If the "Aggregate all file/folder actions" option is disabled, make sure the creator user exists on the destination Managed File Transfer.
Guest accounts created while the "Aggregate all file/folder actions" option is enabled will appear on the destination Managed File Transfer as owned by the user who created the API key.
Configuration
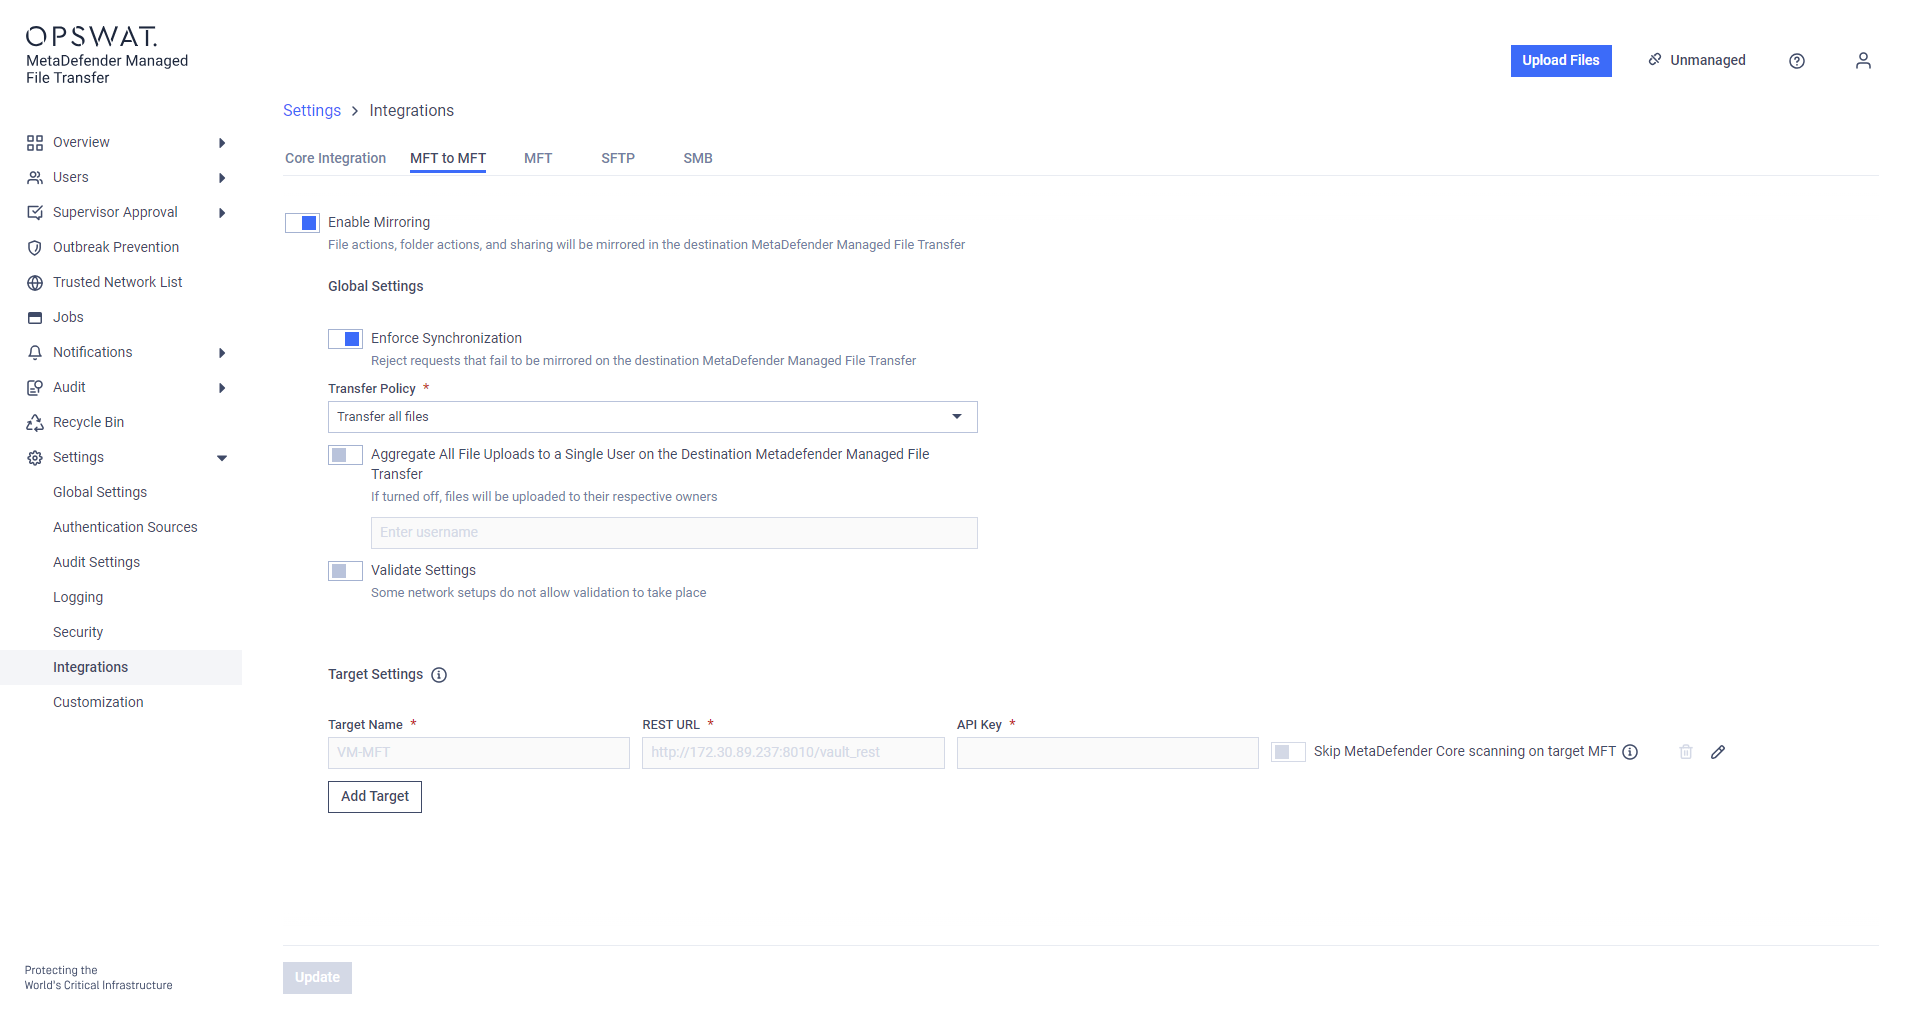
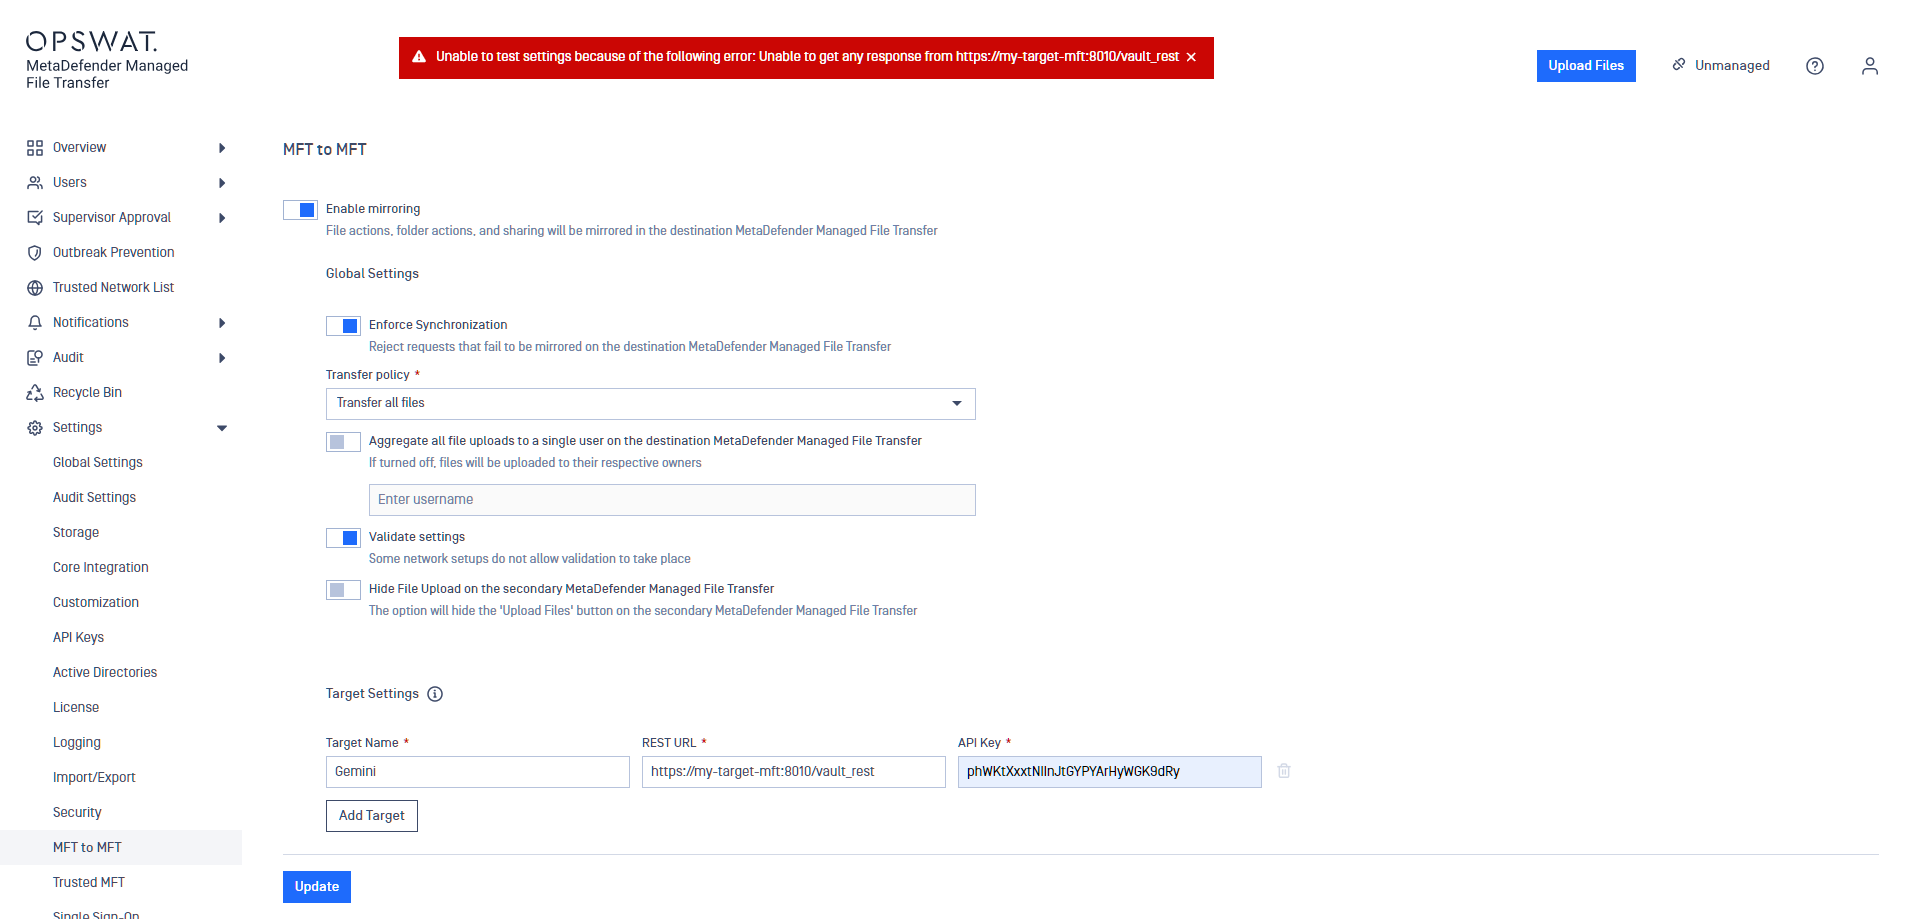
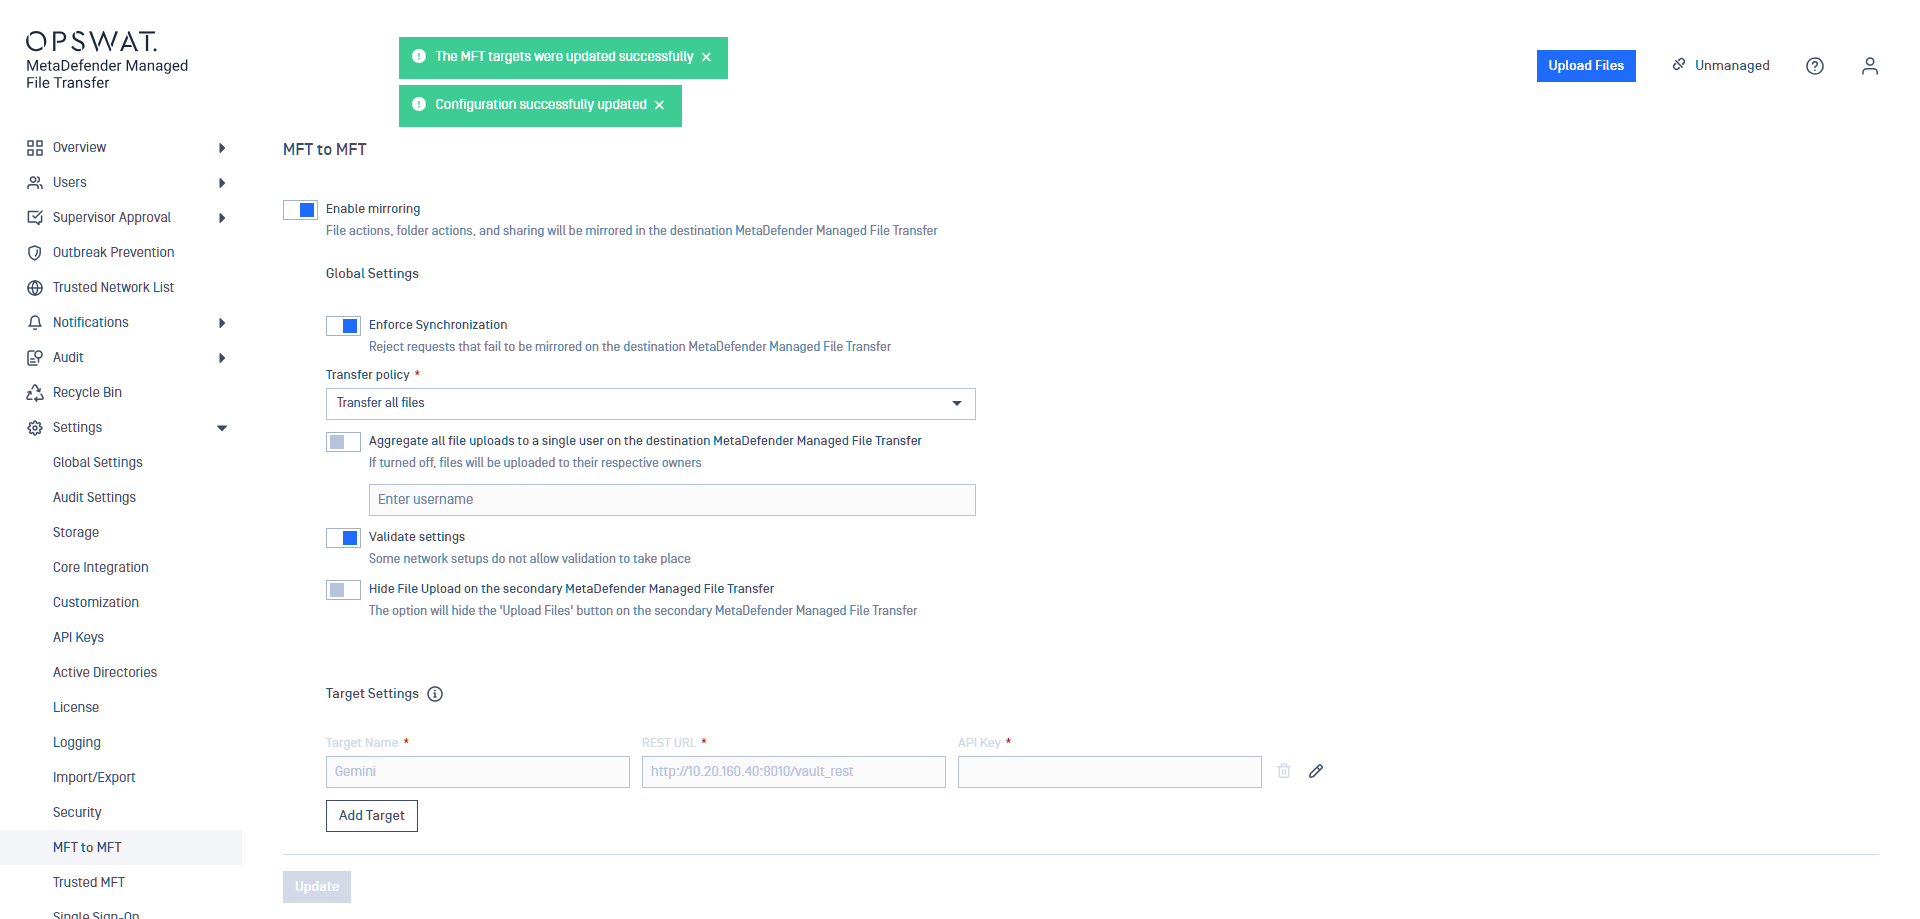
Go to "Settings" --> "Integrations" --> click "MFT to MFT".
MetaDefender Managed File Transfer supports bidirectional integration and communication between MFTs.
By default, this feature is disabled. To enable it, go to "Configuration" and activate "Enable mirroring."
Connecting with an upstream Managed File Transfer instance
Provide the REST URL of the upstream Managed File Transfer instance in this very format: <schema>://<address>:<port>/[vault_rest].
Provide the absolute URL and path to the destination Managed File Transfer's REST service (i.e. //).
Log in as Administrator to the second Managed File Transfer and generate an API key. Use this to authorize requests from the source Managed File Transfer.
Skip MetaDefender Core scanning on target MFT: When this option is toggled on, and the connection uses a system-level API key, files forwarded from this MFT to the target MFT will not be scanned on the target MFT.
Enforce Synchronization is disabled by default: Enable this option to display bad requests for desynchronization between the two Managed File Transfers.
Configure the transfer policy:
Transfer all files
Transfer only allowed files
Transfer only supervisor-approved files (supervisor approval must be enabled):
A file is considered supervised if:
the file is approved by the required supervisors
the file is revoked by a supervisor
the file is revoked by an administrator
Files that have been blocked by MetaDefender Core can be supervised only if they receive an administrator approval
All files in a group transfer must be supervised before the request is forwarded to the upstream Managed File Transfer instance, including files stored in the recycle bin.
Administrators can now revoke blocked files, regardless of ownership.
Prior to version 3.1.0, it was not possible to indicate whether or not the administrators inspected blocked files. They could only approve blocked files to make them available to supervisors.
To transfer only supervisor-approved files, first enable the "Supervisor Approval" feature.
If disabled, the following validation error will be displayed, and the "Update" button will be disabled.

Files will not upload to the destination Managed File Transfer unless:
"Supervisor approval" is enabled
"Other transfer policy" is selected
Aggregate all file/folder actions to a single user: When this option is enabled, all forwarded actions will be treated as if they were requested by a single impersonated user. For example, files will be uploaded to the impersonated user's account, regardless of who initiated the actions on the source Managed File Transfer instance.
The impersonated user must exist on both Managed File Transfer instances. This requires both instances to either integrate with the same Active Directory or have the same local accounts created. If the impersonated user does not exist, all requests will be made on behalf of the user who generated the API key.
Guest accounts created with impersonation will be owned by the impersonated user. If the impersonated user does not exist on the destination Managed File Transfer, the accounts will be owned by the API key owner.
Guest welcome notifications (if configured for the destination Managed File Transfer) will be sent to the email address of the guest account and the creator on the first Managed File Transfer.
Validate Settings: If this option is enabled, an initial connection test is performed to ensure the settings are valid. If disabled, no attempt is made to validate the configuration, which can be useful when responses from the other network are not allowed.
If a data diode is deployed between the two MFT servers, it may be impossible to receive a response from the second MFT. In this case, the validation feature must be manually turned off for the setup to work.
Administrators can use the user mapping functionality to map different users across various MFT-to-MFT integrations.
Multi-MFT
Multi-MFT configuration allows multiple targets for a multi-MFT solution.
From v3.6.2, all user operations are forwarded except for External Users.
Guest account-related operations are forwarded to the specified targets.
All other account-related operations are broadcasted to all targets.
Enable this mode during guest account creation to specify multiple targets. Guest accounts will be created on all targets.
Modify targets while editing guest accounts. Previously uploaded files will be synchronized to newly added targets.
The "Hide File Upload" setting is not supported in this scenario.
If "Enforce Synchronization" is enabled, operations will only fail if not completed on all targets.
Refer to the End-User Guide. for more information on guest user management.