
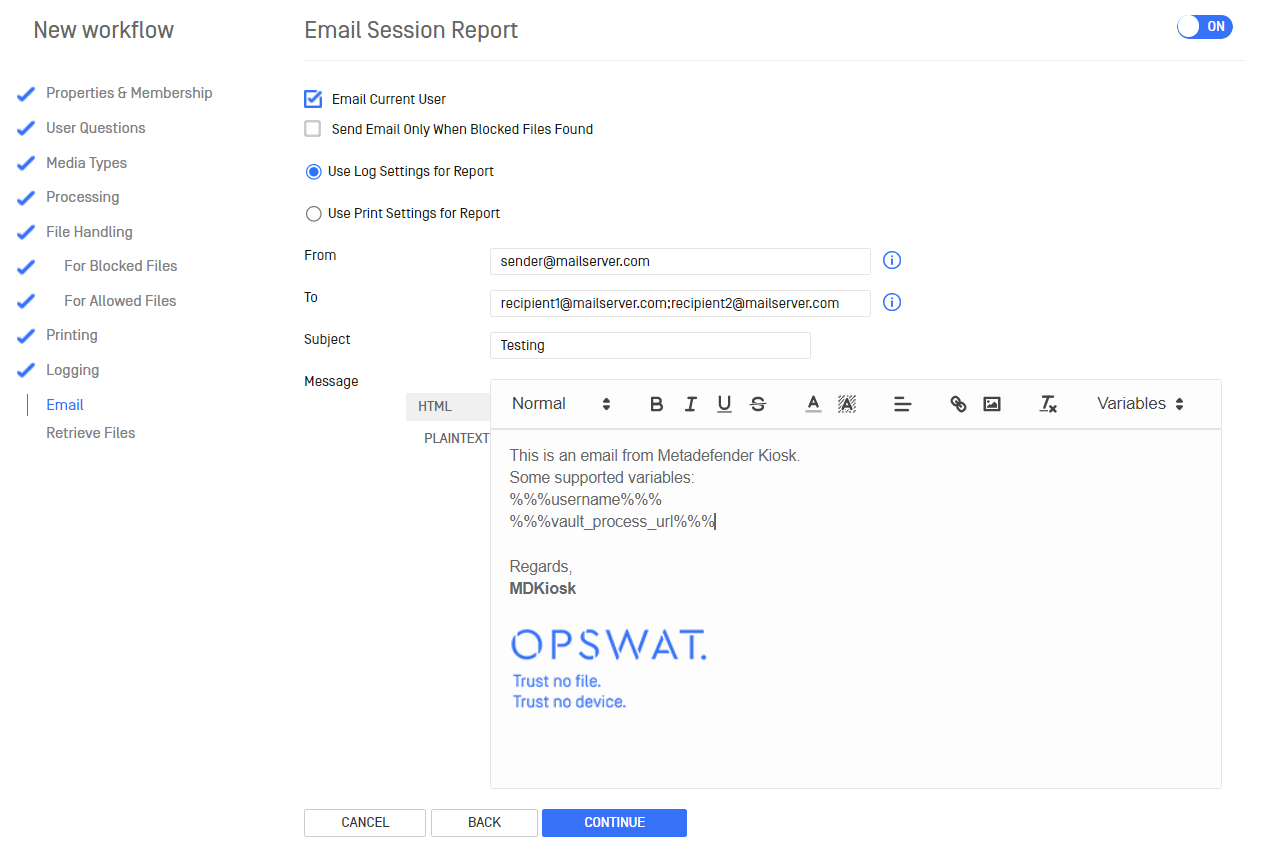
The Email Session Report page lets you set up automatic emails that are sent to a designated recipient after each session is completed. To enable this feature, move the slider on the right hand side of the page to [On]. [Email Current User] allows the ability to send the session report to the currently signed-in user — whether they signed in with an Active Directory account or through Single Sign-On (Microsoft Entra ID, Okta, ADFS, or another OpenID Connect provider) — or allow a Guest user to input an email address when no signed-in identity is available. In an Employee workflow, [Email Specific User] additionally lets the person using the Kiosk choose who else receives the report — see Choosing a Recipient at the Kiosk below. [Send Email Only When Blocked Files Found] will not send an email for every session, only for a session where a blocked file was found. [Use Log Settings for Report] will send the session log as an attachment. [Use Print Settings for Report] will send the session printout as an attachment.
Using Email Current User with Single Sign-On
When Email Current User is turned on for an Employee workflow, MetaDefender Kiosk can send the session report to the email address of whoever signed in — including users who authenticated through Single Sign-On rather than Active Directory. Supported identity providers are Microsoft Entra ID (SAML or OpenID Connect), Okta (SAML), ADFS (SAML), and other OpenID Connect providers.
Prerequisites
An email transport (SMTP or Microsoft 365 Graph API) already configured on the Configuration page.
Single Sign-On already set up as the login method for Employee workflows, under Workflows > Set Default Login Method.
Your identity provider configured to include the user's email address in what it sends back after sign-in. This is usually on by default, but depends on the provider:
Microsoft Entra ID sends an email value automatically.
Okta sends the user's primary email by default; your Okta administrator can point it at a different address field instead.
ADFS does not send an email value by default — your ADFS administrator needs to add an email claim to the relying trust used for the Kiosk before this will work.
Other OpenID Connect providers need an email value included in the sign-in token.
How it works
Open the workflow's Email tab and turn on Email Session Report.
Select Email current user.
Leave the recipient address blank if you only want the signed-in user to receive the report, or also select Email specific user and enter a fixed address if you want a copy sent there too.
Save the workflow.
From then on, when someone signs in through your configured identity provider and completes a scan, the report goes to their email address automatically — they are not asked to type one in.
If the signed-in account doesn't have an email address on file with the identity provider, no report is sent and no prompt appears asking for one — this only happens for guests, who are not signed in at all. If some of your accounts might not have an email address configured, add a fixed recipient as described in step 3 so the report always goes somewhere.
SMTP settings are necessary to be configured to allow sending emails. Configuration can be done in the Advanced Configuration section of the Configuration page. The email template composed in the Configuration page is applied for new workflow creation as a HTML email format, but the Kiosk admin can switch to Plain text. The content of HTML and Plaintext email can be different.
Choosing a Recipient at the Kiosk
In an Employee workflow, you can let the person using the Kiosk pick who receives the scan report, instead of always sending it to a fixed address. This is useful when the report needs to go to someone other than the signed-in user — for example, a visitor sending their report to the colleague escorting them.
To turn this on:
Open the workflow you want to change and go to its Email tab.
Make sure Email Session Report is turned on.
Under Send scan report to, check Email specific user.
Save the workflow.
Once this is on, anyone using that workflow sees a recipient screen after selecting files to scan:
They can start typing a name, and matching people from the organization's directory appear as suggestions to pick from.
They can also type a complete email address directly, even if that address isn't in the directory.
They can add up to 20 recipients for a single session.
The scan doesn't continue until at least one recipient has been added.
The report is sent to everyone chosen this way once the session finishes, in addition to any other recipient already configured for the workflow (such as the signed-in user, if Email Current User is also on).
Directory-based suggestions depend on the Kiosk being able to look up your organization's directory at the time someone uses it. If that lookup isn't available, the suggestion list is simply empty — recipients can still be entered by typing a full email address.
Keeping Your Own Recipient Under a Central Management Policy
If this Kiosk instance is managed by a Central Management policy, the policy's Email Template settings — including the To recipient — normally apply to every instance that uses the policy. If you need a particular instance to keep its own recipient address instead (for example, so blocked-file alerts always reach that site's administrator), the policy can be configured to skip the To field for that policy going forward.
In the Central Management policy's Email Template settings, enabling Do not apply this configuration to the device next to To stops the policy from overwriting that field on instances that use it — each instance keeps whatever To address is already configured on it locally. The From address, Subject, and all other Email Template settings continue to be applied from the policy as normal.
This option is only available when editing a Central Management policy, not when editing an individual Kiosk instance directly.
Some predefined variables are supported to generate session-constraint values. These variables are escaped with corresponding values configured in the WF and the receiver can see them in the email body. The admin can get the meaning of each variables via information icon on each variable
Variable | Description |
|---|---|
%%%% | The Kiosk session ID |
%%%% | Username logged into this session. For guest, the username is Guest |
%%%% | The date of the Kiosk session |
%%%% | The start time of the Kiosk scanning session |
%%%% | The end time of the Kiosk scanning session |
%%%% | The model of the inserted media |
%%%% | The serial number of the inserted media |
%%%% | The device type of the inserted media |
%%%% | The device ID of the inserted media |
%%%% | The total files are scanned by Kiosk |
%%%% | The number of blocked files by Kiosk |
%%%% | The number of allowed files by Kiosk |
%%%% | The number of files is skipped scanning by Kiosk |
%%%% | The number of files is remediated by Kiosk |
%%%% | MFT server URL where files are processed |
%%%% | Login IDs to access files uploaded to MFT |
%%%% | MFT URL where allowed files are copied to |
%%%% | MFT URL where blocked files are copied to |
%%%% | MFT URL where files are downloaded from |
Existing workflows are not updated with new email template.
Note:
The maximum of size of an attachment is 25MB which is the limit for popular email sending providers and clients like Gmail, Outlook, SendGrid, etc. In case the session log is over 25MB, it is divided into approximately 25MB files where each file is sent in separate emails.
The image attached in email should be a low-resolution logo not exceeding 100KB and only one in the email
Multiple recipients are separated by semi-colon.
Identical recipients have to receive duplication emails.
If Email Current User is on and the signed-in user's account has no email address on file, the report is simply not sent — there is no fallback prompt for signed-in users. Add a fixed recipient if this is a possibility for your organization.
When using Email Specific User, recipients are added one at a time from a suggestion list or by typing an address (not a semicolon-separated list), up to 20 per session, and this option is available in Employee workflows only.