
MetaDefender Kiosk recognizes a growing list of encrypted USB devices out of the box, but if you have an encrypted USB drive Kiosk doesn't yet recognize, you can add support for it yourself using an encrypted USB device profile — a small file that tells Kiosk how to recognize and unlock that specific device model. Profiles are created on a Windows workstation using the Kiosk Encrypted USB Profiler, then imported into the Web Management Console. Available starting in Kiosk 4.8.3.
Prerequisites
MetaDefender Kiosk 4.8.3 or later.
Administrator access to the Web Management Console.
A Windows machine with a free USB port to run the Kiosk Encrypted USB Profiler on — it doesn't need to be the Kiosk itself, since the profile file it produces can be carried over on removable media.
The encrypted USB device you want to add support for, along with its unlock password. The device needs to unlock successfully at least once during the capture process.
Creating a device profile with the Kiosk Encrypted USB Profiler
The Kiosk Encrypted USB Profiler (KioskEncDeviceProfiler.exe) ships in the Kiosk installer's Client folder. You run it on any Windows machine — not necessarily the Kiosk itself — to capture how a specific encrypted USB device model unlocks, then carry the resulting profile file over to the Console. The tool guides you through four steps.
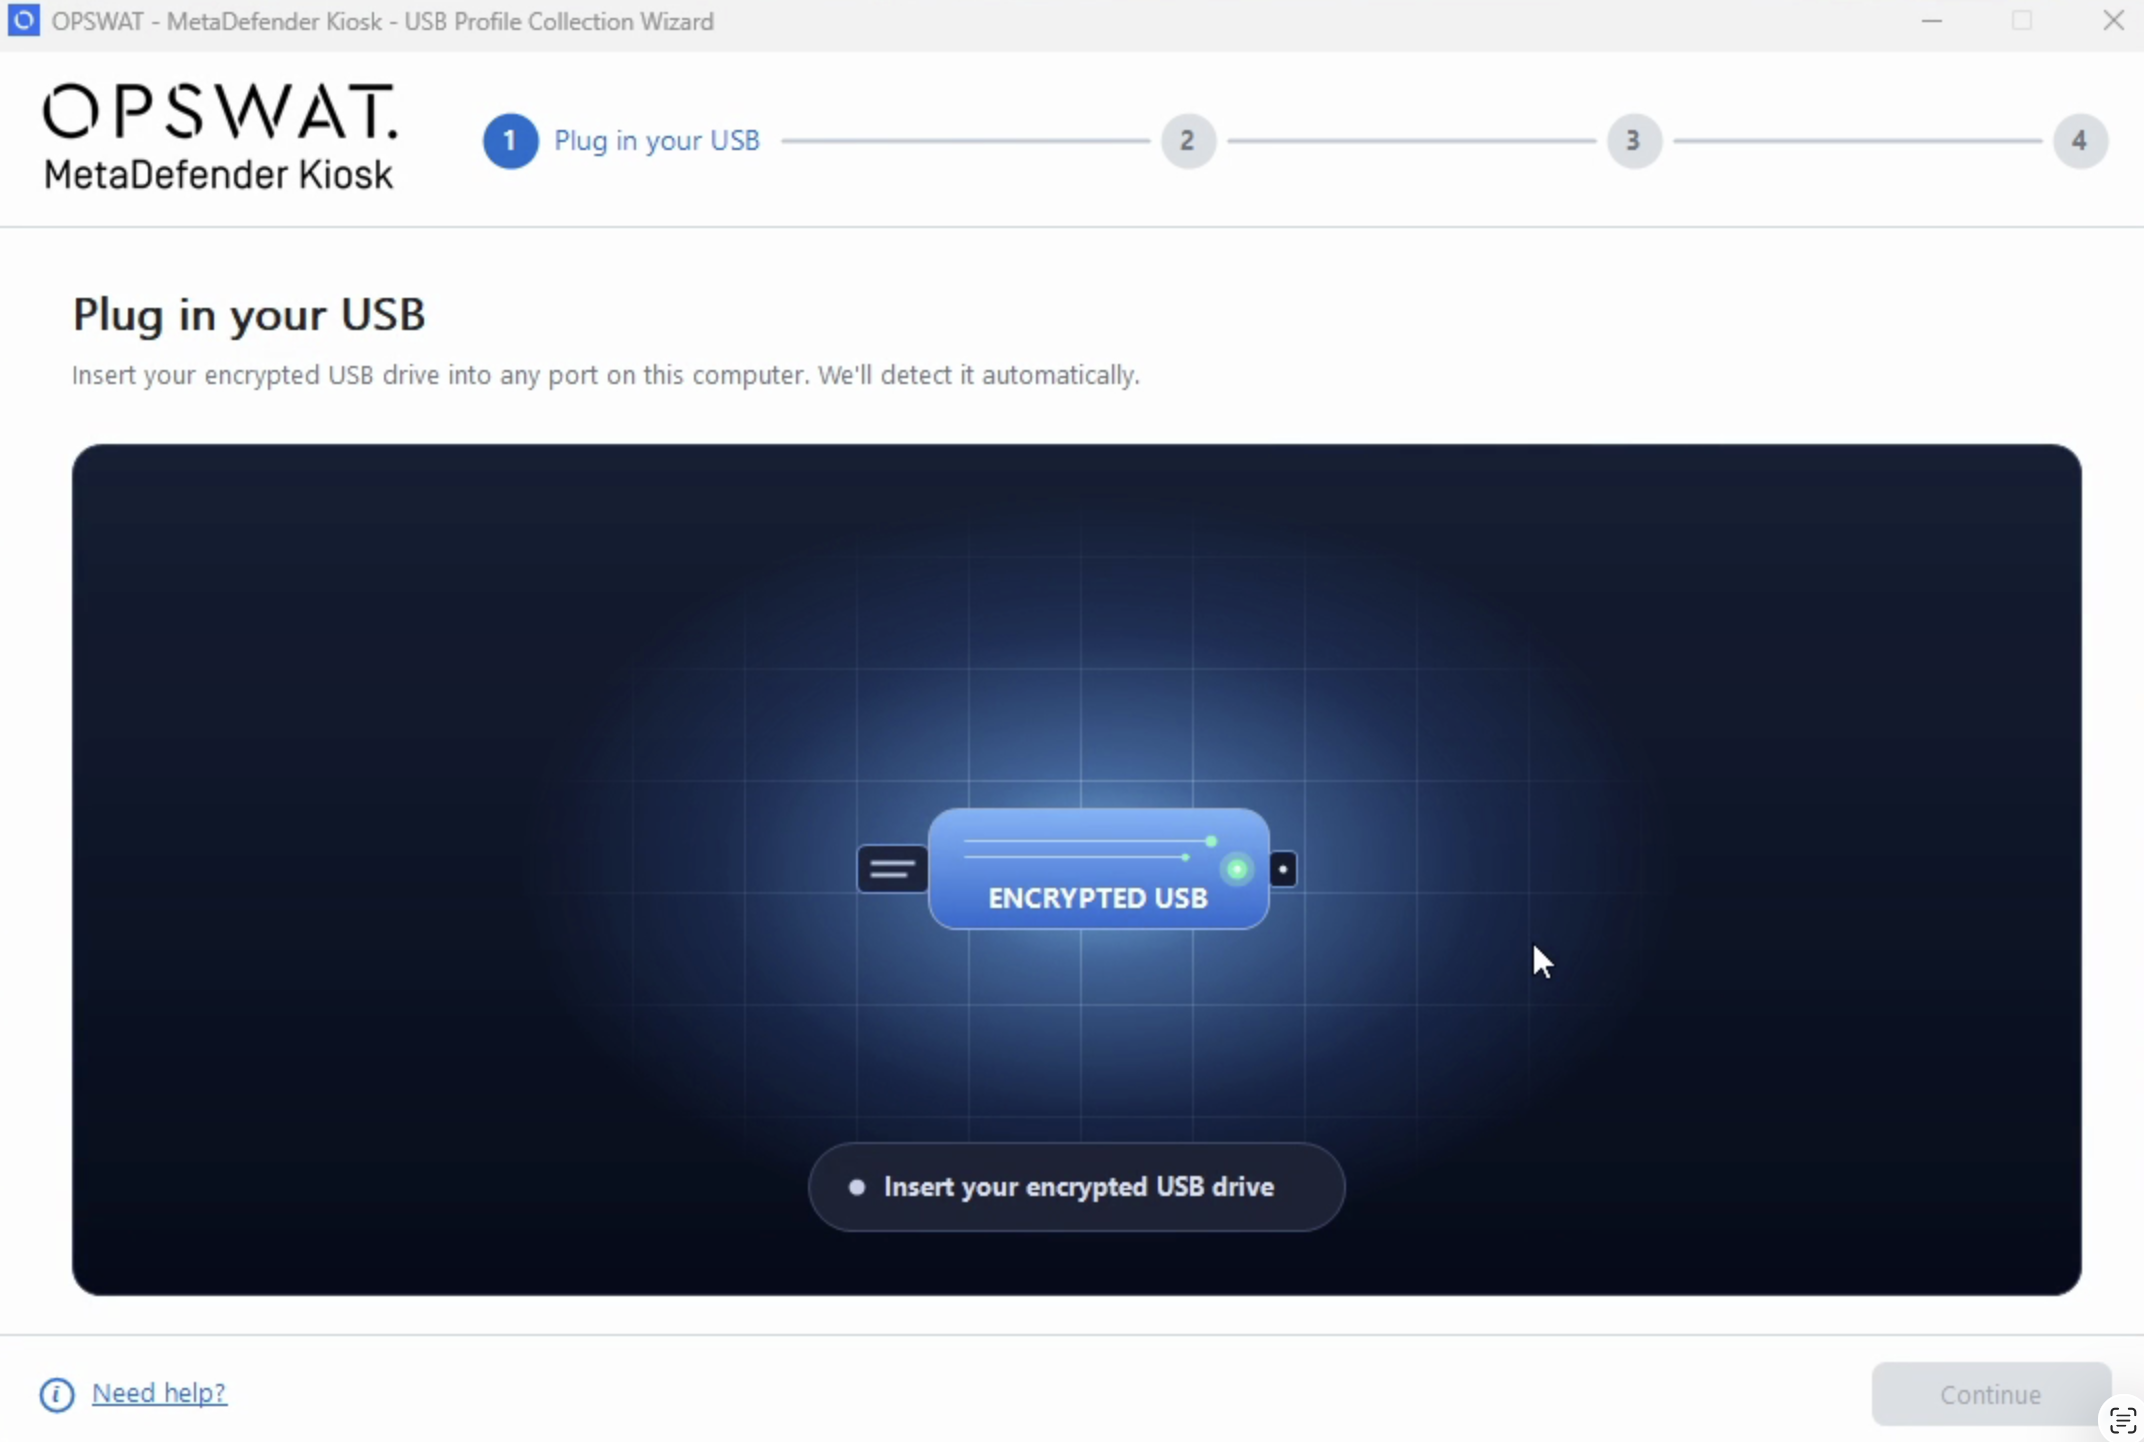
Step 1: Plug in your USB
Launch KioskEncDeviceProfiler.exe and insert the encrypted USB drive you want to profile into any port on the computer. The tool detects it automatically — once it does, the Continue button becomes available.
Step 1 "Plug in your USB" screen. Upload this image via the DevHub editor's image tool and place it here.
Step 2: Choose unlocker
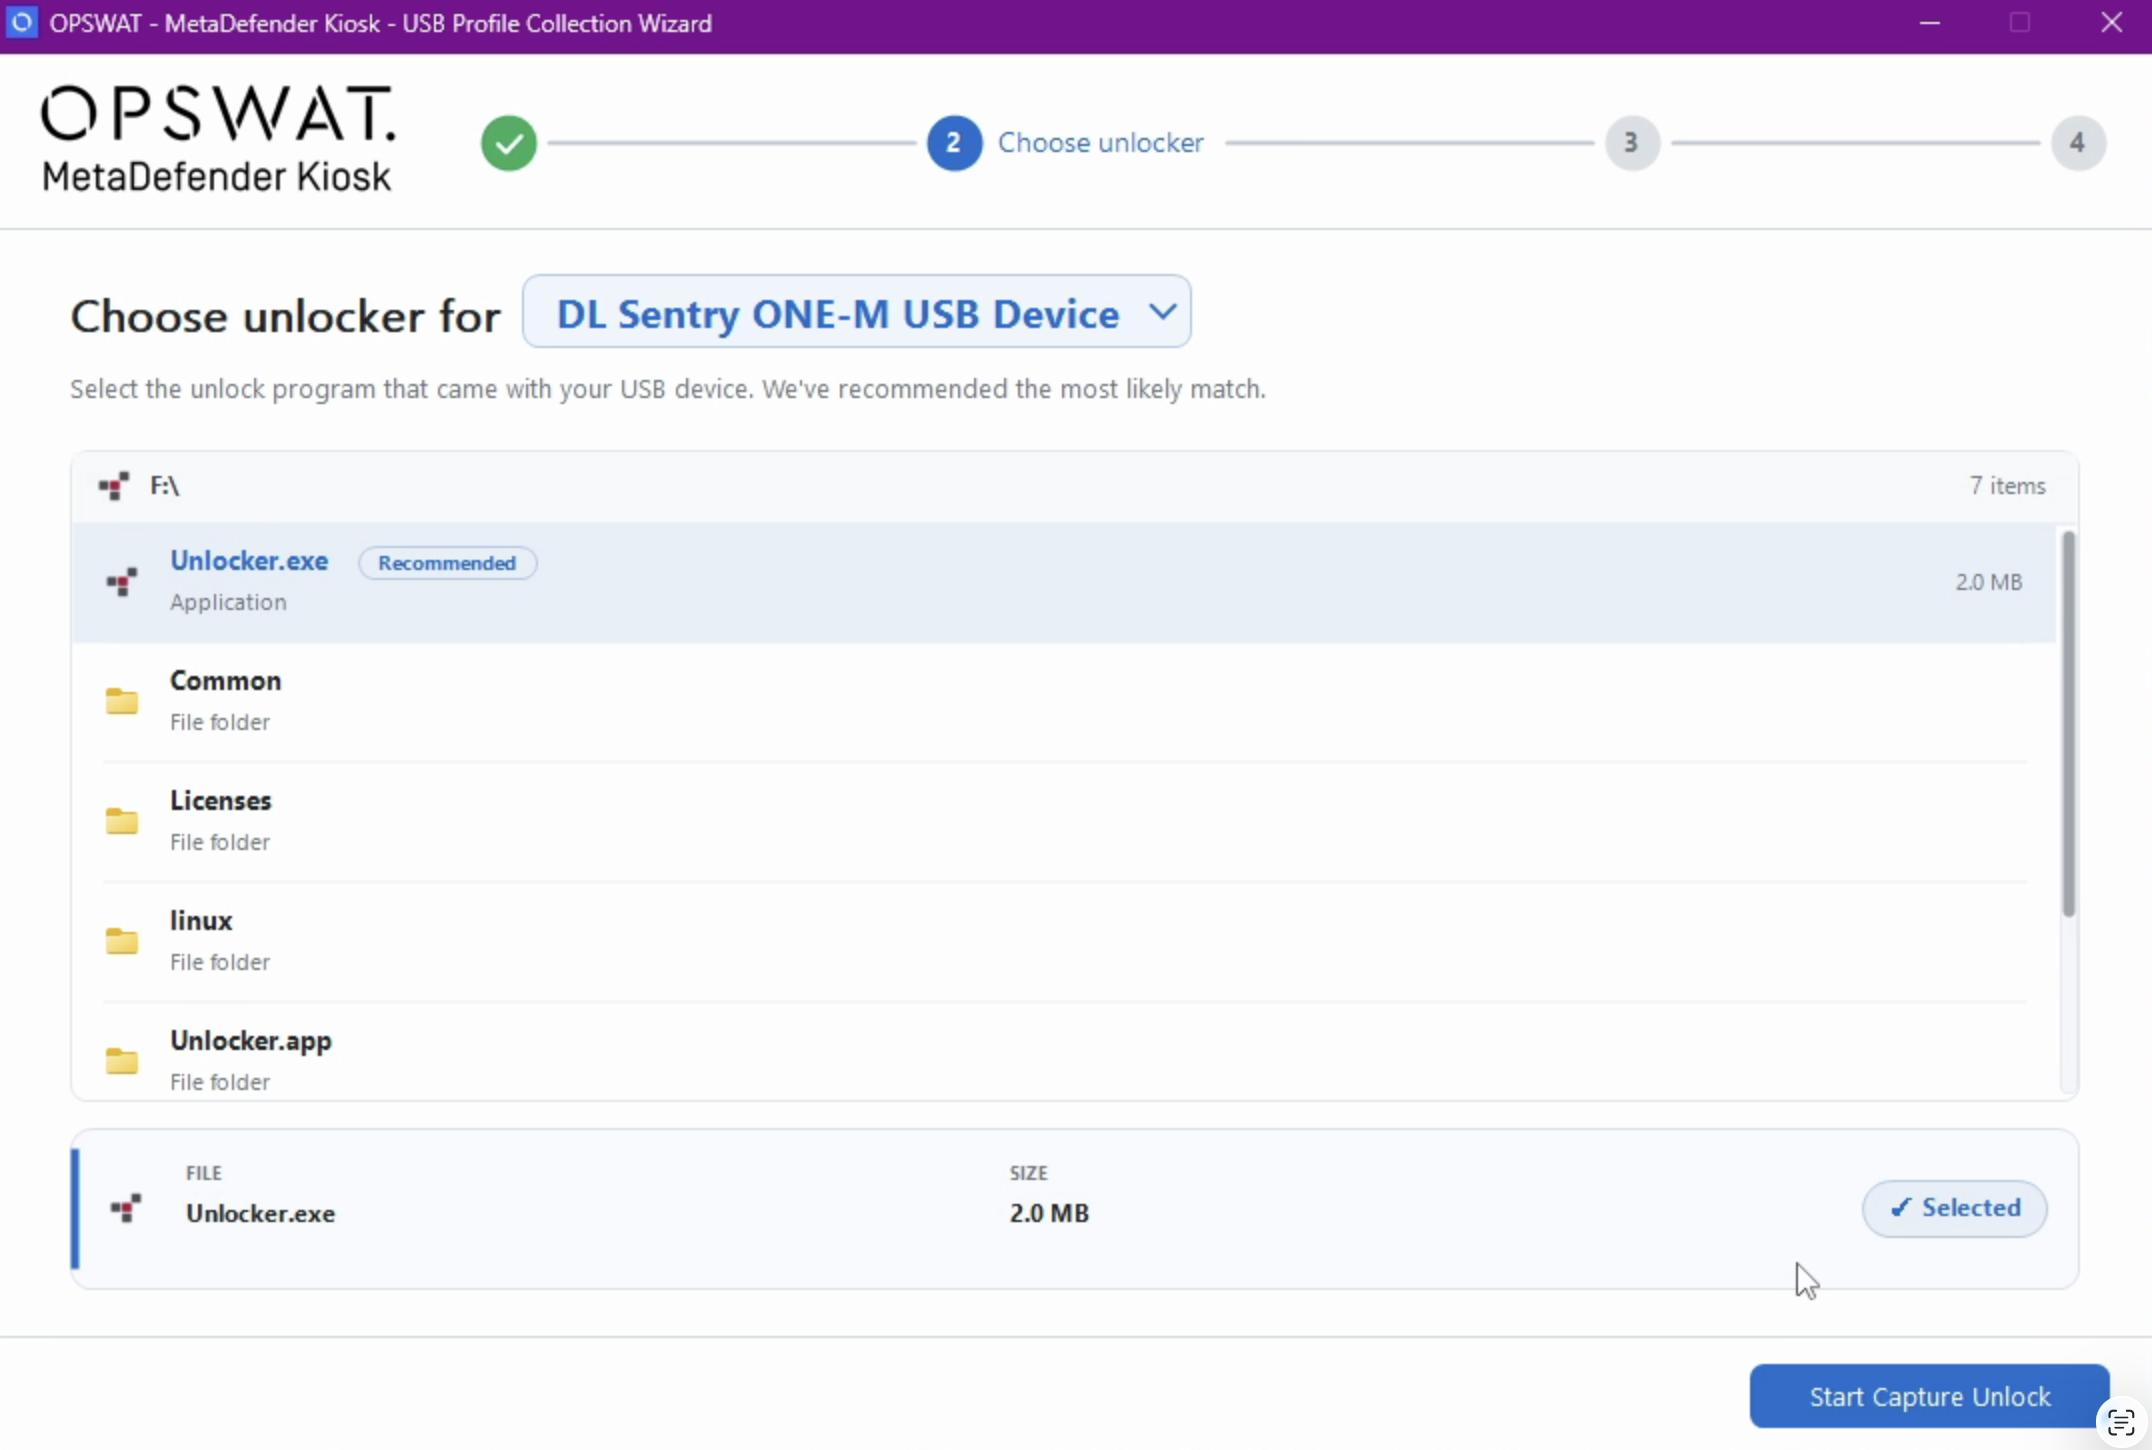
The tool recommends the unlock program it thinks matches your device from the files on the USB drive (for example, Unlocker.exe, tagged Recommended). Confirm the selection — or choose a different file from the drive's contents if the recommended one isn't correct — then click Start Capture Unlock. If more than one encrypted USB device is plugged in, use the dropdown at the top of this step to pick which one to profile.
Step 2 "Choose unlocker" screen. Upload this image via the DevHub editor's image tool and place it here.
Step 3: Capture unlock
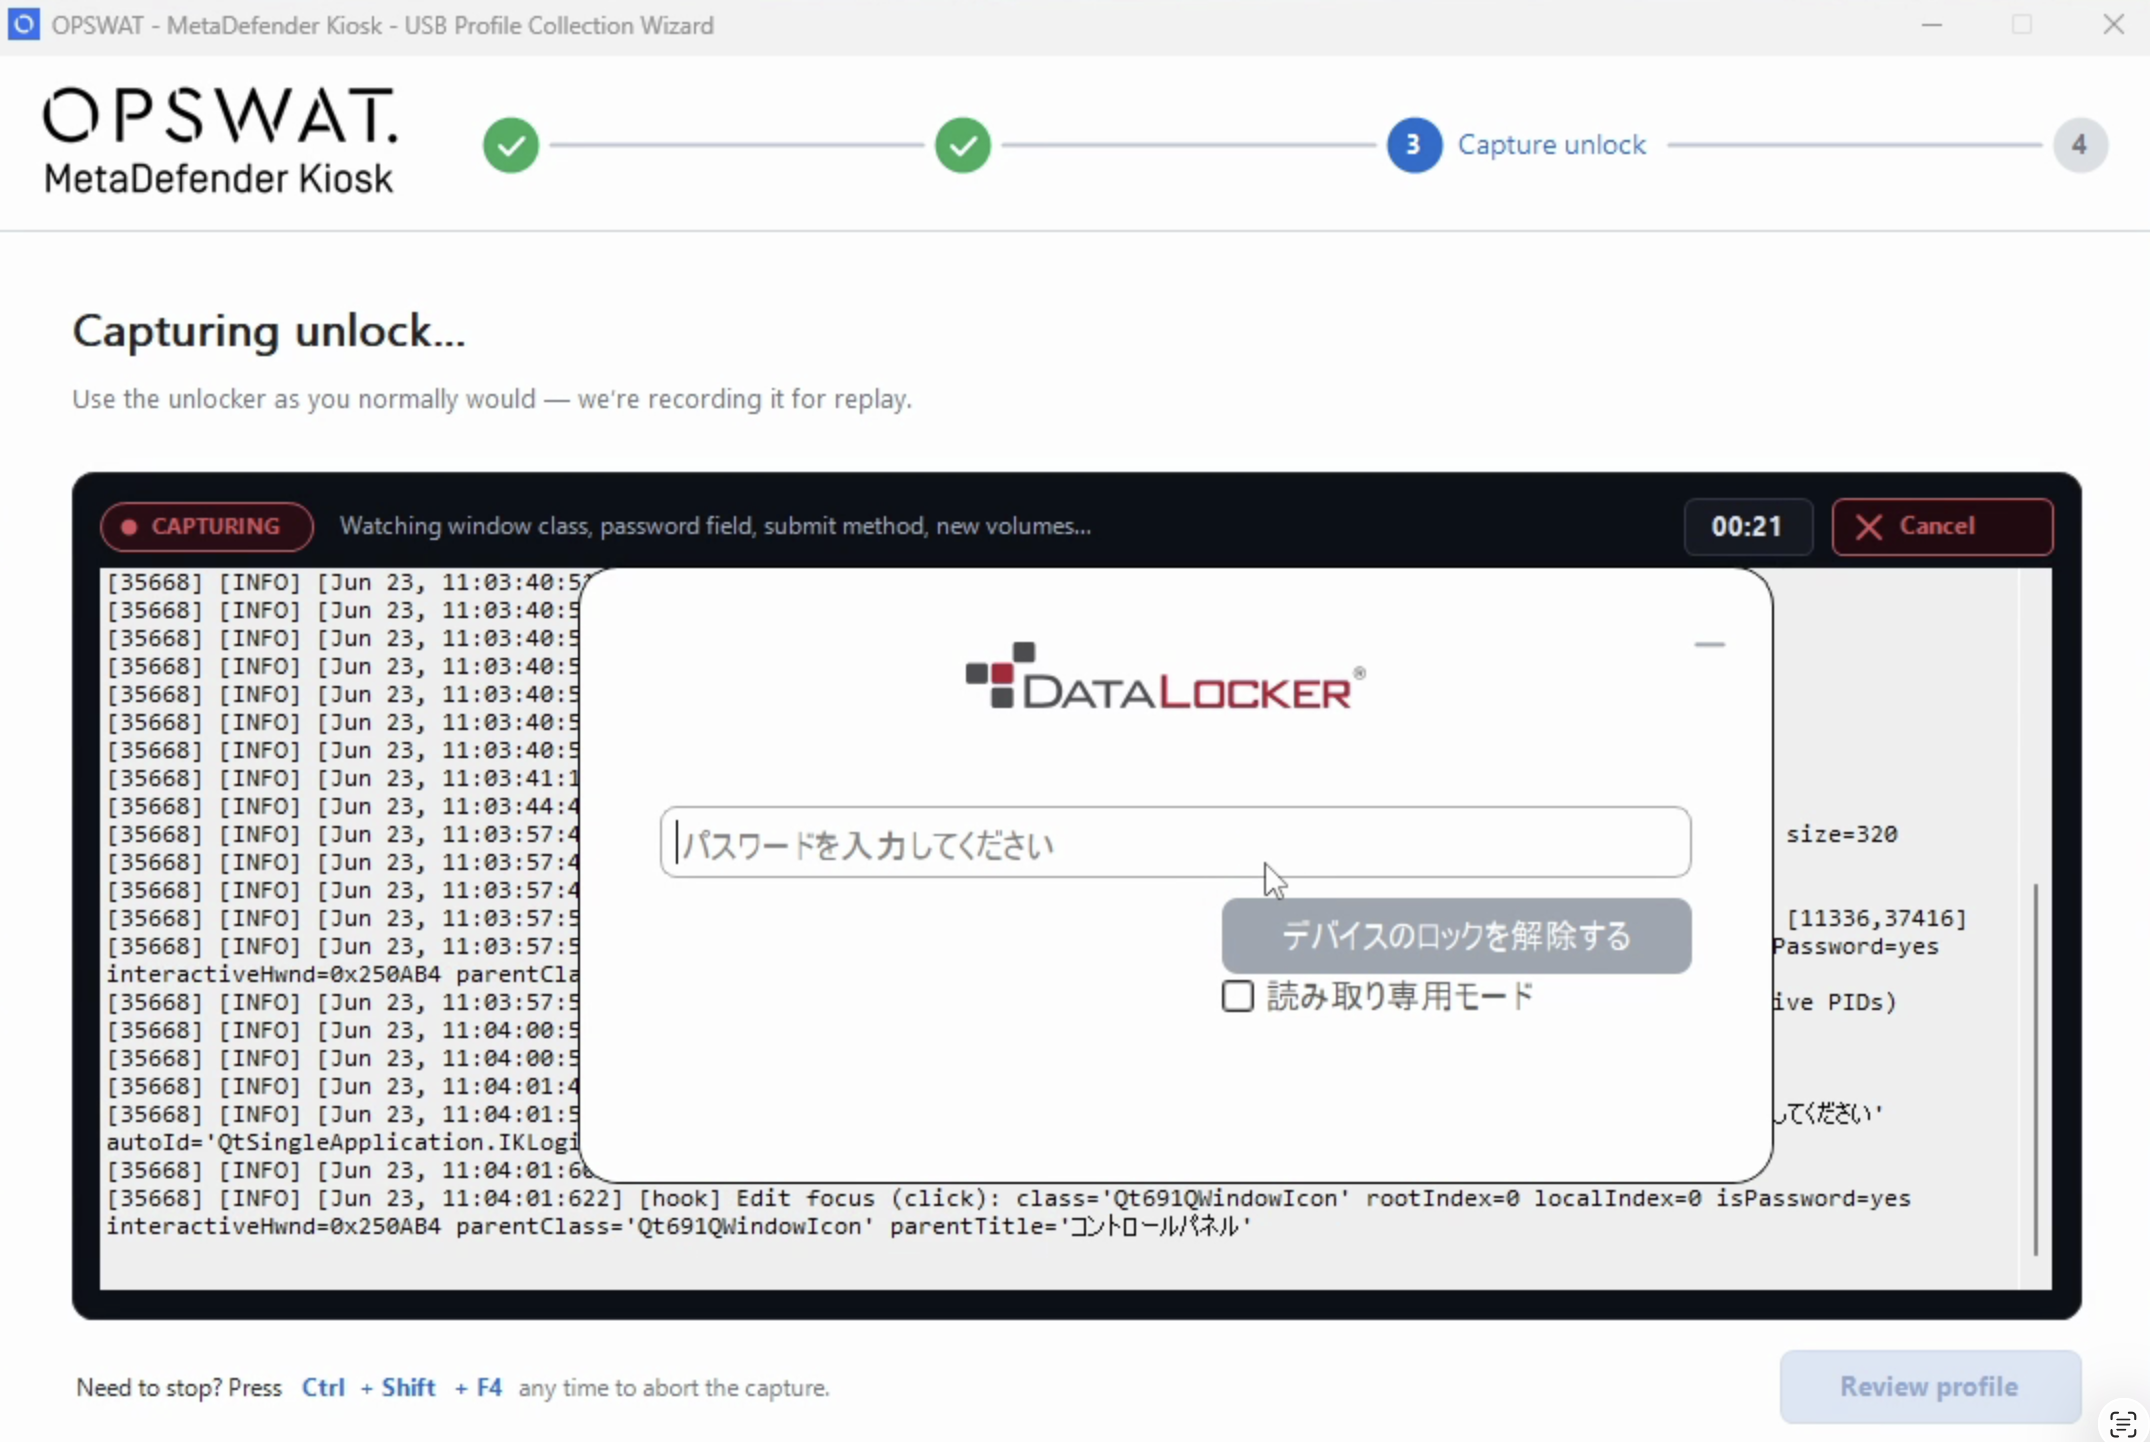
Use the unlock program exactly as you normally would: when the device's own unlock application pops up, enter its password and click that application's own unlock button yourself. The Profiler doesn't unlock the device for you — it watches and records how the unlock program behaves so it can recognize and replay the same behavior later.
Step 3 "Capturing unlock" log view. Upload this image via the DevHub editor's image tool and place it here.
Step 3, the device's own unlock application shown during capture. Upload this image via the DevHub editor's image tool and place it here.
If you need to stop partway through, press Ctrl+Shift+F4 to abort the capture. Once the device unlocks successfully, click Review profile to continue.
Step 4: Review & save
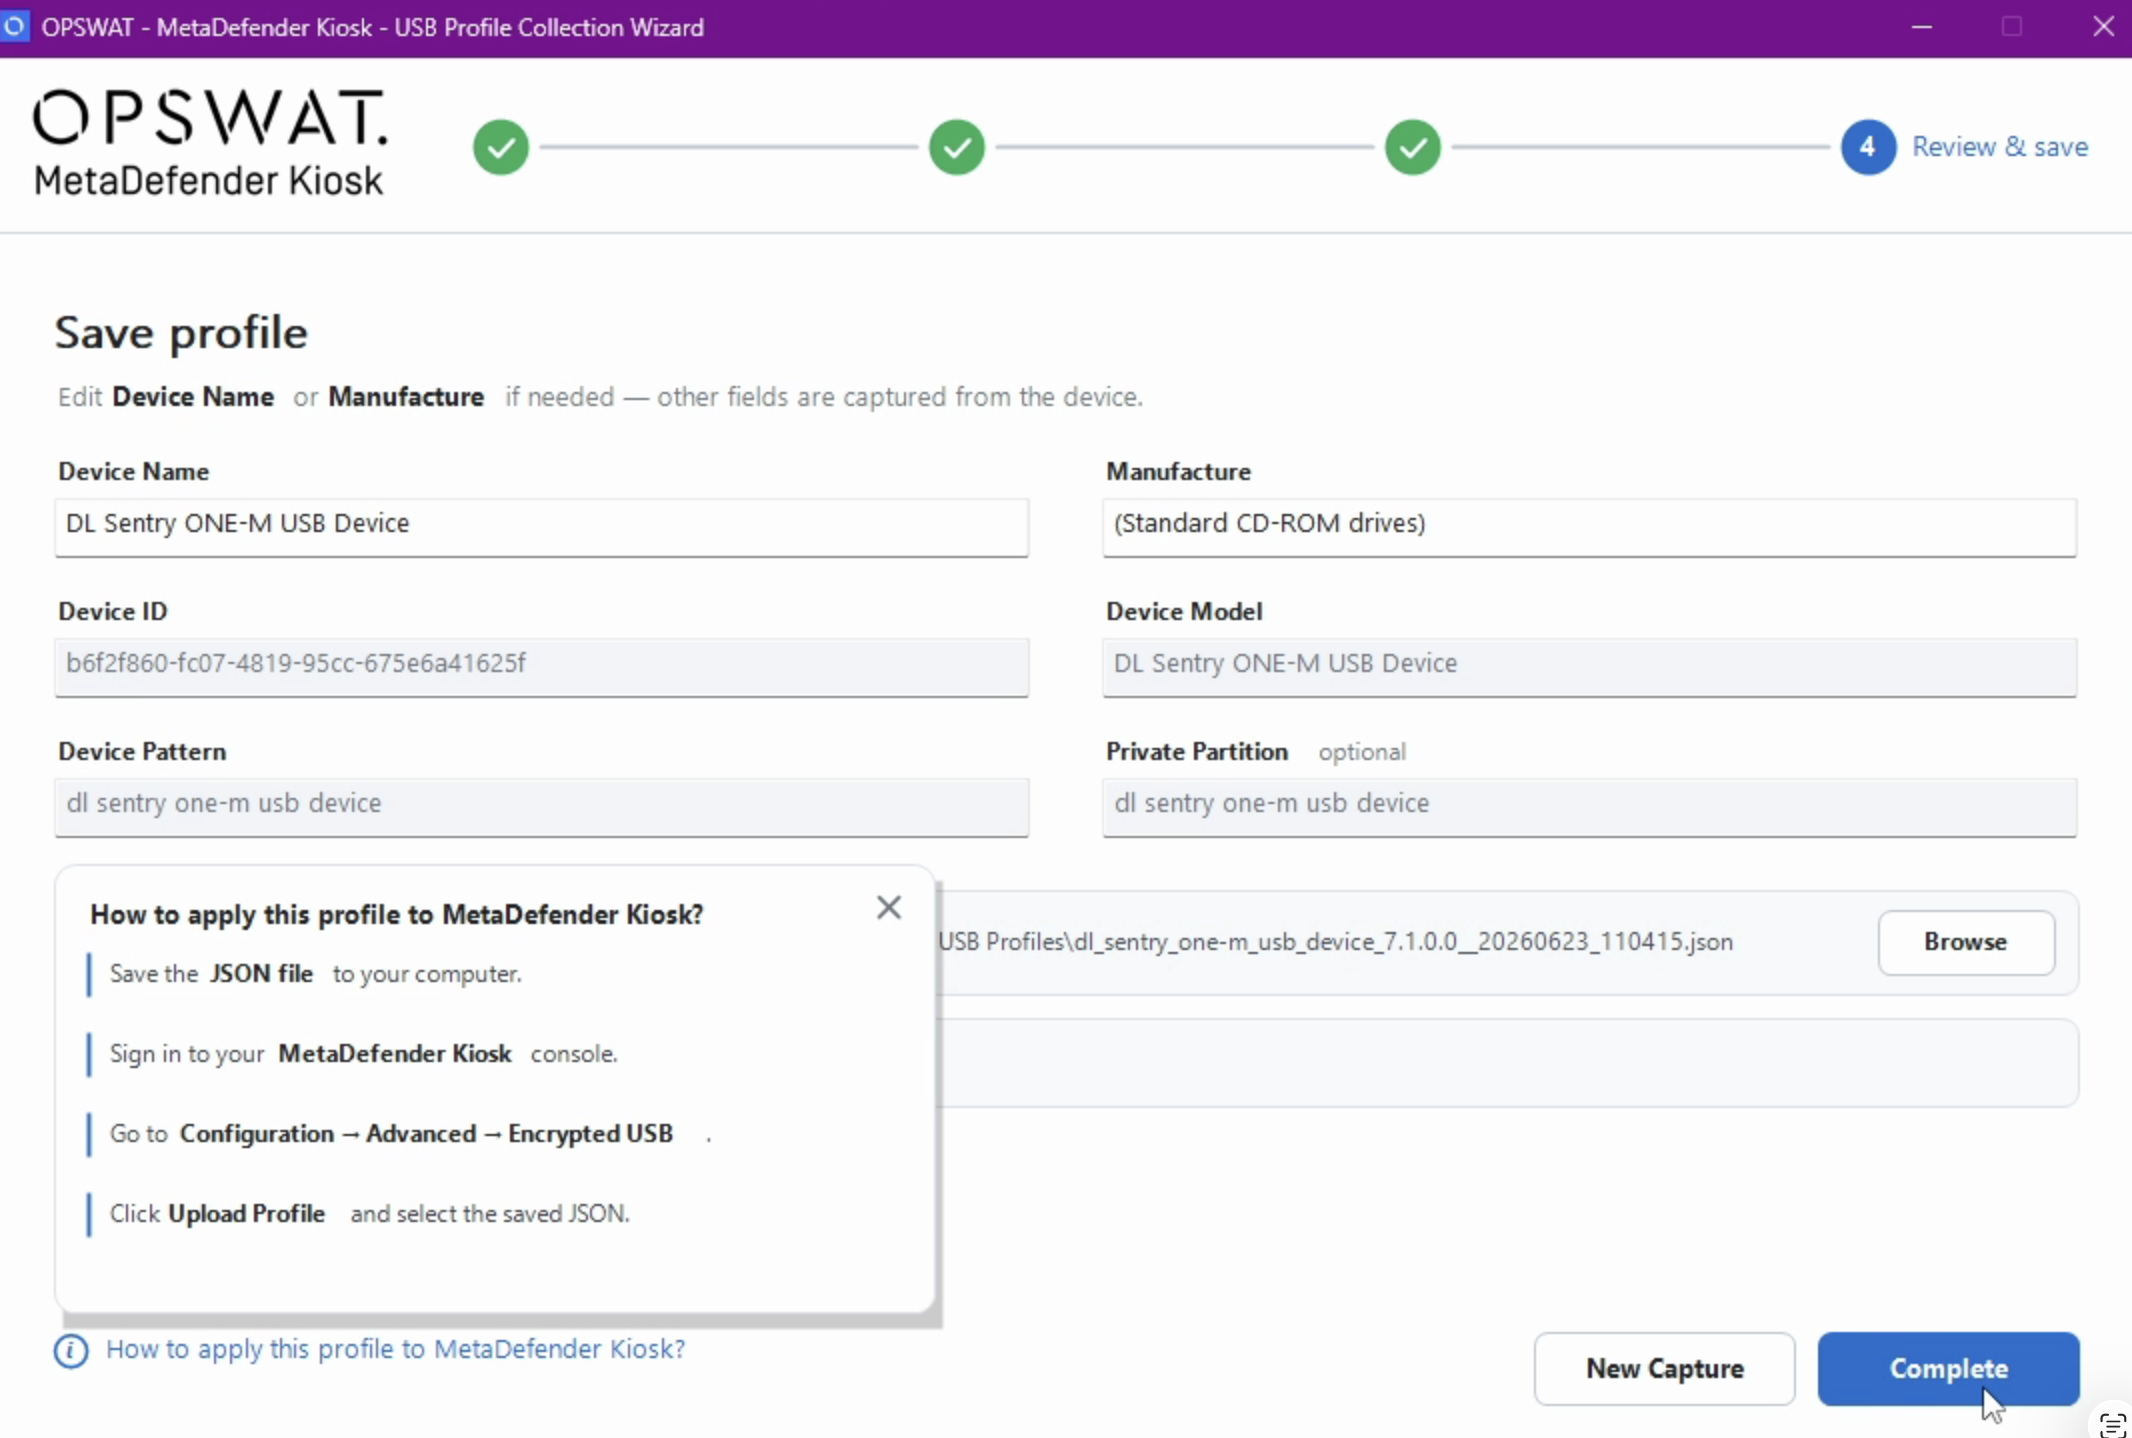
Review the captured details. You can edit the Device Name and Manufacture fields if needed; the remaining fields are read-only, since they're captured directly from the device. Choose where to save the profile (a default filename and folder are suggested, with a Browse button to pick a different location), then click Complete. Click New Capture instead if you want to start over.
Step 4 "Review & save" screen. Upload this image via the DevHub editor's image tool and place it here.
This step also includes a "How to apply this profile to MetaDefender Kiosk?" link with a quick reminder of the import steps — see Importing a device profile below for the full instructions.
The Profiler runs fully offline — no network connection is required or used at any step, making it suitable for air-gapped environments. The resulting JSON file is portable: generate it on any convenient Windows machine, then transfer it (for example, on a USB drive) to wherever you'll import it in the Console.
The Profiler's own in-app instructions say to "Click Upload Profile" when applying a saved profile, but the Console's actual control for this is labeled Import JSON files (see below) — use the Console steps below regardless of what the Profiler's popover calls the button.
The Kiosk Encrypted USB Profiler currently works with devices whose own unlock program is a standard Windows or Qt-based application. Devices that rely on other unlock-program formats, or that eject and reconnect themselves as a different drive partway through unlocking, aren't supported by the Profiler yet.
Importing a device profile
Sign in to the Web Management Console with an administrator account.
Go to Configuration, then open the Advanced tab.
Expand the Encrypted USB section.
Click Import JSON files and select the profile file you want to add.
Kiosk checks the file before adding it — if it's incomplete, corrupted, or already imported, you'll see an error instead of a new entry.
Click Save Updates to apply the change. Selecting a file alone doesn't save it — you must save before the new profile takes effect.
Once saved, the device will unlock and be processed by Kiosk the next time it's connected, the same as any other supported encrypted USB device.
If you use Encrypted Drive Verification (under System Hardening) to require approval of unrecognized encrypted devices, importing a profile for a device counts as approving it — the device won't appear in your pending-approval list, since importing its profile already confirmed it.
Managing imported profiles
The Encrypted USB section lists every profile you've imported:
Column | Description |
|---|---|
Display name | The name shown for the device. |
Model | The device model the profile applies to. |
Software version | The version of the device's unlock software the profile was captured against. |
Date imported | When the profile was added. |
Use the search box to find a specific profile in a long list. To remove a profile you no longer need, use the action menu next to its row — Kiosk will no longer recognize that device model once its profile is removed (it falls back to whatever built-in support existed for it before, if any).
To back up your imported profiles or move them to another Kiosk, click Export all (.zip) to download every profile as a single archive. You can then import the individual files from that archive into another Kiosk the same way described above.
Editing the contents of an already-imported profile isn't supported. If a profile needs to change, remove it and import a corrected file instead.
Things to know
If a device matches both an imported profile and one of Kiosk's built-in supported devices, Kiosk uses the imported profile.
Editing the contents of an already-imported profile isn't supported from either the Console or the Profiler. If a profile needs to change, capture a new one and re-import it — see Managing imported profiles.