The OPSWAT Media Validation Agent (OMVA) is a lightweight tool that is deployed on Windows endpoints ensuring that the contents of media can only be accessed if it has been processed & allowed by MetaDefender Kiosk. With the media manifest feature enabled, after media is processed by MetaDefender Kiosk, it will contain a media manifest that is digitally signed and hashes of all the clean and approved files. When an endpoint has OMVA installed, any media that is inserted is first checked for a valid digital signature from the Kiosk and then a hash check is performed verifying that the contents of the media have not been altered.
Encrypted devices supported by Kiosk are not supported by OMVA
Supported Operating Systems
OMVA is supported on the following operating systems (32\64 bit):
Windows XP SP3
Windows Vista
Windows 7
- Requires Service Pack 1 and Microsoft updates KB2533623 and KB3033929
Windows 8
Windows 8.1
Windows 10
Windows 11
Windows Server Small Business Server standard FE (version: 2011 Standard)
- Requires KB2533623 installed (http://go.microsoft.com/fwlink/p/?linkid=217865)
Windows Server 2008 R2*
Windows Server 2012*
Windows Server 2012 R2*
Windows Server 2016*
Windows Server 2019*
Windows Server 2022*
*Any server OS requires KB4474419 installed (https://support.microsoft.com/en-us/help/4474419/sha-2-code-signing-support-update)
Installing the Agent
The OMVA installer can be obtained from the Kiosk Resources page or My OPSWAT. Run the .msi obtained on the Windows endpoint.
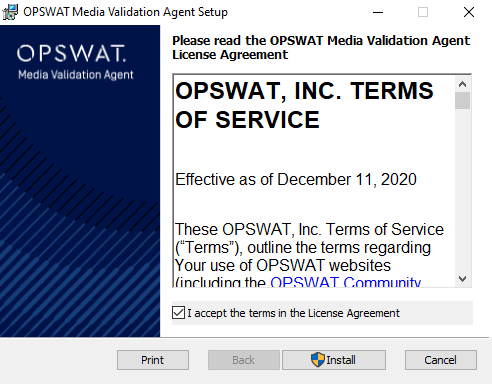
The Agent must be provided with the certificates it should consider trusted.
The Agent will look in %ALLUSERSPROFILE%\OPSWAT\.ssh\ to locate all trusted certificates.
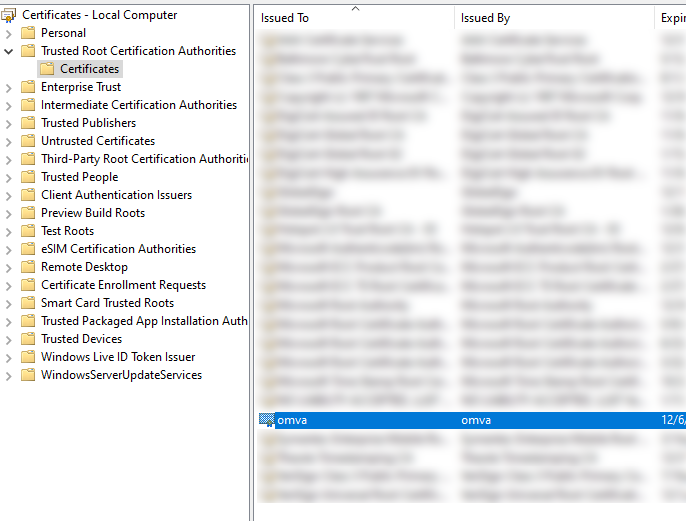
If the trusted certificate is not in the directory, the Agent can also verify certificate trust if the root Certificate Authority certificate is installed.
OPSWAT recommends automating the deployment and installation of trusted certificates to the client using an AD Push or similar technique.
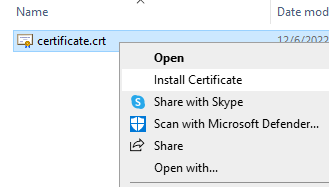
A Certificate Authority certificate can also be installed for an individual end-point by copying the .crt file over, right clicking on it, and selecting Install Certificate.
Usage / Verification of the Media
Insert the media to the endpoint.
The Validation Agent will begin checking the media according to these steps:
- Looks for an OPSWAT Media Manifest file on the media
- Checks to make sure the Certificate that signed the media manifest is trusted
- Checks each file on the removable media against the media manifest to make sure it has not been modified

Result of Verification
If the manifest is found to have all files on the media recorded and unmodified, the media will be allowed to be accessed on the endpoint:

If the manifest is found to be invalid or files on the media are found to be missing/modified from the manifest, the media will be blocked from being accessed on the endpoint:

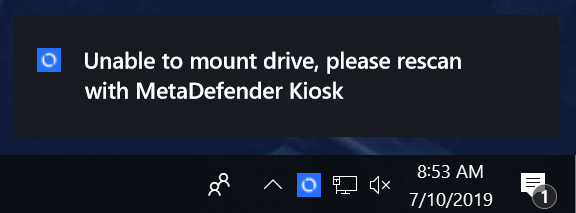
The Validation Agent takes an "all-or-nothing" approach. Any invalid file or manifest will result in the entire media being blocked. There is no access to a subset of valid files.
Logging
OMVA logs JSON formatted messages of its operation.
This can be used to determine the validation ran on the system and identify any media that was blocked.
Logging can be found in the OMVA install directory: %PROGRAMFILES(X86)%\OPSWAT\OPSWAT OMVA\LOG\omva_logs.json
When extracting logs from the file, the JSON objects must be wrapped within square brackets "[ ]" to allow for proper parsing.
{ "date": utc formatted string "event_code": event code integer "level": log level string "message": message string "hostname": system hostname string "username": username of logged-in user string}| Event Code | Description | Notes |
|---|---|---|
| 0 | Validation begin - USB inserted | contains additional user_data string field in the json message |
| 1 | File result error | |
| 2 | Validation end - Media validation result | |
| 3 | Signature Result |
{ "date": "2021-04-22T17:28:11Z", "event_code": 0, "level": "info", "message": "USB inserted - Volume{0f1895d7-d714-4030-9b2c-3aeacb631d1b}", "hostname": "Workstation3186", "username": "company/userA", "user_data": "[Kiosk] SessionID: 81E60795-67D8-4A34-8792-90D6E403D039 || User: abc || System: Kiosk1 || Device ID: SCSI\\DISK&VEN_MSFT&DISK\\2&1F4FFE&0&0001 || Start Time: 2021-07-08 16:10:01"},{ "date": "2021-04-22T17:28:15Z", "event_code": 1, "level": "info", "message": "G:\\files\\spreadsheet.xlsx - File not found in Media Manifest", "hostname": "Workstation3186", "username": "company/userA"},{ "date": "2021-04-22T17:28:20Z", "event_code": 2, "level": "info", "message": "Unable to mount drive, please rescan with MetaDefender Kiosk", "hostname": "Workstation3186", "username": "company/userA"}Configuration of the Agent
Registry configuration:
For Wins 32 bit: HKLM\SOFTWARE\OPSWAT\OPSWAT-OMVA
For Wins 64 bit: HKLM\SOFTWARE\WOW6432Node\OPSWAT\OPSWAT-OMVA
| Key | Type | Description |
|---|---|---|
| days_trusted | REG_SZ or REG_DWORD | The maximum days to use a media manifest result If blank or omitted, the manifest is trusted forever |
Uninstalling the Agent
Uninstalling the agent requires the password: Opswat1234! to successfully complete
OMVA Tool
Run OPSWAT-OMVA-Tool.exe obtained from the Kiosk Resources page before installing OMVA on endpoints.
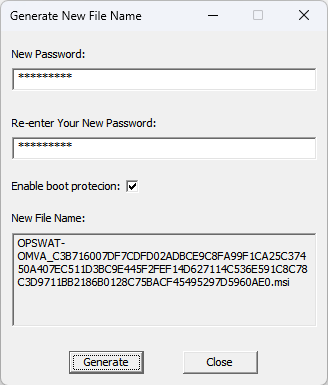
Enter in the new password to configure. Click Generate to create a new filename for the OMVA installer. Download the new OMVA installer from the Resources page. Copy the New File Name and rename the installer. Installing this renamed file on all endpoints will ensure the uninstall password adheres to what was configured in the tool.
When the "Enable boot protection" __option __is checked, the OMVA application block access to any external removable media drives that are connected before the system boots up.
To update existing installations, the previous OMVA must be uninstalled with the default password. Then install the newly renamed OMVA installer.

