Before starting the installation, please make sure that your target system meets the Technical Requirements and the installation is performed by a person with basic Linux skills.
This page is applicable to both clean installations and upgrade installations! The exact same steps should be executed in both cases, no additional configuration is needed for upgrade installs.
To install MetaDefender Sandbox on an offline system without an Internet connection, it is necessary to prepare the offline installation assets on an online computer or virtual machine running Ubuntu 22.04.
After the preparation step is completed, the offline installation can be performed on multiple offline systems by copying the prebuilt assets to the target systems.
Due to legal reasons, the full offline installation package cannot be downloaded directly from my.opswat.com.
Phase 1 - Preparing Assets for Offline Installation (Online System)
An online system running Ubuntu 22.04 is required for Phase 1.
This system can be a physical computer or a (temporary) virtual machine. It can also be decommissioned after the installation assets are prepared and copied.
If you prepare the offline installation assets on a system with an existing MetaDefender Sandbox installation, you might lose all data from that installation!
Note that preparing the offline installation assets will not create a functioning Sandbox deployment, and it will install some packages on the system (e.g. Docker).
Step #1 - Download and unpack the release archive
Download the release archive from https://my.opswat.com/portal/products and copy it to the online system.
Note that the release archive is password protected and needs to be unpacked.
Please use the password that you received from your OPSWAT support!
Please adjust the x.y.z version numbers to match the downloaded filename.
Install the required dependencies and unpack the release archive as follows:
xxxxxxxxxxsudo apt-get updatesudo apt-get install p7zip-full multitail libslang2 -y7z x -aoa -p"PASSWORD" MetaDefender_Sandbox_vx.y.z-Standalone.zipStep #2 - Move to the installation folder and run the install script
Note that this operation can take up to 20-30 minutes (depending on available network bandwidth).
The necessary assets will be collected in the offline-assets subfolder within sandbox-installer .
xxxxxxxxxxcd sandbox-installersudo ./install.sh --prepare-offlineIf your system does not meet the system requirements, you can consider using the --unsafe option to bypass the requirements check. In this case, the installation might fail or it could take more time.
The absolute minimum requirement is having 20 GB free disk space.
xxxxxxxxxxsudo ./install.sh --prepare-offline --unsafeStep #3 - Copy the installation assets to a portable storage device
After a successful run, please copy the entire sandbox-installer folder to an external storage device (e.g. USB stick, portable hard drive) with at least 10 GB free space.
First of all, connect your USB device and check its mount point (by default, Ubuntu mounts removable media at /media/<username>/<name of USB Device> ):
xxxxxxxxxxls -l /media/$USER Example output:total 4drwxr-xr-x 8 myuser myuser 4096 Jan 1 1970 MY-FLASH-DRIVE Example mount point:/media/myuser/MY-FLASH-DRIVEAfter that, you can use the following command to copy the entire sandbox-installer folder to the mounted USB drive (optionally, you can create a tarball instead of copying the folder itself):
xxxxxxxxxxmkdir /media/myuser/MY-FLASH-DRIVE/sandbox-installercp -rpv . /media/myuser/MY-FLASH-DRIVE/sandbox-installer/You need to carry this storage device to the offline system(s) where you wish to install Sandbox.
Of course, if you have other means to transfer this folder to your offline system, feel free to use that approach!
Phase 2 - Running Offline Installation (Offline System)
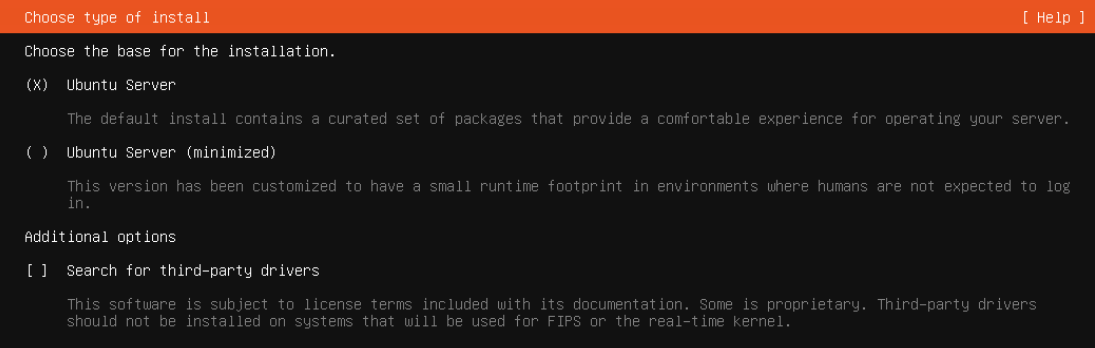
Please prepare an offline system running Ubuntu 22.04.
The "minimized" version of Ubuntu Server is NOT suitable for offline installations, since it lacks some essential packages. Please select "Ubuntu Server" when you install the OS:
Step #1 - Copy the sandbox-installer folder to the offline system
Please copy the installation assets that you prepared in Phase 1 to the offline system where MetaDefender Sandbox should be installed.
If you transfer the files using a USB drive, please connect that device to the offline system and determine its mount point following the suggestions in the previous section.
After that, you can copy the sandbox-installer to your home folder like this (feel free to choose any target directory):
xxxxxxxxxxcp -rpv /media/myuser/MY-FLASH-DRIVE/sandbox-installer ~Step #2 - (Optional) Fix permissions on the opswat-sandbox-packages directory
If you are installing Sandbox on a system with CIS Level 1 or Level 2 hardening, it is required to create the opswat-sandbox-packages directory before the installation and set the necessary permissions:
(This step is only needed on hardened systems)
Step #3 - Move to the installation folder and run the install script
Note that this operation can take up to 10-15 minutes (depending on the available system resources).
xxxxxxxxxxcd sandbox-installersudo ./install.sh --offlineStep #4 - Access the Sandbox web server (https://localhost:443) and setup the initial Admin user
Step #5 - Perform Offline Activation
Please follow the Offline Activation instructions on the License Activation page.
Step #6 - Scan your preferred test file to check if the Sandbox system functions properly
Step #7 - (Optional) Troubleshooting if the Sandbox service failed to initialize
Verify the status of the sandbox service and if the running docker container are healthy:
xxxxxxxxxxsudo service sandbox statussudo docker psThe sblog bash command can be used to check the application logs for different system components.
This command is available to all users (but might require sudo privileges):
xxxxxxxxxx# Show logs from the transform componentsblog # Show logs from the broker componentsblog -b