
Before starting the installation, please make sure that your target system meets the Technical Requirements and the installation is performed by a person with basic Linux skills (mainly with Ubuntu experience).
Please walk through the following steps:
Step #1 - Create a new user that will own all the release files and run the appliance
Step #2 - Download and unpack the release archive to a folder, e.g.: your home folder
Install 7zip:
Download the release archive from https://my.opswat.com/portal/products
Note that the release archive is password protected and needs to be unpacked. Please use the password that you received from your Customer Representative. Please adjust the x.y.z version numbers to match the downloaded file.
Step #3 - Ensure that the embedded installation scripts are executable and have the unix format:
Step #4 - Edit bootstrap.cfg to enable optional features (e.g. S3 bucket storage, E-Mail).
Note: Default settings work fine for standard deploys and all features can be configured post installation.
Step #5 - Move the FileScanIO.zip archive into the current folder (fsBootstrap)
Step #6 - Run the bootstrap shell script
Step #7 - Optimize your transform and broker components if needed. More information: Engine Options.
Step #8 - Access the webserver (localhost, port 443) and setup the initial admin user
Step #9 - Optional: start the transform and/or broker services, if not running already
Step #10 - Check the output to ensure that initialization succeeded:
Notes:
The system will not be able to generate reports yet (and eventually gracefully exit), as a valid license key is required (see next steps).
These command aliases will only be available to the filescanio user(see bootstrap.cfg) and may require a fresh session.
Step #11 - Run the fsFingerprint.jar (distributed with the release archive)
Run this fingerprinting tool on your host machine to generate a unique fingerprint of your deployment host environment.
Upload the fingerprint contents or binary file via https://my.opswat.com, using 'Upload Large File' from the menu in the top right corner:
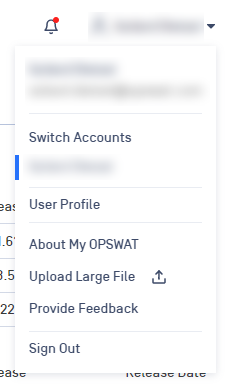
You will receive a license key file shortly. The license key will be needed after the deployment.
Step #12 - Put your license key (see Generate License Key) into the FileScanIO/fsTransform folder
Assuming that you saved your license file to your home folder and installed Filescan under the default filescanio user, you can copy the license with the following command:
The license file will be picked up and loaded automatically.
Note: please refer to the API top level menu at the webservice to learn how files may be sent to the system for automated processing. For custom integrations (e.g.: email), please reach out to support.
Important notes for air-gapped systems
The installation process requires an Internet connection (moving the system into a DMZ is recommended)
Air-gapped systems will only receive updated features (like YARA) when installed and upgraded with an active internet connection. We recommend moving the system into a DMZ during these windows.
All third-party integrations (e.g. Reputation API, geolocation/WHOIS lookup) require an Internet connection.
The "File download" feature is not available in air-gapped environments.
To run Filescan in an offline environment without any errors, the following settings must be changed (after completing the installation process in an online environment).
Please open /home/filescanio/FileScanIO/fsTransform/conf/transform.properties.custom using a text editor and add the following lines:
Also open /home/filescanio/FileScanIO/fsTransform/conf/reputation.properties.custom using a text editor and add the following line:
Please remember to save both configuration files and restart the fsio service: