
Settings
[Global Setting > Device Setting > Settings]
Settings are the information and configurations that help other networks or devices communicate with your appliance.
System Tab
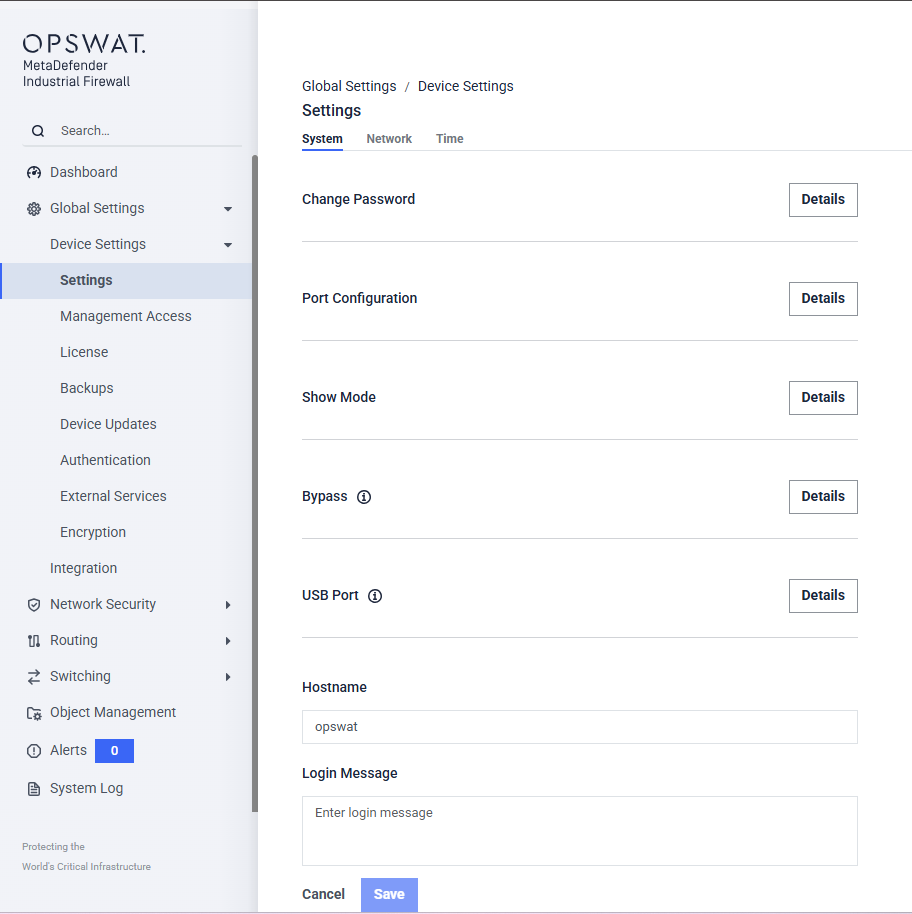
Change password: update the current account password.
Port Configuration: Set the mode for each interface.
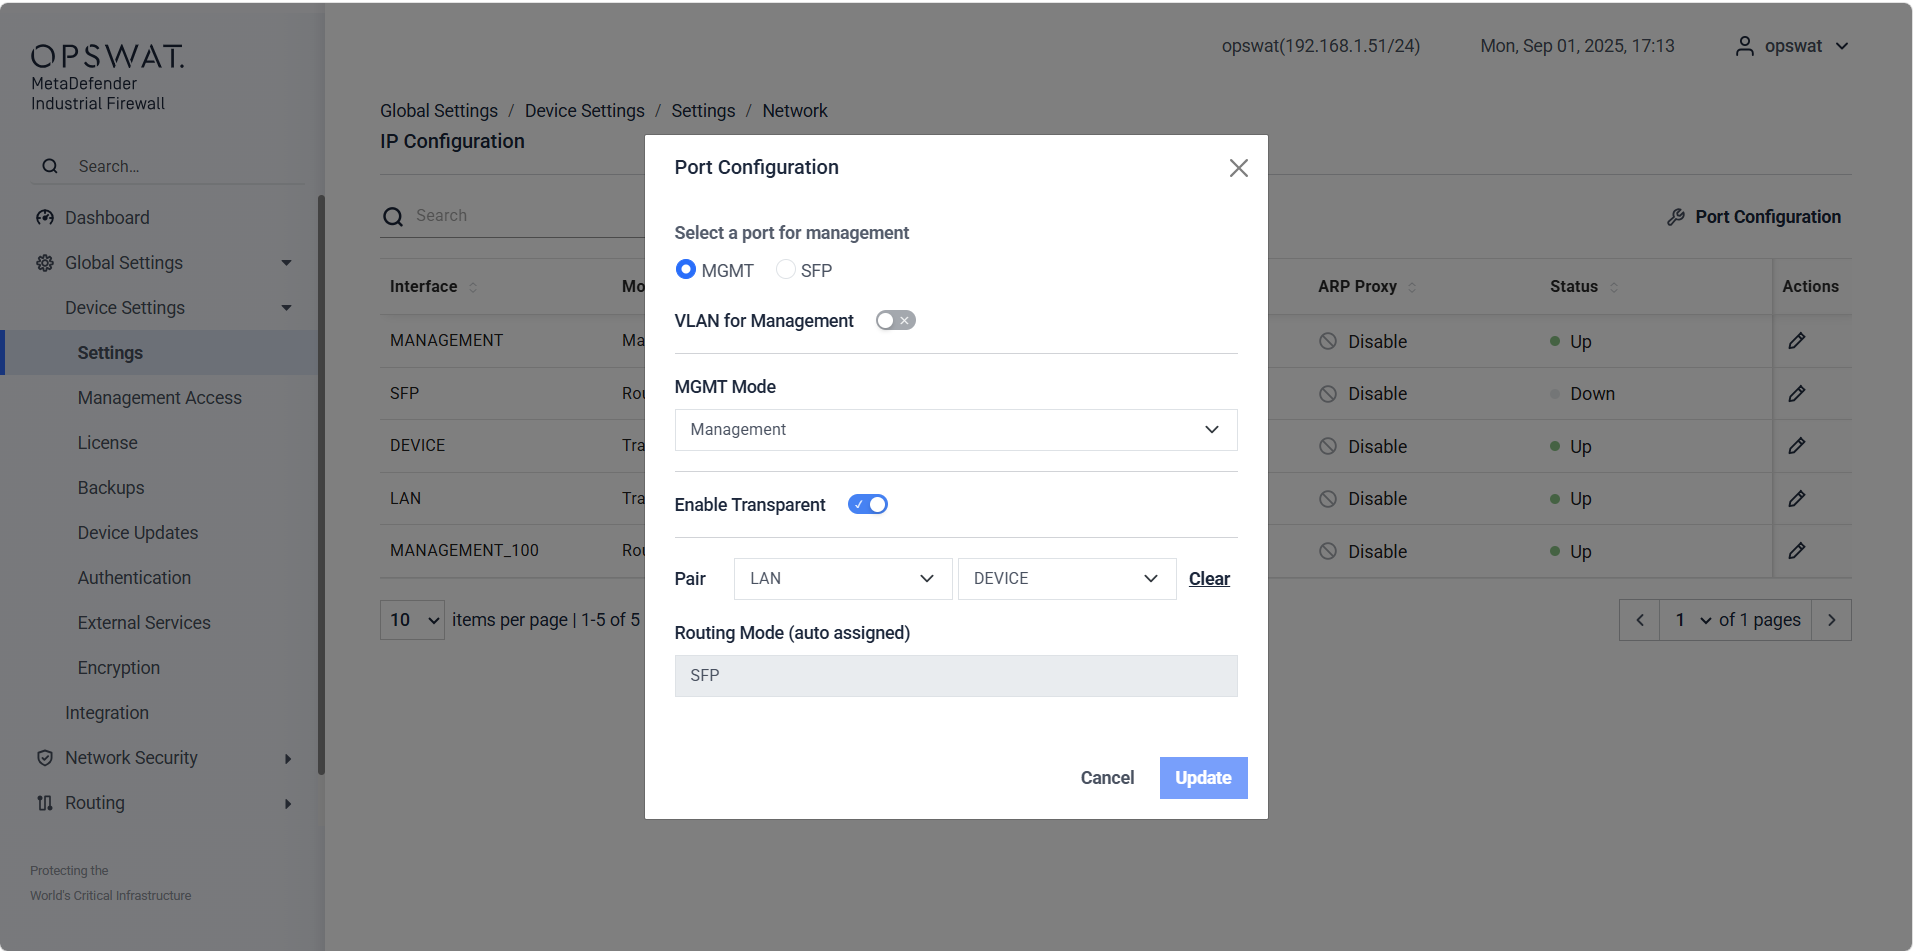
Management Port: The Management Port is used for administrative access. It can also forward network traffic when set to Routing mode.
Optionally, administrative access can be carried over a dedicated VLAN. To use this, first create the VLAN sub-interface under Routing → VLAN Sub Interface and assign it an IP address, then enable Management over VLAN here and select that VLAN sub-interface.
Other Ports: All non-management ports can be individually configure as either:
Routing Mode: operates as a Layer-3 routed interface
Transparent Mode: operates as a Layer-2 inline interface
Transparent Pairing: Transparent mode supports pairing between any Ethernet port and the SFP port, allowing the firewall to operate inline without changing the existing network IP structure.
Hostname: Label specified for the device. This name is used in events and logs.
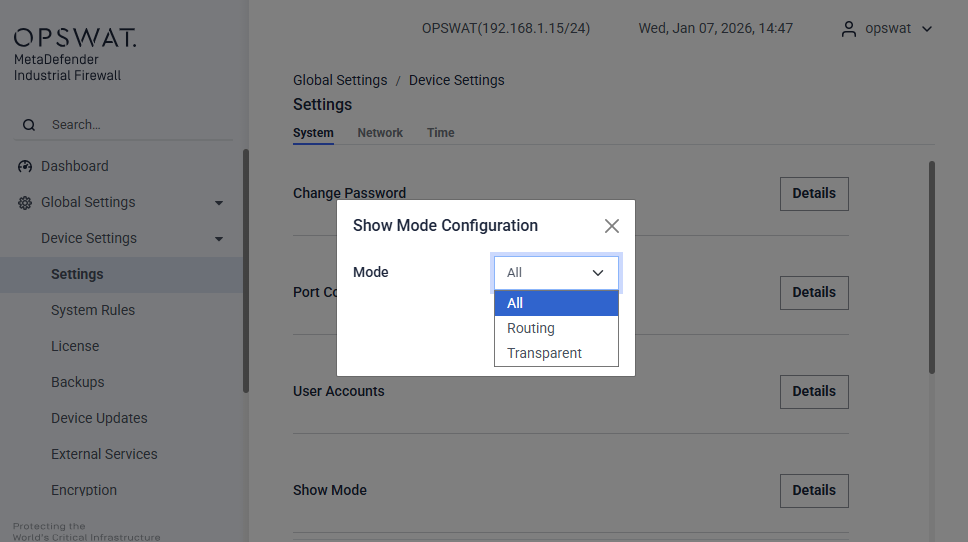
Show Mode: Show or hide the rule page for Transparent or Routing mode.
Bypass: When turned on, this setting enables a physical bypass relay that allows traffic to continue to flow through the firewall in the event the firewall loses power. Firewall rules will continue to be applied as long as the firewall is functional.
USB Port: Enable or disable the physical USB storage port. Disabling it blocks USB drives (used for configuration and system backup export and import) and removes the only out-of-band recovery method. Administrator only.
Hostname: A label that identifies this device. It appears in the web UI header and is included in the device's events, logs, and syslog messages, making it easy to tell appliances apart when several are deployed.
Login Message: Text that shows after a user logs on the appliance
Session Timeout: Number of minutes a session can stay open
The purpose of these limits is to prevent configuration mistakes and maintain system stability.
Network tab
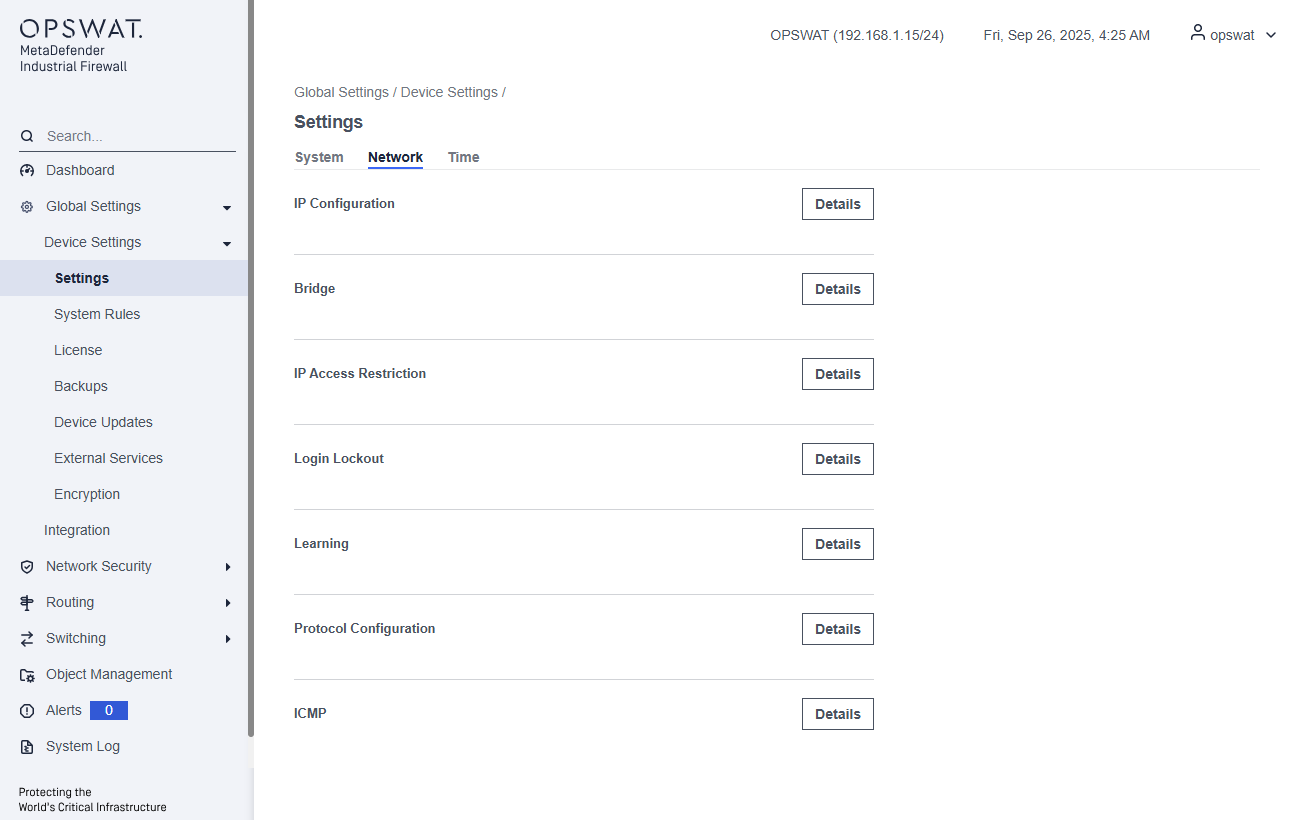
IP Configuration: Configure the mode (Routing or Transparent) for interfaces, and set the interface's IP addresses.
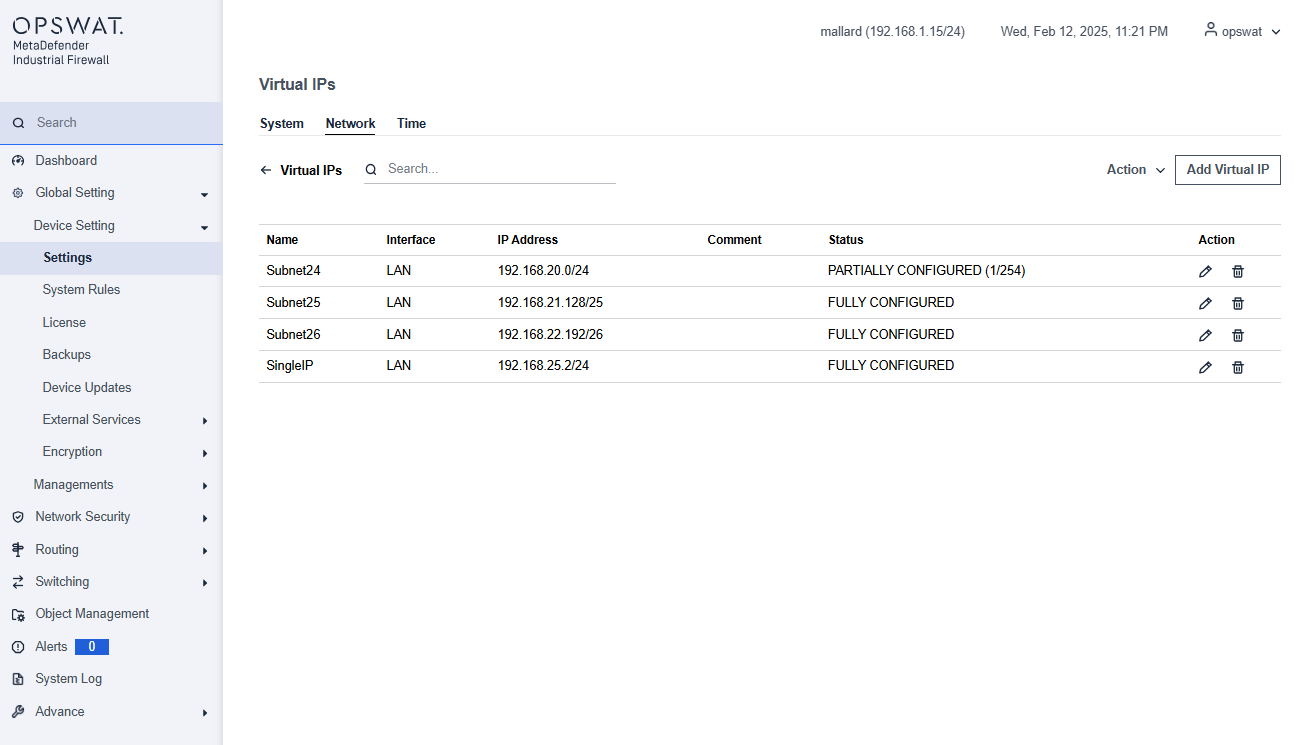
Virtual IPs: Add or delete a virtual IP.
Bridge: Create or delete a bridge network.
Learning UDP Protocol: Enable or disable learning UDP traffic in the Learn state.
IP Access Restriction: Manage IP addresses that can access web management.
Login Lockout: Configure lockout protection for management services after repeated failed login attempts, and view or unlock locked-out accounts.
CIMPLICITY Maximum Writes: Set a limit on the number of write commands per interval. This option is only available if you have purchased the license that supports GE protocol.
IFIX Maximum Writes: Set a limit on the number of write commands per interval. This option is only available if you have purchased the GE protocol.
GESDI Port: Configure the port settings for GESDI (version 6e and 6).
Default SLMP port: Set the default port for SLMP communication.
Default DICOM port: Set the default port for DICOM communications.
Learning Protocol Port 102: This port can be configured for S7COMM or MMS protocols.
Network > IP Configuration
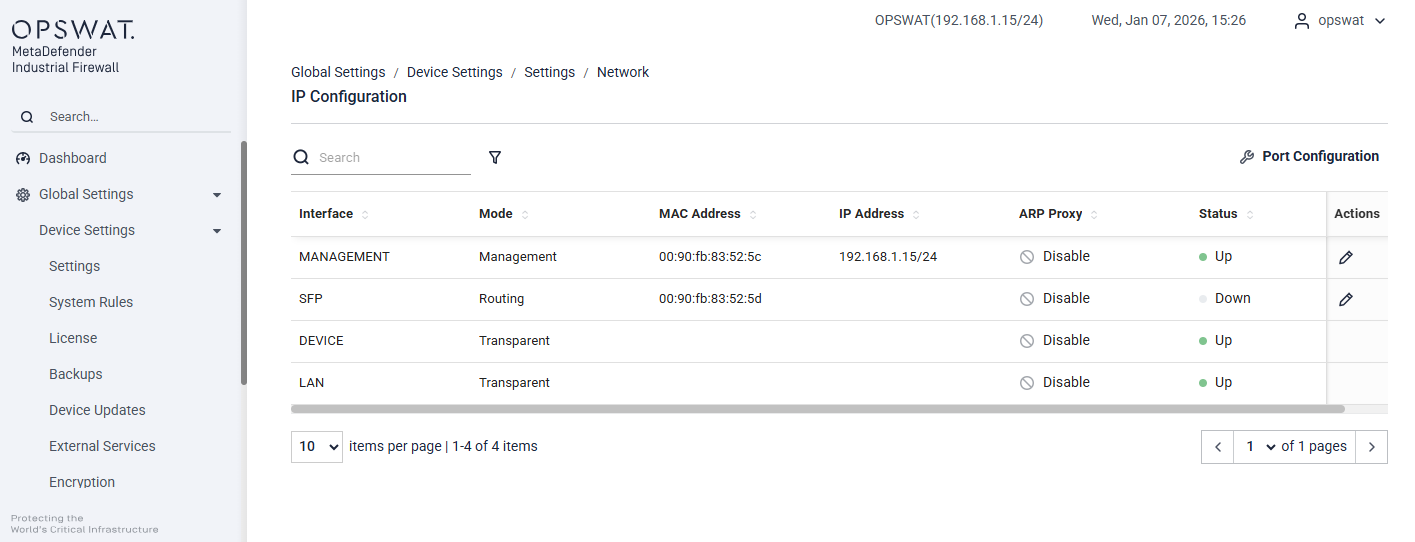
Port Configuration: Configure the operating mode for each interface. By default, both LAN and DEVICE interfaces operate in Transparent mode, as described in the System tab.
Edit icon: Click this icon to configure the IP address for the interface.
Routing Mode:
Enable: Bring the port administratively up or down. When off, the interface is taken out of service and shows Admin Down in the Status column.
Name: The interface label (read-only).
IP Address & Mask: The interface address in CIDR form (for example, 192.168.1.15/24). Disabled while DHCP is on.
Default Gateway (Optional): The next-hop gateway for this interface. Disabled while DHCP is on, or when another interface already owns the device's default gateway.
DHCP: Obtain the interface's IP address and gateway automatically. When on, the IP Address & Mask and Default Gateway fields become read-only.
ARP Proxy: Let the interface answer ARP requests on behalf of hosts reachable through it.
Transparent Mode: only an Enable toggle (no IP/gateway/DHCP/ARP Proxy).
Management: Name (read-only), IP Address & Mask (required), Default Gateway (Optional), ARP Proxy — no Enable toggle and no DHCP.
Interface table: Each interface row shows its Mode, MAC Address, IP Address, ARP Proxy state, and Status (Up, Down, or Admin Down).
Network > Bridge
The page allows you to create and manage Layer 2 bridges by grouping multiple network interfaces into a single logical interface. Bridging enables traffic to pass transparently between interfaces while allowing the firewall to inspect and enforce security policies.
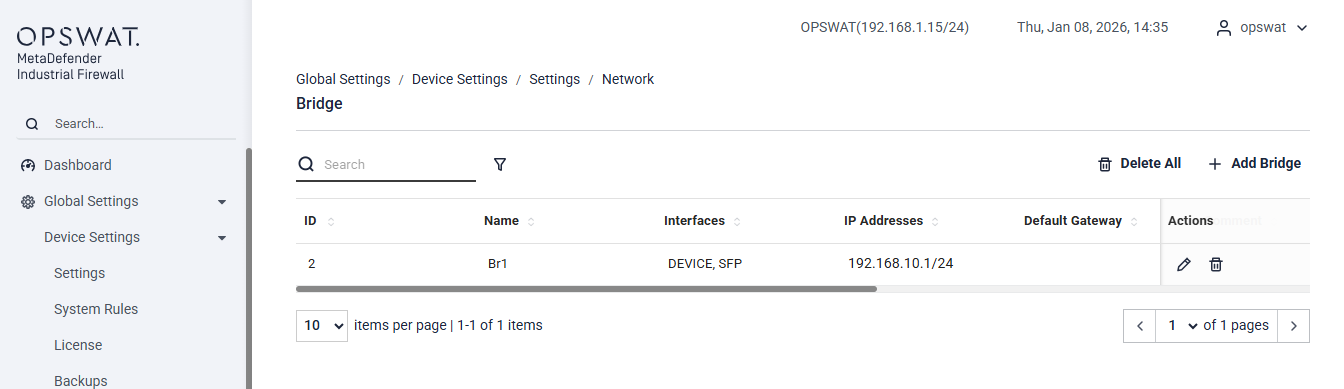
ID: Unique identifier for the bridge.
Name: User-defined bridge name.
Interfaces: Physical interfaces included in the bridge.
IP Addresses: IP address assigned to the bridge (if configured).
Default Gateway: Default gateway associated with the bridge (if configured).
Actions: Edit or delete the bridge.
Adding a Bridge: Allow to create a Layer 2 bridge by combining multiple interfaces into a single logical bridge.
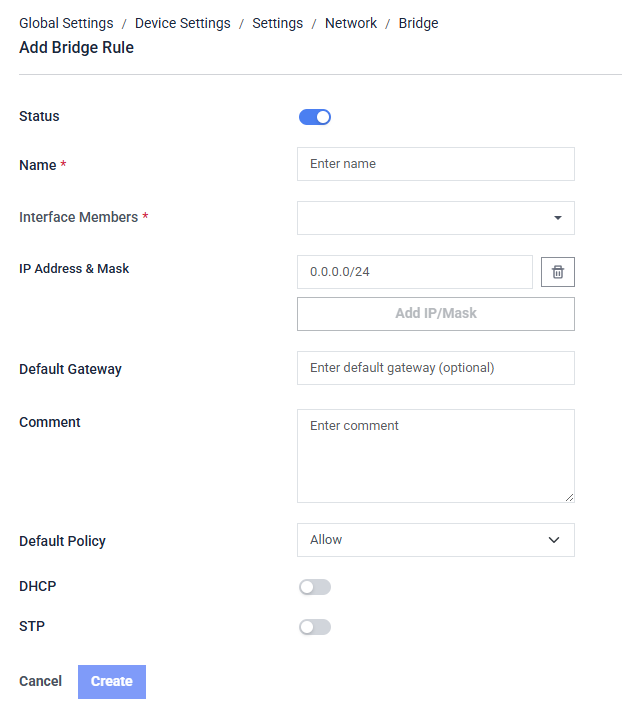
Status: Enables or disables the bridge after it is created.
Name: A unique name used to identify the bridge.
Interface Members: Select the physical interfaces that will be grouped into this bridge.
IP Address & Mask: Assign an IP address to the bridge for routing purpose.
Default Gateway: Specify the gateway used by the bridge IP (optional).
Comment: Optional notes to describe the purpose of the bridge.
Default Policy: Defines whether traffic is allowed or denied by default on this bridge.
DHCP: Enables or disables DHCP service on the bridge.
STP: Enables or disables Spanning Tree Protocol to prevent Layer 2 loops.
Create: Saves the bridge configuration.
Cancel: Discards changes and returns to the previous page.
Network > Virtual IPs
Network > IP Access Restriction
This page allows you to restrict management access to the firewall by permitting only specified IP addresses or networks. When enabled, only the configured IP addresses or ranges can access the firewall management interface.
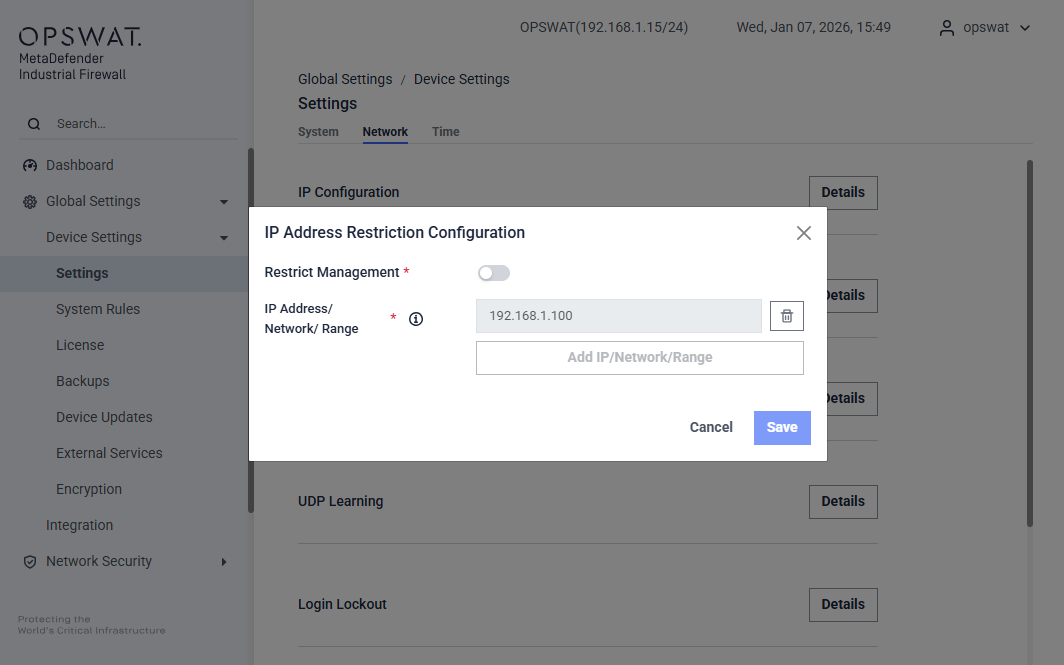
Restrict Management:
Disabled: Management access is allowed from any IP address.
Enabled: Management access is restricted to the IP addresses or networks listed below.
IP Address / Network / Range: Specify the IP addresses that are allowed to access the management interface. Supported formats:
Single IP address: Example:
192.168.1.100Network (CIDR notation): Example:
192.168.1.0/24IP range: Example:
192.168.1.100–192.168.1.120
⚠️ Important: Ensure your current management IP is included before enabling this option to avoid being locked out
Network > UDP Learning
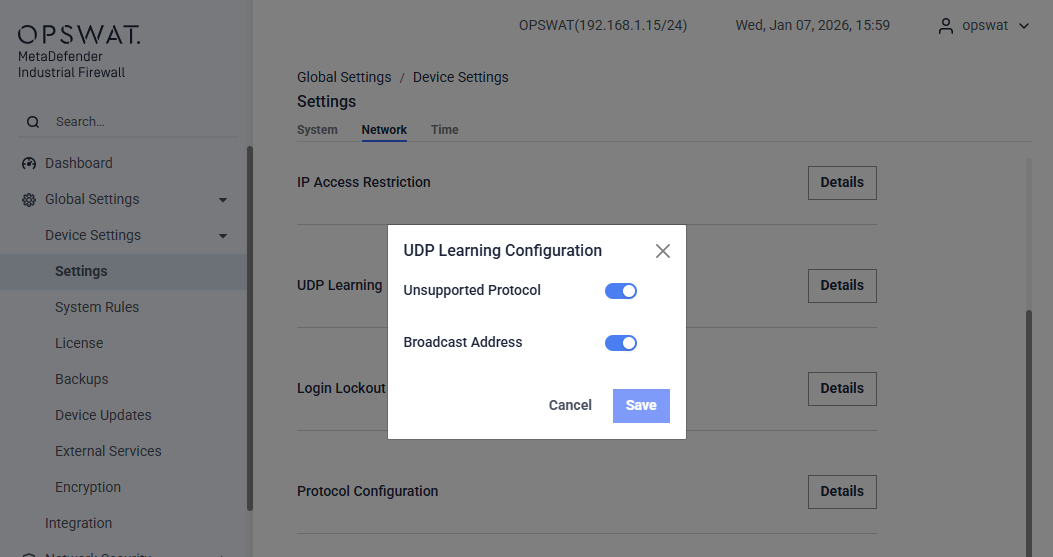
This section allows administrators to configure how the system learns and handles UDP traffic patterns. The available options include:
Unsupported Protocol: When enabled, the system will learn traffic from unsupported UDP protocols. Please note that UDP source ports are often randomly assigned, which may result in duplicated learning traffic.
Broadcast Address: When enabled, the system will learn broadcast UDP traffic.
Network > Login Lockout > Setting
This page allows administrators to configure security settings for protected services within the MetaDefender Industrial Firewall.
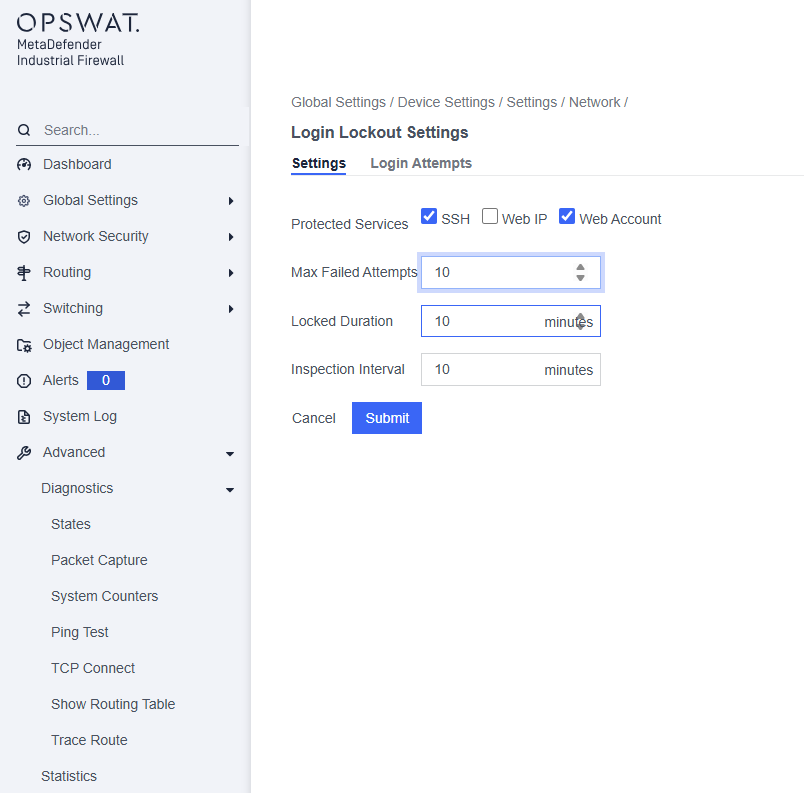
Protected Services: Specify which services should be monitored and protected against unauthorized access attempts. The available options include:
SSH: When enabled, the system will automatically block the IP address of a machine after it reaches the maximum number of failed SSH login attempts.
Web IP: When enabled, the system will block the IP address of a machine after it reaches the maximum number of failed login attempts to the web interface.
Web Account: When enabled, the system will lock the specific web account after it reaches the maximum number of failed login attempts to the web interface.
Max Failed Attempts: Defines the maximum number of failed login attempts allowed before the system initiates a lockout for the selected services.
Locked Duration: Specifies how long the service will remain locked after exceeding the maximum number of failed attempts.
Inspection Interval: Indicates the time interval during which failed attempts are counted. After this interval, the count resets.
Network > Login Lockout > Login Attempts
View the following information about locked-out users and unlock a user account (times shown are the appliance system time):
Name: All users locked out of the appliance.
IP: IP address that attempted to connect to the appliance
Failed Attempts: Number of times the user tried to log on
Last Failed: Last time the user tried to log on
Locked: Time the system locked the user out
Action: Procedures you can perform for this user
Select the user, open the Action menu, and click Clear to unlock the account for that user.
Time tab
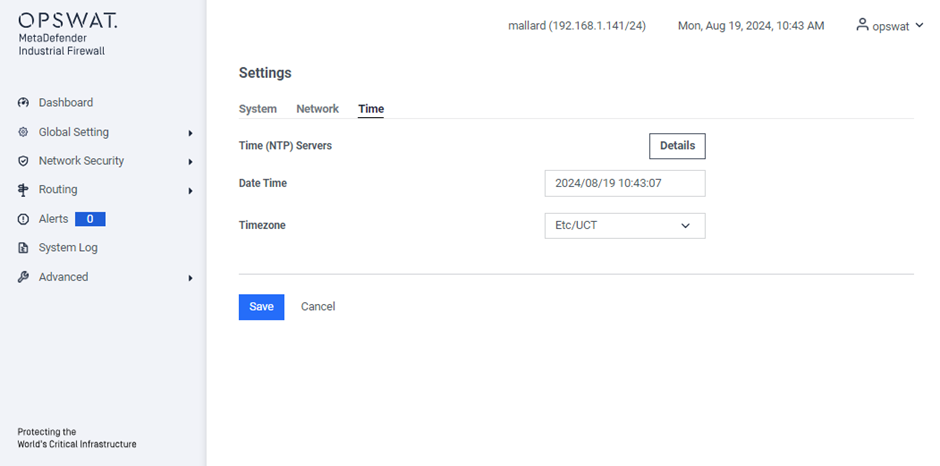
Time (NTP) Servers: Configure Network Time Protocol (NTP) servers to synchronize the system clock with accurate time sources.
Date Time: Set the current date and time for the system.
Timezone: Select the appropriate time zone to ensure the system clock reflects the correct local time.
Management Access
[Global Setting > Management Access]
The System Rules page displays firewall rules that are required for system operation, management access, and enabled services, as well as user-created rules. These rules control essential traffic such as management access, system services, and routing protocols.
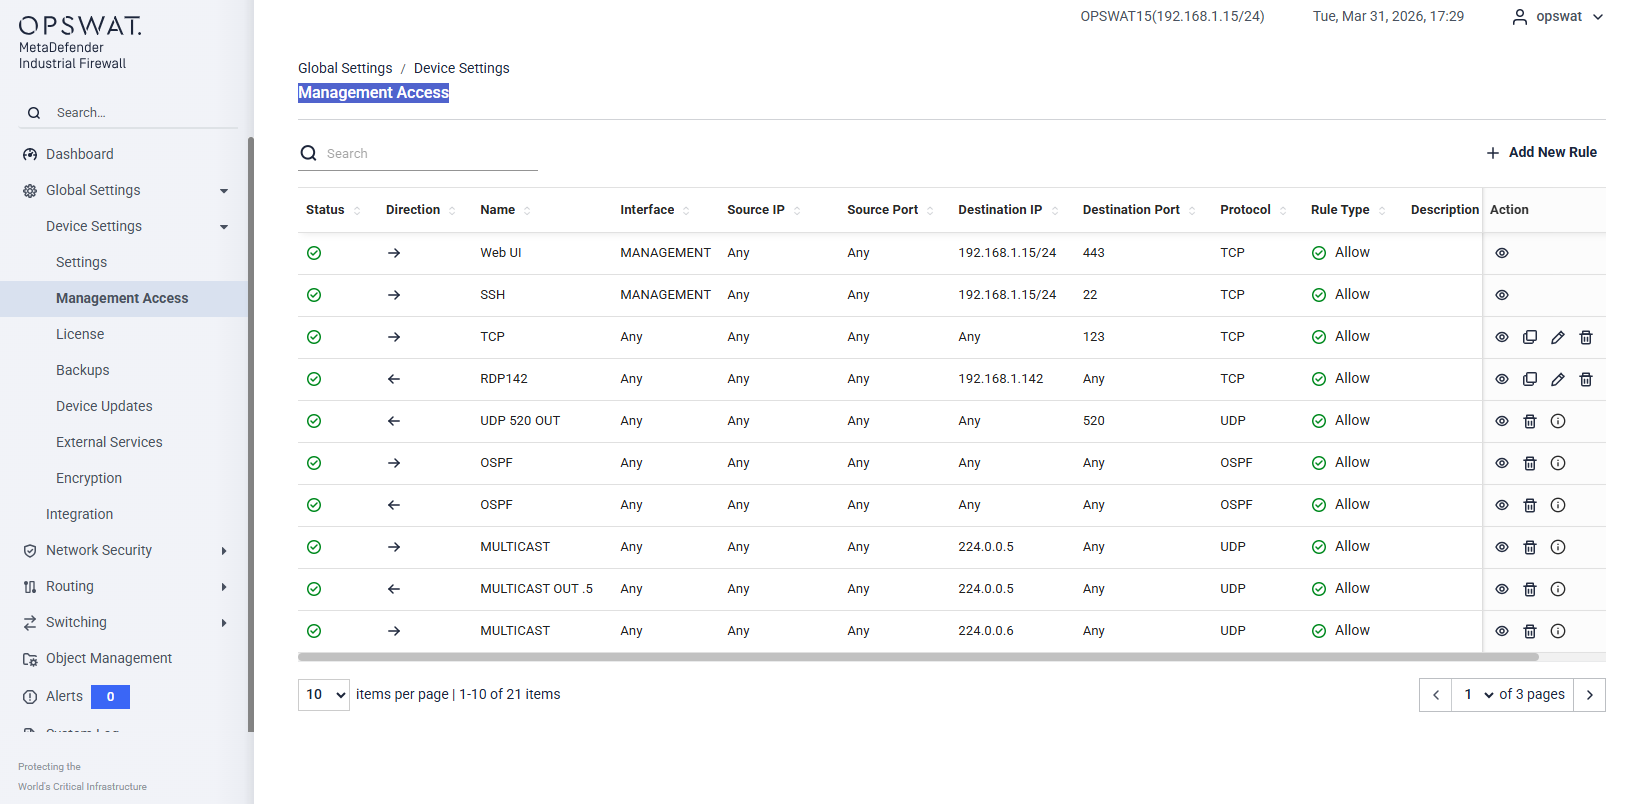
Each rule includes the following information:
Status: Indicates whether the rule is enabled
Direction: Traffic direction (Inbound / Outbound)
Name: Rule name
Interface: Interface to which the rule applies
Source IP / Port: Traffic source
Destination IP / Port: Traffic destination
Protocol: Network protocol
Rule Type: Allow or Deny action
Description: Additional information about the rule
Actions: Available operations for the rule
Types of Rules
Management Access Rules (Read-Only)
These rules are mandatory for firewall management access, such as:
Web UI (HTTPS)
SSH
Characteristics:
Automatically created by the system
Cannot be edited or deleted
Ensure continuous access to the firewall management interface
These rules are protected to prevent accidental lockout of management access.
Service-Dependent Access Rules (Auto-Managed)
These rules are automatically created when certain services are enabled, including: DNS, Remote Syslog, Dynamic Routing protocols (RIP, OSPF), other system services.
Characteristics:
Created automatically when a service is enabled
Automatically removed when the service is disabled
Cannot be cloned
These rules reflect the current service configuration and are managed automatically by the system. Please remove this type of rule manually only if it still exists after the related service has been disabled.
User-Created System Rules
These rules are created manually by the user to meet specific security or connectivity requirements.
Characteristics:
Fully configurable
Can be edited, cloned, or deleted
Install license
[Global Setting > Device Setting > License]
OPSWAT will supply license files to you. Contact Support for a new or renewal production license, or an extension on evaluation licenses. Include the serial number of your appliance.
Go to Global Setting > Device Setting > License. The License page displays.
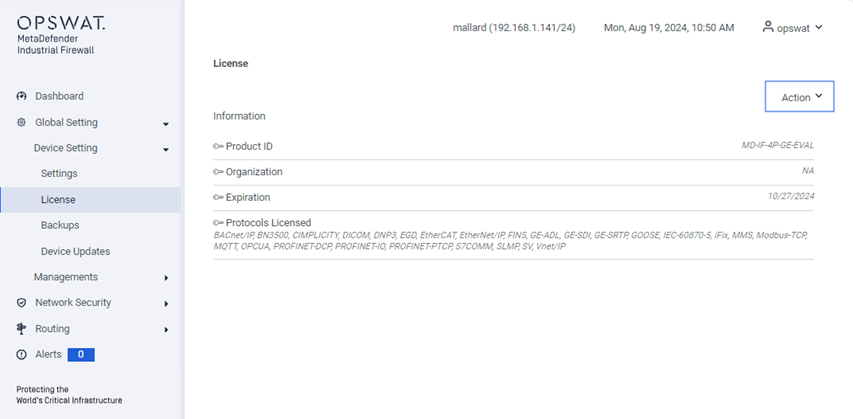
Open the Action menu and click Update License. The Upload pane displays.
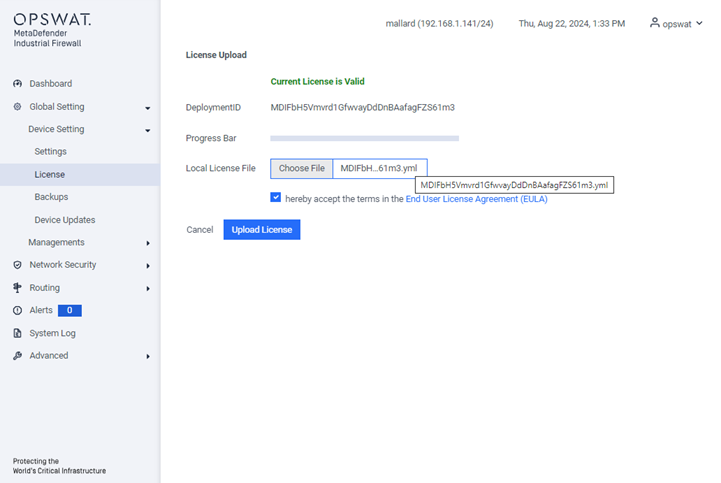
In the Local License File box, click Browse to navigate to the file. Select the file.
Click the Upload License button to start the upload. The Progress Bar shows when the upload is completed.
Click the End User License Agreement (EULA) link and read it. Then, click the check box to show that you accept the terms. A green banner at the top of the page tells you the procedure succeeded. The License page opens with the new information.
Backups
[Global Setting > Device Setting > Backups > System]
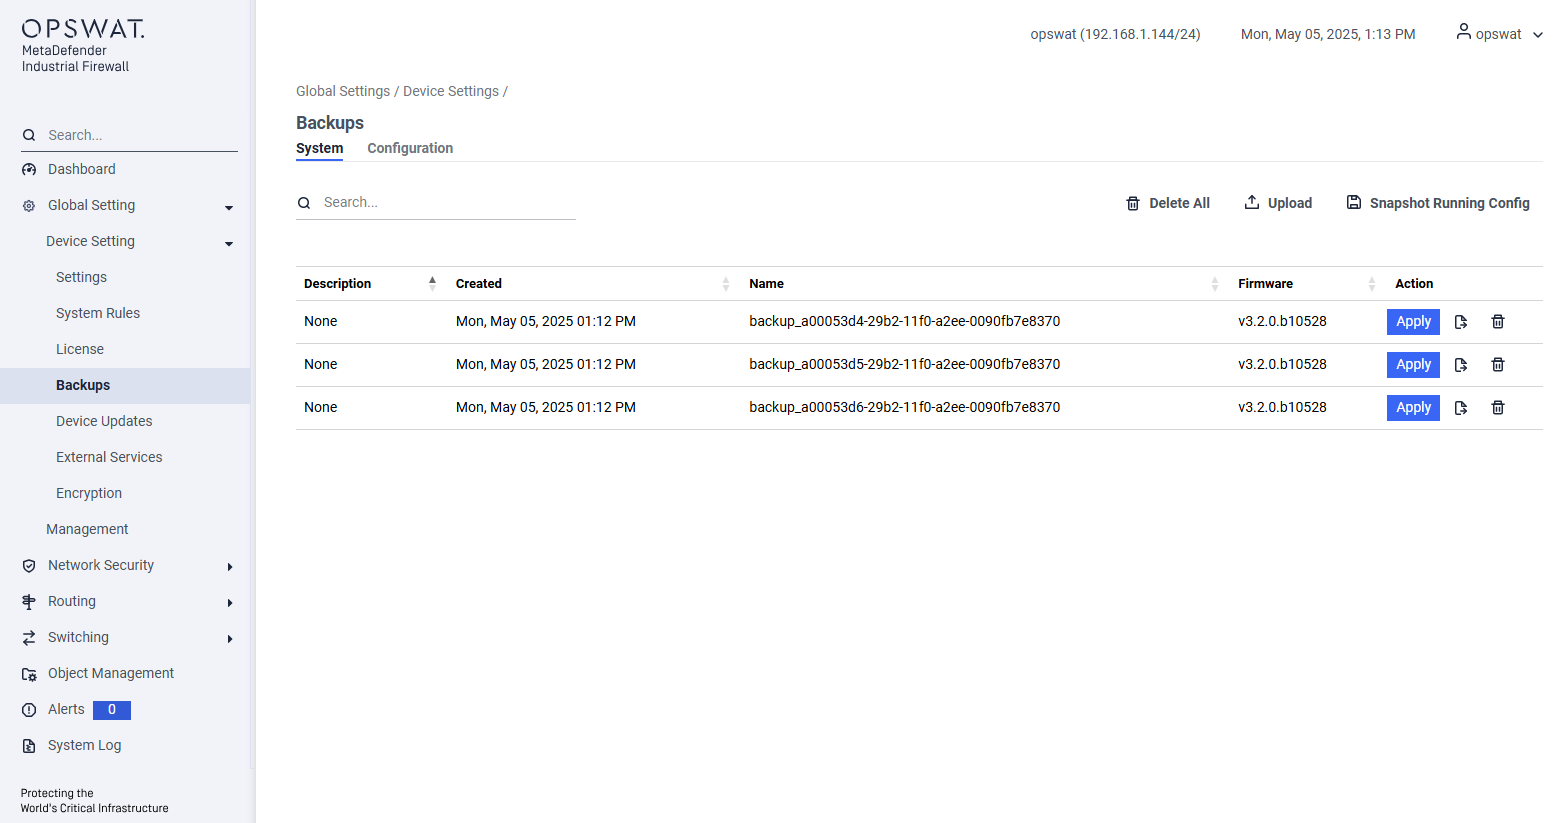
System Backup
A backup or snapshot is a copy of your device configurations and data. The appliance creates a backup automatically before all configuration changes are made. You can also make a backup on demand.
You will perform all backup tasks from the Backup Configs pane. Go to Global Setting > Device Setting > Backups to open this pane, which displays the following information for each backup:
Description: The appliance describes automatic backup that includes the date and time of the backup. For manual backups, the description comes from the Comment box.
Created: Timestamp of the backup (weekday, date, and time).
Name: The system supplies the name. You cannot change it.
Create a backup
Open the Action menu and click Snapshot Running Config. A popup displays, “Snapshot (backup) the current config?”
Enter a comment that includes the cause for the backup. This text becomes the description on the Backup Configs pane. Click the Submit button to save the backup. A green banner at the top of the page tells you the procedure succeeded.
Export a backup
Double-click the backup you want to export. A detail page displays.
Open the Action menu and click Export. The Backup Config Export pane displays.
Enter the Password for this backup. Enter the password again in the Confirm Password box. Record the password in a safe place.
Click the Submit button. A popup page displays. Open the file or Save it. If you save it, the file goes to your local Downloads location. The default location for Windows systems is C:\Users<your user name>\Downloads.
Record the date and time you save it because this will be part of the .bin file name. You cannot edit the file name before it is saved.
Restore a backup
If a new configuration does not operate correctly, you can return an older configuration (rebuild). You can select a backup of this appliance or upload a configuration from a different appliance.
To use a backup from a different appliance, save the backup to a location on this MetaDefender Industrial Firewall network:
To upload the software to the appliance, open the Action menu and click Upload. The Upload pane displays.
Click Browse in the Local Filename of config box to navigate to the file. Record the name.
Enter a Password for this backup.
Click the Upload Config button to start the upload. The Progress Bar shows when the upload completes.
This backup shows in the Backup Configs table.
Find the backup name in the Backup Configs table. You can click a column header to filter the table contents.
Delete a backup
Find the backup in the Backup Configs table. You can click a column header to filter the table contents.
Click the backup row to open a detail page.
Open the Action menu and click Delete. Click the Submit button to confirm your action. A green banner at the top of the page tells you that the procedure succeeded.
Configuration Backup
[Global Setting > Device Setting > Backups > Configuration]
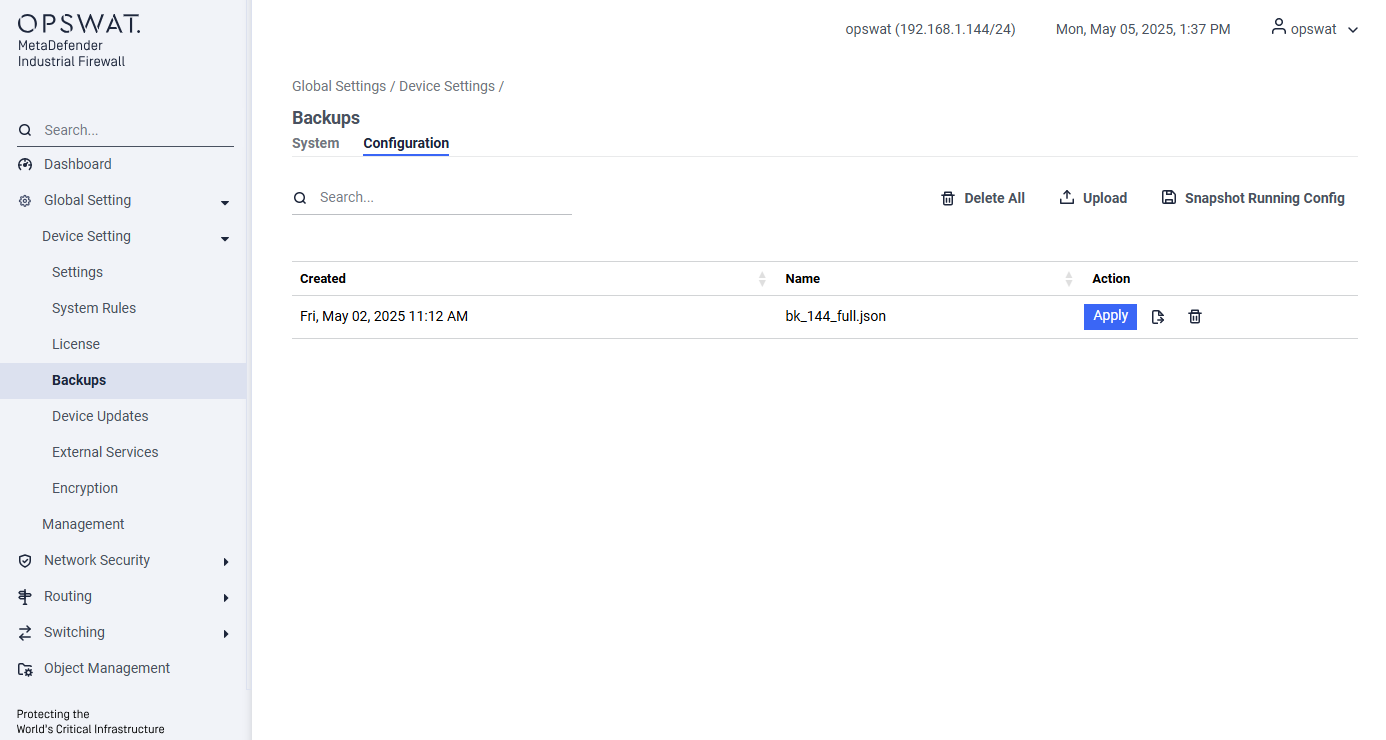
A configuration backup is a JSON text file that contains only the appliance's configuration settings. Unlike a system backup, it does not include data.
Create a backup
Open the header menu and click Snapshot Running Config. A popup will appear, allowing you to:
Choose all configurations to export.
Select specific parts of the full configuration.
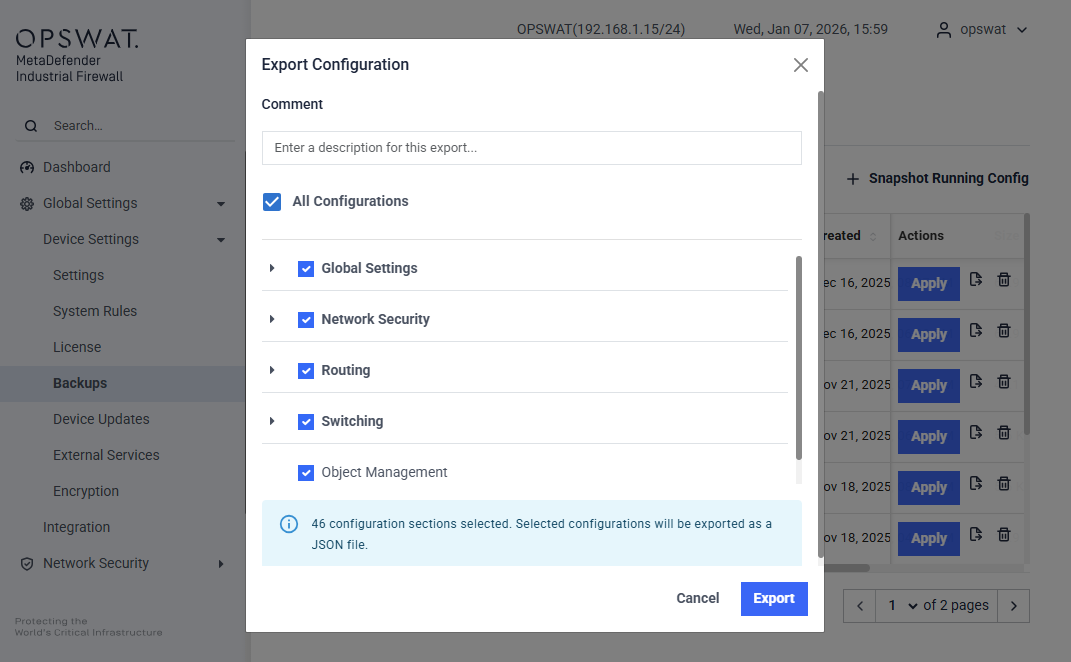
Export a backup
On the Action items of the each line, we can click on the export icon to export the configuration text file.
Restore a backup
On the Action items of the each line, we can click on the Apply button to apply the backup configuration.
Device Update
[Global Setting > Device Setting > Device Updates]
The software was installed on the appliance before it was shipped to you. As part of installation, you need to update the software to the latest release. You will also use this procedure to update new personalities (versions) of the appliance software.
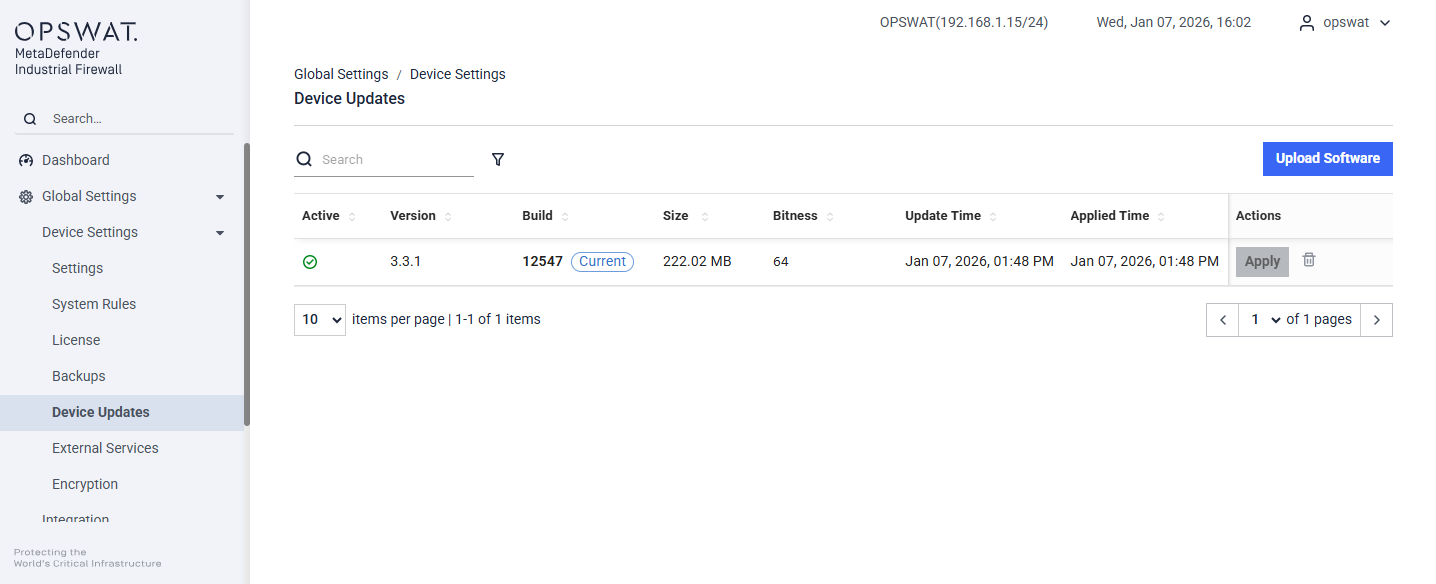
Click Upload Software. The Upload pane displays.
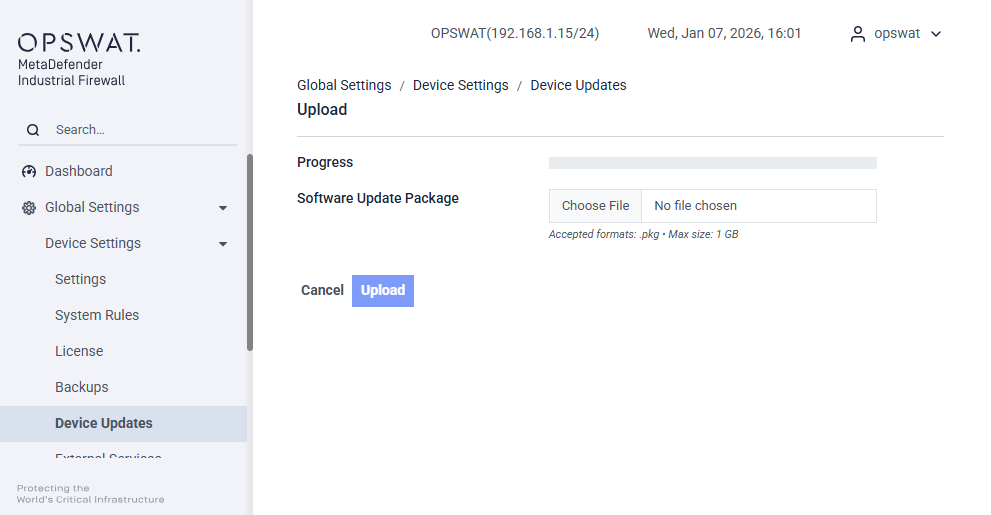
In the Local Filename of update package box, click Browse to navigate to the file for the appliance software.
Click the Upload Package button. The Progress Bar shows when the upload completes.
Click Apply in the Action column of the Software pane to apply the update. The new software version will show in the Version column with the Active column checked
Authentication
[Global Setting > Device Setting > Authentication]
The Authentication page lets administrators manage how users are authenticated when they access the appliance. Users can be validated against local accounts stored on the appliance or against external RADIUS and TACACS+ servers. At login, users select which authentication method to use.
Authentication methods:
Local: Manage accounts for web and CLI access management.
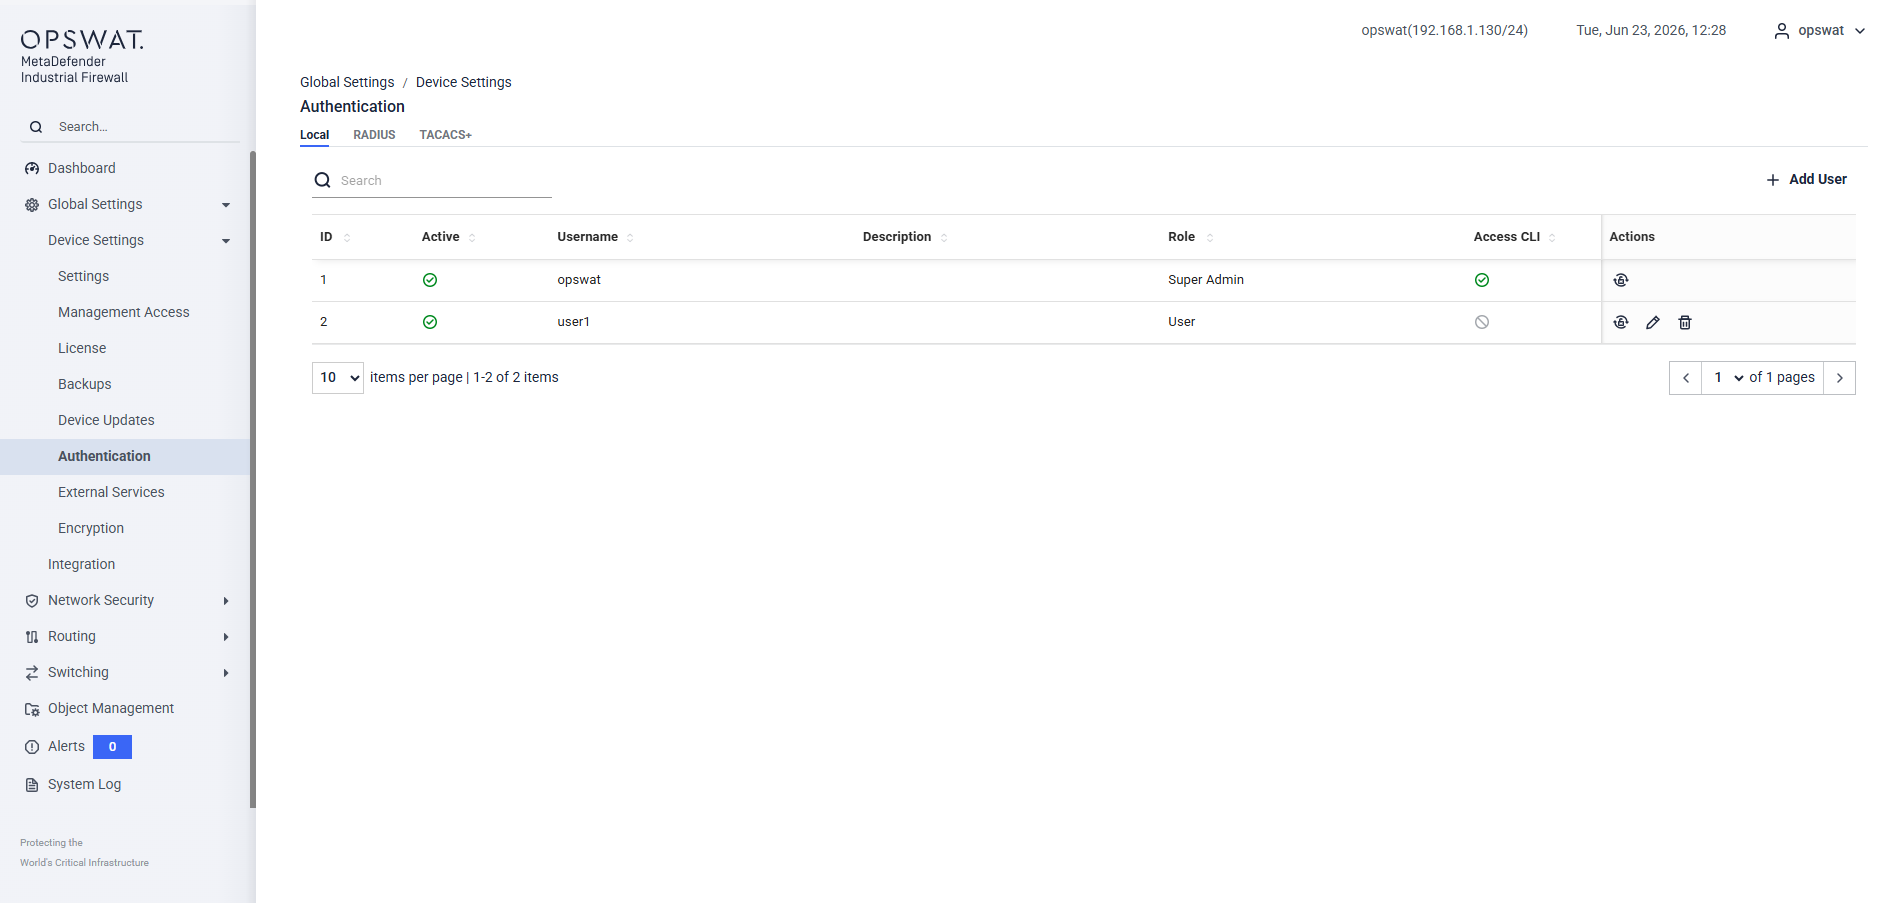
This page allows administrators to view, create, and manage user accounts that can access the Industrial Firewall. Each account defines access permissions, CLI privileges, and user roles to control administrative and operational actions.
Index: Display the sequential number of the user in the list.
Status: Indicates whether the account is active (green dot) or inactive (red dot).
Username: Show the login name of the user account.
Description: Provide a short description or purpose of the account (e.g., Admin Account, Maintenance User).
Access CLI: Display whether the user has permission to access the Command Line Interface (Yes or No).
Role: Define the privilege level of the user:
Super Admin – Full administrative access, including firmware upgrade, factory reset, configuration, monitoring, and account management.
Operator – Read-only access with permission to acknowledge individual alerts. Operators can acknowledge alerts one at a time but cannot acknowledge multiple alerts in bulk or use the Acknowledge All function.
Auditor – Read-only access. Auditors can view system information, configuration, monitoring data, and alerts but cannot make changes or acknowledge alerts.
Action: Provide the following actions for each account:
Reset Password – Reset the user’s password.
Edit – Modify user information, such as role or CLI access.
Delete – Remove the user account.
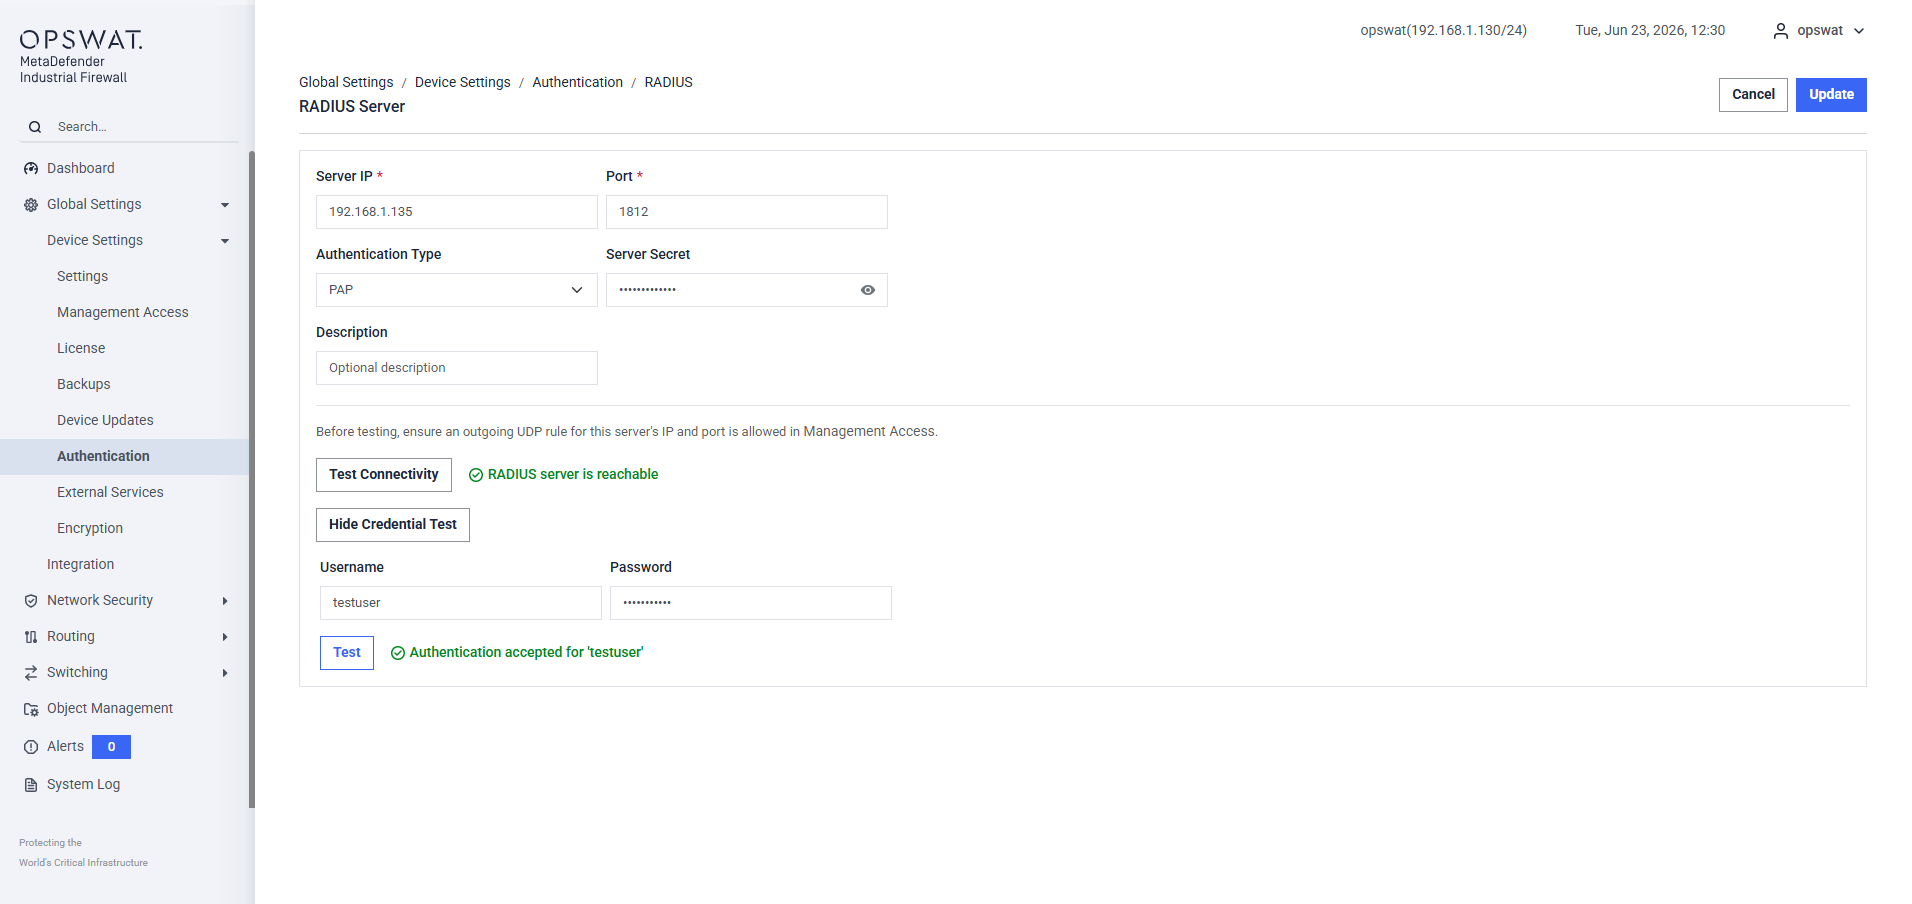
RADIUS: Users are authenticated by an external RADIUS server. Configure the following fields:
Server IP / Hostname: Address of the RADIUS server.
Port: UDP port used for RADIUS communication (default: 1812).
Authentication Type: Currently PAP only (field reserved for future protocol support).
Shared Secret: The shared key used to authenticate communication between the appliance and the RADIUS server. Stored encrypted and never returned by the API.
Description: Optional label to identify this server.
TACACS+: Users are authenticated by an external TACACS+ server. Configure the following fields:
Server IP / Hostname: Address of the TACACS+ server.
Port: TCP port used for TACACS+ communication (default: 49).
Shared Secret: The shared key used to authenticate communication between the appliance and the TACACS+ server. Stored encrypted and never returned by the API.
Description: Optional label to identify this server.
External Authentication Roles:
Auditor: Read-only permission.
Super Admin: Full administrative access.
Note: The mid-tier Operator role is not assignable via external authentication (RADIUS or TACACS+). Externally authenticated users can only be assigned Auditor or Super Admin.
RADIUS Role assignment: After a successful login, the appliance checks the Service-Type attribute returned in the RADIUS Access-Accept response. If Service-Type = 6 (Administrative), the user is assigned the Super Admin role. Any other value, or no Service-Type attribute in the response, results in the Auditor role.
TACACS+ Role assignment: After a successful login, the appliance sends a TACACS+ shell authorization request (service=shell) and reads the priv-lvl attribute from the response. If the server returns priv-lvl >= 15, the user is assigned the Super Admin role. Any other value, or no priv-lvl attribute in the response, results in the Auditor role.
The attribute must be named exactly priv-lvl and returned under the shell (exec) service. For example, with the open-source tac_plus daemon: service = exec { priv-lvl = 15 }
External Services
Use the External Services options to view information about servers associated with the appliance, including:
DNS servers
SNMP servers and trap recipients
RADIUS servers
Remote syslog
Time (NTP) servers
When you click on one of these options, an associated pane displays. Use the Action menu on the pane to add, edit, or delete these servers.
Encryption
Use the Encryption options to view and update SSL/TLS credentials and X509 certificates associated with the appliance.
SSL/TLS Credentials
Click the SSL/TLS Credentials option. The SSL/TLS Credentials pane displays. Use the Action menu to perform one of the following:
Create a local keypair
Import a keypair
Set an SSL key
You can update an existing credential by selecting it, then using the Action menu on the resulting detail pane to:
Add, edit, export or delete an individual certificate
Delete all associated certificates
X509 Certificates
Click the x509 Certificates option. The X509 Certificates pane displays. Use the Action menu to import an X509 certificate.
Certificates
[Global Setting > Device Setting > External Services > Certificates]
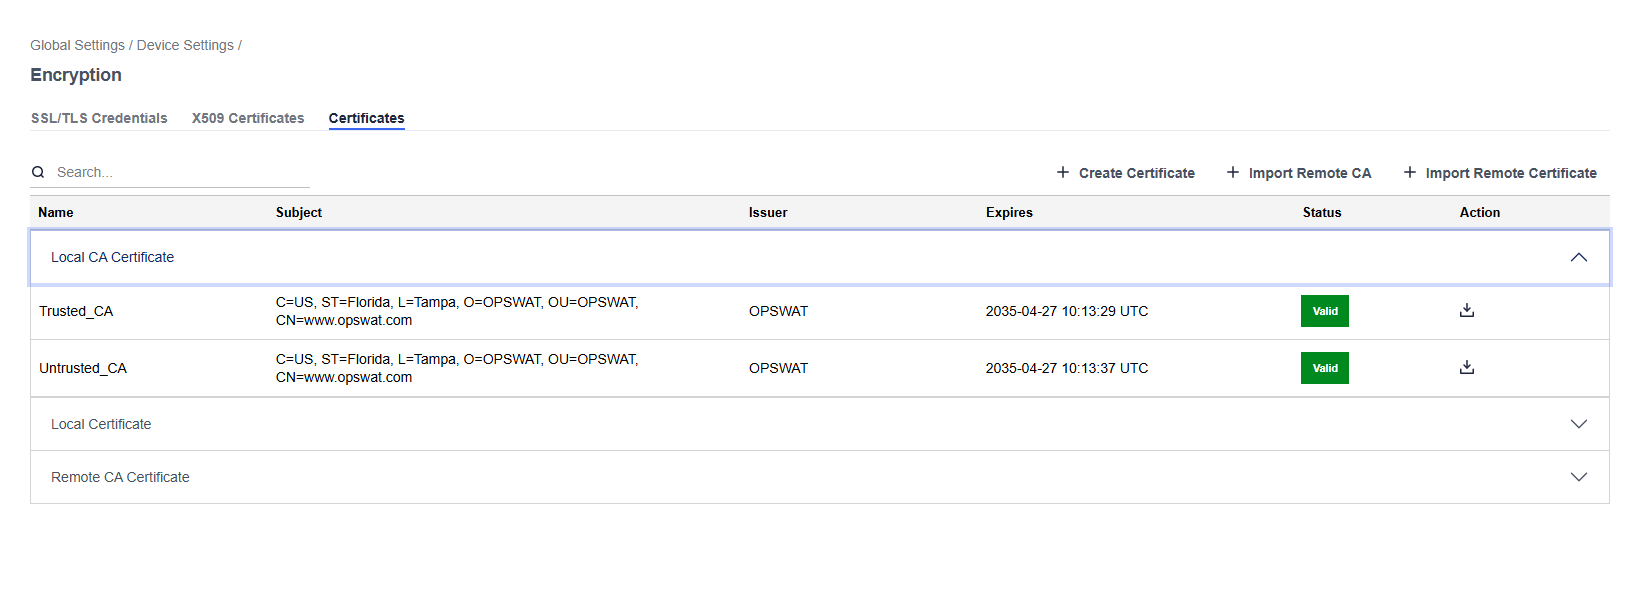
This section allows you to manage certificates used for secure communication between the Industrial Firewall and other systems. You can create, import, and view details of various certificate types to establish trust and encryption across network entities.
Certificate Types:
Local CA Certificate: A certificate authority (CA) certificate generated by the firewall for signing local certificates.
Local Certificate: Certificate issued to this firewall, usually signed by the local or trusted CA.
Remote CA Certificate: Certificate from a remote party (e.g., peer firewall) used to verify identity.
Actions available:
Create Certificate: Generate a new certificate signed by the Local CA. Or import from an external CA.
Import Remote CA: Upload a CA certificate from a remote device or external source.
Import Remote Certificate: Upload an individual certificate (e.g., remote VPN peer certificate).
Use Trusted CA for secure VPN or remote access.
Local CA should be used to generate internal certificates if no external CA is involved.
Regularly review expiration dates to avoid service disruption.
Avoid using Untrusted CA unless for inspection or debugging purposes.
Integration
MyOPSWAT
[Global Setting > Integration > MyOPSWAT]
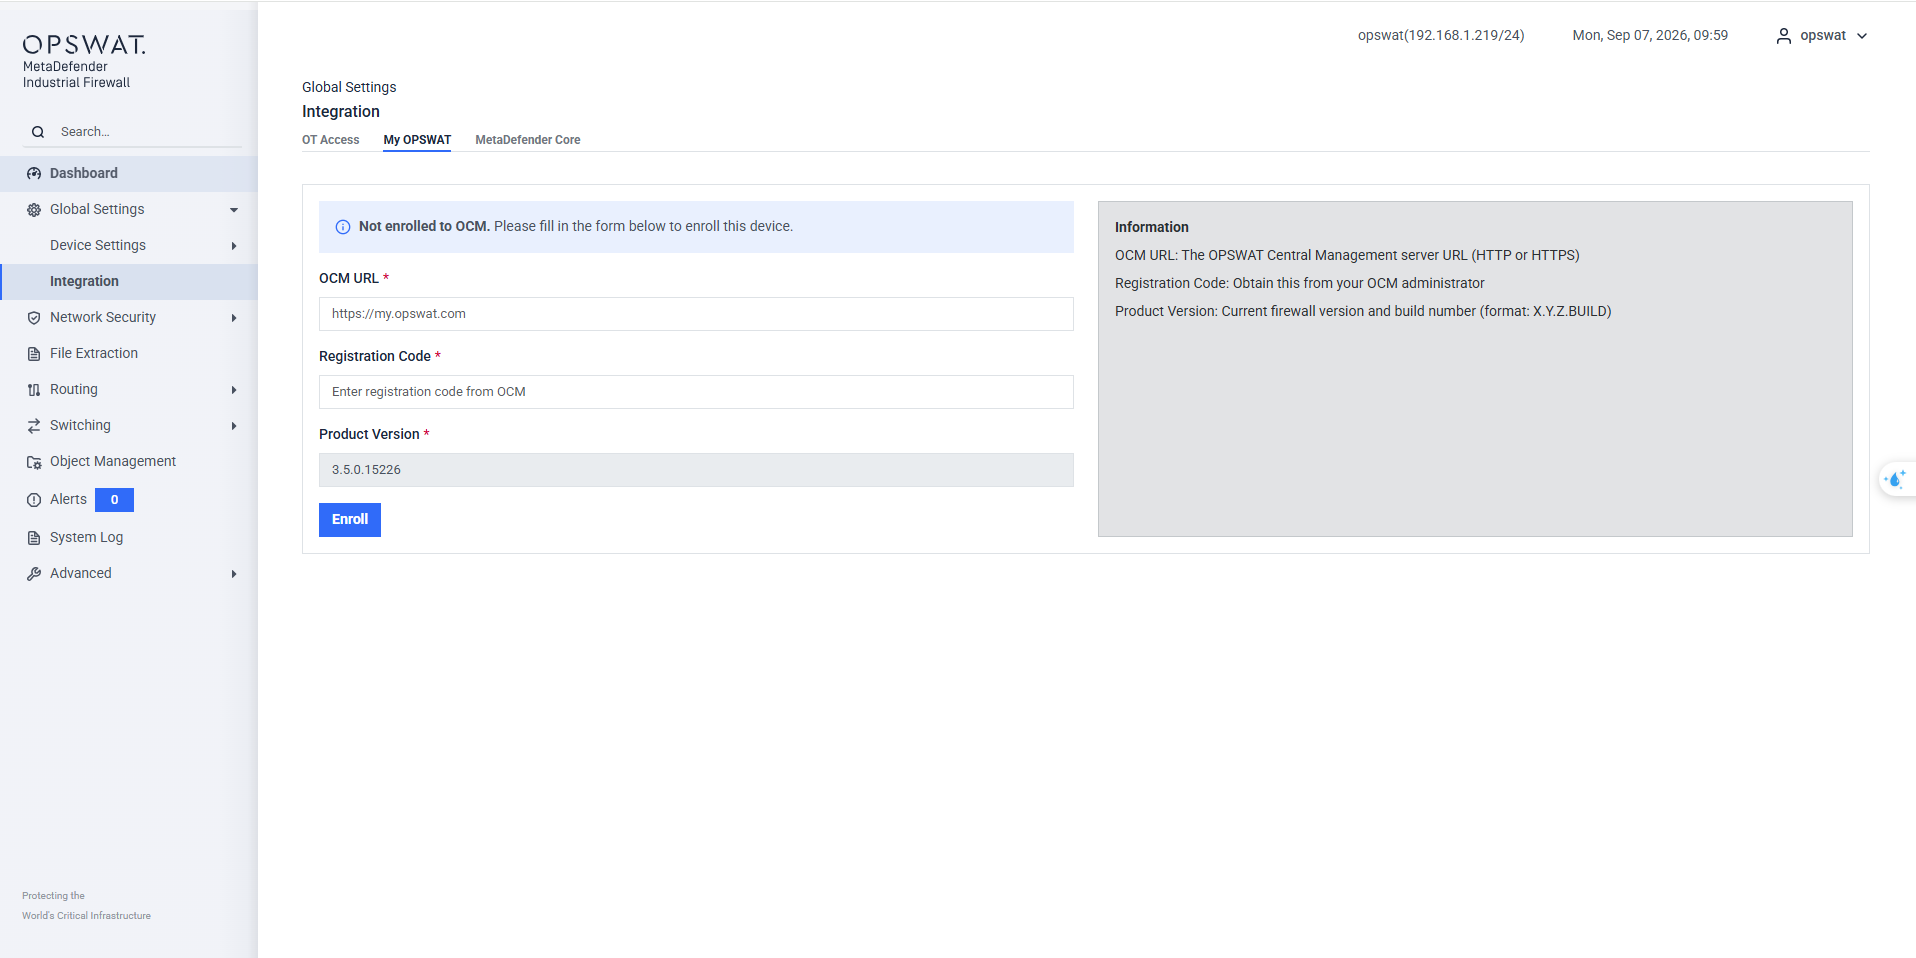
OCM URL: The OPSWAT Central Management server URL (HTTP or HTTPS).
Registration Code: A code obtained from MyOPSWAT.
Detailed information on My OPSWAT and MetaDefender Industrial Firewall integration can be found on this page [My OPSWAT Integration].
To view My OPSWAT integration logs, go to System Log → OCM tab from the side menu.
OT Access
[Global Setting > Integration > OT Access]
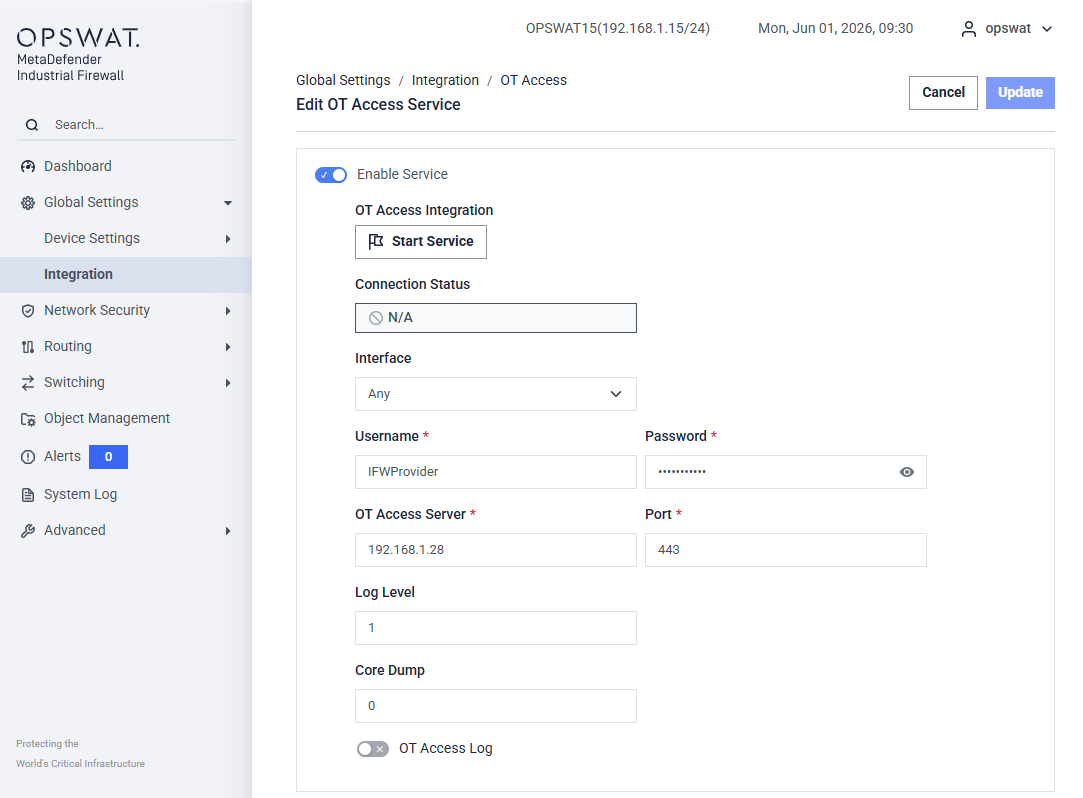
The OT Access Edit page allows administrators to configure the MetaDefender Industrial Firewall to operate as an OTA Gateway. A single MetaDefender Industrial Firewall can register with and maintain connections to multiple OT Access servers at the same time. From this page you can create a new OT Access service or modify an existing one, control the service runtime state (Start / Stop), verify connectivity to the OT Access server, and tune logging and diagnostic options.
Enable Service: Activates or deactivates the OT Access Integration service.
Start Service: Starts or stops the OTA Gateway runtime.
Connection Status: Indicates that the firewall has successfully connected to the OT Access server.
Authentication: Specifies the authentication user used for OT access.
Password: Used to authenticate access to the OT Access server.
OT Access Server: Defines the Service IP address of the OT Access server.
Port: It is always 443.
Log Level: [0, 1, 2] Controls the verbosity of logs generated by the OTA Gateway
Core Dump: Indicates whether core dumps are enabled. 0 is disable and 1 is enable.
OT Access Log: Enables logging for OTA Gateway activities.
Detailed information on OTA and MetaDefender Industrial Firewall integration can be found on this page (OT Access Integration).
Kiosk
You connect the firewall to the Kiosk twice: Check Out before it leaves, and Check In when it returns. Each visit takes a few minutes and produces a passport — a PDF report the Kiosk can email to you and save to a shared folder.
Unplug the servicing cable before you work on the firewall
While the cable is connected, the Kiosk host owns the servicing volume and the appliance cannot safely rewrite it. Work on the firewall itself — settings, toolkit updates, deleting captures, resetting the session, re-arming the volume, rebooting — only with the cable unplugged.
Connect it for the visit, and disconnect once the screen says the visit is complete. A host that writes to the volume while the appliance still owns it can leave it in a state only a fresh provision recovers.
Prerequisites
Two things have to be set up once. If either is missing, the Kiosk stops partway through a visit and tells you why.
1. Connect the firewall to Central Management. The settings the Kiosk applies come from Central Management, and the recordings go back to it, so a firewall that is not enrolled has nowhere to get settings from. Check Out then stops with "the firewall is not enrolled with Central Management." There are two ways to enroll:
- Enroll on the firewall. Use the OCM URL and Registration Code fields described under MyOPSWAT above. To confirm the connection at any time, go to System Log → OCM.
- Let the Kiosk enroll it (Kiosk 6.0.1 or later). Configure Central Management on the Kiosk Console, and turn on Enroll to Central Management in the Integration Workflow for MetaDefender Industrial Firewall.
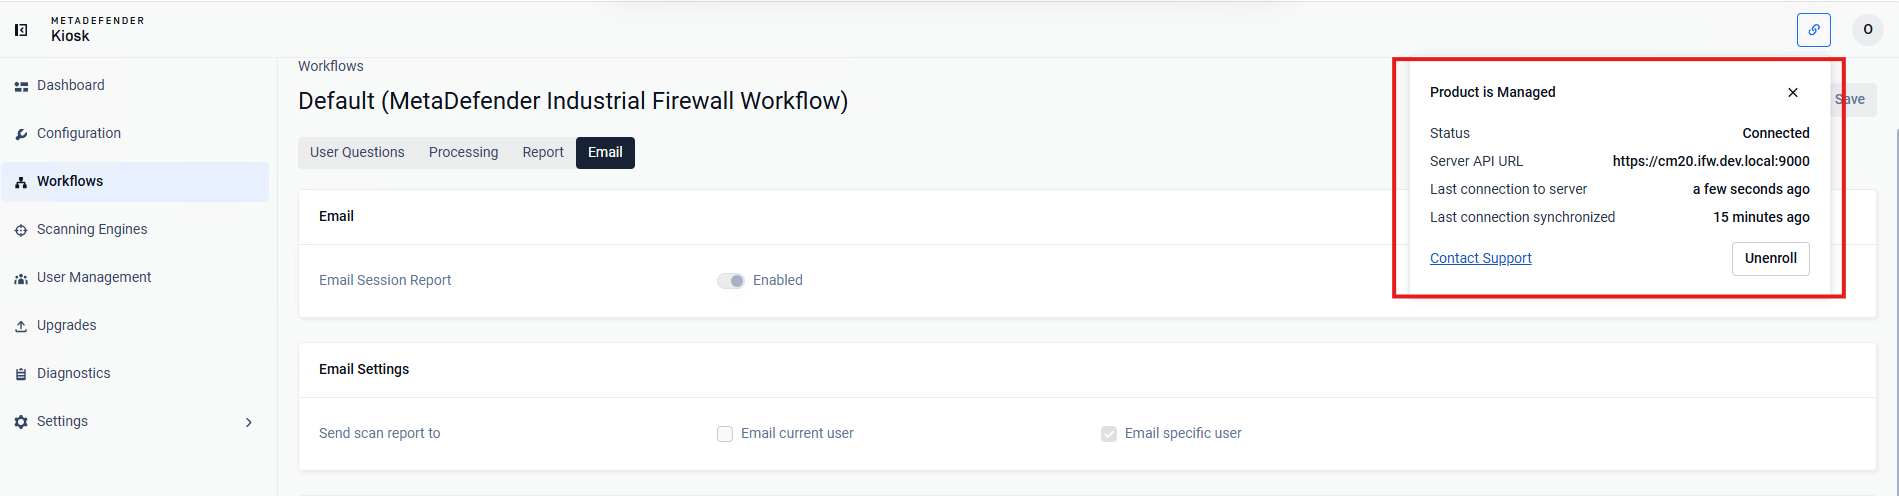
If the recordings must also reach a SIEM, assign a syslog profile to the firewall in Central Management. See Syslog to a SIEM
2. Enable the integration workflow on the Kiosk. On the Kiosk, go to Workflows and find the Integration Workflow group. Two switches have to be on:
The Integration Workflow group switch, at the top right of the group.
The MetaDefender Industrial Firewall row switch, in the table below it.
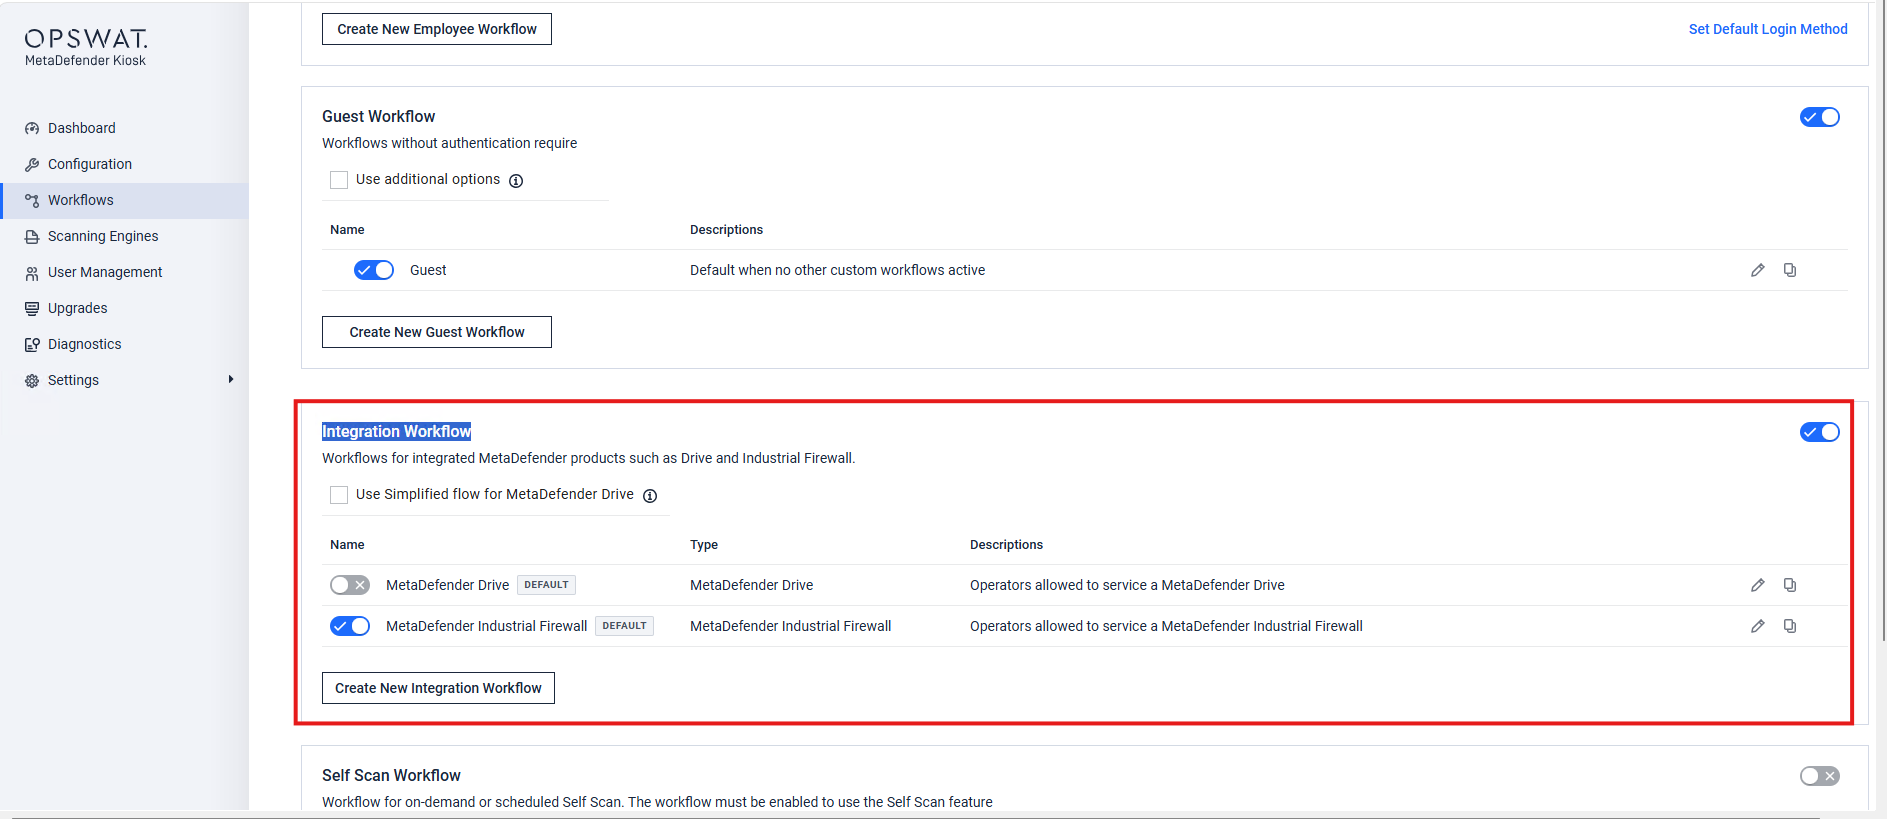
Both switches are required. With the group off, or with the MetaDefender Industrial Firewall row off, the firewall workflow does not run on the Kiosk — the operator either cannot select it or the session ends without servicing the device. The MetaDefender Drive row in the same group is independent: leaving it off does not affect the firewall.
Once it is enrolled, disconnect it from Central Management before you configure anything there — see Configuration in Central Management below.
Configuration in MYOPSWAT Central Management
A Check Out carries whatever MYOPSWAT Central Management holds for this device — so what the appliance leaves with is decided here, before the visit, not on the Kiosk.
In My OPSWAT Central Management, go to Inventory → Devices → Industrial Firewall and select the device, open the Settings tab, then select Edit. Configure it just as you would on the firewall's own web UI, and Save:
- Firewall rules for the mode this appliance runs in — Routing or Transparent.
- DPI profiles.
More detail: Integrating and Managing Industrial Firewall with My OPSWAT - MetaDefender Industrial Firewall
Rules and DPI profiles are what a Check Out ferries to the appliance. Anything left unconfigured here is simply not carried — that is not an error, and the visit still succeeds. Devices can also be configured in bulk through policies, in which case the policy is what a Check Out delivers.
Disconnect the firewall from Central Management before you configure rules
Enrolling needs a live connection to Central Management. Configuring does not — and must not have one. While the firewall can still reach Central Management, a saved configuration is delivered straight to the appliance within about a minute and the result is reported back. There is then nothing left for a Check Out to carry, and the appliance has already changed before it ever left the site.
So the order is: enroll, then take the firewall off the network that reaches Central Management, and only then configure its rules and DPI profiles there.
Disconnect it, do not unenroll it. Unenrolling clears the appliance's agent token, and Check Out then fails with "the firewall is not enrolled with Central Management." The appliance keeps its enrollment for the whole servicing cycle — only its network path to Central Management goes away.
Workflow Options
The workflow decides what each servicing visit actually does. On the Kiosk, open Workflows → MetaDefender Industrial Firewall Workflow and use the Processing, Report and Email tabs. Remember to Save.
Processing tab — the tasks performed during a session.
Sync configuration to My OPSWAT Central Management: the firewall's target configuration is fetched from Central Management and applied at Check Out. With this off, Check Out only arms the traffic recording.
Sync logs to My OPSWAT Central Management: the collected syslog is uploaded at Check In.
Upload pcap files to My OPSWAT Central Management: the collected traffic recordings are uploaded at Check In.
Generate Device Passport: the passport PDF is produced at the end of each visit.
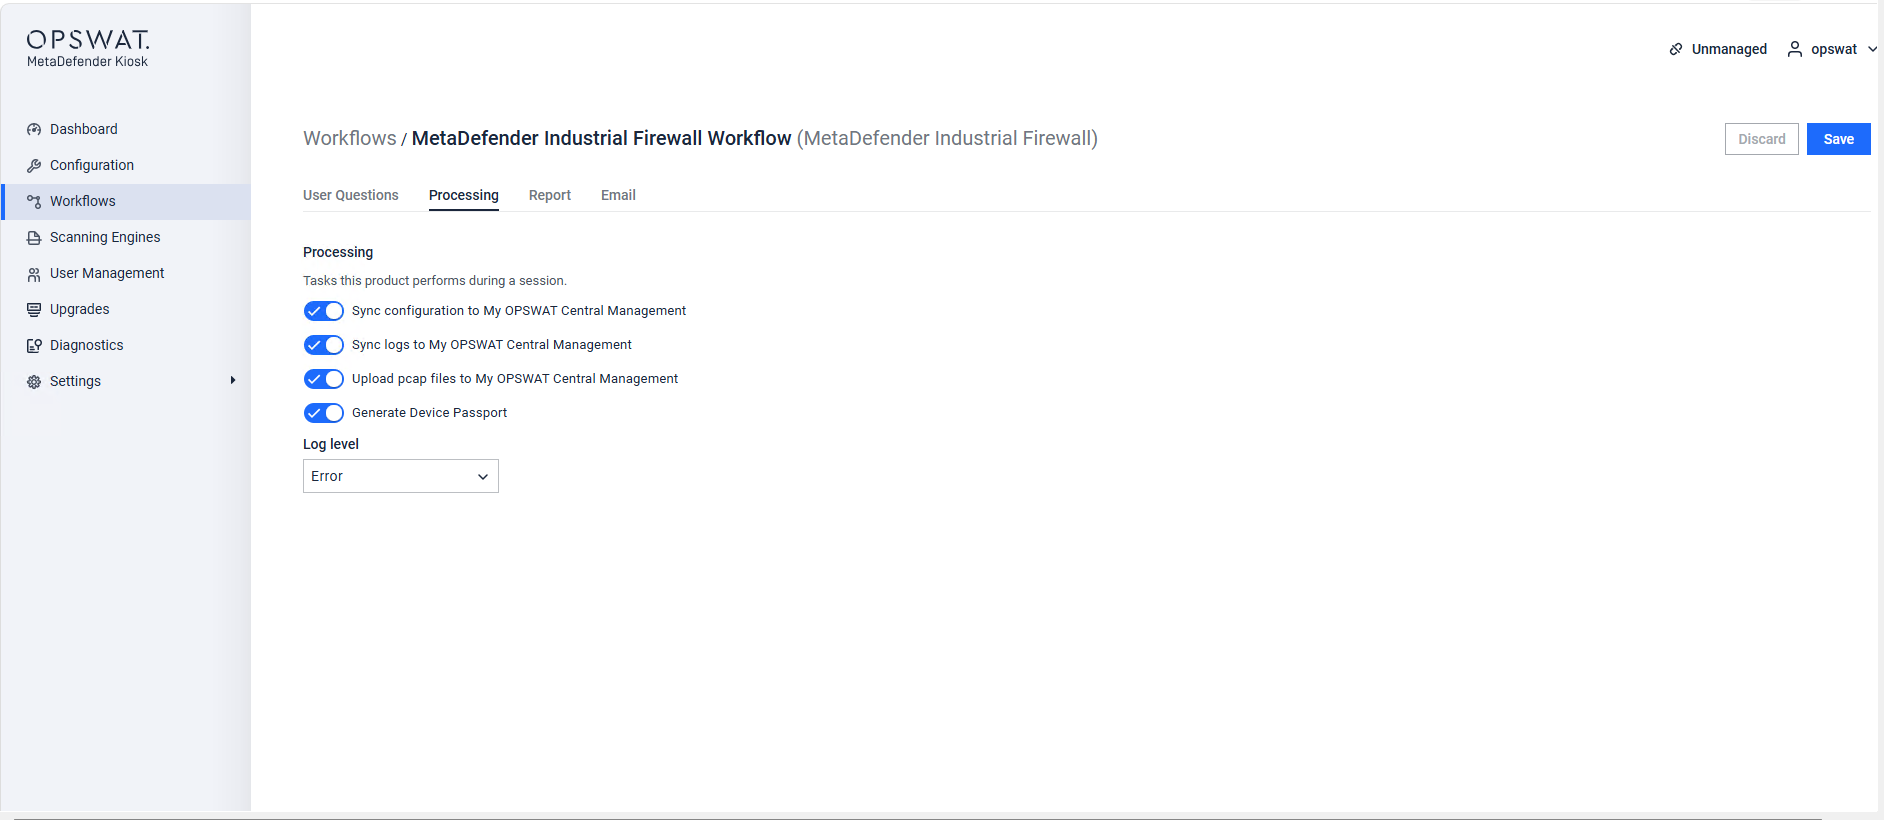
The recordings are still collected from the firewall and integrity-checked even when the two upload switches are off — they simply do not leave for Central Management. If uploads are off while the session is required to succeed as a whole, the firewall keeps its copy and the next Check In collects it again.
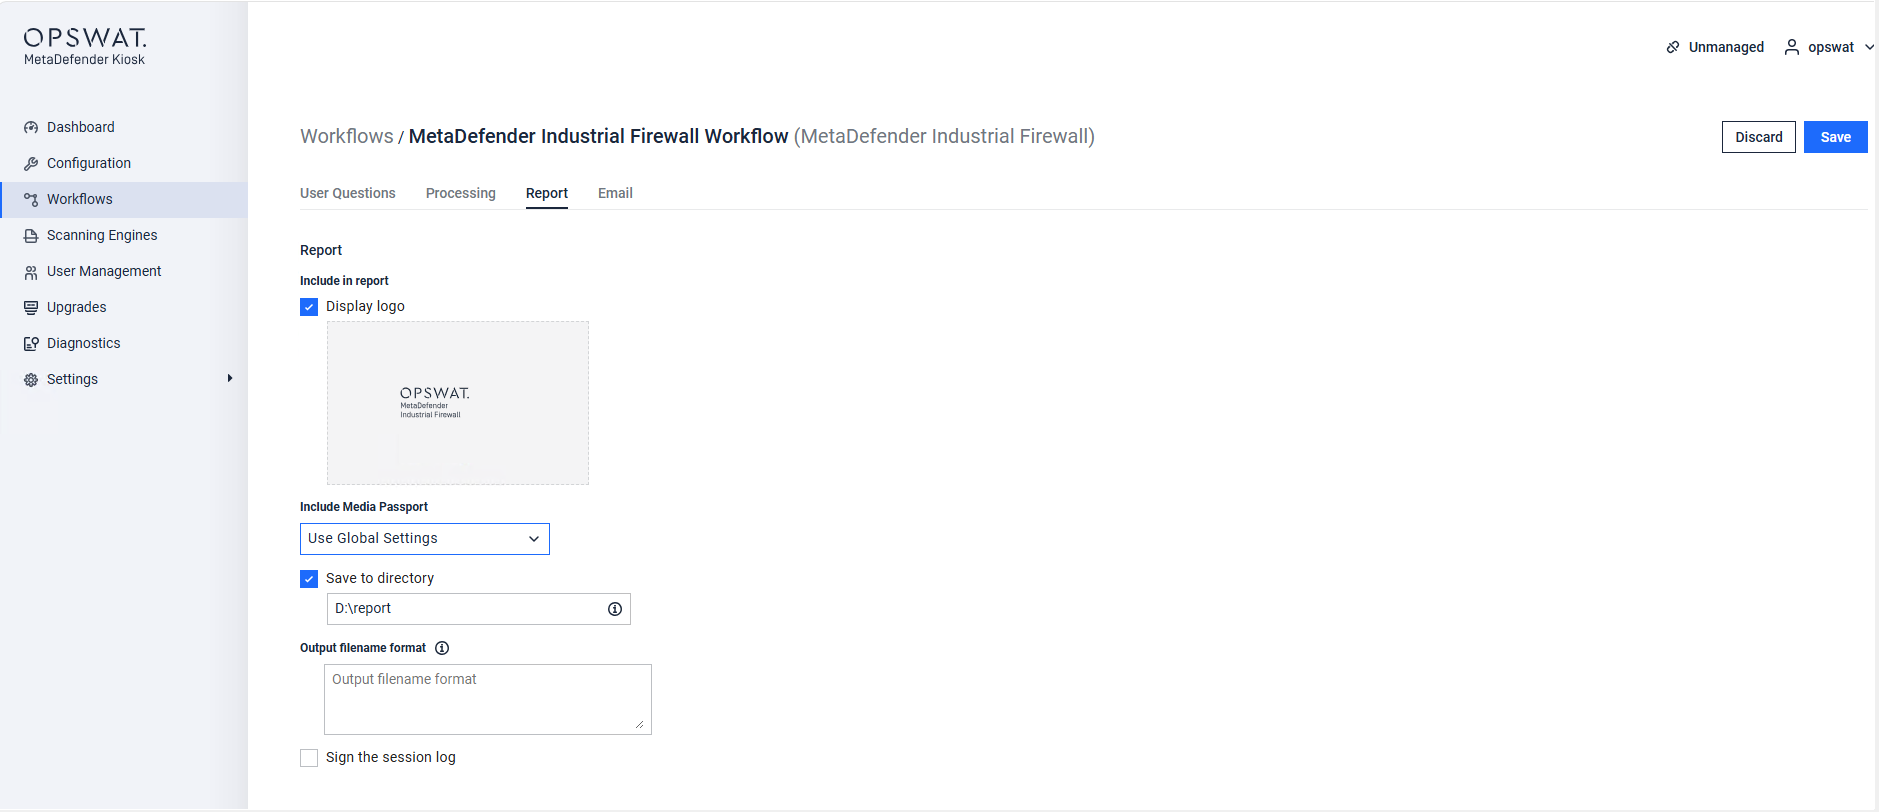
Report tab — what the passport contains and where it goes.
Display logo: prints the product logo on the passport.
Include Media Passport: Use Global Settings or custom setting.
Save to directory: also files a copy of the session into the folder you name — a local path or a share reachable from the Kiosk host, for example
D:\report. The copy is filed at Check In only, and it contains the whole session: the passport, its signature, and every recording collected on that trip.Sign the session log: the Kiosk signs the passport. Signing also needs a signing certificate configured on the Kiosk; without one, nothing is signed.
Email tab — who receives the passport. Email is the only way the passport leaves the Kiosk host, so configure it if anyone needs the report by mail. You can send to a fixed list, let the operator add recipients during the session, include the operator's own address, and choose to send only when a passport comes out UNSAFE.
Not supported yet. Two options on these tabs have no effect on Industrial Firewall servicing: Log level on the Processing tab, and Output filename format on the Report tab. Leave them as they are — the saved copy always uses its default naming, one folder per session.
Check Out
Do this before the device leaves your site. Check Out gives the firewall its latest settings and starts the traffic recording that Check In collects later.
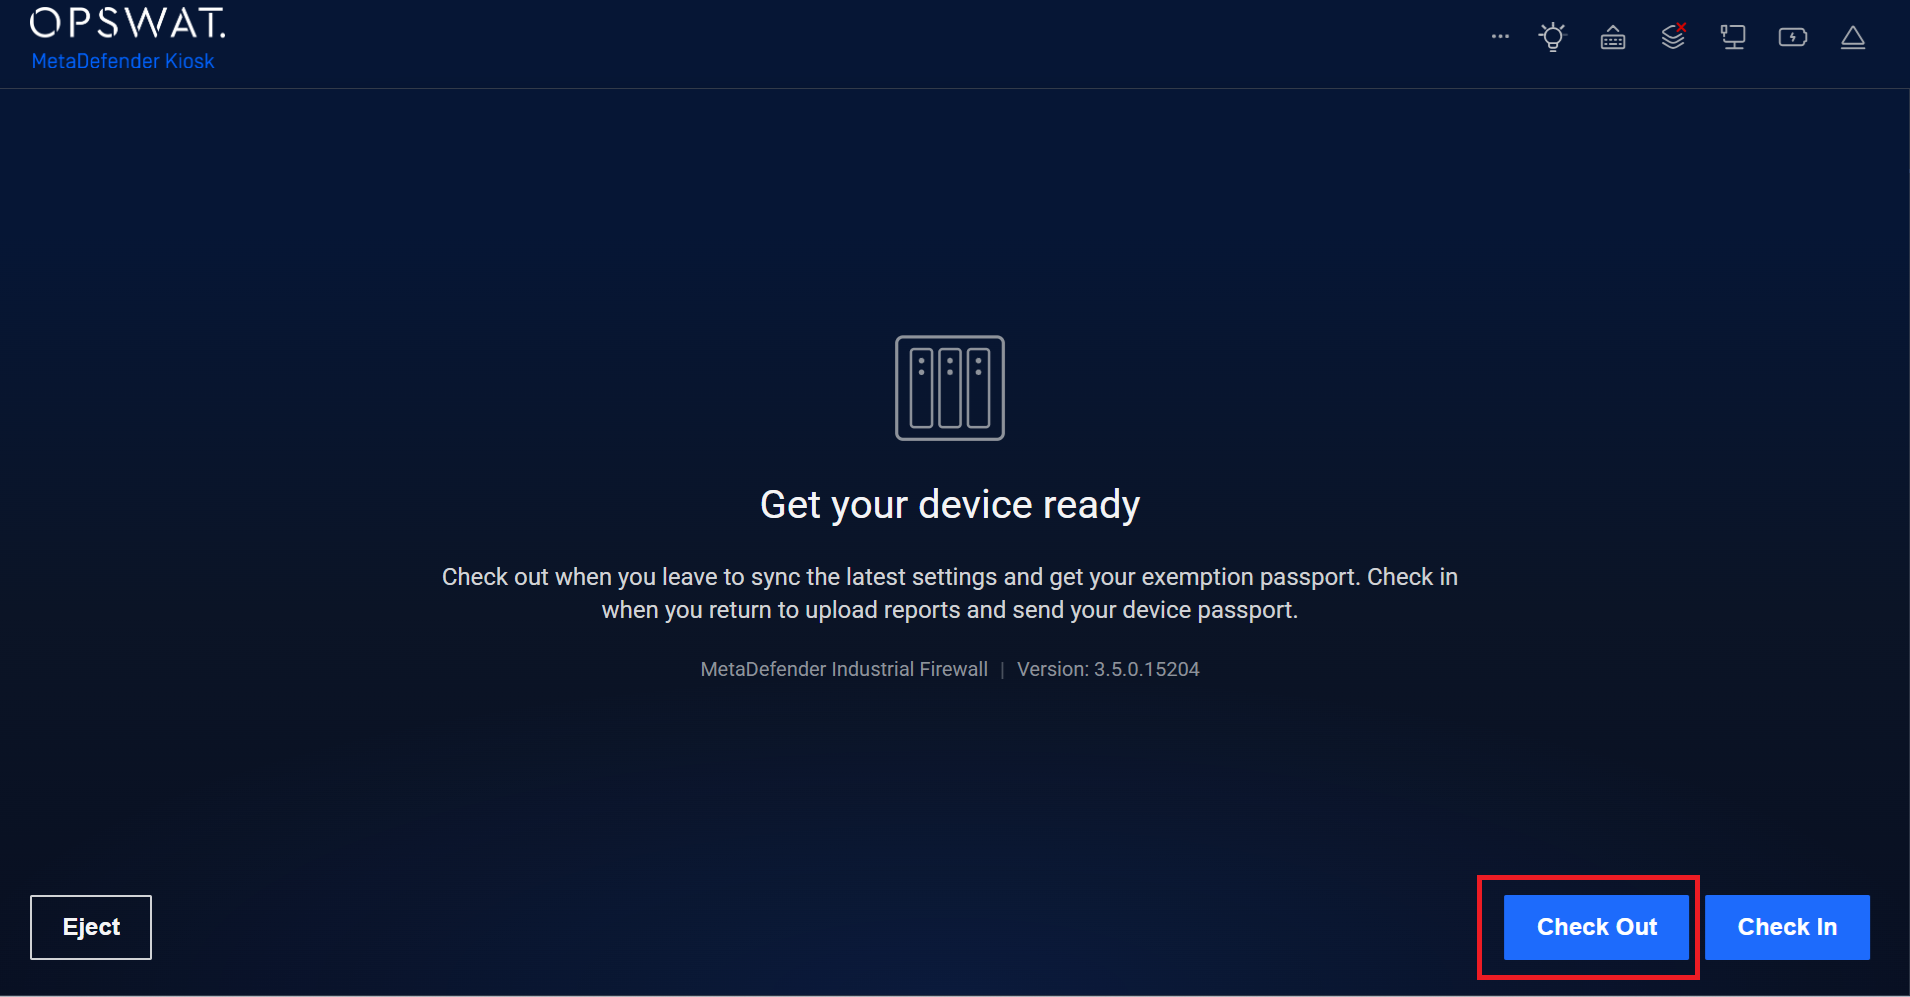
Connect the firewall to the Kiosk with its USB cable. The Kiosk recognises the device on its own — you do not need to select anything first.
Wait for the device screen. After a few seconds the Kiosk shows Get your device ready, with the buttons Check Out, Check In and Eject.
Select Check Out.
Add report recipients, if you are asked. Some workflows show a Send Scan Report page: type an email address, or pick one from the directory list, then select Send. Addresses your administrator configured appear as "Also sent to…" — they are always included and cannot be removed.
Wait while the steps run. Settings are fetched from Central Management, applied to the firewall, and traffic recording is started.
Finish. When the screen says Check-out complete, select Finish and disconnect the firewall.
Your exemption passport is emailed at the end of this visit — the document that says the device left the site with approved settings. No copy is saved to the shared folder yet; that happens at Check In, when there is a trip to report on.
Do not skip Check Out. It is what starts the traffic recording. Without it there is nothing to collect when the device comes back, and Check In will not run.
Check In
Syslog to a SIEM
A firewall on a network can send its syslog directly to a syslog server (see Global Setting → Remote Syslog). A firewall serviced by a Kiosk has no such path, so the Kiosk carries the syslog instead:
At Check Out, the toolkit records the start of the visit on the firewall.
At Check In, the firewall hands the toolkit the syslog written during the visit, together with the packet captures. Lines written before the visit are not included; lines written across a reboot of the firewall inside the visit are.
The toolkit uploads the syslog file to Central Management, where it is stored with the visit's reports.
The toolkit also forwards the syslog line by line to Central Management's syslog service. Central Management relays those lines to the SIEM selected for that firewall.
Steps 3 and 4 are both controlled by the Sync logs option of the Integration Workflow. Step 4 delivers lines to a SIEM only when a syslog profile is assigned to the firewall in Central Management.
Configure the SIEM destination in Central Management
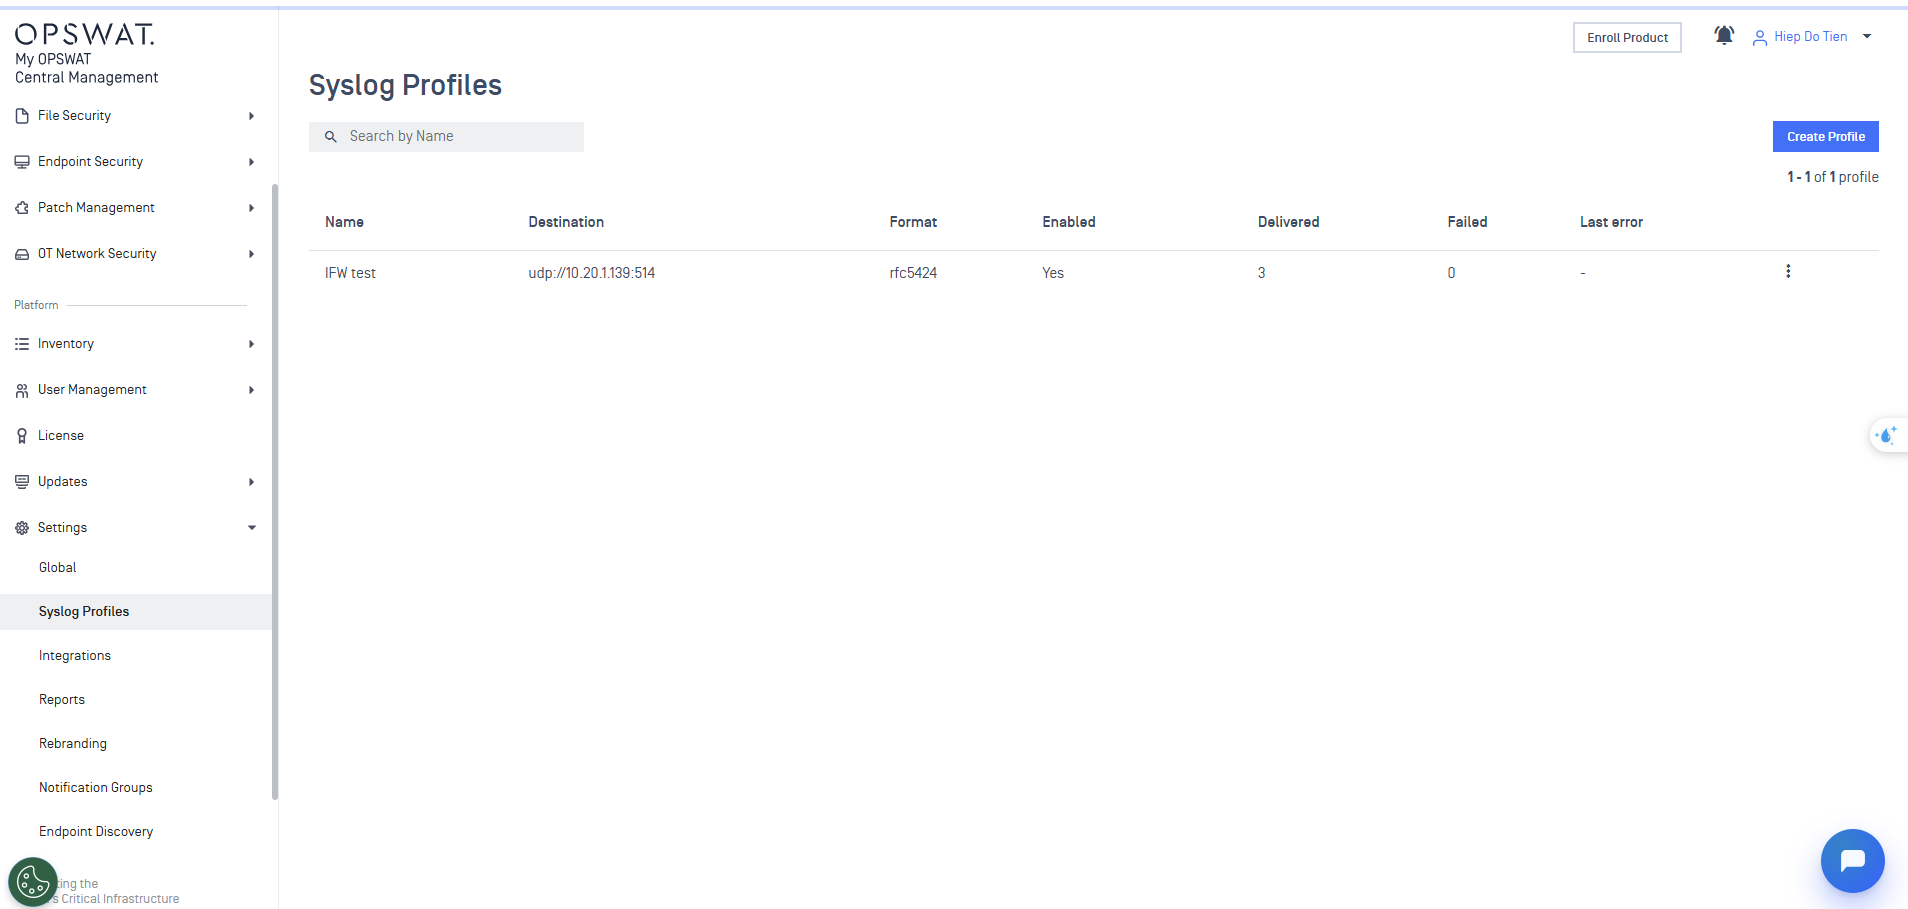
1. In Central Management, create a syslog profile that points at the SIEM (Settings -> Syslog Profiles).
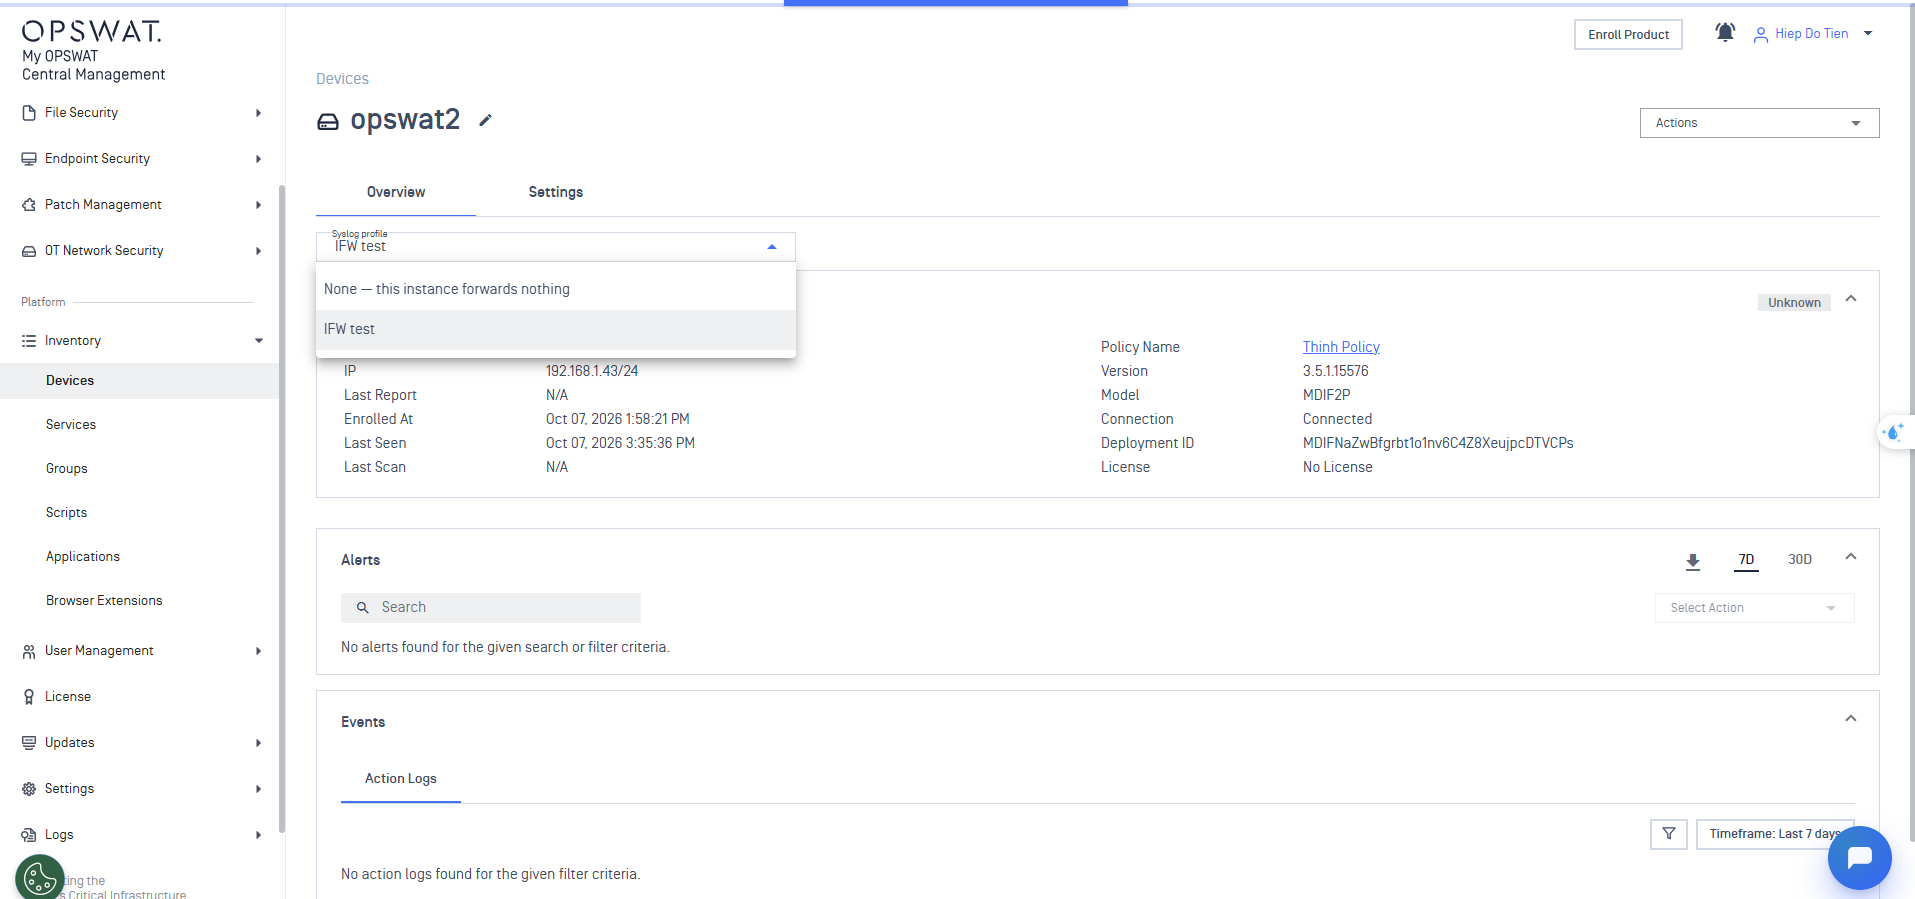
2. Open the firewall's device page and assign the profile to it.
3. Perform a Check Out and a Check In at the Kiosk. The visit's syslog reaches the SIEM when the Check In completes.
Until a profile is assigned, Check In still completes and the syslog file is still stored in Central Management. The forwarding step reports that no profile is selected; this is not an error.
Do this when the device returns.
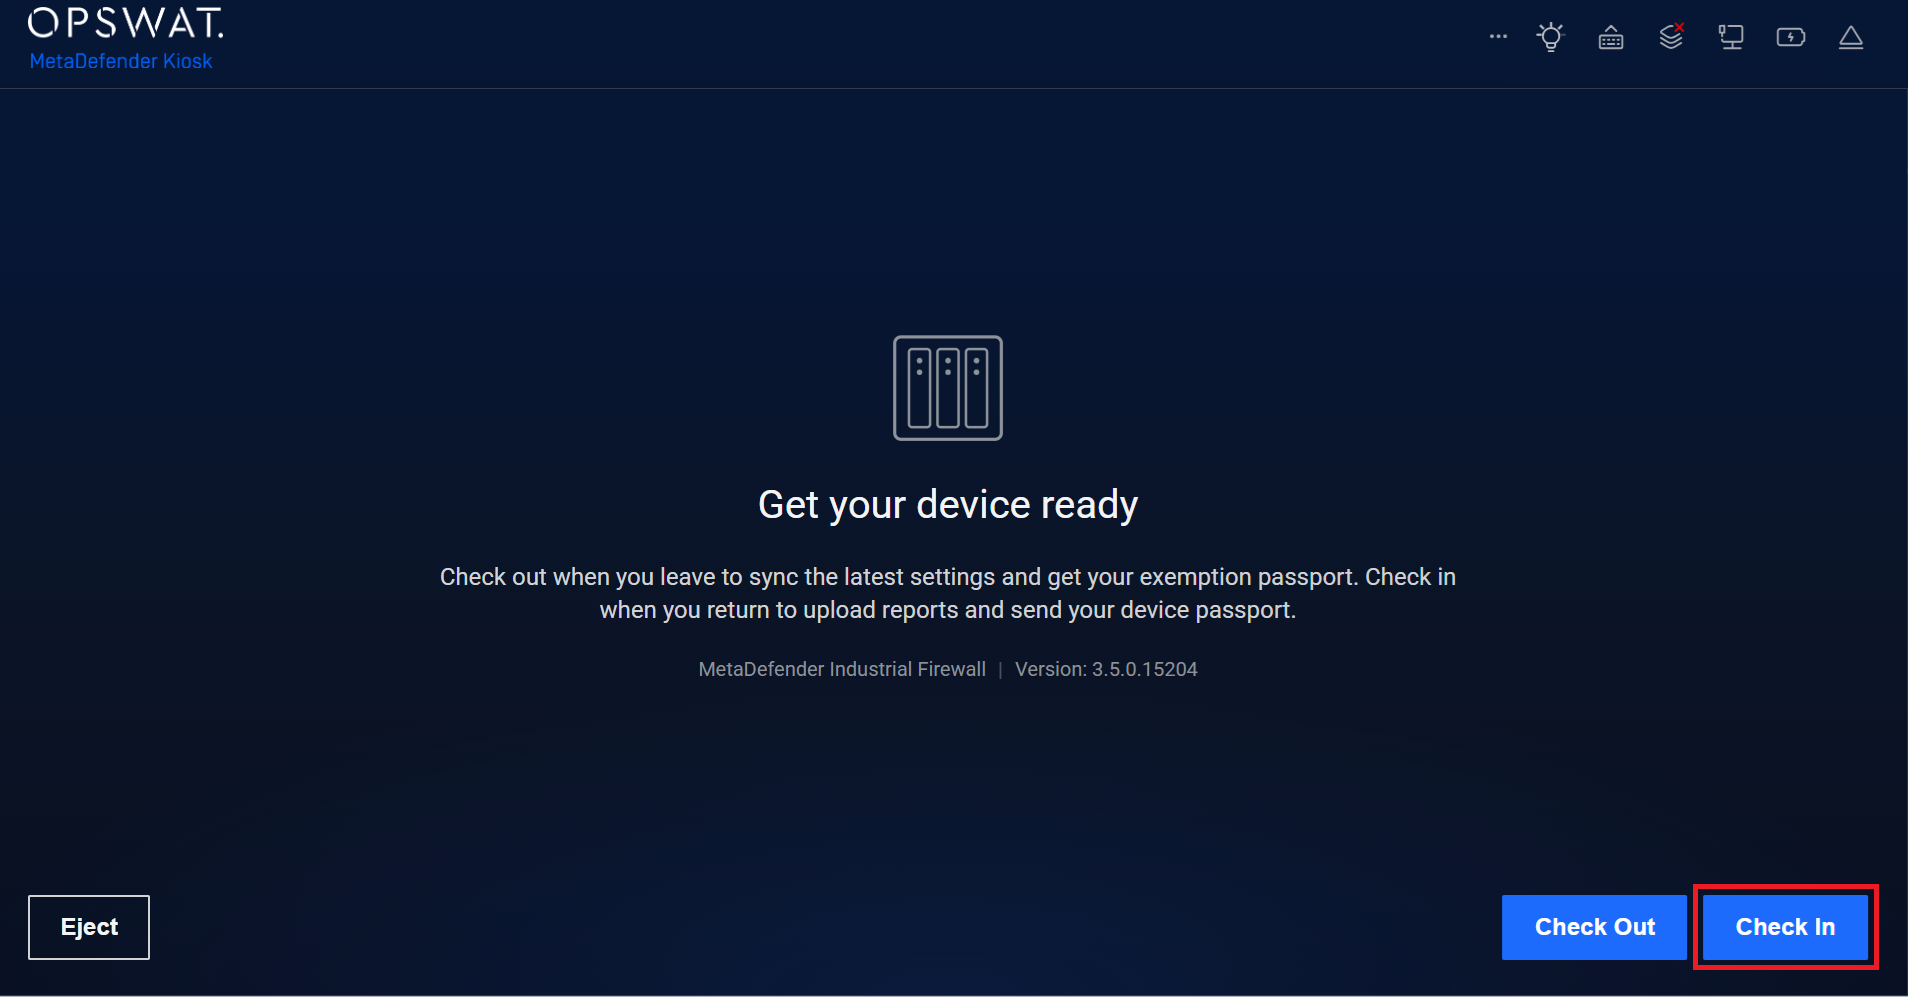
Connect the firewall to the Kiosk again and wait for the device screen.
Select Check In.
Add report recipients, if you are asked — the same Send Scan Report page as at Check Out.
Wait while the steps run. This visit does more work: the Kiosk stops the recording, collects it from the device, checks that it is complete, uploads it to Central Management, and clears the temporary rules the servicing session added. A device that has been out for a long time can take several minutes here — this is normal, and the screen keeps moving.
Finish. When the screen says Check-in complete, select Finish and disconnect the firewall.
At the end of this visit the Kiosk produces the device passport and, depending on your workflow, emails it and saves a copy of the whole session — the passport plus the recordings — into your shared folder. Each session gets its own folder, named after the operator and the time the device left.
Where the recordings appear in Central Management
The collected files land on the device's own page in My OPSWAT Central Management: Inventory → Devices, select the device, open the Settings tab, then Global Settings → Integration → Kiosk.
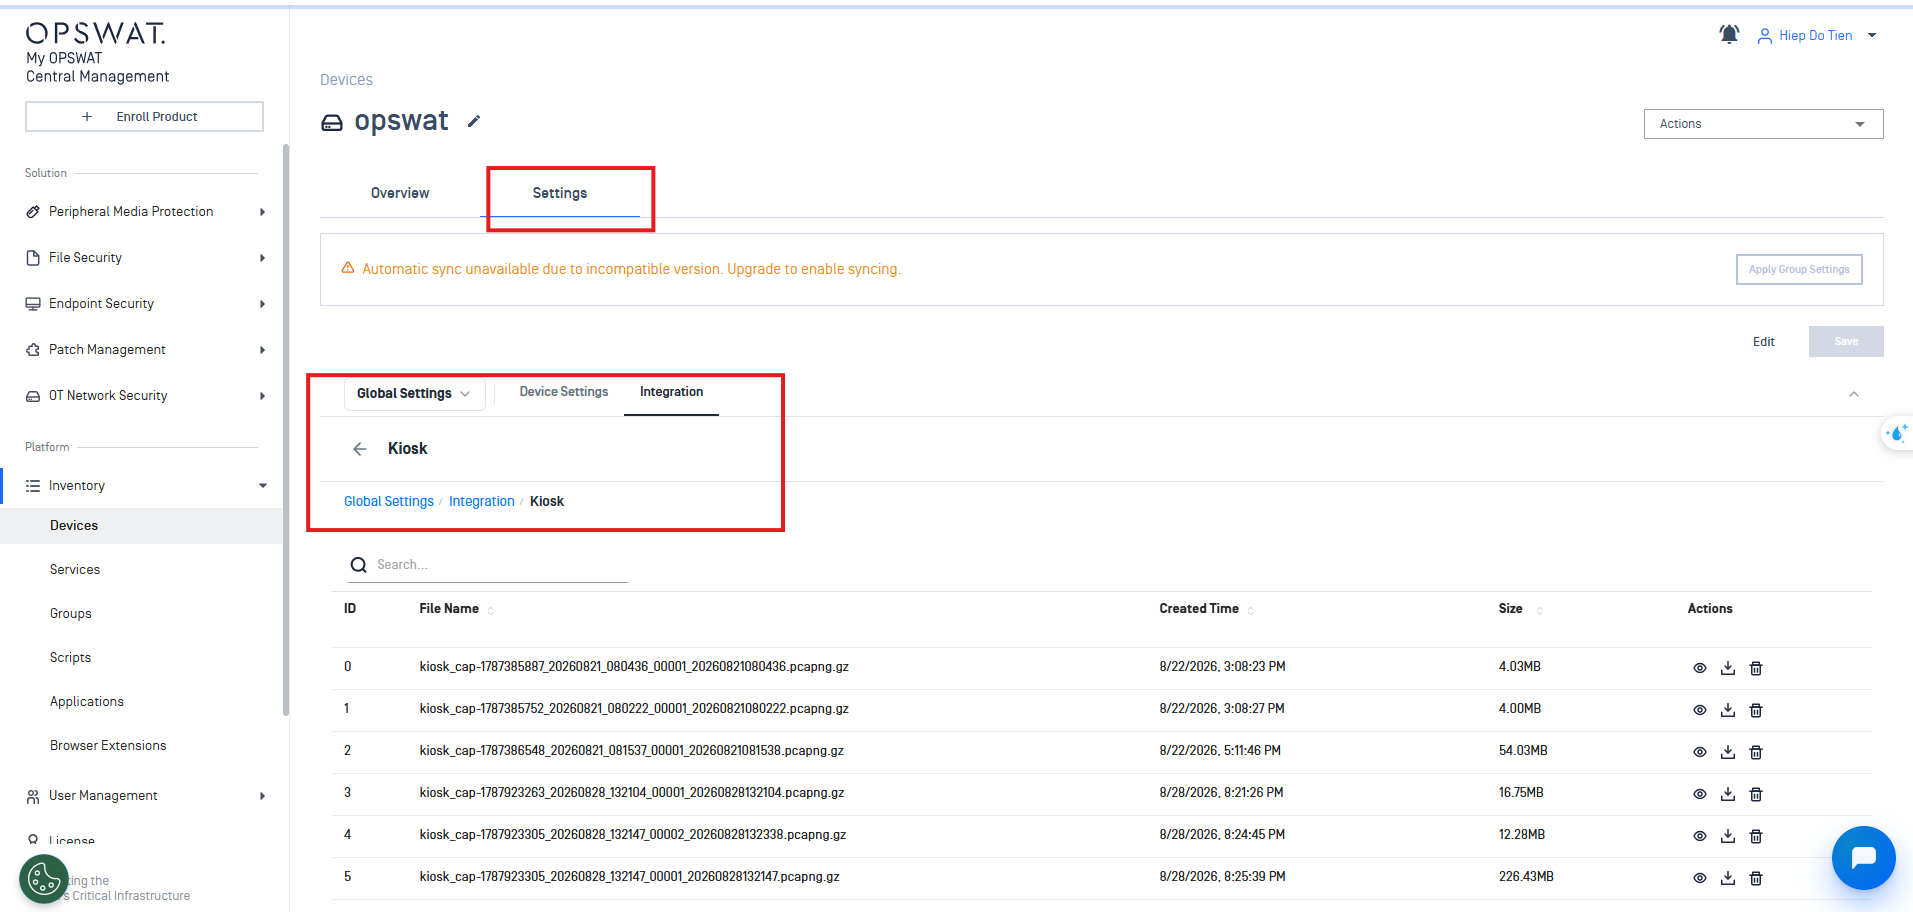
The table lists every file collected from this device with its ID, File Name, Created Time and Size, and per-row actions to view, download or delete it. Both the traffic recordings (.pcapng.gz) and the session's syslog arrive here.
The file name carries the capture session and its timestamps, and the 00001, 00002 … counter numbers the files as the recording rolls over at the Memory limit per file. One long trip therefore normally appears as several files rather than one.
This list is also the answer to "did the evidence arrive?" — a SAFE passport means these files reached Central Management, and the appliance's own copy is cleared once they have.
The passport carries a result:
SAFE: The session's recordings reached Central Management, and the device recorded the whole time it was out.
UNSAFE: Something is missing. Either the recordings did not reach Central Management, or the device reached its Total storage limit and the capture stopped early, so part of the trip was never recorded.
An UNSAFE passport is not a virus alert. It means the evidence for this trip is incomplete. Check In again once the problem is fixed, or report it to your security team.
Servicing Status and Recovery
[Global Settings > Integration > Kiosk]
This tab is the firewall's own view of Kiosk servicing. Use it to see whether a session is open, how much recording is on the device, and — when something is stuck — to clear it from the firewall side.
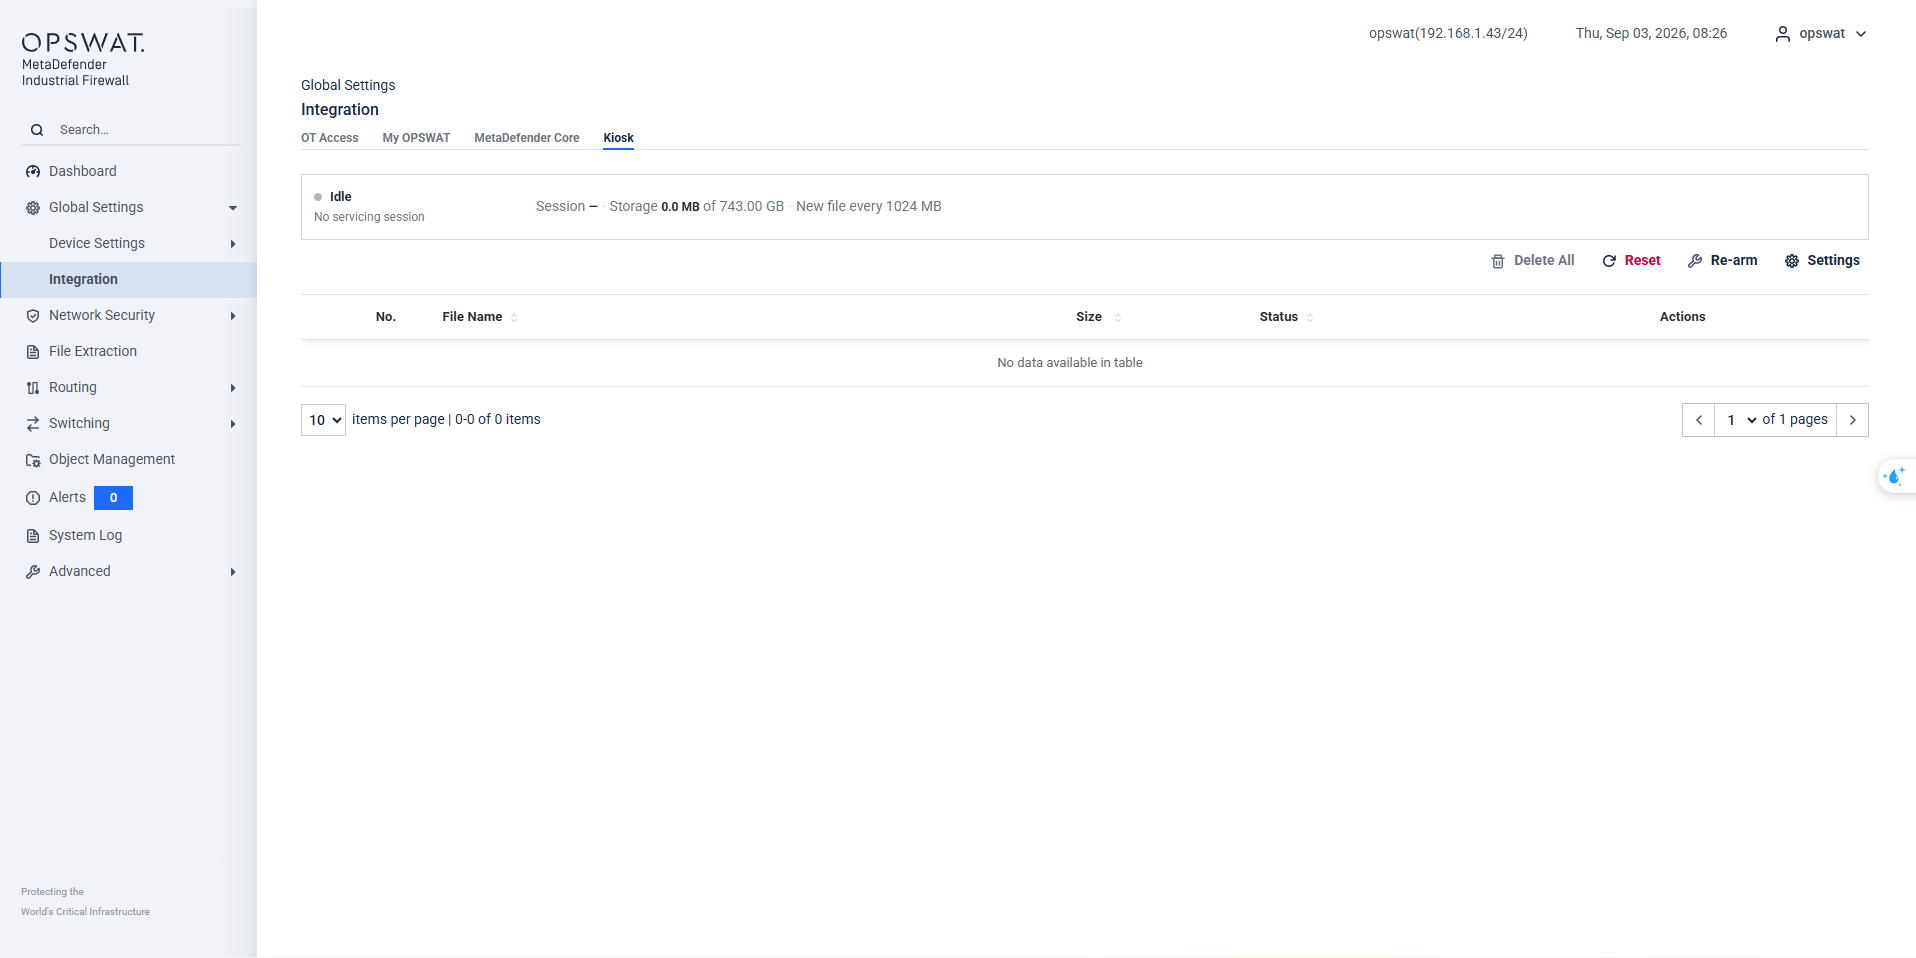
The status card shows:
State: Idle with No servicing session when nothing is checked out, or the running session while the device is out.
Session: the identifier of the current servicing session, or — when there is none.
Storage: how much recording is held on the device, against the Total storage limit.
New file every: the Memory limit per file, i.e. the size at which the capture rolls into a new file.
The table below lists each capture file with its No., File Name, Size, Status and Actions. An empty table with No data available in table is normal on an idle device, or right after a Check In has collected everything.
Actions on this tab
Delete (row action) — removes that one capture file from the device.
Delete All — removes every capture file listed. Use it to free space on a device whose storage is full; anything already uploaded to Central Management is unaffected.
Reset — clears the servicing session on the firewall. Afterwards the firewall reports no servicing session, so a new Check Out can start. Use it only when a session is stuck and Check In cannot finish: a recording still waiting to be collected is no longer part of a session the Kiosk can check in.
Re-arm — presents the servicing USB volume to the host again. Use this when the Kiosk does not see the device at all (see Troubleshooting).
Settings — the capture limits, below.
Delete All and Reset discard evidence that has not been collected yet. Prefer running a Check In first: if it succeeds, the recordings reach Central Management and the device's copy is cleared for you.
Capture Settings
Select Settings on the Kiosk tab to open Kiosk Capture Settings.
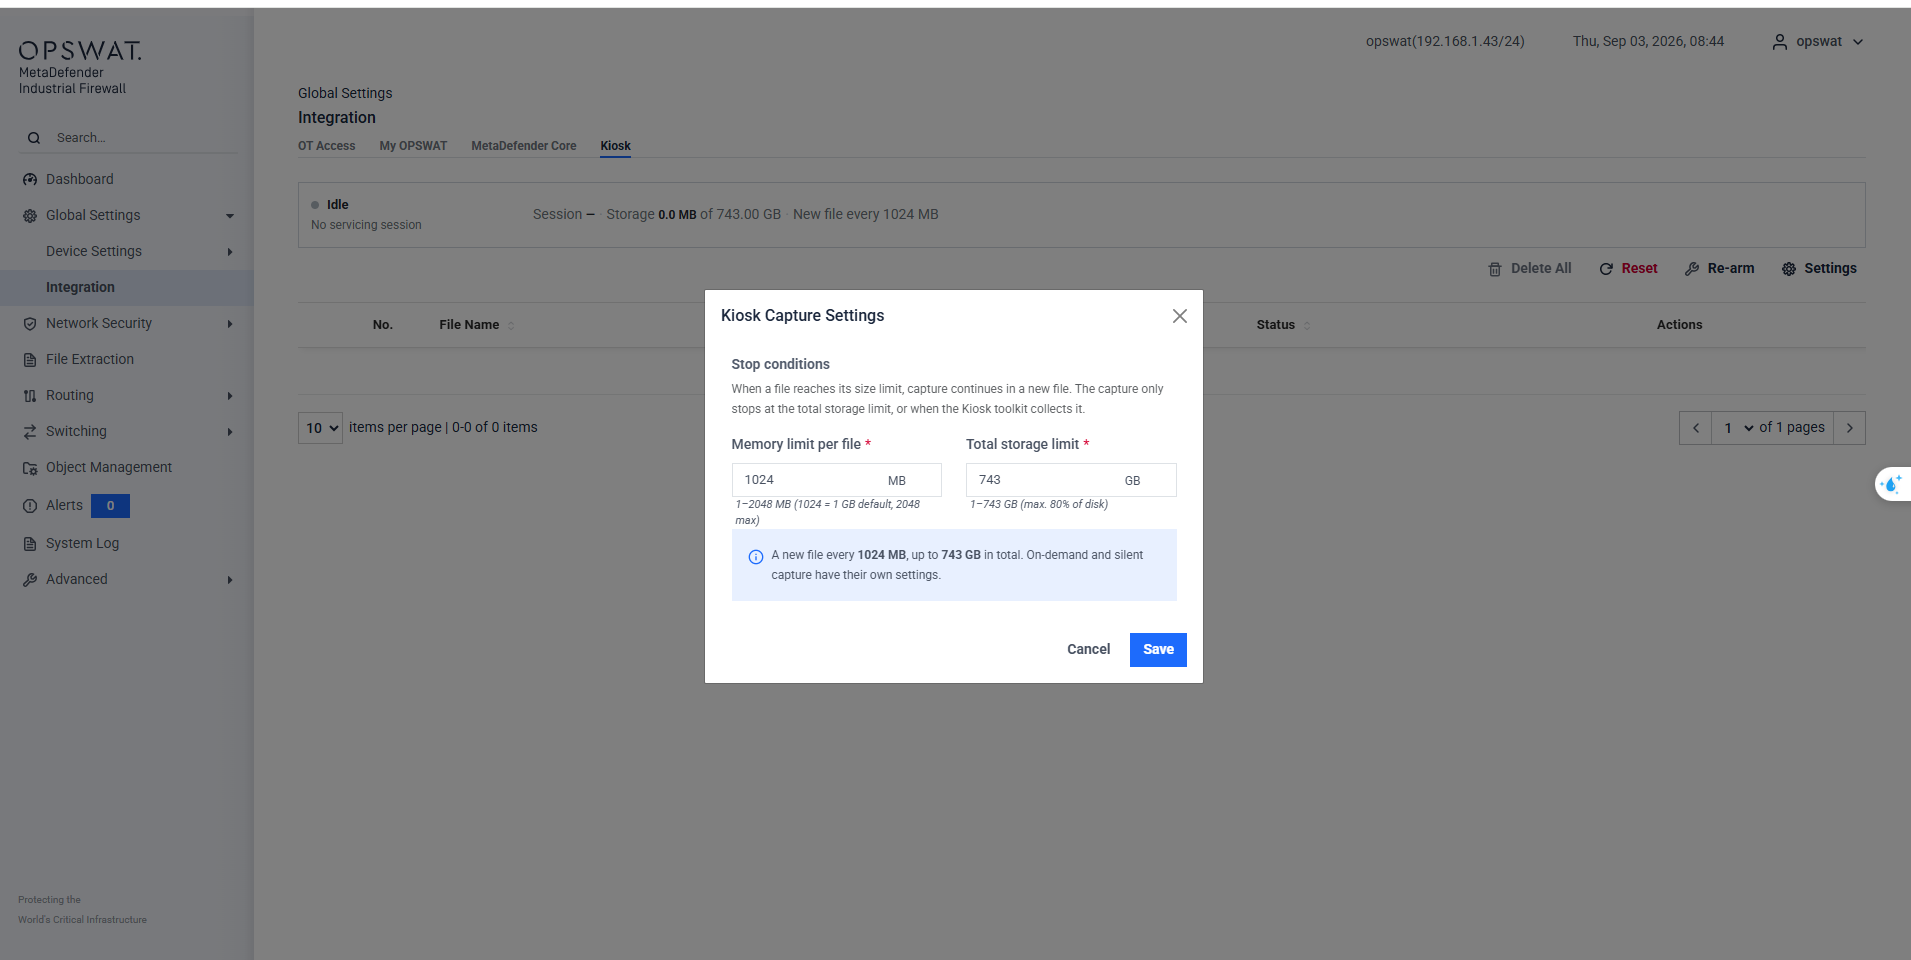
Memory limit per file: the size at which the capture rolls into a new file. Range 1–2048 MB; the default 1024 MB is 1 GB. This does not stop the capture — it only decides how the recording is split.
Total storage limit: the total the recordings may occupy on the device. Range 1 GB up to 80% of the disk. This one does stop the capture.
So a capture only ends in one of two ways: the total storage limit is reached, or the Kiosk toolkit collects it at Check In.
The Total storage limit is what decides whether a long trip is fully recorded. If the device fills up before it returns, the capture stops early and the device passport comes out UNSAFE, because part of the trip was never recorded. If your devices go out for long periods, raise this limit or check them in more often.
On-demand and silent capture are separate features with their own settings; these limits apply to Kiosk servicing captures only.
Troubleshooting
Most problems are fixed by unplugging the device, plugging it back in, and trying again. Here is what the rest mean.
The Kiosk does not notice the device. Wait about ten seconds, then reconnect the cable, and try the other USB port. If the Kiosk still sees nothing, the host may have ejected the servicing volume — the firewall looks healthy, but the volume is gone from the Kiosk's side. Go to Global Settings → Integration → Kiosk and select Re-arm, then reconnect. If it is still not detected, ask your administrator: Industrial Firewall support may not be switched on for this Kiosk.
The device screen does not appear, or the Kiosk reports that it could not reach the device. Disconnect, reconnect, and wait once more. If it happens twice in a row, this is a Kiosk configuration problem and your administrator has to fix it.
Check Out stops right away. The message names the cause:
The firewall is not enrolled with Central Management — enroll it as described under MyOPSWAT above, then try again.
The previous session's evidence has not reached Central Management yet — run Check In first — the last trip was never checked in and its recordings are still on the device. Select Check In, let it finish, then Check Out normally. Only if that Check In cannot be completed at all, clear the session with Reset on the Kiosk tab — which discards the recording it was holding.
The media carries no Central Management coordinates — this is a test or spare USB device, not one prepared by a firewall. Use the device's own servicing media.
Check In stops right away with no active capture session — check out required. This device was never checked out, so there is nothing to collect. Check Out first: the recording starts there.
Check In takes a long time, then fails. The device could not hand over its recording in time, usually because the trip was long and the recording is very large. Select Retry once — the device keeps its copy until the Kiosk has taken it, so nothing is lost. If it fails again, tell your administrator how long the device was out; checking devices in more often keeps each recording small.
The Kiosk tab shows storage close to the limit. The device is running out of room to record. Check the firewall in so its recordings reach Central Management and the device's copy is cleared. If you need space immediately and the recordings are expendable, use Delete All on the Kiosk tab, or raise the Total storage limit in Capture Settings.
A step shows "Skipped". That is normal. Your workflow decides which steps run — it may not upload recordings, not sign the passport, or not send email. A skipped step is a configuration choice, not a failure.
The passport did not arrive by email. Check your junk folder first. Then check the Email tab of the workflow: it may be configured to send only when the passport comes out UNSAFE, so a clean session sends nothing on purpose. If the Send Scan Report page did not appear, you cannot add addresses yourself and the report went only to the addresses your administrator configured. If some people received it and others did not, that is normal — each address is delivered separately, and one bad address does not stop the rest.
The passport has no signature or no QR code. Both are workflow settings on the Report tab. Signing also needs a signing certificate on the Kiosk. Ask your administrator to enable them if you need them.
No copy appeared in the shared folder. Check that Save to directory is selected on the workflow's Report tab and that the path is reachable from the Kiosk host. A copy is saved at Check In only — Check Out does not save one, because its trip has not happened yet. If you re-ran a failed Check In, look in the folder from the original trip: the re-run tops it up instead of creating a second one.
The report file is not named the way the workflow says. Output filename format is not supported yet. The saved copy uses its default naming, one folder per session.
The screen says "Check-in incomplete". The Kiosk finishes as much as it safely can, then shows you what it could not do. The device keeps its recording, so nothing is lost. Select Retry to run the visit again; if it fails the same way twice, select Eject, disconnect the device, and pass the message on to your administrator.
Do not disconnect the device while steps are still running. If you need to stop, select Cancel first, wait for the screen to settle, and then disconnect.
Update the Kiosk Toolkit
[Global Settings > Device Settings > Device Updates > Toolkit Updates]
The toolkit is the program the Kiosk runs to service this firewall. It travels on the firewall's own servicing volume rather than being installed on the Kiosk, so you update it here, on the firewall — and every Kiosk this device is taken to then uses the new version automatically.
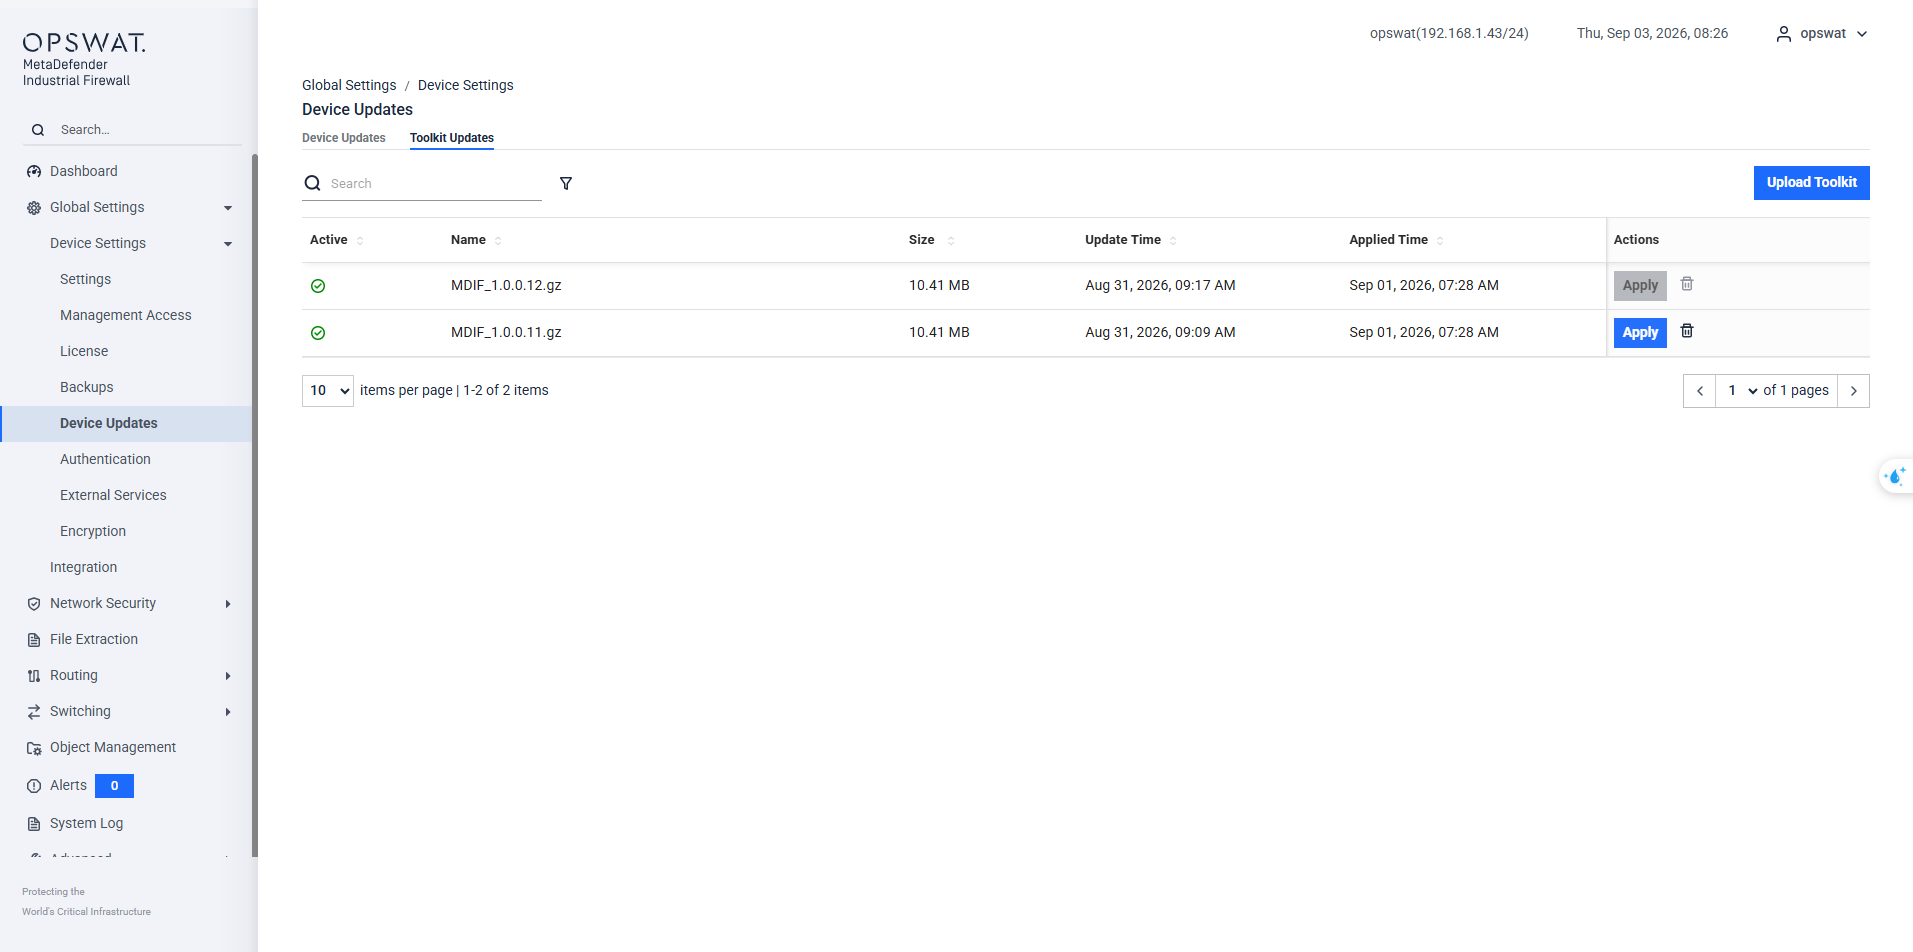
Select Upload Toolkit and choose the toolkit package, for example
MDIF_1.0.0.12.gz.Wait for the upload to finish. The package appears in the table with its Size and Update Time.
Select Apply on the row you want to use. Applied Time is then filled in, and Active marks the version in use. Apply is unavailable on the version that is already applied.
The table keeps the packages you have uploaded, so you can apply an earlier one if you need to go back. Use the delete action to remove a package you no longer want.
Apply a toolkit update while the device is Idle, between servicing visits — not while a session is open. Check the Kiosk tab first: it should show No servicing session.
Quick Reference
Which comes first? Check Out before the device leaves, Check In when it returns. Check In will not run without a Check Out.
Can I check out twice in a row? Only if the previous trip was checked in. Otherwise the Kiosk asks you to Check In first.
Is it safe to press Retry? Yes. The device keeps its recording until the Kiosk has taken it successfully.
How long does it take? Check Out is usually under a minute. Check In depends on how much the device recorded.
Where is my report? Emailed to the recipients in your workflow plus anyone you added, and — if Save to directory is set — filed in that folder at Check In.
What does UNSAFE mean? The evidence for this trip is incomplete, not that a threat was found.
The Kiosk cannot see my device — what first? Re-arm on the Kiosk tab, then reconnect the cable.
How do I know how much the device has recorded? The Storage figure on the Kiosk tab, against the Total storage limit in Capture Settings.
Where are the toolkit logs? On the Kiosk host, under C:\ProgramData\OPSWAT\Metadefender\ProductIntegration\IFW\logs.
MD Core
[Global Setting > Integration > MD Core]
MetaDefender Core scans the files that File Extraction carves out of FTP and SMB traffic (Network Security > File Extraction). The MD Core tab is where you tell the firewall which MetaDefender Core does the scanning. It has two sub-tabs:
Embedded: a MetaDefender Core that runs on the appliance itself, so carved files never leave the appliance to be scanned. It is available on appliances whose license includes it; on every other appliance, the tab explains why it cannot be used there.
External: a MetaDefender Core you run elsewhere, or MetaDefender Cloud, reached by URL and API key.
Opening MD Core takes you to the Embedded tab when the license includes the embedded Core, and to the External tab otherwise.
One Core at a time. File Extraction sends files to one MetaDefender Core. While the embedded Core is scanning, the External tab does not offer Save or Start scanning; while an external server is scanning, the Embedded tab does not offer Start scanning. Stop scanning on one tab before you start it on the other. The At a glance panel on either tab shows which Core is in use: On, Off, Embedded, or External.
Administrator access. The Embedded tab is managed by administrators only; other users see a notice instead of the page. On the External tab, other users can read the settings, but every field and action is disabled.
Where scan results appear. Each carved file's verdict is shown under Network Security > File Extraction > Carved Files. View MetaDefender Report opens the report for a file, and its Scanned by line tells you whether this appliance's embedded Core, an external MetaDefender Core, or MetaDefender Cloud scanned it.
Embedded MD Core
[Global Setting > Integration > MD Core > Embedded]
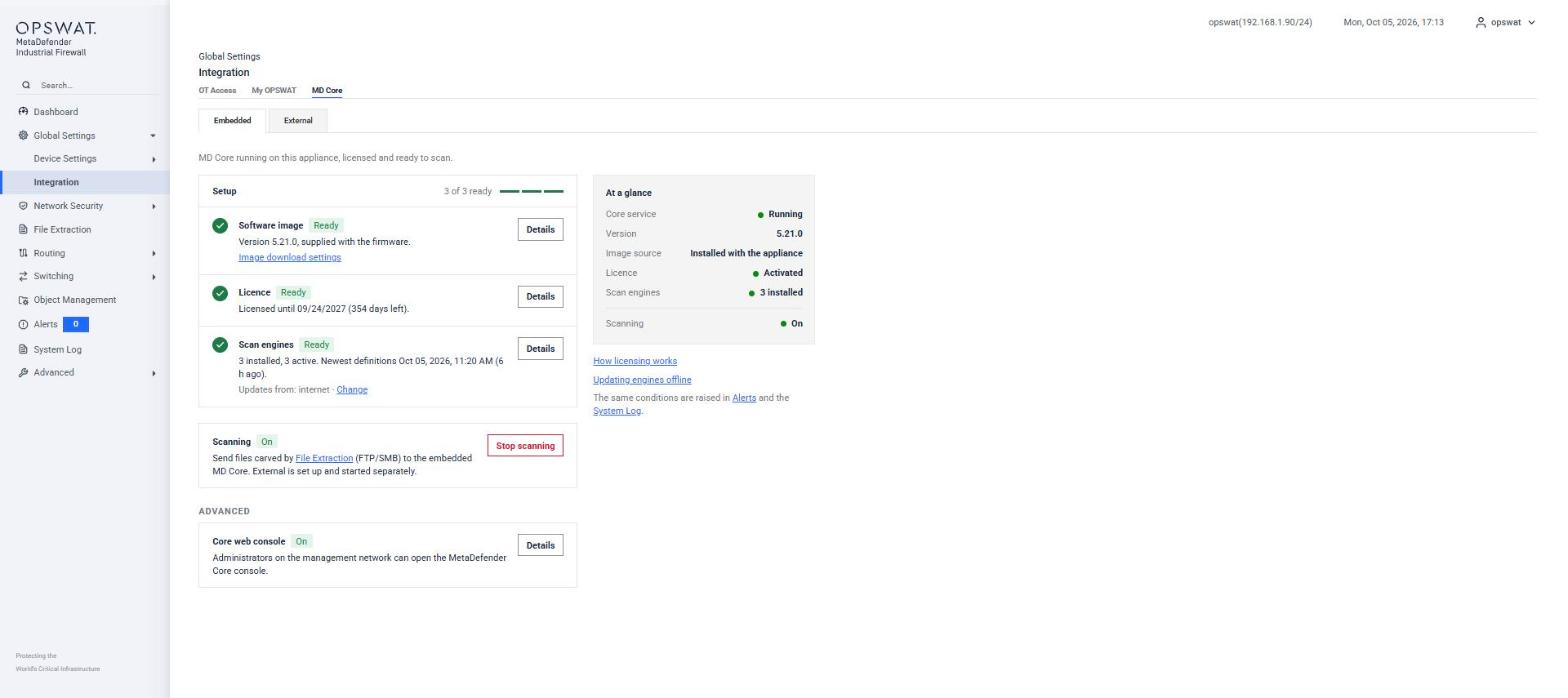
The embedded MetaDefender Core is set up in three steps shown on the page: the software image, the license, and the scan engines. Scanning can start once all three are ready. Everything on this tab is per appliance: on a high-availability pair, set the Core up on each node, because its activation file, engines, download settings, and console settings are not shared between the nodes.
Before you start
Four things have to be in place. The page tells you which one is missing.
A firewall license that includes the embedded MetaDefender Core. Apply it under Global Setting > Device Setting > License as usual; the license Type on the Dashboard then reads GE + Embedded MD Core. On an appliance that is already running, the upload asks you to reboot (Reboot Now or Reboot Later). The Core is set up during that reboot, and until then the Embedded tab shows "Reboot the appliance to set it up and start it". Without such a license, the tab says "This appliance's licence does not include the embedded MetaDefender Core" and points you to the External tab.
An appliance that can run it. The embedded Core needs a supported model with enough memory. When the license includes the Core but this appliance cannot run it, the tab says so instead of showing the setup steps; use the External tab on that appliance.
A MetaDefender Core activation file from OPSWAT. The embedded Core is licensed separately from the firewall, per installation. You request the activation file with the deployment ID that the Licence step shows (Step 2 below).
Scan engines and a way to keep them current. Either engine update packages you produce with the MetaDefender Core Update Downloader on a connected machine, or internet access for the Core itself (Step 3 below). The MD Core variant firmware does not include scan engines, so this applies to every appliance.
The software image. An appliance installed from the MD Core variant firmware (the MD Core variant ISO) already carries the MetaDefender Core software image, and nothing is downloaded. It does not carry scan engines; those are added in Step 3, as on any other appliance. Any other appliance downloads the image over the internet on its own once the Core is set up, and retries every 30 minutes until the download succeeds. That download needs name servers configured under External Services, and the outbound access listed under Image download settings (Step 1 below). A site without internet access can install the image from an offline package that OPSWAT provides instead.
The Embedded tab
A line under the tabs says where the Core stands, for example, "MD Core is not running on this appliance yet" or "MD Core is running on this appliance, licensed and ready to scan". Below it, a banner lists anything that needs attention (see Conditions and what to do). The same conditions are raised in Alerts and the System Log.
Setup: the three steps, each with a status, a short description, and a Details button. The header counts how many are done ("2 of 3 ready"). A step shown in amber needs you to act now.
Scanning: starts and stops scanning with the embedded Core.
Advanced > Core web console: opens MetaDefender Core's own console to the management network, and manages the administrator password the firewall uses with the Core.
At a glance: Core service (Running, Downloading, Not responding or Not running), Version, Image source (Installed with the appliance, Downloaded from OPSWAT, Installed package or Already on the appliance), Licence (Activated, Not activated, Expires in N d or Expired), Scan engines (how many are installed) and Scanning (On, Off or External). The links under the panel open short help texts on licensing and on updating engines offline. The page refreshes on its own, more often while a download or a version change is running.
Step 1: Software image
The MetaDefender Core software itself. The status reads:
Ready: the image is on the appliance. The description gives the version and where it came from.
Not downloaded: the appliance has not fetched it yet. The download starts on its own once the Core is set up.
Downloading: the download is running, and the page follows its progress. It takes a few minutes on a fast connection, and MetaDefender Core needs several more minutes after that before it answers.
Download failed: the description explains why: the registry hostname could not be resolved, the registry could not be reached, the proxy refused the connection, there is not enough free disk space, and so on. The appliance retries automatically every 30 minutes. After fixing the network, gateway, DNS, or proxy, select Retry now to retry at once.
Changing version: a version change is being applied (see below).
Image download settings opens the Software image download dialog:
Proxy (optional): an HTTP proxy the appliance downloads through, for example http://proxy.example.com:3128. Leave it blank to download directly. It takes no username or password; allow this appliance on the proxy instead.
Registry mirror (optional): a cache of the public registry inside your network. It must be an https:// address.
Network access the download needs: the exact hosts and ports your firewall team has to allow, listed here as this appliance needs them. Without a proxy, it is TCP 443 from the management interface to the image registry and the content delivery network it uses, plus DNS to the configured name servers; with a proxy, only the proxy's port. The appliance opens this access only while a download runs and closes it again afterwards.
Last attempt details: where the image came from, when the last attempt was made, how many attempts there were, the failure class, and the error reported, for support.
Saving takes effect on the next download.
Details on this step open Change MetaDefender Core version. It shows the running version, the configured version, the state, and the last change, and offers two ways to move to a newer version:
Signed version manifest: the signed .json file OPSWAT provides for a version. The appliance downloads that version (it needs internet access or a proxy), restarts MetaDefender Core on it, and rolls back if the new version does not come up.
Offline package: for an appliance without internet access, the .tar package OPSWAT provides together with its .json manifest (up to 4 GB). The signature is checked before the upload starts, so a wrong file costs one request rather than the whole transfer.
Downgrades are refused: an older Core cannot open the newer version's database. While an uploaded package is installed, the manifest option is unavailable until you Remove installed package; after that, the firmware's own version runs at the next start, and the confirmation explains what happens if that version is older than the one running now. Technical details list the configured and running image references for support.
Step 2: Licence
The embedded MetaDefender Core is licensed per installation, separately from the firewall license. Its deployment ID identifies this installation to OPSWAT.
Copy the deployment ID. While the license is missing, the step shows it with a Copy button; it is also the first thing in the dialog behind Details.
Send it to OPSWAT Support to request an activation file for it.
Select Details, choose the file under Activation file, and select Upload. The firewall applies it to MetaDefender Core and re-checks the license straight away.
The dialog also shows the current state, the expiry date, and the licensed engines. An activation file only works for the deployment ID it was issued for: a file issued for another appliance, or for an earlier installation of this one, is rejected with a message saying so. Upload is available while MetaDefender Core is running and has reported its deployment ID. On an appliance installed from the MD Core variant firmware, the ID is shown before the Core has ever started, so you can request the file in advance.
The status reads Action needed until a license is activated, Ready once it is (with the expiry date and the days left), Expires in N days during the last 14 days, and Expired afterwards. Request a renewal before it lapses and upload the new activation file the same way.
Step 3: Scan engines
MetaDefender Core scans with the engines installed in it, and their definitions need refreshing over time. The step shows how many engines are installed and active, the date of the newest definitions and how old they are, and where updates come from. Change, or Details, once the license is activated, opens the Engine updates dialog.
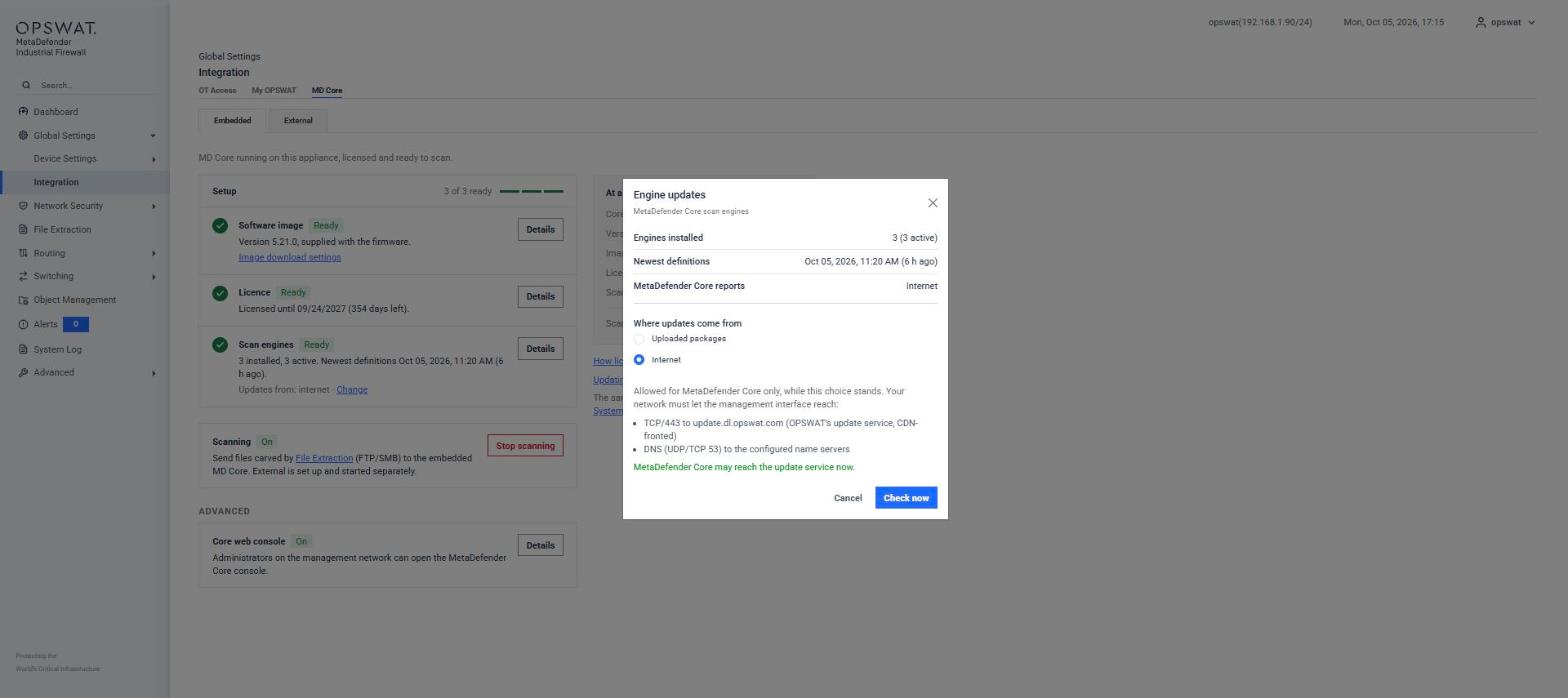
Where updates come from: two choices, applied the moment you pick one.
Uploaded packages (the default): produce an update package with the MetaDefender Core Update Downloader on a connected machine, choose it under Update package (a .zip, or its .yml descriptor, up to 2 GB), and select Upload. MetaDefender Core imports it on its own schedule, and the appliance needs no internet access. Upload a newer package whenever the definitions need refreshing. If the Core is not running, the package is stored and imported once it is.
Internet: MetaDefender Core downloads engines and definitions from OPSWAT's update service itself, on its own schedule, the way a stand-alone Core does. The appliance allows that connection for MetaDefender Core alone, and only while this choice stands. The dialog lists what your network must let the management interface reach (TCP 443 to update.dl.opswat.com, and DNS to the configured name servers) and says whether the connection is open yet. Check now asks the Core to look for updates immediately. The Core does not use the appliance's download proxy; if your site needs one, set it in the MetaDefender Core console (see Core web console). Uploading a package later switches the choice back to Uploaded packages.
Appliances installed from the MD Core variant firmware. The variant carries the MetaDefender Core software image but no scan engines. Add the engines here in the same two ways as on any other appliance: upload an update package, or choose Internet.
The status reads Waiting on licence until the license is activated, Action needed while no engine is installed or none is active yet, and Ready once engines are active. Freshly imported engines take a few minutes to activate.
Scanning with the embedded Core
Once all three steps are ready, select Start scanning. From then on, the files File Extraction carves from FTP and SMB are sent to the embedded Core, and their verdicts appear under Carved Files. Stop scanning stops submitting files; the connection is kept, so you can start again at any time. Start scanning is unavailable while setup is incomplete, and while an external server is scanning: stop that on the External tab first.
Core web console and the MD Core password
MetaDefender Core has a console of its own, with license and engine detail the Embedded tab does not cover. It normally answers only on the appliance itself. The Console access dialog (Details on the Core web console card) lets administrators on the management network open it:
Reachable from the management network: turn the switch on and select Save. The appliance opens the console on its management address, over the same certificate as the web UI, and shows the Address as a link. MetaDefender Core still asks for its own sign-in, and nothing else on the appliance becomes reachable. Turning the switch off closes the console again; the Core keeps running either way.
Console sign-in: Show sign-in reads the Username and Password that MetaDefender Core accepts (generated for this appliance, or the password last set here), each with a Copy button. They are read-only when you ask for them and are not kept by the page.
Change password: changes the MetaDefender Core administrator password on the firewall. Enter the new password twice, or select Generate for a random 24-character one; it must meet the firewall's password policy. The firewall changes it in MetaDefender Core and saves it in the same step, so scanning continues. Every open console session is signed out when it changes.
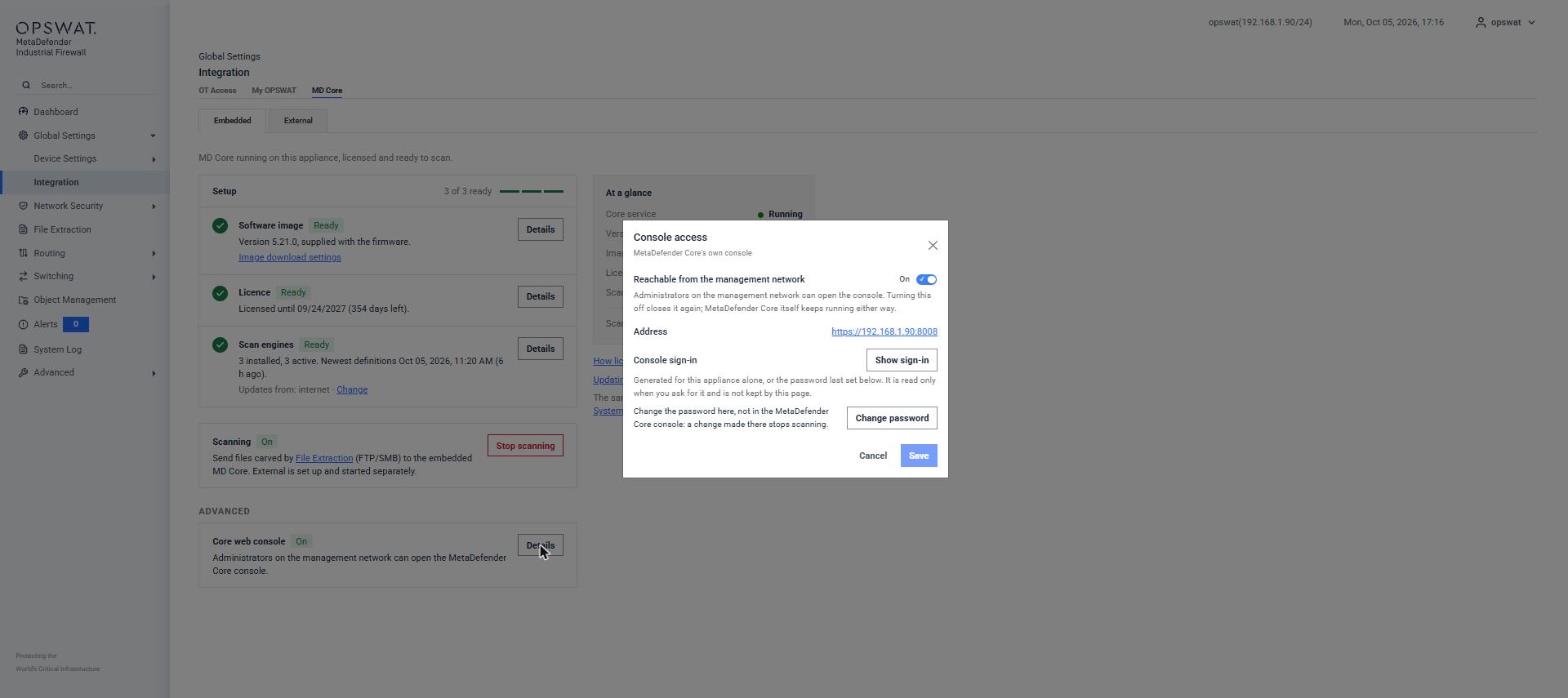
Change the password here, not in the MetaDefender Core console. The firewall signs in to MetaDefender Core with this administrator account to submit files and to manage the Core. If the password is changed in the Core's own console, MetaDefender Core stops accepting the password the firewall saved, scanning stops, and the Core can no longer be managed from the firewall.
If that happens, administrators see a banner on every page: "MetaDefender Core no longer accepts the saved password. Files are not being scanned until you update it." Select Update MD Core password on the banner (or Update password in the Console access dialog, which takes the place of Change password while the saved password is refused). Enter the current username (any MetaDefender Core administrator; admin is pre-filled) and password, and select Save. The firewall checks them with MetaDefender Core and saves them only if they are accepted; a wrong password leaves the saved one as it was. Scanning and management resume as soon as the password is saved. If you do not know the new password, ask whoever changed it: the MetaDefender Core audit log records when the password was changed and from where.
Conditions and what to do
The banner under the headline lists what is wrong and what to do about it. The same conditions are raised in Alerts and the System Log, so you can act on them without opening the page.
The page says | What to do |
|---|---|
MD Core is not running on this appliance yet / MD Core is installed on this appliance but is not responding | MetaDefender Core takes several minutes to come up after a download, a version change, or a reboot; wait and let the page refresh. If it stays unresponsive, check the Software image step and the System Log. |
The licence now includes MetaDefender Core. Reboot the appliance to set it up and start it. | Reboot when convenient. The Core is set up during that boot. |
The licence includes MetaDefender Core, but this appliance could not set up the software it needs to run it. Restarting will not fix this. | Update the firmware to the latest version. If the message remains, contact OPSWAT Support. |
The software image has not been downloaded yet / The download failed: ... | Open Image download settings: configure name servers under External Services, allow the listed outbound access or set a proxy, then select Retry now. A site without internet access installs the image from an offline package instead. |
MetaDefender Core has no valid licence and cannot scan / The MetaDefender Core licence expired / The MetaDefender Core licence expires in N days | Request an activation file (or a renewal) for the deployment ID and upload it on the Licence step. |
No scan engines are installed / N engines are installed but none is active | On the Scan engines step, upload an engine update package or choose Internet. Freshly imported engines take a few minutes to activate. |
MetaDefender Core is running but not ready to scan yet | It has no license or no engines. Complete Step 2 and Step 3. |
MetaDefender Core no longer accepts the password this appliance saved for it | Select Update MD Core password and enter the current MetaDefender Core administrator password (see Core web console and the MD Core password). |
Files are not being scanned: the licence no longer includes the embedded MetaDefender Core | Scanning was started on the embedded Core and the firewall license was replaced by one without it. Connect an external MetaDefender Core on the External tab, or install a license that includes the embedded Core again. |
If the firewall license changes. When the firewall license is replaced by one that does not include the embedded Core, or is removed, the appliance stops the embedded Core. Its activation, engines, and scan history are kept. Once a license that includes the Core is installed again, the Core comes back at the next reboot, and files waiting to be scanned are submitted as soon as it answers.
External MD Core
[Global Setting > Integration > MD Core > External]
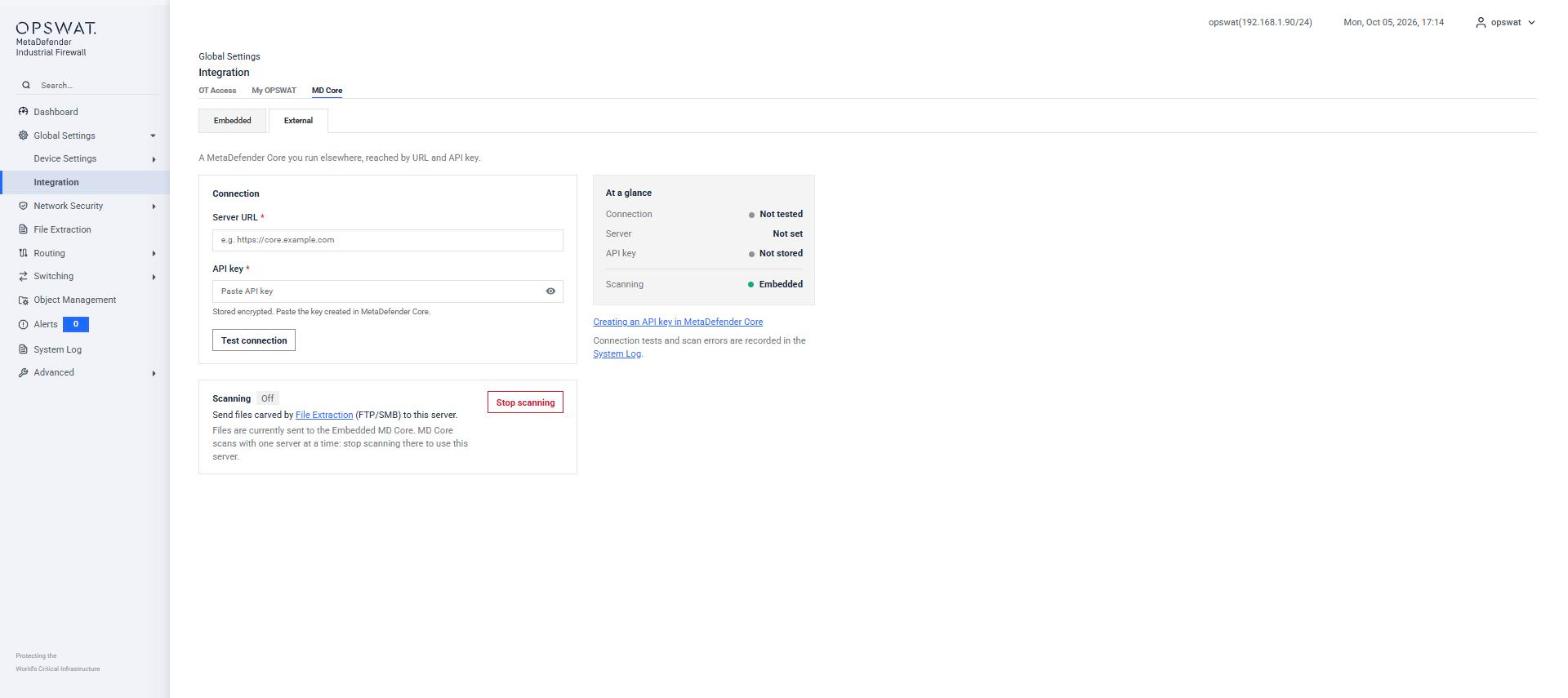
Use the External tab to scan with a MetaDefender Core you run elsewhere, or with MetaDefender Cloud. While no Core is scanning, a banner says "MetaDefender service is not running" and tells you whether a stored connection can simply be started again or the form has to be filled in first.
Connection
Server URL (required): the address of the server, starting with http:// or https://, for example https://core.example.com for a MetaDefender Core or https://api.metadefender.com for MetaDefender Cloud. Do not enter this appliance's own address: that is the embedded Core, and the page points you to the Embedded tab instead.
API key: a key the server accepts. It is stored encrypted and is required the first time. Once a key is stored, leave the field blank to keep it or paste a new key to replace it; the eye icon reveals the stored key to an administrator.
Test connection: checks the URL and key without saving anything, and reports "Connected. The server accepted the API key.", "The server refused the API key." or "The server could not be reached." with a short detail.
Creating an API key in MetaDefender Core. Sign in to the web console of the MetaDefender Core you want to use as an administrator and create an API key for this appliance; in MetaDefender Core, the keys are managed per user, under the user settings. For MetaDefender Cloud, use the API key from your OPSWAT account.
Scanning
Save: verifies the server and key first, refusing a bad key or an unreachable server, then stores them. While this server is scanning, a save applies the change to the running service.
Start scanning: saves the form and starts sending the files File Extraction carves from FTP and SMB to this server. It is not offered while the embedded Core is scanning.
Stop scanning: stops submitting files. The server URL and API key are kept, so you can start again at any time.
The appliance reaches the server from its management interface and creates the outbound firewall rule the connection needs on its own (MDCORE OUT, listed under Management Access). At a glance shows the connection (Test passed, Key refused, Unreachable, In use, or Not tested), the stored server, whether an API key is stored, and which Core is scanning (On, Embedded, or Off). Connection tests and scan errors are recorded in the System Log.
MD Core Quick Reference
Which tab do I use? Embedded for the Core on this appliance, when the license includes it; External for a MetaDefender Core elsewhere or for MetaDefender Cloud. Only one of them scans at a time.
What do I need from OPSWAT for the embedded Core? A firewall license that includes it, and an activation file for the deployment ID shown on the Licence step.
Does the appliance need internet access for the embedded Core? Only to download the software image and, if you choose Internet on the Scan engines step, to fetch engine updates. An appliance installed from the MD Core variant firmware (or given an offline package) already has the image, and uploaded engine packages cover the engines, so it needs none.
Why are no files being scanned? Check the Scanning card (On or Off), the banner at the top of the tab, and the Carved Files page. A password banner on every page means the MD Core password was changed outside the firewall.
Where do I see the results? Network Security > File Extraction > Carved Files, and the System Log for connection tests and scan errors.