
Windows
Wizard Installation
The Install Wizard is only for the Windows installer (.msi file).
Since MetaDefender Core 4.19.0, we have switched to using PostgreSQL DBMS which needs a dedicated database server. MetaDefender Core supports two modes to setup PostgreSQL server:
Local PostgreSQL server
This is a bundled PostgreSQL. MetaDefender Core will itself install and setup a new PostgreSQL server locally in the same box with the product.
Unicode characters are NOT supported for "Username" and "Password"
"Password" does not accept # (hash) as starting character (e.g. #ABC)
If the ignition file exist in the designated location, then MetaDefender Core will use the details defined in the ignition file, rather than what is passed via the installation wizard.
More info about the ignition file based installation: Command Line Installation
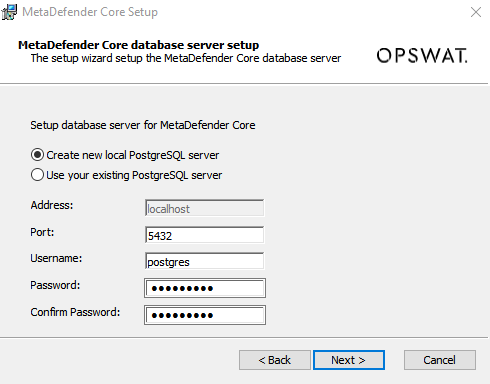
Remote PostgreSQL server
PostgreSQL version 14/15/16 is required.
According to PostgreSQL notice, version 12 stopped receiving fixes from November 14, 2024, so we suggest that you use newer version.
MetaDefender Core will connect to a pre-installed PostgreSQL running remotely.
"Test Connection" button is required, to make sure the PostgreSQL is connected and authenticated successfully. Make sure to check and perform steps at Open Connection On PostgreSQL Server if you are unable to test the connection with remote PostgreSQL server.
MetaDefender Core will need to create and use dedicated PostgreSQL users for database setup, upgrade and its own operations. Those users requires certain privileges configured on PostgreSQL server, otherwise expecting failures to occur while installing and operating MetaDefender Core.

Command Line Installation
Ignition File
For command line installation, it is mandatory to use MetaDefender Core ignition file to add PostgreSQL server information BEFORE installing MetaDefender Core 4.19.0 or newer.
Location: C:\OPSWAT\ometascan.conf
MetaDefender Core supports two modes to setup PostgreSQL server:
Local PostgreSQL server
MetaDefender Core will install a new PostgreSQL server locally, next to the product.
A sample iginition file for PostgreSQL server information. Only non-Unicode characters are supported for "user" and "password"):
Remote PostgreSQL server
PostgreSQL version 14/15/16 is required.
According to PostgreSQL notice, version 12 stopped receiving fixes from November 14, 2024, so we suggest that you use newer version.
MetaDefender Core will connect to a pre-installed PostgreSQL server running remotely and will setup its database.
A sample ignition file for PostgreSQL server information:
How to setup a remote PostgreSQL server
Download and install PostgreSQL server version 14.x for Windows x64 at https://www.enterprisedb.com/downloads/postgres-postgresql-downloads
Configure PostgreSQL for remote access so that your remote existing PostgreSQL server to accept upcoming connection from MetaDefender Core:
2.1) Modify the pg_hba.conf file**:** file resides in the PostgreSQL data directory. Common locations include: C:\Program Files\PostgreSQL\14\data(adjust the version number if needed).
2.2) Modify the postgresql.conf file. This file is in the same data directory as pg_hba.conf
Restart postgres service.
Install MetaDefender Core
On Windows systems, it is possible to install the product by executing the corresponding .msi file.
From the command line interface, it is also possible to put the following parameters
where the possible keys and their default values are the following:
Key | Default Value | Description |
|---|---|---|
INSTALLFOLDER | \Program Files\OPSWAT\MetaDefender Core | Customize installation folder for product Example: |
RESTADDRESS | REST interface binding IPv4 or IPv6 address ( '*' means that service listens on all IPv4 and IPv6 interfaces) | |
RESTPORT | 8008 | REST interface binding port |
REPORT_ENGINE_ISSUE | true | Enable reporting of engine issue count. (possible values: "true" or "false"). |
Reporting of engine issue count
If reporting of engine issue count is enabled, MetaDefender Core server will send only the number of initialization errors and number of unexpected stops for the specific db/engine version. This information is sent over a HTTPS channel when the product downloads the latest package descriptors. This information is used for early detection of any specific 3rd party engine quality issues.
For details on using msiexec, please consult Windows installer documentation.
Linux
Only supports command-line installation.
Ignition File
For command line installation, it is mandatory to use MetaDefender Core ignition file to add PostgreSQL server information BEFORE installing MetaDefender Core 4.19.0 or newer.
Location: /etc/opswat/ometascan.conf
MetaDefender Core supports two modes to setup a PostgreSQL server:
Local PostgreSQL server
MetaDefender Core will install a new PostgreSQL server locally, next to the product.
A sample ignition file for PostgreSQL server information. Only non-Unicode characters are supported for "user" and "password"):
Remote PostgreSQL server
PostgreSQL version 14/15/16 is required.
According to PostgreSQL notice, version 12 stopped receiving fixes from November 14, 2024, so we suggest that you use newer version.
MetaDefender Core will connect to a pre-installed PostgreSQL server running remotely and will setup its database.
A sample ignition file for PostgreSQL server information:
How to setup a remote PostgreSQL server
Debian / Ubuntu
Update System Packages
Add PostgreSQL APT Repository
Install PostgreSQL
Once installed, the PostgreSQL service should start automatically. You can verify that it is running:
To start or restart the PostgreSQL service manually, you can run:
By default, the Postgres user is configured without a password. Run the following command to set a password for the Postgres user:
Install needed extensions:
Configure PostgreSQL for remote access
Red Hat Enterprise Linux 8, 9 / Rocky Linux 9
Due to the shorter support cycle on Red Hat Enterprise Linux, all supported versions of PostgreSQL are not available on this platform. The PostgreSQL Yum Repository will integrate with the normal systems and patch management, and provide automatic updates for all supported versions of PostgreSQL throughout the supported lifetime of PostgreSQL. Reference: https://www.postgresql.org/download/linux/redhat/
Install the PostgreSQL repository RPM:
Run these CMDs to initialize the PostgreSQL:
By default, the Postgres user is configured without a password. Run the following command to set a password for the Postgres user:
Install needed extensions:
Configure PostgreSQL for remote access
A sample ignition file for PostgreSQL server information:
After installing MetaDefender Core successfully, you may want to remove all credentials info created for the [dbserver] section in the ignition file for security reasons.
If the MetaDefender Core package dependencies are not installed on your system, you may need to have a working Internet connection, or you may have to provide the Installation media during the installation. Consult your Operating System documentation on how to use Installation media as a package repository.