The document provides an overview plan for all customers who are using My OPSWAT On-premise version 7.39.x (also known as OPSWAT Central Management v7) to upgrade to My OPSWAT Central Management v10.
Depending on your data and current infrastructure, the migration time can be a day or several weeks.
This is the general guideline for migration. The actual migration can be customized based on the customer environment.
Prerequisites
Minimum My OPSWAT Central Management v10: 10.3.2511
If you are using the older version, you need to upgrade to the minimum version to support the migration plan. Follow the Upgrading My OPSWAT Central Management for detailed instructions.
Plan Overview
OPSWAT Central Management v7 and My OPSWAT Central Management v10 are two distinct major versions. Simply uninstalling v7 and installing v10 on the same server will not preserve existing data. Proper migration steps are required to ensure data continuity.
There are 6 steps to migrate from v7 On-Prem to v10 On-Prem:
Step 1: Identify the use case and required features
Step 2: Determine the necessary data for migration
Step 3: Assess network requirements and prepare the environment
Step 4: Migrate configuration settings
Step 5: Migrate OPSWAT products
Step 6: Migrate historical data
The migration time can be an hour or several weeks, depending on the customer's use case and expectations.
Plan Detail
Step 1: Identify the use case and required features
Review the products currently in use and their usage.
Using _____ MetaDefender Endpoint
Using _____ MetaDefender Kiosk (Hardware / Software)
Using _____ MetaDefender Core
Using _____ MetaDefende ICAP
Using _____ MetaDefende MFT
Using _____ MetaDefende Drive
Using _____ MetaDefende Aether
Using other products ___
If you're using products that are not listed above, it means My OPSWAT Central Management v10 does not support integration with those products.
Step 2: Determine the necessary data for migration
Review the required features. Should take screenshots for each configuration
Using Proxy
Using AD integration
Using SSO
Using HTTPS
Using SMTP
Using features in CM7 but not available in CM10: ____
Take screenshots of groups, policy, and settings
Auto-reconnect MetaDefender Endpoints
Able to re-deploy all MetaDefender Endpoints
Keep all groups & Configuration
Keep all Policy & Configuration
Auto reconnect MetaDefende Core/Kiosk - Not possible
Keep Processing History in ____ days
Keep Event Log in ____ days
Notice for License Migration
Your existing Central Management v7 licensing entitlement remains valid after migrating to My OPSWAT Central Management v10. No additional license purchase is required as part of the migration process.
Please note that license information is not migrated automatically. After migration, you must re-add your existing product licenses to My OPSWAT Central Management v10.
If you encounter any license-related issues, please contact OPSWAT Support for assistance.
Step 3: Assess network requirements and prepare the environment
In v7, the CM server initiates communication with each Core/Kiosk server.
In v10, the communication flow is reversed --- Kiosk and Core servers initiate contact with the CM server
Ensure that you adjust the firewall and proxy settings properly when transitioning to v10.
Tip: Using a Fully Qualified Domain Name (FQDN) along with a valid SSL certificate can simplify future updates. This approach eliminates the need to reconfigure each MetaDefender product individually when the CM10 server IP address changes.

Step 4: Migrate configuration settings
OPSWAT Central Management v7 and My OPSWAT Central Management v10 are two distinct major versions, each with significant architectural and functional differences. Many configurations available in v10 are not supported in v7. As a result, simply exporting a configuration from v7 and importing it into v10 will not work due to incompatibilities between the two versions.
To ensure a successful migration, necessary configurations must be recreated manually in v10, based on the features in use and reference materials such as checklists & screenshots captured in Step 2.
Step 5: Migrate OPSWAT products
In v7, MetaDefender products operate in passive mode, where the v7 server initiates communication with each connected product (e.g., Core, Kiosk).
In v10, the architecture shifts to active mode, meaning MetaDefender products initiate communication with the v10 server instead.
To switch from v7 to v10, MetaDefender products must be re-enrolled into v10. This process ensures proper communication and configuration alignment with the new architecture.
Steps to Re-Enroll:
Log in to the product console (e.g., Core Console or Kiosk Console).
Unmanage the product from v7.
Enroll the product with the v10 URL and Registration Code.
Tip You can create groups in CM10 before enrollment to organize your products, or assign them to groups after enrollment based on your operational structure.
Step 6: Migrate historical data
OPSWAT Central Management v7 historical data is equivalent to processing history data from each MetaDefender Core instance. Instead of copying each record from v7, this functionality is also available in v10. To perform the import, follow the steps below:
Download the Migration Plugin
Download the file migration_cm_7_10_1.2.1.1.zip
Install the Plugin
Unzip the downloaded file to: C:\Program Files\OPSWAT\MOCM\tomcat\webapps
Restart the My OPSWAT Central Management services.\
(Note: The restart process may take a few minutes.)*
Access the Migration Console
Open your browser and go to: http(s)://{your-server-url}/migration
Add all MetaDefender Core instances you would like to migrate the processing history data.
My OPSWAT Central Management v10 requires access to each MetaDefender Core instance to retrieve historical data. Please ensure that your firewall or proxy settings allow v10 to communicate with all MetaDefender Core instances.
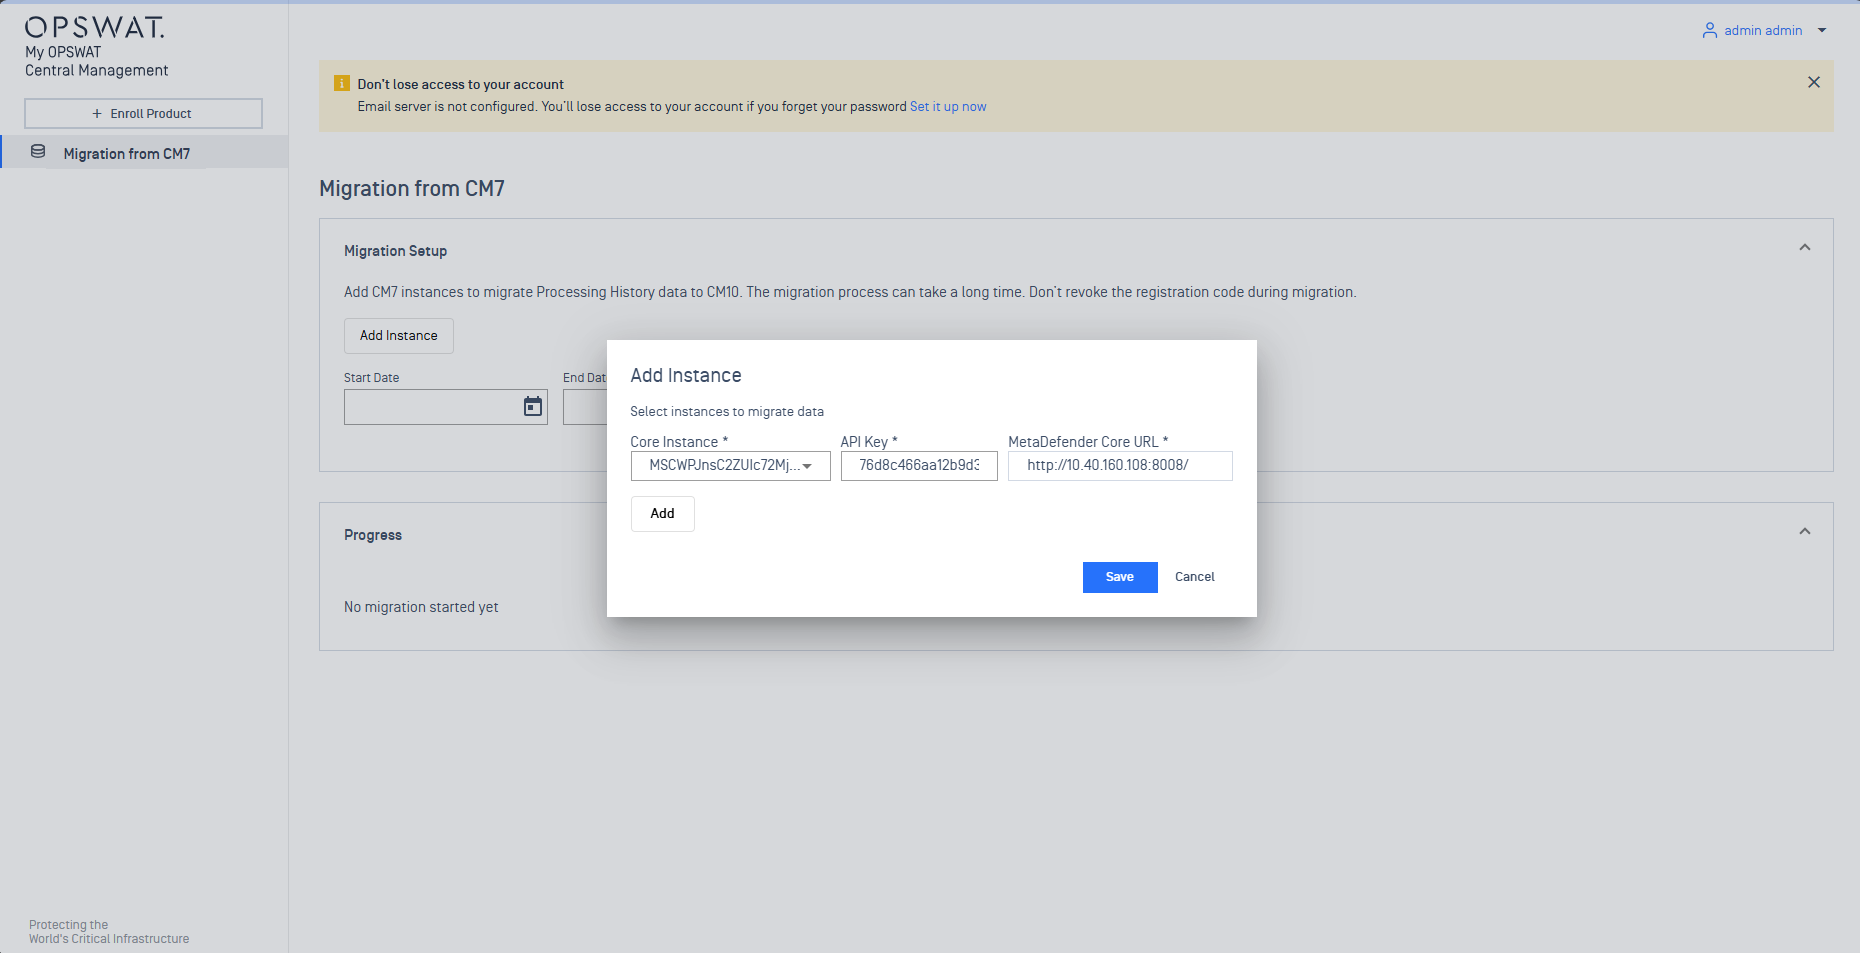
Additionally, an API key from MetaDefender Core is required to authorize v10 to call Core APIs. The simplest way to generate this key is directly from the MetaDefender Core Console.
Select a specific historical data time frame to import data
Select "Start Date" and "End Date" to begin the migration.
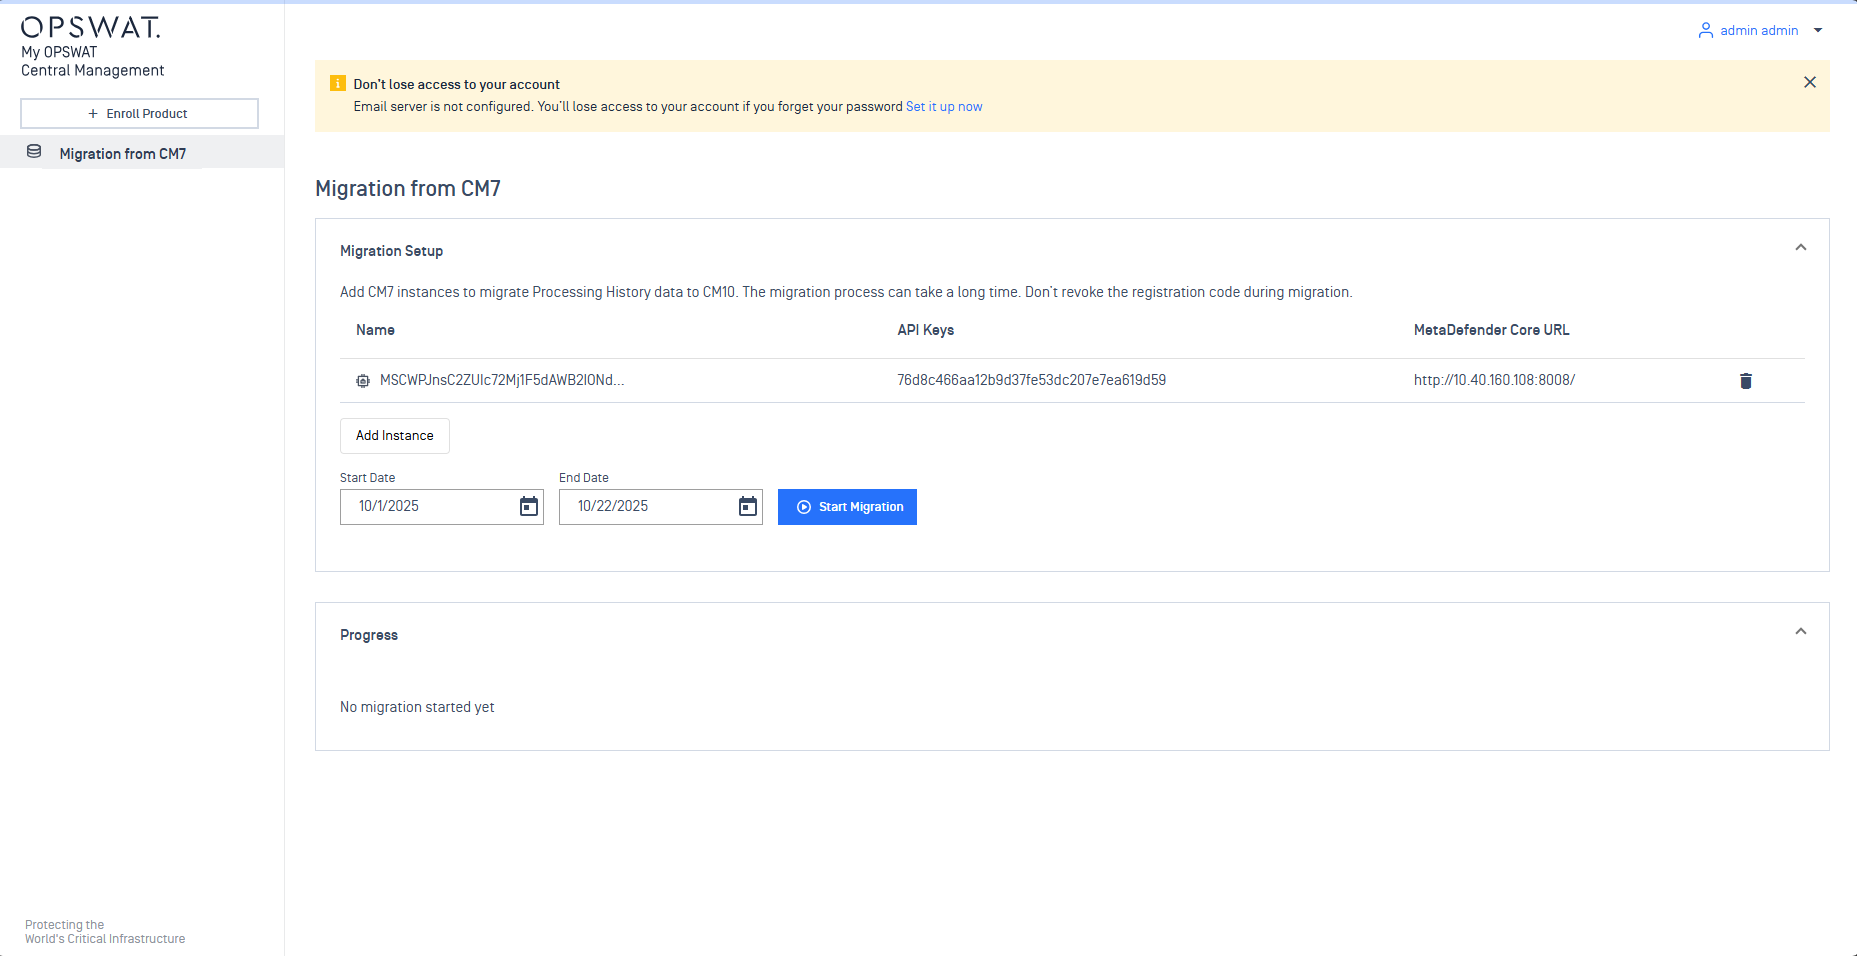
You can monitor the progress of the import process in real time. Additionally, you have the ability to pause, resume, or retry the operation as needed. The migration proceeds incrementally, processing data day by day.
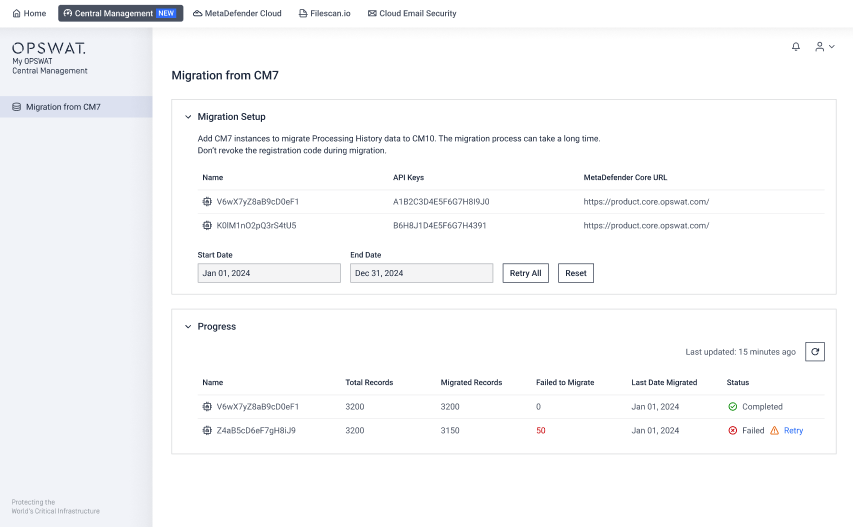
During the migration process, the plugin retains the last known status. If you wish to restart the migration from the beginning, click the Reset button.
To retry data migration for a specific failed date, click the Retry button next to the corresponding row. If you want to retry all failed tasks at once, click Retry All.
License Migration to v10
Before migrating from v7 to v10, please verify your existing license status.
After migration to My OPSWAT Central Management v10:
Check that your existing license is activated successfully.
If you are using MetaDefender Endpoint or MetaDefender Kiosk Linux, you must add a license to the v10 Admin Console to enable My OPSWAT Central Management for managing MetaDefender Endpoin.